


1.什么是SPI
SPI全称Service Provider Interface,是Java提供的一套用来被第三方实现或者扩展的接口,它可以用来启用框架扩展和替换组件。 SPI的作用就是为这些被扩展的API寻找服务实现。本质是将接口实现类的全限定名配置在文件中,并由服务加载器读取配置文件,加载实现类。这样可以在运行时,动态为接口替换实现类。通过在ClassPath路径下的META-INF/services文件夹查找文件,自动加载文件里所定义的类,进而实现可插拔,解耦。
项目推荐:基于SpringBoot2.x、SpringCloud和SpringCloudAlibaba企业级系统架构底层框架封装,解决业务开发时常见的非功能性需求,防止重复造轮子,方便业务快速开发和企业技术栈框架统一管理。引入组件化的思想实现高内聚低耦合并且高度可配置化,做到可插拔。严格控制包依赖和统一版本管理,做到最少化依赖。注重代码规范和注释,非常适合个人学习和企业使用
Github地址:https://github.com/plasticene/plasticene-boot-starter-parent
Gitee地址:https://gitee.com/plasticene3/plasticene-boot-starter-parent
微信公众号:Shepherd进阶笔记
2.案例demo
首先我们定义一个接口:
/**
 * @author fjzheng
 * @version 1.0
 * @date 2021/11/5 10:32
 */
public interface SpiService {
    void execute();
}
然后再定义两个接口实现类,这里为了方便就写在一个项目中,但是SPI的核心思想是引入相关框架之后,通过框架提供的spi机制,可以在自己的项目中提供spi接口实现类,动态扩展框架功能和做到可插拔,例如jdbc。
/**
 * @author fjzheng
 * @version 1.0
 * @date 2021/11/5 10:34
 */
public class SpiServiceImpl1 implements SpiService {
    @Override
    public void execute() {
        System.out.println("SpiServiceImpl1 execute finish.....");
    }
}


public class SpiServiceImpl2 implements SpiService {
    @Override
    public void execute() {
        System.out.println("piServiceImpl2 execute finish.....");
    }
}
接下来我们要在项目的ClassPath即resources下创建META-INF/services目录,然后在该目录下创建一个文件,文件名为接口的全限定类名,文件里写入接口实现类的全限定类名,如下所示:
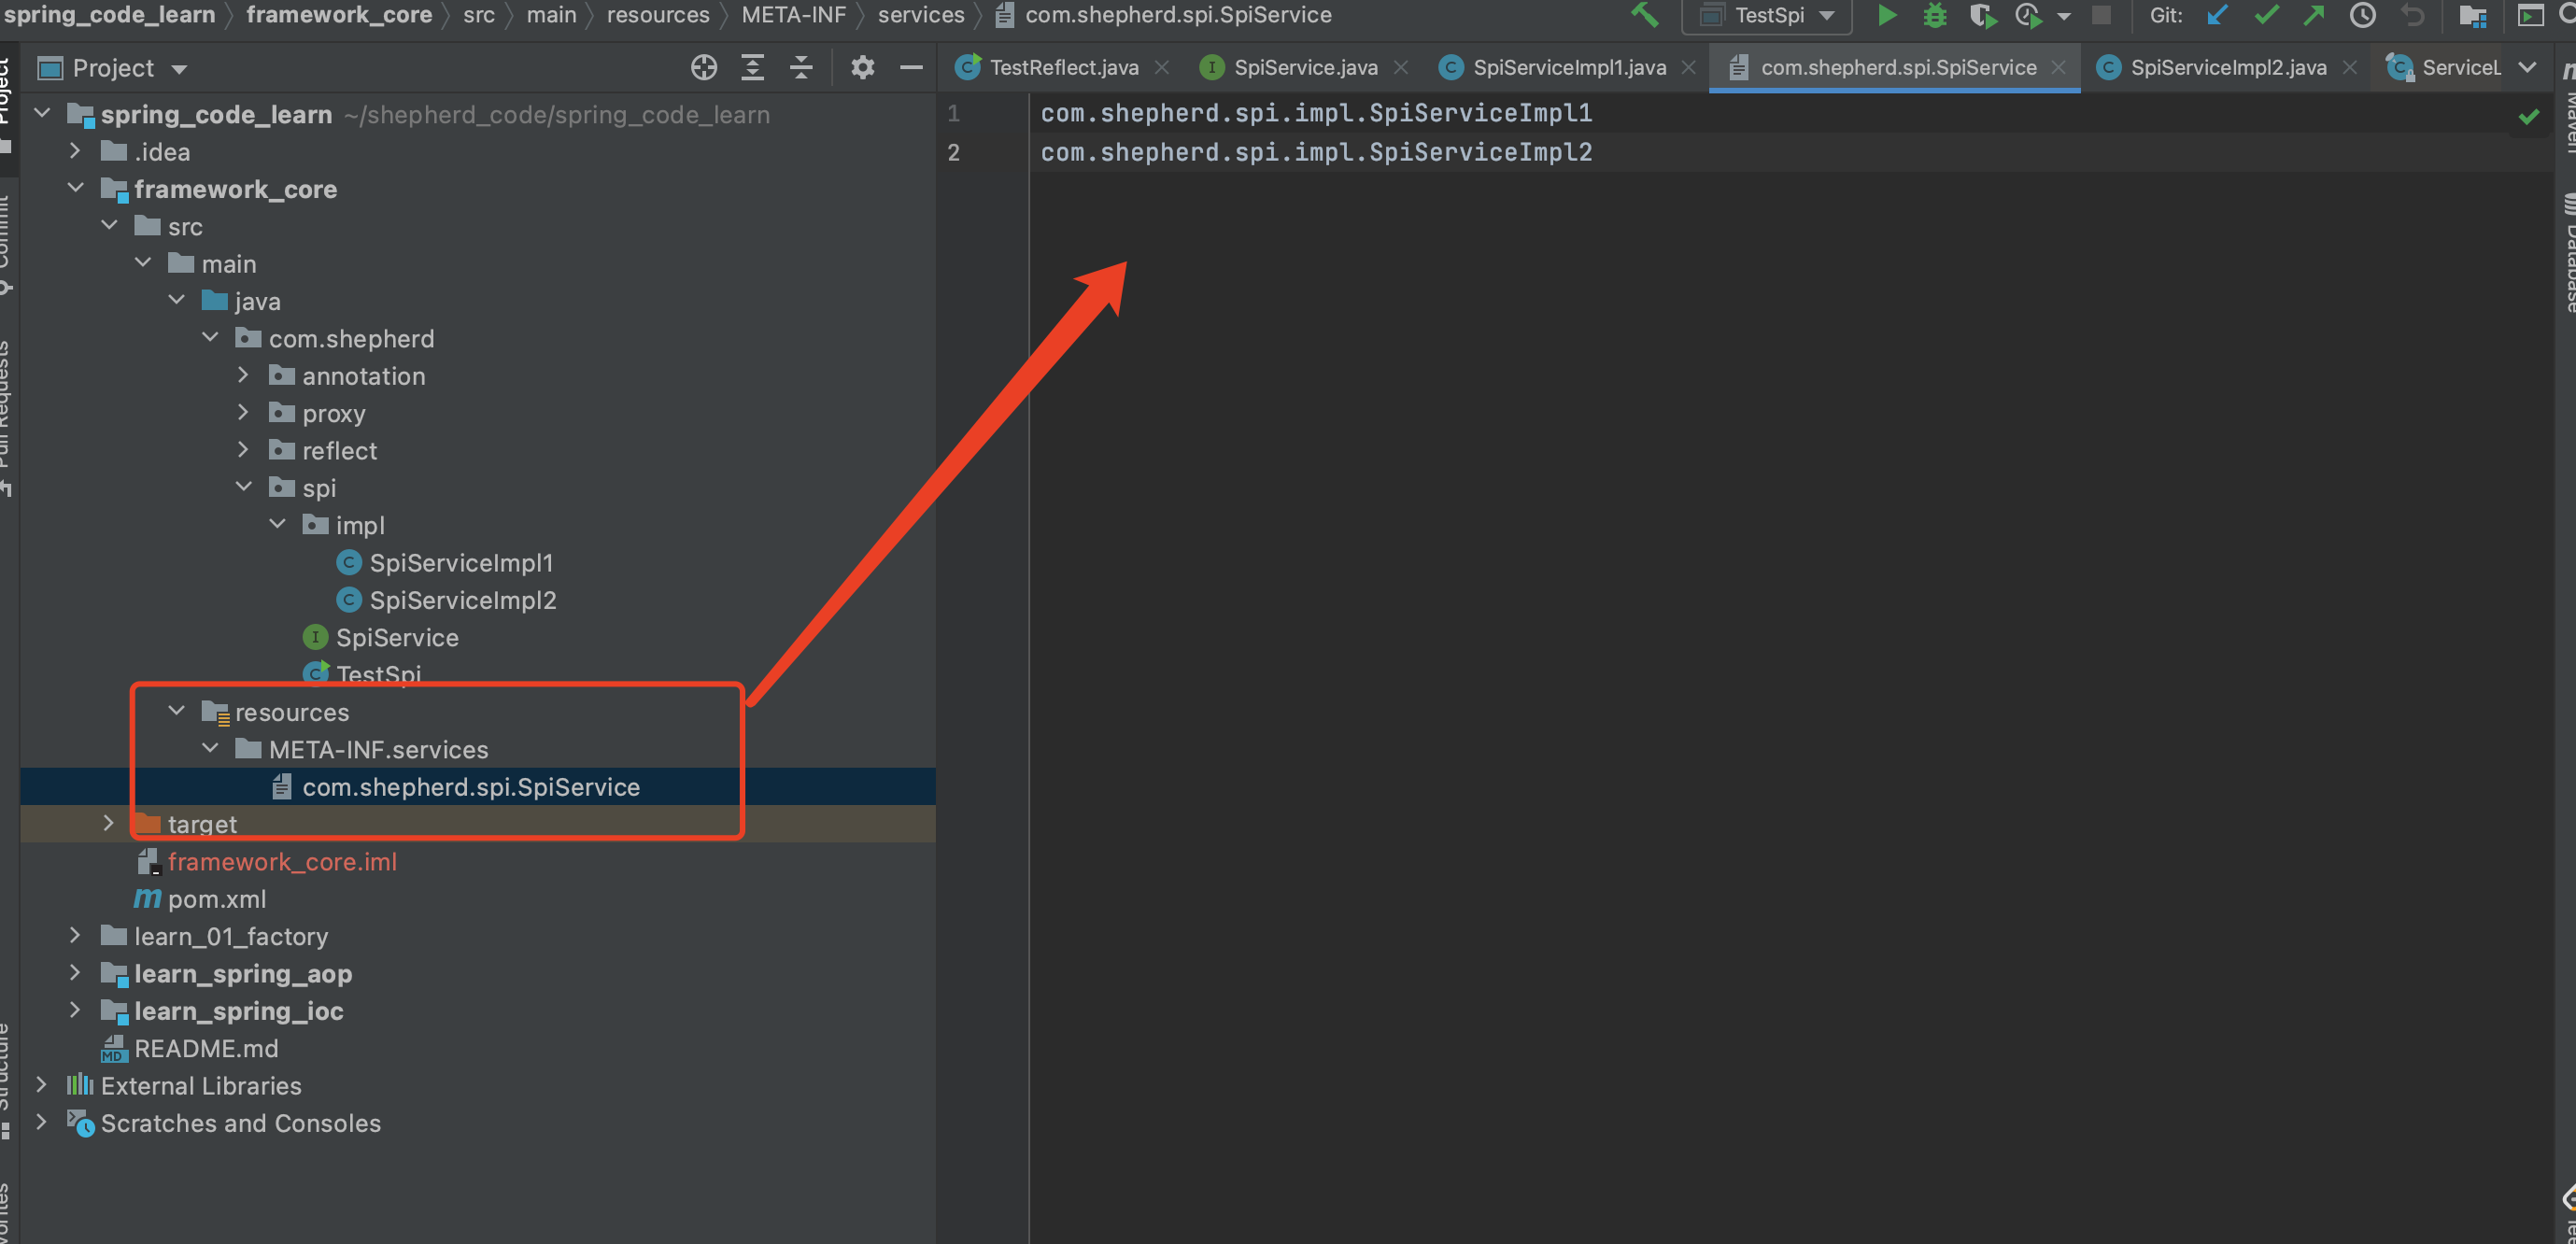
最后我们就可以通过ServiceLoader.load或者Service.providers方法拿到实现类的实例。其中,Service.providers包位于sun.misc.Service,而ServiceLoader.load包位于java.util.ServiceLoader
/**
 * @author fjzheng
 * @version 1.0
 * @date 2021/11/5 10:42
 */
public class TestSpi {
    public static void main(String[] args) {
        Iterator<SpiService> providers = Service.providers(SpiService.class);
        ServiceLoader<SpiService> load = ServiceLoader.load(SpiService.class);

        while(providers.hasNext()) {
            SpiService ser = providers.next();
            ser.execute();
        }
        System.out.println("--------------------------------");
        Iterator<SpiService> iterator = load.iterator();
        while(iterator.hasNext()) {
            SpiService ser = iterator.next();
            ser.execute();
        }
    }
}
运行接口如下所示:
SpiServiceImpl1 execute finish.....
SpiServiceImpl2 execute finish.....
--------------------------------
SpiServiceImpl1 execute finish.....
SpiServiceImpl2 execute finish.....
demo代码:https://github.com/ShepherdZFJ/spring_code_learn/tree/main/framework_core/src/main/java/com/shepherd/spi
3.浅析源码实现
我们看到一个位于sun.misc包,一个位于java.util包,sun包下的源码看不到。我们就以ServiceLoader.load为例,通过源码看看它里面到底怎么做的。
ServiceLoader
首先看看ServiceLoader类结果变量信息:
public final class ServiceLoader<S> implements Iterable<S>
    //配置文件的路径
    private static final String PREFIX = "META-INF/services/";
    //加载的服务类或接口
    private final Class<S> service;
    //已加载的服务类集合
    private LinkedHashMap<String,S> providers = new LinkedHashMap<>();
    //类加载器
    private final ClassLoader loader;
    //内部类,真正加载服务类
    private LazyIterator lookupIterator;

		......
}
ServiceLoader的load()方法创建了一些属性,重要的是实例化了内部类LazyIterator。最后返回ServiceLoader的实例
    private ServiceLoader(Class<S> svc, ClassLoader cl) {
        service = Objects.requireNonNull(svc, "Service interface cannot be null");
        loader = (cl == null) ? ClassLoader.getSystemClassLoader() : cl;
        acc = (System.getSecurityManager() != null) ? AccessController.getContext() : null;
        reload();
    }

    public void reload() {
        providers.clear();
        lookupIterator = new LazyIterator(service, loader);
    }
load()最终执行上面的构造方法,并对相关属性赋值,返回ServiceLoader的实例。
查找实现类
查找实现类和创建实现类的过程,都在LazyIterator完成。当我们调用iterator.hasNext和iterator.next方法的时候,实际上调用的都是LazyIterator的相应方法。
public Iterator<S> iterator() {
    return new Iterator<S>() {
        public boolean hasNext() {
            return lookupIterator.hasNext();
        }
        public S next() {
            return lookupIterator.next();
        }
        .......
    };
}
所以,我们重点关注lookupIterator.hasNext()方法,它最终会调用到hasNextService。
private class LazyIterator implements Iterator<S>{
    Class<S> service;
    ClassLoader loader;
    Enumeration<URL> configs = null;
    Iterator<String> pending = null;
    String nextName = null;
    private boolean hasNextService() {
        //第二次调用的时候,已经解析完成了,直接返回
        if (nextName != null) {
            return true;
        }
        if (configs == null) {
            //META-INF/services/ 加上接口的全限定类名,就是文件服务类的文件
            //META-INF/services/com.viewscenes.netsupervisor.spi.SPIService
            String fullName = PREFIX + service.getName();
            //将文件路径转成URL对象
            configs = loader.getResources(fullName);
        }
        while ((pending == null) || !pending.hasNext()) {
            //解析URL文件对象,读取内容,最后返回
            pending = parse(service, configs.nextElement());
        }
        //拿到第一个实现类的类名
        nextName = pending.next();
        return true;
    }
}
创建实例对象
调用next方法的时候,实际调用到的是,lookupIterator.nextService。它通过反射的方式,创建实现类的实例并返回
private class LazyIterator implements Iterator<S>{
    private S nextService() {
        //全限定类名
        String cn = nextName;
        nextName = null;
        //创建类的Class对象
        Class<?> c = Class.forName(cn, false, loader);
        //通过newInstance实例化
        S p = service.cast(c.newInstance());
        //放入集合,返回实例
        providers.put(cn, p);
        return p;
    }
}
流程图如下:

以上是ServiceLoader实现spi机制的核心流程源码讲解。
4.框架应用
common-logging
apache最早提供的日志的门面接口。只有接口,没有实现。具体方案由各提供商实现, 发现日志提供商是通过扫描 META-INF/services/org.apache.commons.logging.LogFactory配置文件,通过读取该文件的内容找到日志提供的实现类。
只要我们的日志实现里包含了这个文件,并在文件里制定 LogFactory工厂接口的实现类即可。
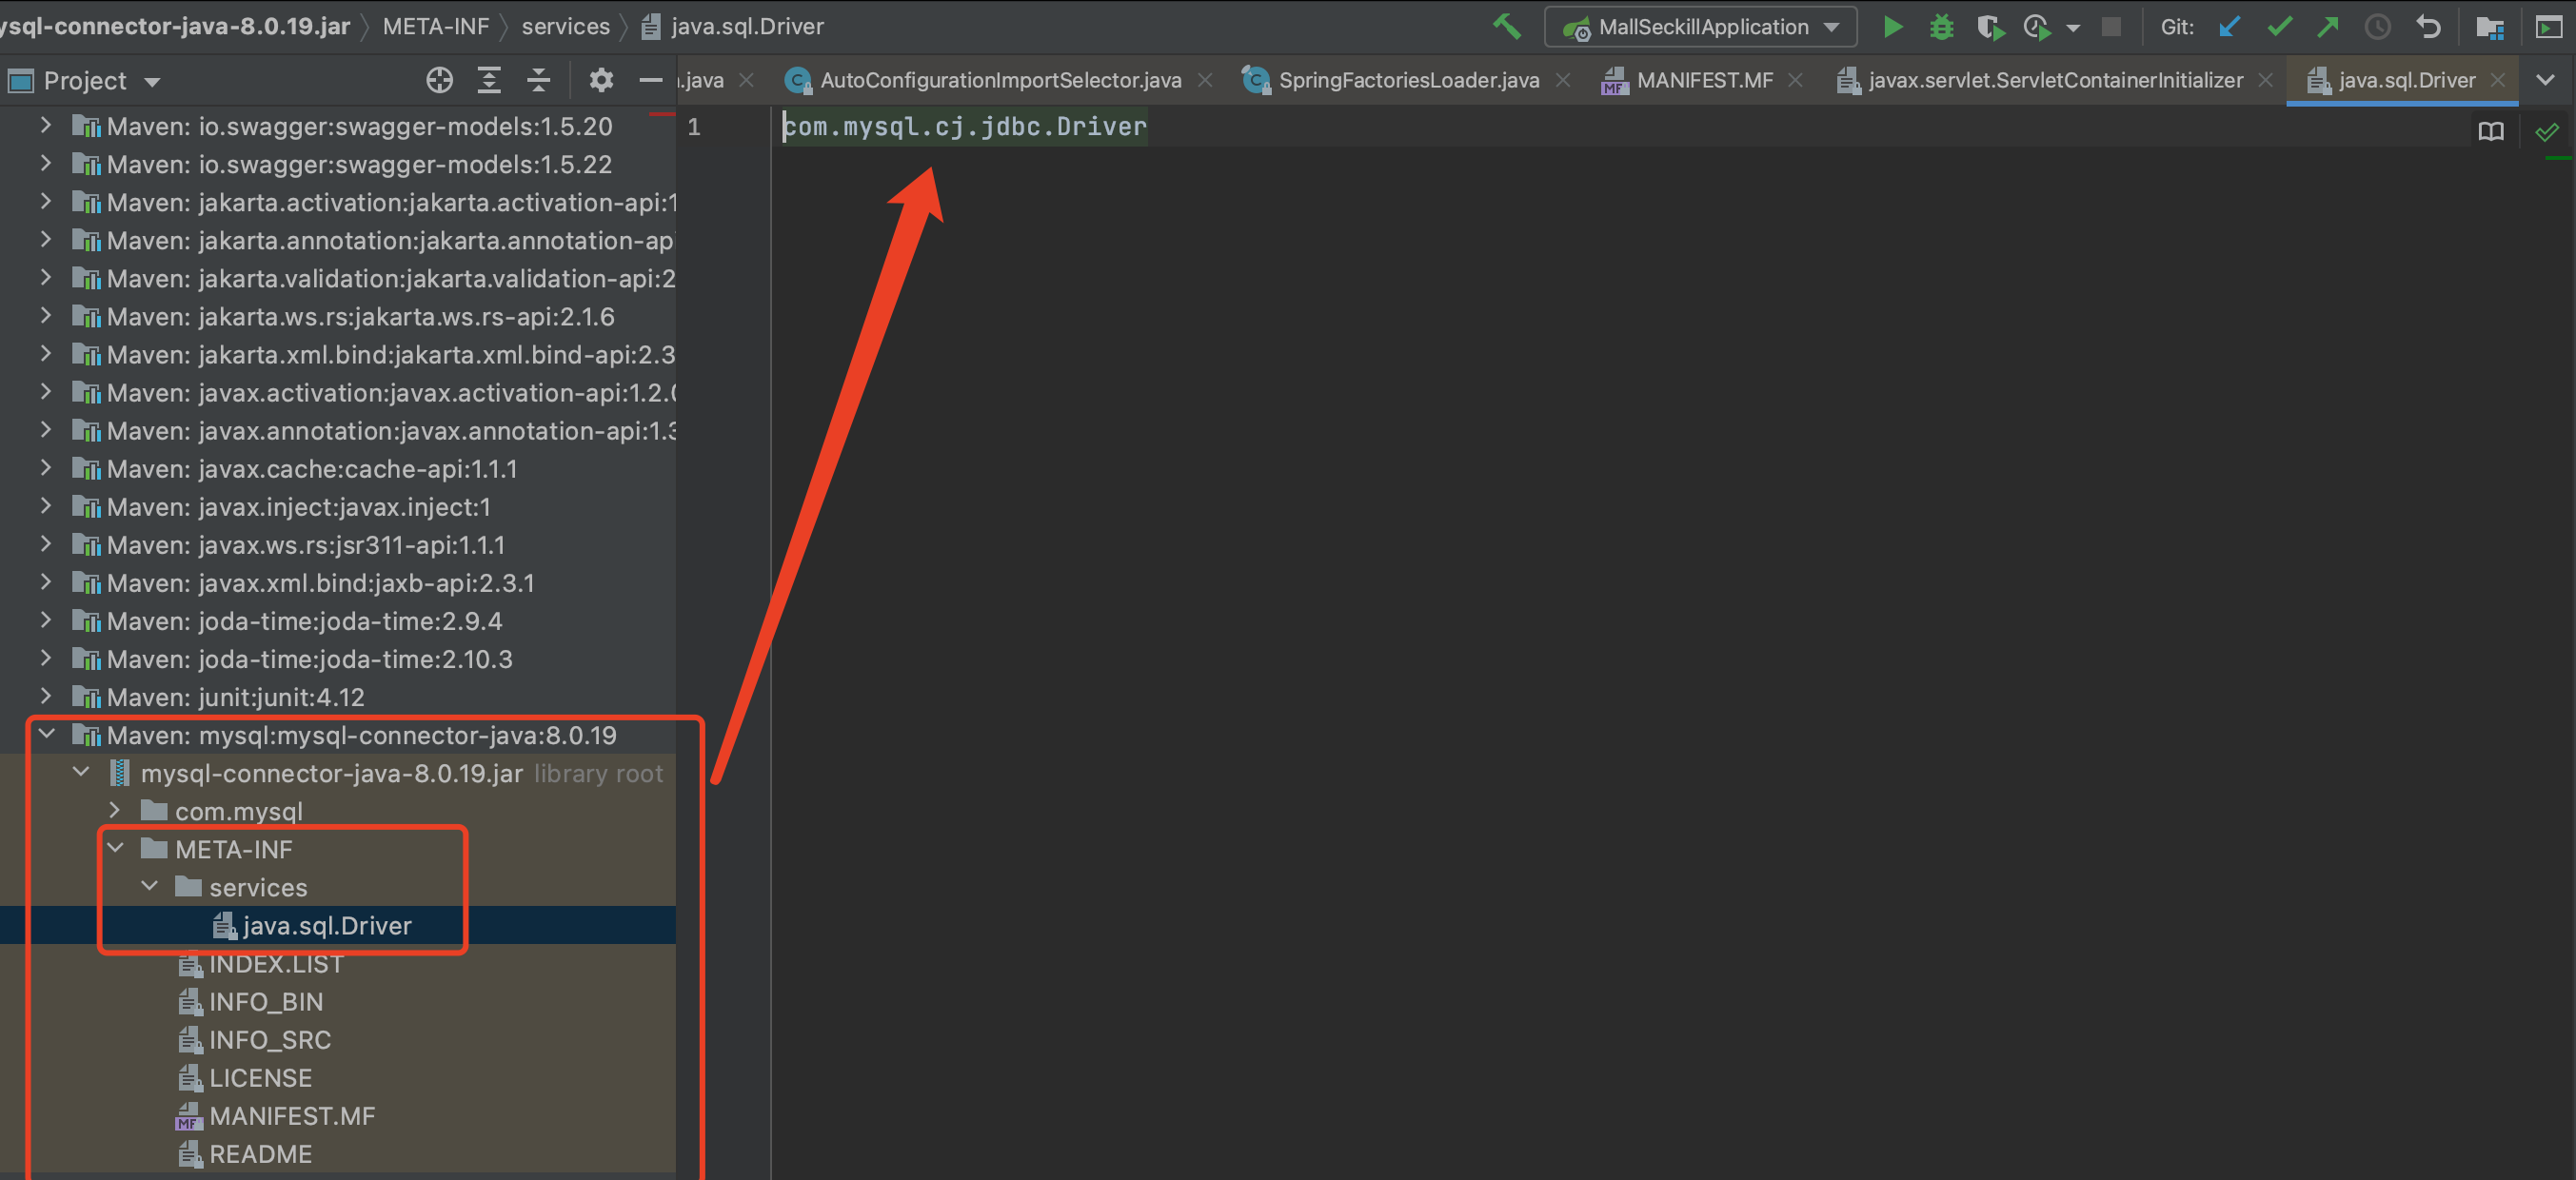
jdbc
jdbc4.0以前, 开发人员还需要基于Class.forName(“xxx”)的方式来装载驱动,jdbc4以后基于spi的机制来发现驱动提供商了,可以通过META-INF/services/java.sql.Driver文件里指定实现类的方式来暴露驱动提供者。如下所示:
springboot中spi机制
springboot最重要的特性就是自动配置,许多功能不需要手动开启,会自动帮助程序员开启,如果想扩展某些第三方组件的功能,例如mybatis,只需要配置依赖,就可以了,这其中都是需要SPI支持实现的,下面我们从源码层面看看springboot如何通过spi机制实现自动配置的。
从项目启动类的run方法进入:
public class SpringApplication {


	/**
	 * Create a new {@link SpringApplication} instance. The application context will load
	 * beans from the specified primary sources (see {@link SpringApplication class-level}
	 * documentation for details. The instance can be customized before calling
	 * {@link #run(String...)}.
	 * @param resourceLoader the resource loader to use
	 * @param primarySources the primary bean sources
	 * @see #run(Class, String[])
	 * @see #setSources(Set)
	 */
	@SuppressWarnings({ "unchecked", "rawtypes" })
	public SpringApplication(ResourceLoader resourceLoader, Class<?>... primarySources) {
		this.resourceLoader = resourceLoader;
		Assert.notNull(primarySources, "PrimarySources must not be null");
		this.primarySources = new LinkedHashSet<>(Arrays.asList(primarySources));
		this.webApplicationType = WebApplicationType.deduceFromClasspath();
		setInitializers((Collection) getSpringFactoriesInstances(ApplicationContextInitializer.class));
		setListeners((Collection) getSpringFactoriesInstances(ApplicationListener.class));
		this.mainApplicationClass = deduceMainApplicationClass();
	}

  	private <T> Collection<T> getSpringFactoriesInstances(Class<T> type) {
		return getSpringFactoriesInstances(type, new Class<?>[] {});
	}

	private <T> Collection<T> getSpringFactoriesInstances(Class<T> type, Class<?>[] parameterTypes, Object...    args) {
		ClassLoader classLoader = getClassLoader();
		// Use names and ensure unique to protect against duplicates
		Set<String> names = new LinkedHashSet<>(SpringFactoriesLoader.loadFactoryNames(type, classLoader));
		List<T> instances = createSpringFactoriesInstances(type, parameterTypes, classLoader, args, names);
		AnnotationAwareOrderComparator.sort(instances);
		return instances;
	}

  ........
}
进入的getSpringFactoriesInstances()方法,就会看到一个关键的类SpringFactoriesLoader,这个类就是springboot的spi机制实现的核心类,相当于JDK中spi机制的ServiceLoader
Spring-Core包的core/io/support下定义了SpringFactoriesLoader类,这个类用来加载META-INF/spring.factories文件,并获取指定接口的实现类。
loadFactories:使用给定的类加载器从文件中加载并实例化给定类型的工厂实现。(返回的是实例对象列表)
loadFactoryNames:使用给定的类加载器从文件中加载给定类型的工厂实现的标准类名。(返回的是类名列表)
public final class SpringFactoriesLoader {

	/**
	 * The location to look for factories.
	 * <p>Can be present in multiple JAR files.
	 */
	public static final String FACTORIES_RESOURCE_LOCATION = "META-INF/spring.factories";


	private static final Log logger = LogFactory.getLog(SpringFactoriesLoader.class);

	private static final Map<ClassLoader, MultiValueMap<String, String>> cache = new ConcurrentReferenceHashMap<>();


	private SpringFactoriesLoader() {
	}

  //加载并实例化给定类型的工厂实现
	public static <T> List<T> loadFactories(Class<T> factoryType, @Nullable ClassLoader classLoader) {
    Assert.notNull(factoryType, "'factoryType' must not be null");
    ClassLoader classLoaderToUse = classLoader;
    if (classLoaderToUse == null) {
        classLoaderToUse = SpringFactoriesLoader.class.getClassLoader();
    }
    // 返回的类名列表
    List<String> factoryImplementationNames = loadFactoryNames(factoryType, classLoaderToUse);
    if (logger.isTraceEnabled()) {
        logger.trace("Loaded [" + factoryType.getName() + "] names: " + factoryImplementationNames);
    }
    List<T> result = new ArrayList<>(factoryImplementationNames.size());
    for (String factoryImplementationName : factoryImplementationNames) {
        // 实例化
        result.add(instantiateFactory(factoryImplementationName, factoryType, classLoaderToUse));
    }
    AnnotationAwareOrderComparator.sort(result);
    return result;
	}
  //加载指定类型的工厂实现的标准类名
  public static List<String> loadFactoryNames(Class<?> factoryType, @Nullable ClassLoader classLoader) {
    String factoryTypeName = factoryType.getName();
    return loadSpringFactories(classLoader).getOrDefault(factoryTypeName, Collections.emptyList());
  }
  // 加载spring.factoies文件
  private static Map<String, List<String>> loadSpringFactories(@Nullable ClassLoader classLoader) {
    MultiValueMap<String, String> result = cache.get(classLoader);
    if (result != null) {
        return result;
    }
    try {
        // 获取文件的地址,将当前项目内及其引入的jar包下的META-INF/spring.factories文件全部读取出来
        Enumeration<URL> urls = (classLoader != null ?
                classLoader.getResources(FACTORIES_RESOURCE_LOCATION) :
                ClassLoader.getSystemResources(FACTORIES_RESOURCE_LOCATION));
        result = new LinkedMultiValueMap<>();
        while (urls.hasMoreElements()) {
            URL url = urls.nextElement();
            UrlResource resource = new UrlResource(url);
            // 读取加载
            Properties properties = PropertiesLoaderUtils.loadProperties(resource);
            for (Map.Entry<?, ?> entry : properties.entrySet()) {
                String factoryTypeName = ((String) entry.getKey()).trim();
                for (String factoryImplementationName : StringUtils.commaDelimitedListToStringArray((String) entry.getValue())) {
                    result.add(factoryTypeName, factoryImplementationName.trim());
                }
            }
        }
        cache.put(classLoader, result);
        return result;
    }

	@SuppressWarnings("unchecked")
	private static <T> T instantiateFactory(String factoryImplementationName, Class<T> factoryType, ClassLoader classLoader) {
		try {
			Class<?> factoryImplementationClass = ClassUtils.forName(factoryImplementationName, classLoader);
			if (!factoryType.isAssignableFrom(factoryImplementationClass)) {
				throw new IllegalArgumentException(
						"Class [" + factoryImplementationName + "] is not assignable to factory type [" + factoryType.getName() + "]");
			}
			return (T) ReflectionUtils.accessibleConstructor(factoryImplementationClass).newInstance();
		}
		catch (Throwable ex) {
			throw new IllegalArgumentException(
				"Unable to instantiate factory class [" + factoryImplementationName + "] for factory type [" + factoryType.getName() + "]",
				ex);
		}
	}

}
如mybatis-spring-boot-starter、spring-boot-starter-web等组件的META-INF文件下均含有spring.factories文件,自动配置模块中,SpringFactoriesLoader收集到文件中的类全名并返回一个类全名的数组,返回的类全名通过反射被实例化,就形成了具体的工厂实例,工厂实例来生成组件具体需要的bean,这就是springboot自动配置的核心原理。


 1888
1888


 被折叠的 条评论
为什么被折叠?
被折叠的 条评论
为什么被折叠?
 到【灌水乐园】发言


