


背景
环境
1、linux centos 9(该环境的ip可以被你的其他设备访问到,例如你可以用windows访问到家里的服务器)
2、k3s集群已完成部署,参考:国内k3s环境搭建-CSDN博客
3、HA部署方式采用容器化部署
概念
1、k3s:k8s的轻量化发布版本,容器编排管理平台,可以很方便的部署应用(包括HA应用),并且具有很强的故障恢复等容灾能力,并且可以将HA应用配置服务化管理
2、HA:智能家居管理平台,可以方便接入各家智能设备(当前主要考虑接入米家)
配置步骤
1、拉取HA镜像
拉取稳定版本的HA镜像(官方地址:ghcr.io/home-assistant/home-assistant:stable)
国内备份镜像:(国内镜像备份拉取查询网站:https://docker.aityp.com/,查询上面官方的镜像是否存在,选择对应架构,当前为x86_64的centos 9)
# crictl pull swr.cn-north-4.myhuaweicloud.com/ddn-k8s/ghcr.io/home-assistant/home-assistant:stable
Image is up to date for sha256:bb85a3c4daccce652deb5b0a3a64749ed315cf6d263c98e01c1558ae744d762a
查看镜像是否拉取成功:
# crictl images
IMAGE                                                                            TAG                    IMAGE ID            SIZE
**ghcr.io/home-assistant/home-assistant**                                            stable                 c1eff36acdd78       590MB
registry.cn-hangzhou.aliyuncs.com/rancher/klipper-helm                           v0.8.4-build20240523   0c1204a22f132       94.4MB
registry.cn-hangzhou.aliyuncs.com/rancher/klipper-lb                             v0.4.7                 edc812b8e25d0       4.78MB
registry.cn-hangzhou.aliyuncs.com/rancher/local-path-provisioner                 v0.0.27                c451116631150       17.8MB
registry.cn-hangzhou.aliyuncs.com/rancher/mirrored-coredns-coredns               1.10.1                 ead0a4a53df89       16.2MB
registry.cn-hangzhou.aliyuncs.com/rancher/mirrored-library-traefik               2.10.7                 ee69e8120b64a       43.2MB
registry.cn-hangzhou.aliyuncs.com/rancher/mirrored-metrics-server                v0.7.0                 b9a5a1927366a       19.4MB
registry.cn-hangzhou.aliyuncs.com/rancher/mirrored-pause                         3.6                    6270bb605e12e       301kB
**swr.cn-north-4.myhuaweicloud.com/ddn-k8s/ghcr.io/home-assistant/home-assistant**   stable                 bb85a3c4daccc       521MB
2、配置deployment
deployment是k8s管理平台中一种pod部署器,具有自动恢复、负载均衡等特性,可以很好的适配HA这种需要持续运行应用的部署
对应deployment文件内容如下:
# cat deploy_ha.yaml
apiVersion: apps/v1
kind: Deployment
metadata:
  name: homeassistant
spec:
  replicas: 1
  selector:
    matchLabels:
      app: homeassistant
  template:
    metadata:
      labels:
        app: homeassistant
    spec:
      hostNetwork: true  # This ensures the container uses the host network (similar to `network_mode: host` in Docker Compose)
      containers:
        - name: homeassistant
          image: swr.cn-north-4.myhuaweicloud.com/ddn-k8s/ghcr.io/home-assistant/home-assistant:stable
          volumeMounts:
            - name: config-volume
              mountPath: /config
            - name: localtime
              mountPath: /etc/localtime
              readOnly: true
            - name: dbus
              mountPath: /run/dbus
              readOnly: true
          ports:
            - containerPort: 8123
      volumes:
        - name: config-volume
          hostPath:
            path: **/home/ha_config**
            type: Directory
        - name: localtime
          hostPath:
            path: /etc/localtime
            type: File
        - name: dbus
          hostPath:
            path: /run/dbus
            type: DirectoryOrCreate
其中加粗的这个地方的配置/home/ha_config,可以按照自己当前的环境进行修改,这个目录就是HA运行的时候存储信息以及配置的目录,可以简单理解为安装目录
部署pod:
kubectl apply -f deploy_ha.yaml
查看pod是否已经成功运行起来:(HA pod的状态为running即可)
 #  kubectl get pods -A
NAMESPACE     NAME                                      READY   STATUS        RESTARTS   AGE
**default       homeassistant-5dcc949887-2tqkv            1/1     Running**       0          3h38m
kube-system   coredns-58c9946f4-njxqz                   1/1     Running       0          44d
kube-system   coredns-58c9946f4-rvq8x                   1/1     Terminating   0          167d
kube-system   local-path-provisioner-6d79b7444c-4hkvt   1/1     Terminating   0          167d
kube-system   local-path-provisioner-6d79b7444c-hkz7v   1/1     Running       0          44d
kube-system   metrics-server-5bbb74b77-7kn5q            1/1     Running       0          44d
kube-system   metrics-server-5bbb74b77-xcl8b            0/1     Terminating   0          167d
kube-system   svclb-traefik-1be5d357-lgn5h              2/2     Running       0          44d
kube-system   svclb-traefik-1be5d357-w4m9x              2/2     Running       0          167d
kube-system   traefik-57c89d7764-2ckfn                  1/1     Running       0          44d
kube-system   traefik-57c89d7764-jszjh                  1/1     Terminating   0          167d
配置服务:
k8s集群的应用如果不配置服务,集群内的应用是无法被访问的,因此需要配置service,将应用的能力暴露出去,对应的服务配置文件内容如下:
# cat srv_ha.yaml
apiVersion: v1
kind: Service
metadata:
  name: homeassistant
spec:
  type: NodePort
  ports:
    - port: 8123
      targetPort: 8123
      nodePort: 30000
  selector:
    app: homeassistant
注意:
- 该服务的类型是NodePort意味着集群外部的机器可以通过“节点IP:端口”来访问集群内部的应用,其中端口就是参数中nodePort的参数30000(范围只能是:30000-32767)
- 前面两个port的参数分别是:port表示主机暴露给应用的端口,targetPort表示应用暴露给集群的端口,一般这两个参数都是一样的
- 至于为什么是8123,则是因为HA应用默认暴露的端口就是8123
- selector:则是将这个服务绑定到指定的deployment应用上,我们这里就是homeassistant
部署service命令:
kubectl apply -f srv_ha.yaml
查看service是否部署成功:
# kubectl get svc -A
NAMESPACE     NAME             TYPE           CLUSTER-IP      EXTERNAL-IP      PORT(S)                      AGE
**default       homeassistant    NodePort       10.43.114.143   <none>           8123:30000/TCP**               4h40m
default       kubernetes       ClusterIP      10.43.0.1       <none>           443/TCP                      167d
kube-system   kube-dns         ClusterIP      10.43.0.10      <none>           53/UDP,53/TCP,9153/TCP       167d
kube-system   metrics-server   ClusterIP      10.43.208.91    <none>           443/TCP                      167d
kube-system   traefik          LoadBalancer   10.43.32.56     192.168.101.24   80:32373/TCP,443:32371/TCP   167d
3、配置HA
参考官方配置步骤:Onboarding Home Assistant - Home Assistant
(1)浏览器登录HA网址:http://ip:30000/,这里的ip为k8s的master节点的ip地址,端口就是服务暴露的30000这个端口
(2)选择创建HA账户
(3)创建自己的用户名和密码
(4)选择位置(用于显示温度、天气、货币等等)
(5)选择你想要共享的数据(可以不共享)
(6)直接选择完成
4、配置HACS
HACS是一个第三方的插件商店,可以安装很多关于智能家居的插件或者应用,比如米家等
安装可以参考:https://zhuanlan.zhihu.com/p/400985801、https://hacs.xyz/docs/use/download/download/#to-download-hacs
当前环境安装配置步骤如下:
(1)进入容器
kubectl exec -it homeassistant-5dcc949887-89s27 -c homeassistant -- /bin/bash
homeassistant-5dcc949887-89s27为pod名称,homeassistant为容器名称
(2)执行命令
wget --no-check-certificate -O - <https://get.hacs.xyz> | bash -
但是可能遇到如下报错:
--2024-12-25 21:49:15--  <https://get.hacs.xyz/>
Resolving get.hacs.xyz (get.hacs.xyz)... 104.26.6.112, 2606:4700:20::681a:770, 2606:4700:20::681a:670, ...
Connecting to get.hacs.xyz (get.hacs.xyz)|104.26.6.112|:443... connected.
HTTP request sent, awaiting response... 301 Moved Permanently
Location: <https://raw.githubusercontent.com/hacs/get/main/get> [following]
--2024-12-25 21:49:17--  <https://raw.githubusercontent.com/hacs/get/main/get>
Resolving raw.githubusercontent.com (raw.githubusercontent.com)... 0.0.0.0, ::
Connecting to raw.githubusercontent.com (raw.githubusercontent.com)|0.0.0.0|:443... connected.
WARNING: The certificate of ‘raw.githubusercontent.com’ is not trusted.
WARNING: The certificate of ‘raw.githubusercontent.com’ doesn't have a known issuer.
The certificate's owner does not match hostname ‘raw.githubusercontent.com’
HTTP request sent, awaiting response... 404 Not Found
2024-12-25 21:49:17 ERROR 404: Not Found.
由于这个步骤实际上就是执行一下安装脚本,因此可以将脚本内容直接保存在容器目录下,直接bash执行也是可以的,脚本内容如下:
# cat install_hacs.sh

#!/bin/bash
# wget -O - <https://get.hacs.xyz> | bash -
function run() {
    set -e

    RED_COLOR='\\033[0;31m'
    GREEN_COLOR='\\033[0;32m'
    GREEN_YELLOW='\\033[1;33m'
    NO_COLOR='\\033[0m'

    declare haPath
    declare -a paths=(
        "$PWD"
        "$PWD/config"
        "/config"
        "/homeassistant"
        "$HOME/.homeassistant"
        "/usr/share/hassio/homeassistant"
    )
    declare currentVersion
    declare currentYear
    declare currentMonth
    declare currentPatch
    declare targetVersion
    declare targetYear
    declare targetMonth
    declare targetPatch

    function info () { echo -e "${GREEN_COLOR}INFO: $1${NO_COLOR}";}
    function warn () { echo -e "${GREEN_YELLOW}WARN: $1${NO_COLOR}";}
    function error () { echo -e "${RED_COLOR}ERROR: $1${NO_COLOR}"; if [ "$2" != "false" ]; then exit 1;fi; }

    function checkRequirement () {
        if [ -z "$(command -v "$1")" ]; then
            error "'$1' is not installed"
        fi
    }

    checkRequirement "wget"
    checkRequirement "unzip"

    info "Trying to find the correct directory..."
    for path in "${paths[@]}"; do
        if [ -n "$haPath" ]; then
            break
        fi

        if [ -f "$path/.HA_VERSION" ]; then
            haPath="$path"
        fi
    done

    if [ -n "$haPath" ]; then
        info "Found Home Assistant configuration directory at '$haPath'"
        cd "$haPath" || error "Could not change path to $haPath"
        if [ ! -d "$haPath/custom_components" ]; then
            info "Creating custom_components directory..."
            mkdir "$haPath/custom_components"
        fi

        info "Changing to the custom_components directory..."
        cd "$haPath/custom_components" || error "Could not change path to $haPath/custom_components"

        info "Downloading HACS"
        rm -f "$haPath/custom_components/hacs.zip"
        wget "<https://github.com/hacs/integration/releases/latest/download/hacs.zip>"

        if [ -d "$haPath/custom_components/hacs" ]; then
            warn "HACS directory already exist, cleaning up..."
            rm -R "$haPath/custom_components/hacs"
        fi

        info "Creating HACS directory..."
        mkdir "$haPath/custom_components/hacs"

        info "Unpacking HACS..."
        unzip "$haPath/custom_components/hacs.zip" -d "$haPath/custom_components/hacs" >/dev/null 2>&1

        echo
        info "Verifying versions"
        targetVersion=$(sed -n -e '/^MINIMUM_HA_VERSION/p' "$haPath/custom_components/hacs/const.py" | cut -d '"' -f 2)
        currentVersion=$(cat "$haPath/.HA_VERSION")

        info "Current version is ${currentVersion}, minimum version is ${targetVersion}"

        targetYear=$(echo "${targetVersion}" | cut -d "." -f 1)
        currentYear=$(echo "${currentVersion}" | cut -d "." -f 1)

        if [ "${currentVersion}" == "2023.12.0" ]; then
            rm -R "$haPath/custom_components/hacs"
            rm -f "$haPath/custom_components/hacs.zip"
            error "HACS will not work on version 2023.12.0 of Home Assistant, upgrade to 2023.12.1 (or newer) before re-running this script."
        fi

        if [ "${currentYear}" -lt "${targetYear}" ]; then
            rm -R "$haPath/custom_components/hacs"
            rm -f "$haPath/custom_components/hacs.zip"
            error "Version ${currentVersion} is not new enough, needs at least ${targetVersion}"
        fi

        if [ "${currentYear}" == "${targetYear}" ]; then
            targetMonth=$(echo "${targetVersion}" | cut -d "." -f 2)
            currentMonth=$(echo "${currentVersion}" | cut -d "." -f 2)

            if [ "${currentMonth}" -lt "${targetMonth}" ]; then
                rm -R "$haPath/custom_components/hacs"
                rm -f "$haPath/custom_components/hacs.zip"
                error "Version ${currentVersion} is not new enough, needs at least ${targetVersion}"
            fi

            if [ "${currentMonth}" == "${targetMonth}" ]; then
                targetPatch=$(echo "${targetVersion}" | cut -d "." -f 3)
                currentPatch=$(echo "${currentVersion}" | cut -d "." -f 3)

                if [ "${currentPatch}" -lt "${targetPatch}" ]; then
                    rm -R "$haPath/custom_components/hacs"
                    rm -f "$haPath/custom_components/hacs.zip"
                    error "Version ${currentVersion} is not new enough, needs at least ${targetVersion}"
                fi
            fi
        fi

        echo
        info "Removing HACS zip file..."
        rm -f "$haPath/custom_components/hacs.zip"
        info "Installation complete."
        echo
        info "Remember to restart Home Assistant before you configure it"

    else
        echo
        error "Could not find the directory for Home Assistant" false
        echo "Manually change the directory to the root of your Home Assistant configuration"
        echo "With the user that is running Home Assistant"
        echo "and run the script again"
        exit 1
    fi
}

run
(3)运行命令:(实际上就是在安装目录下创建了个custom_components目录,然后将HACS插件的压缩包下载并解压到了那个目录 ,如果网络实在有问题,也可以手动下载资源的进行操作)
# bash install_hacs.sh
INFO: Trying to find the correct directory...
INFO: Found Home Assistant configuration directory at '/config'
INFO: Creating custom_components directory...
INFO: Changing to the custom_components directory...
INFO: Downloading HACS
Connecting to github.com (20.205.243.166:443)
Connecting to github.com (20.205.243.166:443)
Connecting to objects.githubusercontent.com (185.199.110.133:443)
saving to 'hacs.zip'
hacs.zip             100% |***************************************************************************************| 16.0M  0:00:00 ETA
'hacs.zip' saved
INFO: Creating HACS directory...
INFO: Unpacking HACS...

INFO: Verifying versions
INFO: Current version is 2024.6.4, minimum version is 2024.4.1

INFO: Removing HACS zip file...
INFO: Installation complete.

INFO: Remember to restart Home Assistant before you configure it
(4)重启HA应用pod
直接将pod删除即可,k8s会自动拉起来pod,即可认为完成了一次重启
# kubectl delete pod homeassistant-5dcc949887-89s27
再次查看pod,发现新的pod已经被拉起来了
# kubectl get pods -A
(5)配置HACS(当前环境语言为简体中文,其他语言可能会不能匹配上)
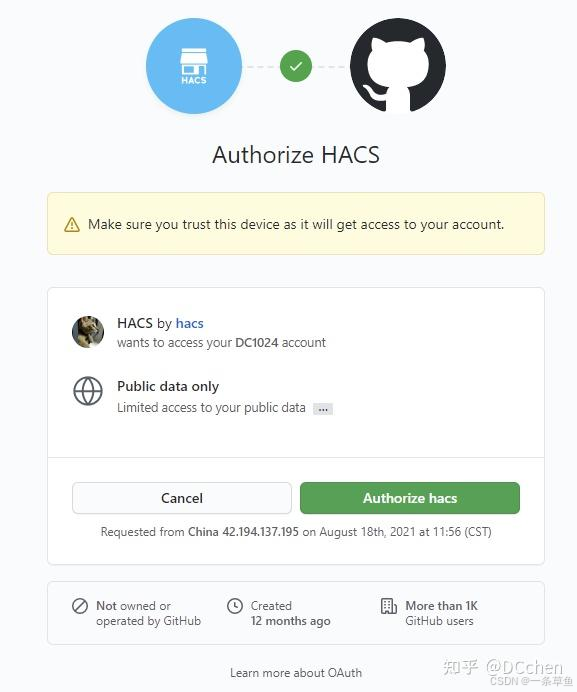
由于HACS的插件库都来源于github上的项目,因此需要github进行授权才能访问这些库
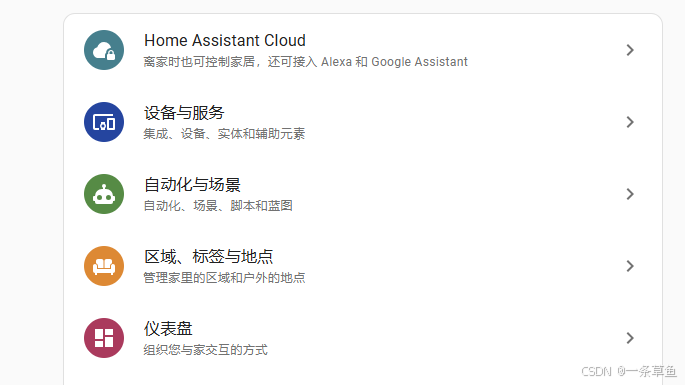
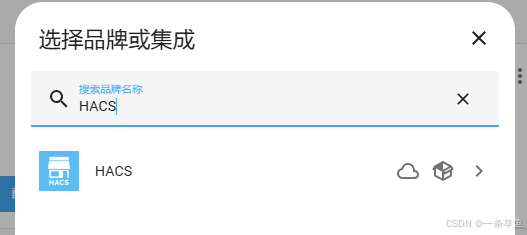
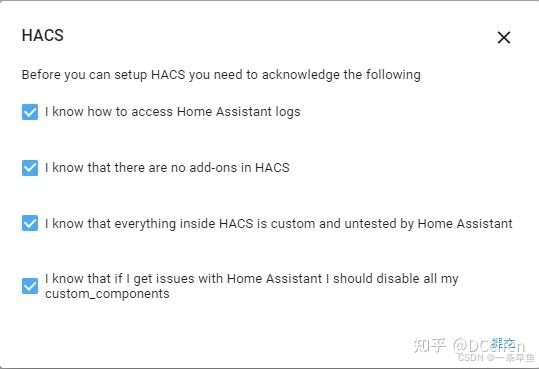
路径:配置→设备与服务→添加集成(右下角)→搜索HACS,选择并添加HACS→全选接受协议→github授权→完成
主界面左下角

第二个
添加集成弹出的选项框中进行搜索
全选
1、当前环境需要能够访问github,并且当前你已经登录了github;2、点击蓝色连接进行授权;3、将下面的授权码填入你打开的授权页面
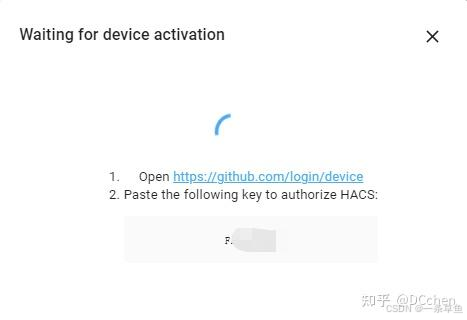
确认授权
配置完成
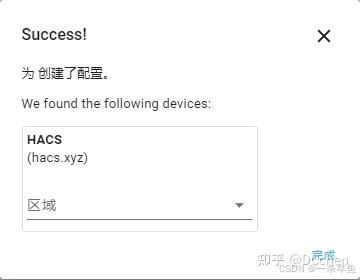
5、配置XIAOMI HOME
可以参考小米官方github说明:ha_xiaomi_home/doc/README_zh.md at main · XiaoMi/ha_xiaomi_home · GitHub
(1)如果上述步骤一切正常,那么你的HA主界面的侧边栏应该已经存在了HACS这个选项卡
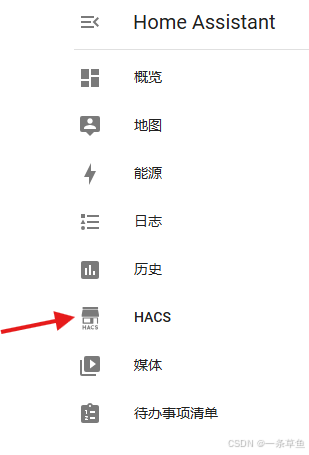
(2)点击选择HACS
(3)点击右上角的三个点,并选择custom repositories
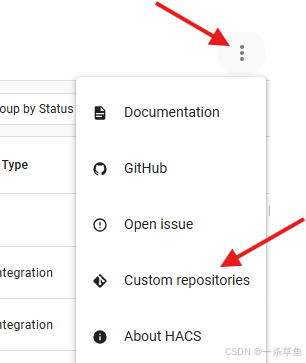
在弹出的选项卡中填入:Repository: **https://github.com/XiaoMi/ha_xiaomi_home.git**
选择Type:Category or Type: Integration
点击ADD,这个时候HACS的页面下面就会出现新的应用了:

(4)选择XiaomiHome进行下载
(5)配置xiaomihome
下载完成之后,还是在之前的添加集成的位置,添加xiaomihome:
配置→设备与服务→添加集成(右下角)→搜索xiaomi
(6)使用小米账号进行登录授权
进行授权的时候会弹出页面,有一个蓝色的链接:
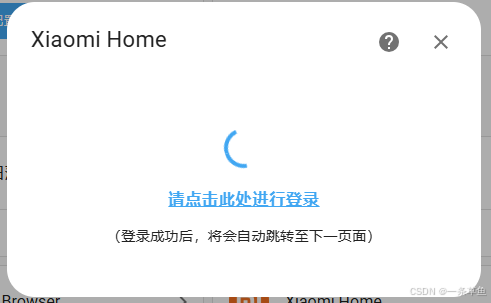
点击蓝色的链接(注意,一定需要是从这个蓝色链接进入的网页,因为点击了之后授权才会触发webhook)
弹出来的页面输入登录小米的账号,进行授权
然后发现授权的网页无法打开,是因为这个网页的默认url的开头是:http://homeassistant.local:8123
需要在浏览器页面的网址栏,将这个ip和端口改成当前HA实际的IP和端口,即登录HA的IP和端口30000,然后再回车,即可成功授权
授权完成之后回到HA页面点击确认即可


 1634
1634

 被折叠的 条评论
为什么被折叠?
被折叠的 条评论
为什么被折叠?
 到【灌水乐园】发言


