文章目录
https://curiousily.com/posts/sentiment-analysis-with-bert-and-hugging-face-using-pytorch-and-python/
导入各种包,设置基本参数
import transformers
from transformers import BertModel, BertTokenizer, AdamW, get_linear_schedule_with_warmup
import torch
import numpy as np
import pandas as pd
import seaborn as sns
from pylab import rcParams
import matplotlib.pyplot as plt
from matplotlib import rc
from sklearn.model_selection import train_test_split
from sklearn.metrics import confusion_matrix, classification_report
from collections import defaultdict
from textwrap import wrap
from torch import nn, optim
from torch.utils.data import Dataset, DataLoader
%matplotlib inline
%config InlineBackend.figure_format='retina'
sns.set(style='whitegrid', palette='muted', font_scale=1.2)
HAPPY_COLORS_PALETTE = ["#01BEFE", "#FFDD00", "#FF7D00", "#FF006D", "#ADFF02", "#8F00FF"]
sns.set_palette(sns.color_palette(HAPPY_COLORS_PALETTE))
rcParams['figure.figsize'] = 12, 8
RANDOM_SEED = 42
np.random.seed(RANDOM_SEED)
torch.manual_seed(RANDOM_SEED)
device = torch.device("cuda:0" if torch.cuda.is_available() else "cpu")
使用的是Google Play 的评论数据,用下面的程序,从谷歌drive上下载数据集
import gdown
url1 = "https://drive.google.com/uc?id=1S6qMioqPJjyBLpLVz4gmRTnJHnjitnuV"
url2 = 'https://drive.google.com/uc?id=1zdmewp7ayS4js4VtrJEHzAheSW-5NBZv'
gdown.download(url1) #'apps.csv'
gdown.download(url2) #'reviews.csv'
读取数据
df = pd.read_csv("reviews.csv")
df.head()
有这些类:
list(df.columns)
['userName',
'userImage',
'content',
'score',
'thumbsUpCount',
'reviewCreatedVersion',
'at',
'replyContent',
'repliedAt',
'sortOrder',
'appId']
最主要的还是content
和score
,分别是评论的内容和打分(1-5分)
查看数据形状
df.shape
(15746, 11)
查看缺失值情况
df.info()
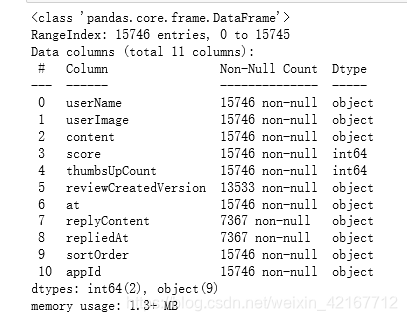
可以看到content和score没有缺失值,其他的并不影响
查看各个打分的分布情况
sns.countplot(df['score'])
plt.xlabel('review score')
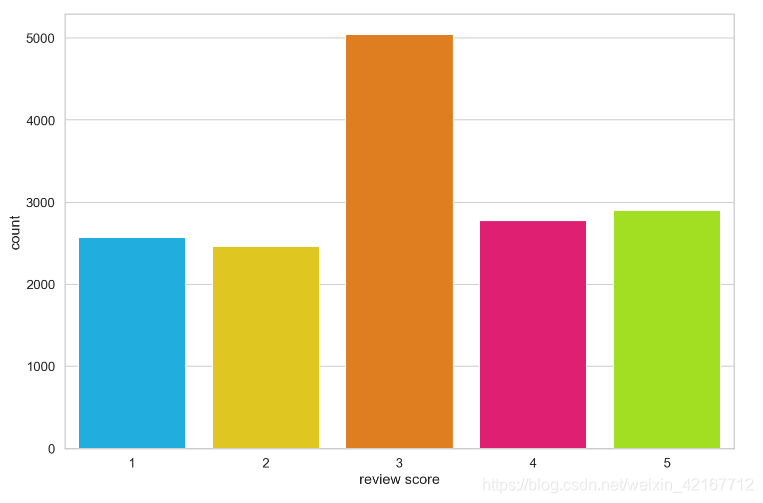
相当不平衡,所以考虑将其转化为negative,neutral,positive类,进行情感分析
将socre 转化为0,1,2
def to_sentiment(rating):
rating = int(rating)
if rating <= 2:
return 0 # 负面
elif rating == 3:
return 1 #中立
else:
return 2 # 正面
df['sentiment'] = df.score.apply(to_sentiment) #sentiment列里面存的也只是[0,1,2]
class_names = ['negative', 'neutral', 'positive']
画出新的分布图
ax = sns.countplot(df["sentiment"])
plt.xlabel('review sentiment')
ax.set_xticklabels(class_names) #将原本的0,1,2设置为['negative', 'neutral', 'positive']
这样看数据就差不多平衡了
将纯文本数据转化成数字,有些要求如下:
- 添加special tokens特殊字符来分句,
- 将句子变成固定长度,补长截短
- 创建attention mask,也就是对padding补长的空字符标记为0(1,1,1,1,1,1,0,0,0)
Transformer库中有许多训练好的模型
PRE_TRAINED_MODEL_NAME = 'bert-base-cased'
你可以使用cased(有大小写的)模型,作者试验了下,发现有cased模型效果更好,直觉来说,BAD比bad更具有情感。
加载与训练过的tokenizer
tokenizer = BertTokenizer.from_pretrained(PRE_TRAINED_MODEL_NAME)
我们用下面这句话来理解tokenization
sample_txt = 'When was I last outside? I am stuck at home for 2 weeks.'
一些基本的操作将文本转化为token,再将token转化成id(unique integers)
tokens = tokenizer.tokenize(sample_txt)
token_ids = tokenizer.convert_tokens_to_ids(tokens)
print(f' Sentence: {sample_txt}') #以 f开头表示在字符串内支持大括号内的python 表达式
print(f' Tokens: {tokens}')
print(f'Token IDs: {token_ids}')
Sentence: When was I last outside? I am stuck at home for 2 weeks.
Tokens: ['When', 'was', 'I', 'last', 'outside', '?', 'I', 'am', 'stuck', 'at', 'home', 'for', '2', 'weeks', '.']
Token IDs: [1332, 1108, 146, 1314, 1796, 136, 146, 1821, 5342, 1120, 1313, 1111, 123, 2277, 119]
Special tokens
1.[SEP],句子结尾的标志【marker for ending of a sentence】
tokenizer.sep_token
返回的是’[SEP]’ 字符串
tokenizer.sep_token_id
返回的是整形:102(SEP的token id 是102)
2.[CLS] 要将这个特殊token加在每个句子的开头,这样BERT才知道我们在做分类任务
(we must add this token to the start of each sentence, so BERT knows we’re doing classification)
tokenizer.cls_token, tokenizer.cls_token_id
生成一个元组,cls的id是101
3.’[PAD]’ 用于句子补长,id是0
tokenizer.pad_token, tokenizer.pad_token_id
4.[UNK],BERT知道训练集中的所有token,其他的可以使用Unknown token来进行编码
tokenizer.unk_token, tokenizer.unk_token_id
以上这些都可以使用 encode_plus()
方法来实现
encoding = tokenizer.encode_plus(
sample_txt,
max_length=32,
add_special_tokens=True, # Add '[CLS]' and '[SEP]'
return_token_type_ids=False, # 如果不是做sentence pair任务,所有的token_type_id都是0,
pad_to_max_length=True,
truncation = True,
return_attention_mask=True,
return_tensors='pt', # Return PyTorch tensors
)
encoding.keys()
得
dict_keys(['input_ids', 'attention_mask'])
print(encoding)
{'input_ids': tensor([[ 101, 1332, 1108, 146, 1314, 1796, 136, 146, 1821, 5342, 1120, 1313, 1111, 123, 2277, 119, 102, 0, 0, 0, 0, 0, 0, 0, 0, 0, 0, 0, 0, 0, 0, 0]]),
'attention_mask': tensor([[1, 1, 1, 1, 1, 1, 1, 1, 1, 1, 1, 1, 1, 1, 1, 1, 1, 0, 0, 0, 0, 0, 0, 0, 0, 0, 0, 0, 0, 0, 0, 0]])}
将tokenizaiton逆转(将token id还原成句子),就能看到special token
tokenizer.convert_ids_to_tokens(encoding['input_ids'][0])
['[CLS]',
'When',
'was',
'I',
'last',
'outside',
'?',
'I',
'am',
'stuck',
'at',
'home',
'for',
'2',
'weeks',
'.',
'[SEP]',
'[PAD]',
'[PAD]',
'[PAD]',
'[PAD]',
'[PAD]',
'[PAD]',
'[PAD]',
'[PAD]',
'[PAD]',
'[PAD]',
'[PAD]',
'[PAD]',
'[PAD]',
'[PAD]',
'[PAD]']
选择句子得长度Choosing Sequence Length
BERT只接受固定长度的文本输入,我们会用一个简单的方法来选择max_length。
首先存储每个评论(句子)tokenize后的token长度
token_lens = []
for txt in df.content:
tokens = tokenizer.encode(txt, max_length=512)
token_lens.append(len(tokens))
sns.distplot(token_lens)
plt.xlim([0, 256]); # x轴长度
plt.xlabel('Token count')
可以看到大部分句子的长度都小于128,但安全起见,选择160
MAX_LEN = 160
我们有创建PyTorch数据集所需的所有构造模块。 我们开始做吧:
class GPReviewDataset(Dataset):
def __init__(self, reviews, targets, tokenizer, max_len):
self.reviews = reviews
self.targets = targets
self.tokenizer = tokenizer
self.max_len = max_len
def __len__(self):
return len(self.reviews)
def __getitem__(self, item):
review = str(self.reviews[item])
target = self.targets[item]
encoding = self.tokenizer.encode_plus(
review,
add_special_tokens=True,
max_length=self.max_len,
return_token_type_ids=False,
pad_to_max_length=True,
truncate = True,
return_attention_mask=True,
return_tensors='pt',
)
return {
'review_text': review,
'input_ids': encoding['input_ids'].flatten(), #flatten()将张量平铺成一行
'attention_mask': encoding['attention_mask'].flatten(),
'targets': torch.tensor(target, dtype=torch.long)
}
分词器为我们完成了大部分繁重的工作。 我们也返回了评论文本,因此可以更轻松地评估模型中的预测。
将数据分成训练集和测试集,验证集:0.9:0.05:0.05
df_train, df_test = train_test_split(
df,
test_size=0.1,
random_state=RANDOM_SEED
)
df_val, df_test = train_test_split(
df_test,
test_size=0.5,
random_state=RANDOM_SEED
)
df_train.shape, df_val.shape, df_test.shape
我们还需要创建几个数据加载器。 这是一个辅助函数:
def create_data_loader(df, tokenizer, max_len, batch_size):
ds = GPReviewDataset(
reviews=df.content.to_numpy(),
targets=df.sentiment.to_numpy(),
tokenizer=tokenizer,
max_len=max_len
)
return DataLoader(
ds,
batch_size=batch_size,
num_workers=4
)
BATCH_SIZE = 16
train_data_loader = create_data_loader(df_train, tokenizer, MAX_LEN, BATCH_SIZE)
val_data_loader = create_data_loader(df_val, tokenizer, MAX_LEN, BATCH_SIZE)
test_data_loader = create_data_loader(df_test, tokenizer, MAX_LEN, BATCH_SIZE)
让我们看一下训练数据加载器中的示例批次(an example batch):
data = next(iter(train_data_loader)) #next() 返回迭代器的下一个项目。要和生成迭代器的 iter() 函数一起使用。
data.keys()
dict_keys(['review_text', 'input_ids', 'attention_mask', 'targets'])
print(data['input_ids'].shape)
print(data['attention_mask'].shape)
print(data['targets'].shape)
(运行上面那段程序,太耗时了,结果如下)
torch.Size([16, 160])
torch.Size([16])
加载预训练好的基础bert模型
bert_model = BertModel.from_pretrained(PRE_TRAINED_MODEL_NAME)
并尝试将其用于样本文本的编码
#上面有介绍如何对sample_txt进行tokenize,并编码
sample_txt = 'When was I last outside? I am stuck at home for 2 weeks.'
output = bert_model(
input_ids=encoding['input_ids'],
attention_mask=encoding['attention_mask']
)
last_hidden_state
是模型最后一层的hidden_state序列。
print(output.last_hidden_state.shape)
得:
torch.Size([1, 32, 768])
从上面这个输出可以看出,我们这32个tokens(样本得长度是32)都有hidden sate(神经元得输出结果叫hidden sate)
但768是代表什么意思?这是前向传播网络中得隐含层单元数量(hidden units)
可以通过
print(bert_model.config.hidden_size)
查询
print(output.pooler_output.shape)
得:
torch.Size([1, 768])
可以将pooler_output理解为summary of content
Obtaining the pooled_output
is done by applying the BertPooler on last_hidden_state
我们可以使用所有的这些知识来创建基于BERT模型的分类器
class SentimentClassifier(nn.Module):
def __init__(self, n_classes):
super(SentimentClassifier, self).__init__()
self.bert = BertModel.from_pretrained(PRE_TRAINED_MODEL_NAME)
self.drop = nn.Dropout(p=0.3)
self.out = nn.Linear(self.bert.config.hidden_size, n_classes)
def forward(self, input_ids, attention_mask):
_, pooled_output = self.bert(
input_ids=input_ids,
attention_mask=attention_mask
)
output = self.drop(pooled_output)
return self.out(output
从这步开始后面的步骤都完成不下去