


python已安装,但是使用pip安装其他环境时,提示WSL下不行,需要一步步探索各种依赖,确保WSL下可行的环境
1-安装CUDA,这个就提供了WSL-Ubuntu的配置,迈出了不错的一步
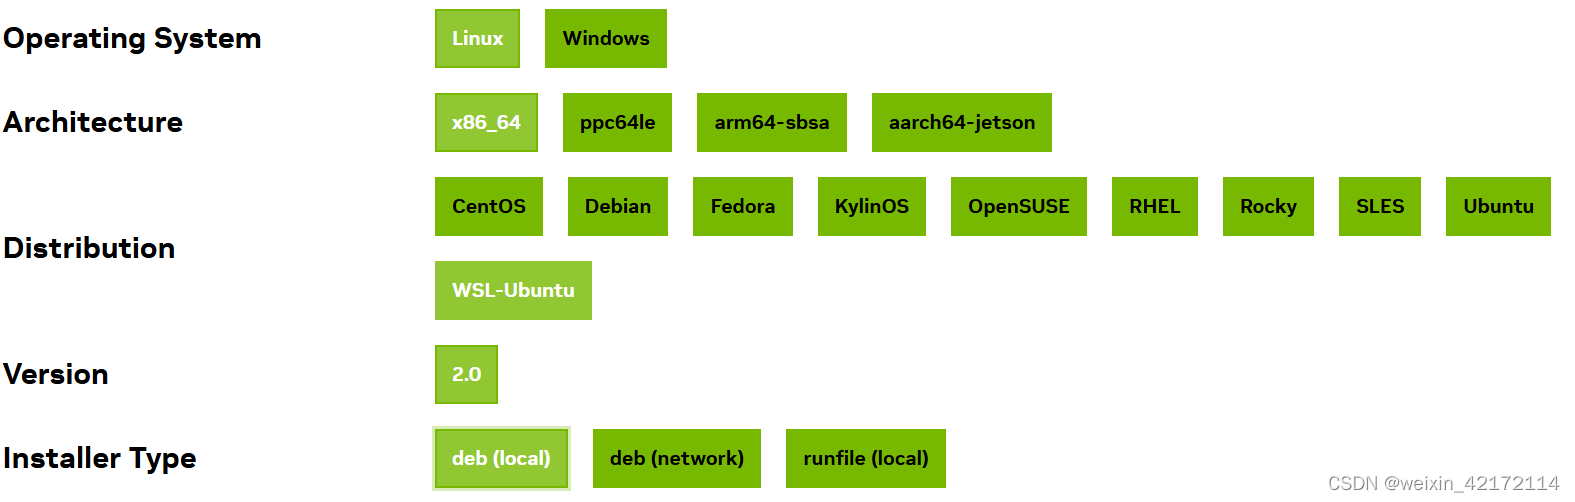
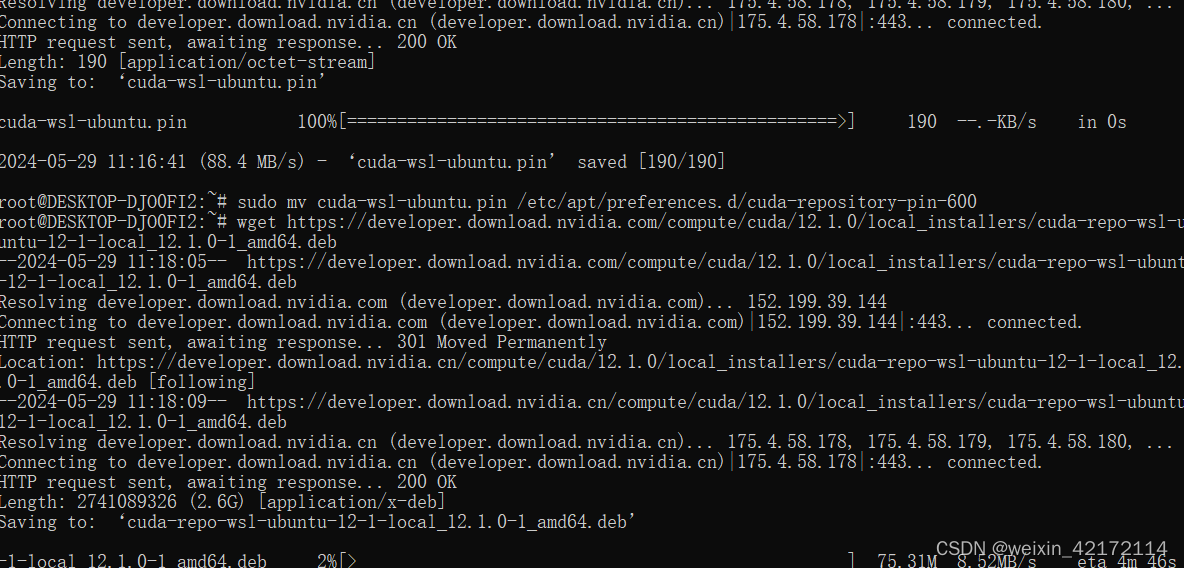
2-安装CUDA的代码块
Base Installer
Installation Instructions:
wget https://developer.download.nvidia.com/compute/cuda/repos/wsl-ubuntu/x86_64/cuda-wsl-ubuntu.pin
sudo mv cuda-wsl-ubuntu.pin /etc/apt/preferences.d/cuda-repository-pin-600
wget https://developer.download.nvidia.com/compute/cuda/12.1.0/local_installers/cuda-repo-wsl-ubuntu-12-1-local_12.1.0-1_amd64.deb
sudo dpkg -i cuda-repo-wsl-ubuntu-12-1-local_12.1.0-1_amd64.deb
sudo cp /var/cuda-repo-wsl-ubuntu-12-1-local/cuda-*-keyring.gpg /usr/share/keyrings/
sudo apt-get update
sudo apt-get -y install cuda
看看这极不人性化的安装吧,不过谁让咱们是程序员呢,我们是为AI服务的
nsight-systems-2023.1.2 : Depends: libtinfo5 but it is not installable
sudo apt-get install libncurses5
sudo apt-get install libncursesw5
E: Unable to locate package libncurses5
E: Package ‘libtinfo5’ has no installation candidate
sudo apt-get update
sudo apt-get install libtinfo5
以上都失败了
直接检查nvcc -V后,提示
root@DESKTOP-DJO0FI2:~# nvcc -V
Command 'nvcc' not found, but can be installed with:
apt install nvidia-cuda-toolkit
root@DESKTOP-DJO0FI2:~# **apt install nvidia-cuda-toolkit**
好像是成功了
3-检查是否安装好 nvcc -V
root@DESKTOP-DJO0FI2:~# nvcc -V
nvcc: NVIDIA (R) Cuda compiler driver
Copyright (c) 2005-2023 NVIDIA Corporation
Built on Fri_Jan__6_16:45:21_PST_2023
Cuda compilation tools, release 12.0, V12.0.140
Build cuda_12.0.r12.0/compiler.32267302_0
nvcc -V有可能还是报没安装CUDA-Toolkit,先去/usr/local/cuda/bin看一眼有没有nvcc的可执行文件,如果有的话打开vi ~/.bashrc,把cuda的bin目录加到PATH,也就是把下面这行加到.bashrc中。
export PATH=$PATH:/usr/local/cuda/bin
这个没有验证,先留着备用
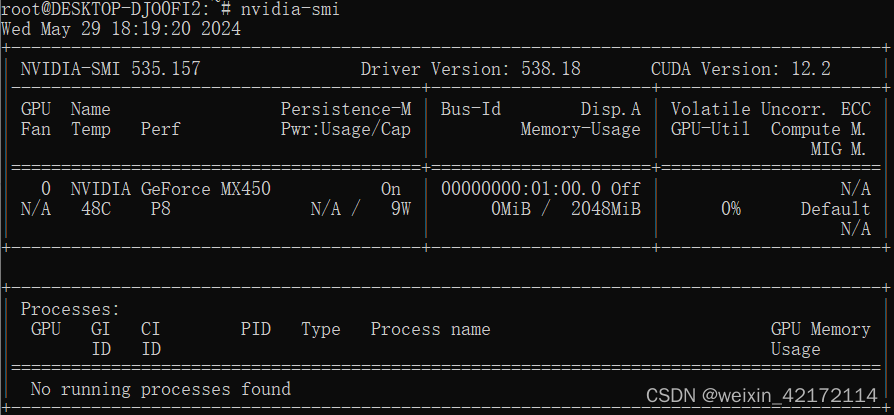
4-检查nvidia-smi
nvidia-smi
Wed May 29 14:38:55 2024
+---------------------------------------------------------------------------------------+
| NVIDIA-SMI 535.157                Driver Version: 538.18       CUDA Version: 12.2     |
|-----------------------------------------+----------------------+----------------------+
| GPU  Name                 Persistence-M | Bus-Id        Disp.A | Volatile Uncorr. ECC |
| Fan  Temp   Perf          Pwr:Usage/Cap |         Memory-Usage | GPU-Util  Compute M. |
|                                         |                      |               MIG M. |
|=========================================+======================+======================|
|   0  NVIDIA GeForce MX450           On  | 00000000:01:00.0 Off |                  N/A |
| N/A   51C    P8              N/A /   9W |     18MiB /  2048MiB |      0%      Default |
|                                         |                      |                  N/A |
+-----------------------------------------+----------------------+----------------------+

+---------------------------------------------------------------------------------------+
| Processes:                                                                            |
|  GPU   GI   CI        PID   Type   Process name                            GPU Memory |
|        ID   ID                                                             Usage      |
|=======================================================================================|
|  No running processes found                                                           |
+---------------------------------------------------------------------------------------+
5-装好cuda
直接上CUDA Toolkit,其实CPU版本也不需要,仅试一试
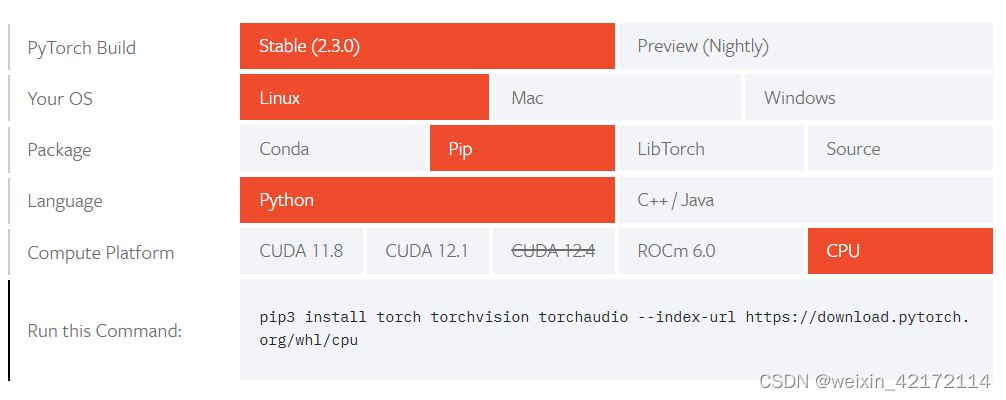
pip3 install torch torchvision torchaudio --index-url https://download.pytorch.org/whl/cpu
用这个就够了
然后验证
To ensure that PyTorch was installed correctly, we can verify the installation by running sample PyTorch code. Here we will construct a randomly initialized tensor.

import torch
x = torch.rand(5, 3)
print(x)
The output should be something similar to:
tensor([[0.3380, 0.3845, 0.3217],
        [0.8337, 0.9050, 0.2650],
        [0.2979, 0.7141, 0.9069],
        [0.1449, 0.1132, 0.1375],
        [0.4675, 0.3947, 0.1426]])
结局
失败抓狂中,需要再尝试!
1-安装conda
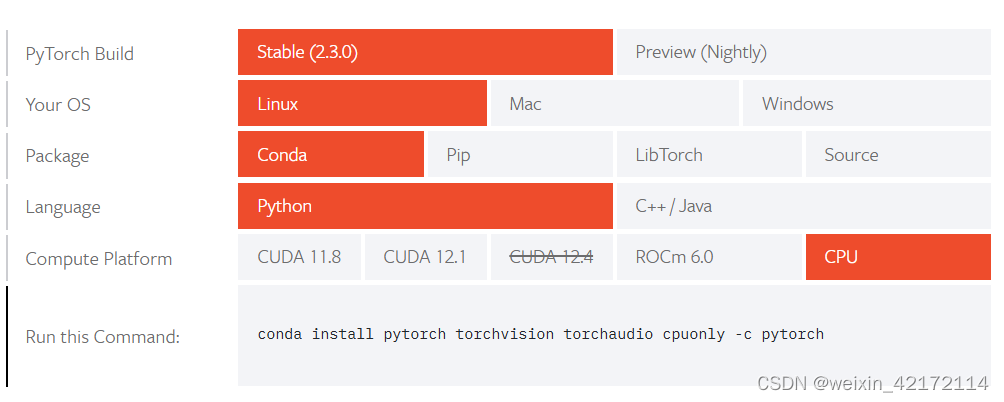
来自pytorch官方链接
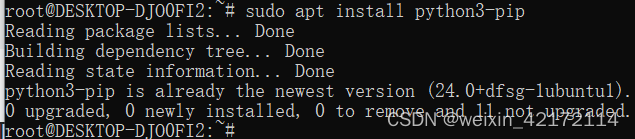
1-1-安装pip3【不好的兆头,因为pip在WSL中好像是不行】
1-2-尝试安装anaconda,来到链接 https://www.anaconda.com/download/success
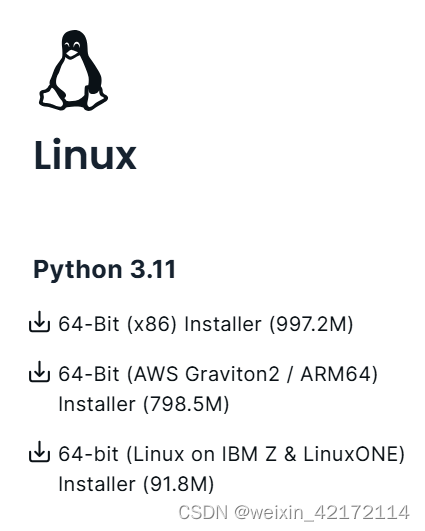
不像是对WSL友好的样子
Anaconda
To install Anaconda, you will use the command-line installer . Right-click on the 64-bit installer link, select Copy Link Location, and then use the following commands:【找不到,准备直接执行下面的命令了。。。】【原来是让我找到链接https://repo.anaconda.com/archive/Anaconda3-2024.02-1-Linux-x86_64.sh通过curl -O下载
然后sh Miniconda3-latest-Linux-x86_64.sh
】
# The version of Anaconda may be different depending on when you are installing`
curl -O https://repo.anaconda.com/miniconda/Miniconda3-latest-Linux-x86_64.sh
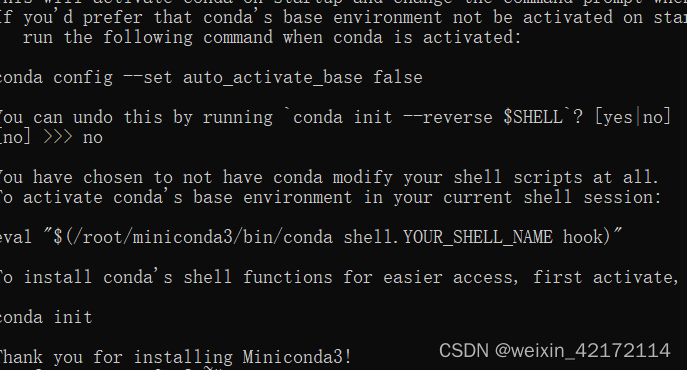
sh Miniconda3-latest-Linux-x86_64.sh
# and follow the prompts. The defaults are generally good.`
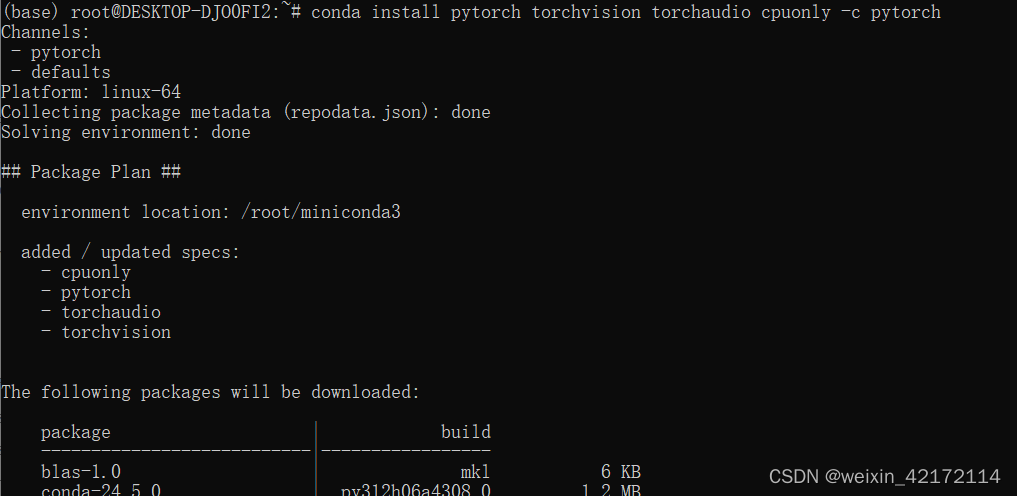
conda install pytorch torchvision torchaudio cpuonly -c pytorch
conda自己都不成功,还得再研究研究
【
Conda:是一个包管理器和环境管理器,可以用于安装和管理软件包和虚拟环境。
Anaconda:是一个基于Conda的数据科学发行版,它包含了Conda、Python以及大量的数据科学相关的软件包。Anaconda适合需要完整数据科学栈的用户。
**Miniconda:是一个轻量级的Anaconda替代品,它只包含Conda、Python和少量必要的软件包。Miniconda适合只需要基础Python环境和Conda管理功能的用户,用户可以根据自己的需要安装其他软件包。**
】
##方法一:设置每次开启终端都会进入conda的base环境
~/miniconda3/bin/conda init bash
~/miniconda3/bin/conda init zsh
conda install pytorch torchvision torchaudio cpuonly -c pytorch
#linux安装,指令来自于miniconda官网,会下载到当前用户的根目录的miniconda文件夹
mkdir -p ~/miniconda3
wget https://repo.anaconda.com/miniconda/Miniconda3-latest-Linux-x86_64.sh -O ~/miniconda3/miniconda.sh
bash ~/miniconda3/miniconda.sh -b -u -p ~/miniconda3
rm -rf ~/miniconda3/miniconda.sh


##运行conda:
##方法一:设置每次开启终端都会进入conda的base环境
~/miniconda3/bin/conda init bash
~/miniconda3/bin/conda init zsh
##2.开启终端运行下行代码进入base,每进入一次都要运行一次下行代码
source /home/w/miniconda3/bin/activate
#通过conda deactivate,退出base环境,返回正常终端


#换源/添加镜像:
#镜像配置1
conda config --add channels https://mirrors.tuna.tsinghua.edu.cn/anaconda/pkgs/free
conda config --add channels https://mirrors.tuna.tsinghua.edu.cn/anaconda/cloud/conda-forge
conda config --add channels https://mirrors.tuna.tsinghua.edu.cn/anaconda/cloud/bioconda
#镜像配置2
conda config --add channels https://mirrors.tuna.tsinghua.edu.cn/anaconda/pkgs/free/
conda config --add channels https://mirrors.tuna.tsinghua.edu.cn/anaconda/pkgs/main/
conda config --add channels https://mirrors.ustc.edu.cn/anaconda/pkgs/free/
#其他:
conda config --remove channels 'https://mirrors.tuna.tsinghua.edu.cn/anaconda/pkgs/free/'#删除镜像
conda config --set show_channel_urls yes #设置搜索时显示channels地址
conda config --show-sources  #查看源的配置


conda --version/-V #版本
conda --help/-h #帮助


##环境
##创建conda环境
conda create --name your_env_name
conda create --name your_env_name python=3
conda create --name your_env_name python=3.9
conda create --name your_env_name numpy scipy ##创建环境,顺便安装几个包
conda create --name your_env_name python=3.5 numpy scipy
conda create --name new_env_name --clone old_env_name
conda env export > environment.yml #分享环境
conda env create -f environment.yml #使用分享环境
##删除环境
conda remove -n/--name your_env_name --all
#进入/退出环境
conda activate your_env_name
conda deactivate  #其他环境->base->退到原始终端
conda env list#查看所有环境


##包
##安装包
conda install package_name #在当前环境中安装包
conda install -n/--name env_name package_name #在指定环境中安装包
conda install  tensorflow=1.8.0 python=3.6
conda install -c https://conda.anaconda.org/anaconda tensorflow=1.8.0
conda create --name/-n your_env_name numpy scipy ##创建环境,顺便安装几个包
##删除包
conda remove -n/--name env_name package #删除指定环境中的包
conda remove package #删除当前环境中的包
##更新包
conda update -n 虚拟机名称  安装包名称
conda update package_name #更新指定的包
conda list #查看所有已经安装的包
conda list -n your_env_name #查看当前环境已安装的包
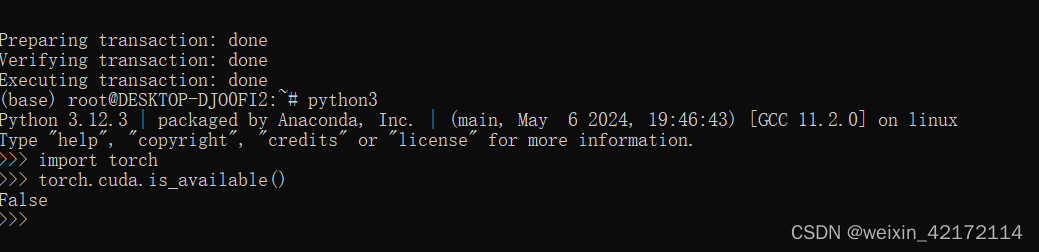
测试是否GPU版本,如果是的话会返回TRUE
import torch
torch.cuda.is_available()
OK,let’s call it a day!
------------abandon--------------
居然又回到了对anaconda的依赖上,走了很久又绕回来了,所以这部分暂时用不上
直接搬运:
cudnn下载:cudnn链接
安装时下载的小tips
在WSL2中的Ubuntu 20.04系统上,已经安装了CUDA 12.1的情况下,你应该选择与你的系统架构和操作系统版本相匹配的cuDNN版本进行安装。基于你提供的信息,有几个关键点需要考虑:

操作系统版本:你正在使用Ubuntu 20.04。
CUDA版本:已安装的是CUDA 12.1。
系统架构:WSL2通常模拟的是x86_64架构,除非你明确知道你在使用基于ARM的处理器并通过某种方式在WSL2上运行ARM架构的Linux。
鉴于以上信息,你应该选择与Ubuntu 20.04和x86_64架构相匹配的cuDNN安装程序:
Local Installer for Ubuntu20.04 x86_64 (Deb)
这个版本是专为Ubuntu 20.04系统设计的,并且是针对x86_64架构的,这应该与大多数通过WSL2运行的系统兼容。使用.deb包格式意味着安装过程将会非常简单,只需几个命令就可以完成。
安装这个版本的具体步骤通常包括下载.deb文件,然后使用dpkg命令安装,类似于之前解释的cuDNN安装步骤。确认下载的cuDNN版本与你的CUDA 12.1版本兼容非常重要,所以请参考NVIDIA官方文档来获取这些信息。
具体安装步骤
下载cudnn,将下载好的cudnn移动到wsl2中的 linux 系统文件目录,我的目录是\\wsl.localhost\Ubuntu-20.04\home\amos\my_folder;
转到上述目录中,并输入:sudo dpkg -i cudnn-local-repo-ubuntu2004-8.9.7.29_1.0-1_amd64.deb
amos@DESKTOP-K2UHV5L:~/my_folder$ sudo dpkg -i cudnn-local-repo-ubuntu2004-8.9.7.29_1.0-1_amd64.deb
出现问题:
[sudo] password for amos:
Selecting previously unselected package cudnn-local-repo-ubuntu2004-8.9.7.29.
(Reading database ... 106617 files and directories currently installed.)
Preparing to unpack cudnn-local-repo-ubuntu2004-8.9.7.29_1.0-1_amd64.deb ...
Unpacking cudnn-local-repo-ubuntu2004-8.9.7.29 (1.0-1) ...
Setting up cudnn-local-repo-ubuntu2004-8.9.7.29 (1.0-1) ...

The public cudnn-local-repo-ubuntu2004-8.9.7.29 GPG key does not appear to be installed.
To install the key, run this command:
sudo cp /var/cudnn-local-repo-ubuntu2004-8.9.7.29/cudnn-local-30472A84-keyring.gpg >/usr/share/keyrings/
按上述要求输入
sudo cp /var/cudnn-local-repo-ubuntu2004-8.9.7.29/cudnn-local-30472A84-keyring.gpg /usr/share/keyrings/
最终安装完成:
amos@DESKTOP-K2UHV5L:~/my_folder$ sudo dpkg -i cudnn-local-repo-ubuntu2004-8.9.7.29_1.0-1_amd64.deb
(Reading database ... 106633 files and directories currently installed.)
Preparing to unpack cudnn-local-repo-ubuntu2004-8.9.7.29_1.0-1_amd64.deb ...
Unpacking cudnn-local-repo-ubuntu2004-8.9.7.29 (1.0-1) over (1.0-1) ...
Setting up cudnn-local-repo-ubuntu2004-8.9.7.29 (1.0-1) ...
检查cudnn是否安装成功
tar -xvf cudnn-linux-x86_64-8.4.1.50_cuda11.6-archive.tar.xz

sudo cp cudnn-*-archive/include/cudnn*.h /usr/local/cuda/include
sudo cp -P cudnn-*-archive/lib/libcudnn* /usr/local/cuda/lib64
sudo chmod a+r /usr/local/cuda/include/cudnn*.h /usr/local/cuda/lib64/libcudnn*
- WSL2中安装anconda3
4.1 在vscode中安装WSL
安装WSL插件,在扩展中搜索WSL,选择安装即可
连接至WSL2:
1.使用快捷键 ctrl+ p,再输入>,即可看到connect to WSL点击即可
如上显示即说明激活正确
4.2 Anconda开发环境的搭建
换源,修改Linux apt下载地址,以加快各种Linux下载速度,避免下载安装失败。在终端中输入并执行(第一次sudo需要输入用户密码)
sudo chmod 777 /etc/apt/sources.list # 提权,方便直接使用vscode编辑文件
然后在左侧文件目录中找到并打开/etc/apt/source.list,将里面的文本替换为
#默认注释了源码仓库,如有需要可自行取消注释
deb https://mirrors.ustc.edu.cn/ubuntu/ focal main restricted universe multiverse
deb-src https://mirrors.ustc.edu.cn/ubuntu/ focal main restricted universe multiverse
deb https://mirrors.ustc.edu.cn/ubuntu/ focal-security main restricted universe multiverse
# deb-src https://mirrors.ustc.edu.cn/ubuntu/ focal-security main restricted universe multiverse
deb https://mirrors.ustc.edu.cn/ubuntu/ focal-updates main restricted universe multiverse
# deb-src https://mirrors.ustc.edu.cn/ubuntu/ focal-updates main restricted universe multiverse
deb https://mirrors.ustc.edu.cn/ubuntu/ focal-backports main restricted universe multiverse
# deb-src https://mirrors.ustc.edu.cn/ubuntu/ focal-backports main restricted universe multiverse
# 预发布软件源,不建议启用
# deb https://mirrors.ustc.edu.cn/ubuntu/ focal-proposed main restricted universe multiverse
# deb-src https://mirrors.ustc.edu.cn/ubuntu/ focal-proposed main restricted universe multiverse
Ctrl+S保存即可。
3. 然后打开新的终端在终端中输入sudo apt update进行更新,等待更新完成.。
sudo apt update # apt更新
4. 下载anaconda安装包,这里可以登录https://repo.anaconda.com/archive/网站查找要下载的版本,选择Linux-x86_64.sh结尾的。
wget -P /tmp https://repo.anaconda.com/archive/Anaconda3-2022.05-Linux-x86_64.sh # 下载anaconda安装包至 /tmp 目录下
1
5.安装anconda3
bash /tmp/Anaconda3-2022.05-Linux-x86_64.sh # 安装anaconda
1
安装过程中会出现yes和ENTER
比如:
Anaconda3 will now be installed into this location:
/home/amos/anaconda3
- Press ENTER to confirm the location
- Press CTRL-C to abort the installation
- Or specify a different location below
此时应该输入ENTER
此时安装完成,没有则输入source /home/amos/anaconda3/bin/activate即完成anconda安装
4.3 pytorch的安装
为了保证安装的正常下载,最好换源操作:
conda、pip换源,加快各种依赖包的下载安装速度
conda config --add channels https://mirrors.bfsu.edu.cn/anaconda/pkgs/main
# 添加conda下载源,目的是它自动生成的一个配置文件
执行完之后刷新左侧的资源管理器,可以在用户文件夹/home/<用户名>/下找到.condarc文件,替换成以下内容保存即可。
channels:
 - defaults
show_channel_urls: true
default_channels:
 - https://mirrors.bfsu.edu.cn/anaconda/pkgs/main
 - https://mirrors.bfsu.edu.cn/anaconda/pkgs/r
 - https://mirrors.bfsu.edu.cn/anaconda/pkgs/msys2
custom_channels:
  conda-forge: https://mirrors.bfsu.edu.cn/anaconda/cloud
  msys2: https://mirrors.bfsu.edu.cn/anaconda/cloud
  bioconda: https://mirrors.bfsu.edu.cn/anaconda/cloud
  menpo: https://mirrors.bfsu.edu.cn/anaconda/cloud
  pytorch: https://mirrors.bfsu.edu.cn/anaconda/cloud
  pytorch-lts: https://mirrors.bfsu.edu.cn/anaconda/cloud
  simpleitk: https://mirrors.bfsu.edu.cn/anaconda/cloud
更换下载源:
pip config set global.index-url https://pypi.mirrors.ustc.edu.cn/simple # 修改pip下载源
创建一个环境
conda create -n d2l python=3.9
6.再pytorch中下载linux适配的版本
CUDA 11.8
pip install torch==2.1.1 torchvision==0.16.1 torchaudio==2.1.1 --index-url https://download.pytorch.org/whl/cu118
7.安装完成,在该环境下检查安装是否成功
输入.py文件:
import torch
print(torch.__version__)
print(torch.cuda.is_available())
输出:
(pytorch_2.1.1_llm) (base) amos@DESKTOP-OR1VC42:~$ /home/amos/anaconda3/envs/pytorch_2.1.1_llm/bin/python /home/amos/test.py
2.1.1
True
参考:https://blog.csdn.net/wm199/article/details/136330597


 121
121


 被折叠的 条评论
为什么被折叠?
被折叠的 条评论
为什么被折叠?
 到【灌水乐园】发言


