


使用vscode,在git上获取fastBEV代码
在readme中找到安装依赖:
Installation
- CUDA>=9.2【这个正常是依赖NVIDIA驱动的,似乎没有NVIDIAGPU,安装驱动后也能部署CPU版本】
- GCC>=5.4
- Python>=3.6【选择在conda下安装】
- Pytorch>=1.8.1
- Torchvision>=0.9.1
- MMCV-full==1.4.0【上一个官网链接,官网这个门太难找了。。。中文网站比英文网站用起来都不好懂。。。
- 安装mmcv-full涉及多个步骤,包括检查CUDA和PyTorch版本、选择合适的mmcv-full版本、使用pip安装以及可能的编译安装。以下是一些具体的步骤和注意事项:①检查CUDA和PyTorch版本:在安装mmcv-full之前,首先需要确定本地CUDA的版本和已安装的PyTorch版本。这些信息将用于在官方网站上找到对应的mmcv-full版本。②选择合适的mmcv-full版本:访问OpenMMLab的官方网站,根据CUDA版本和PyTorch版本来选择合适的mmcv-full版本。例如,如果CUDA版本是116,PyTorch版本是1.12,那么应该选择与这些版本匹配的mmcv-full版本】【https://openmmlab.com/】
- MMDetection==2.14.0【MMDetection:pip install mmdet】
- MMSegmentation==0.14.1
【conda环境创建】→【cuda】→【pytorch&torchvision】→【MMCV】
conda info --envs
# 克隆并重命名为新环境
conda create --name new_env_name --clone old_env_name

# 删除旧环境
conda remove --name old_env_name --all
请将old_env_name替换为你的旧环境名,将new_env_name替换为你想要的新环境名。
fastBEV开源做的很好,该有的东西都有,按照步骤操作
网络使用的是resNET
【查看有没有GPU,或者GPU型号,如果不是英伟达的GPU,安装CUDA也有点问题】
【CUDA不是最新最好,要conda search cudatoolkit 查一下自己的conda支持哪个、还有ubuntu版本(这个在网页上选择时候会提示)】
没有GPU的电脑lspci | grep VGA
00:02.0 VGA compatible controller: Intel Corporation Device 9b41 (rev 02)
如果有英伟达的GPU,则nvidia-smi
首先安装cuda,链接:https://developer.nvidia.com/cuda-toolkit-archive
 使用lscpu查看CPU架构
架构:           x86_64
CPU 运行模式:   32-bit, 64-bit
字节序:         Little Endian
CPU:             8
在线 CPU 列表:  0-7
每个核的线程数: 2
每个座的核数:   4
座:             1
NUMA 节点:      1
厂商 ID:        GenuineIntel
CPU 系列:       6
型号:           142
型号名称:       Intel(R) Core(TM) i5-10210U CPU @ 1.60GHz
这个版本支持的ubuntu也是最新的22.**,我的是【使用命令lsb_release -a】
(pytorch1.6) wayne@wayne-ThinkPad-X1-Carbon-Gen-8:~$ lsb_release -a
No LSB modules are available.
Distributor ID:	Ubuntu
Description:	Ubuntu 18.04.6 LTS
Release:	18.04
Codename:	bionic
WSL的ubuntu版本是24【cuda9.2版本是这种安装形式】
支持版本【conda search cudatoolkit】
cudatoolkit                      9.0      h13b8566_0  pkgs/main
cudatoolkit                      9.2               0  pkgs/main
cudatoolkit                 10.0.130               0  pkgs/main
cudatoolkit                 10.1.168               0  pkgs/main
cudatoolkit                 10.1.243      h6bb024c_0  pkgs/main
cudatoolkit                  10.2.89      hfd86e86_0  pkgs/main
cudatoolkit                  10.2.89      hfd86e86_1  pkgs/main
cudatoolkit                 11.0.221      h6bb024c_0  pkgs/main
cudatoolkit                   11.3.1      h2bc3f7f_2  pkgs/main
cudatoolkit                   11.8.0      h6a678d5_0  pkgs/main
安装方式
wget https://developer.download.nvidia.com/compute/cuda/repos/wsl-ubuntu/x86_64/cuda-wsl-ubuntu.pin
sudo mv cuda-wsl-ubuntu.pin /etc/apt/preferences.d/cuda-repository-pin-600
wget https://developer.download.nvidia.com/compute/cuda/11.8.0/local_installers/cuda-repo-wsl-ubuntu-11-8-local_11.8.0-1_amd64.deb
sudo dpkg -i cuda-repo-wsl-ubuntu-11-8-local_11.8.0-1_amd64.deb
sudo cp /var/cuda-repo-wsl-ubuntu-11-8-local/cuda-*-keyring.gpg /usr/share/keyrings/
sudo apt-get update
sudo apt-get -y install cuda
【The following packages have unmet dependencies:
nsight-systems-2023.1.2 : Depends: libtinfo5 but it is not installable】
解决方案:

1.打开镜像源文件,并修改。
sudo vim /etc/apt/sources.list.d/ubuntu.sources
2.向sources文件中添加如下内容:
Types: deb
URIs: http://archive.ubuntu.com/ubuntu/
Suites: lunar
Components: universe
Signed-By: /usr/share/keyrings/ubuntu-archive-keyring.gpg
3.更新
sudo apt-get update
4.重新安装cuda
 sudo apt install cuda -y
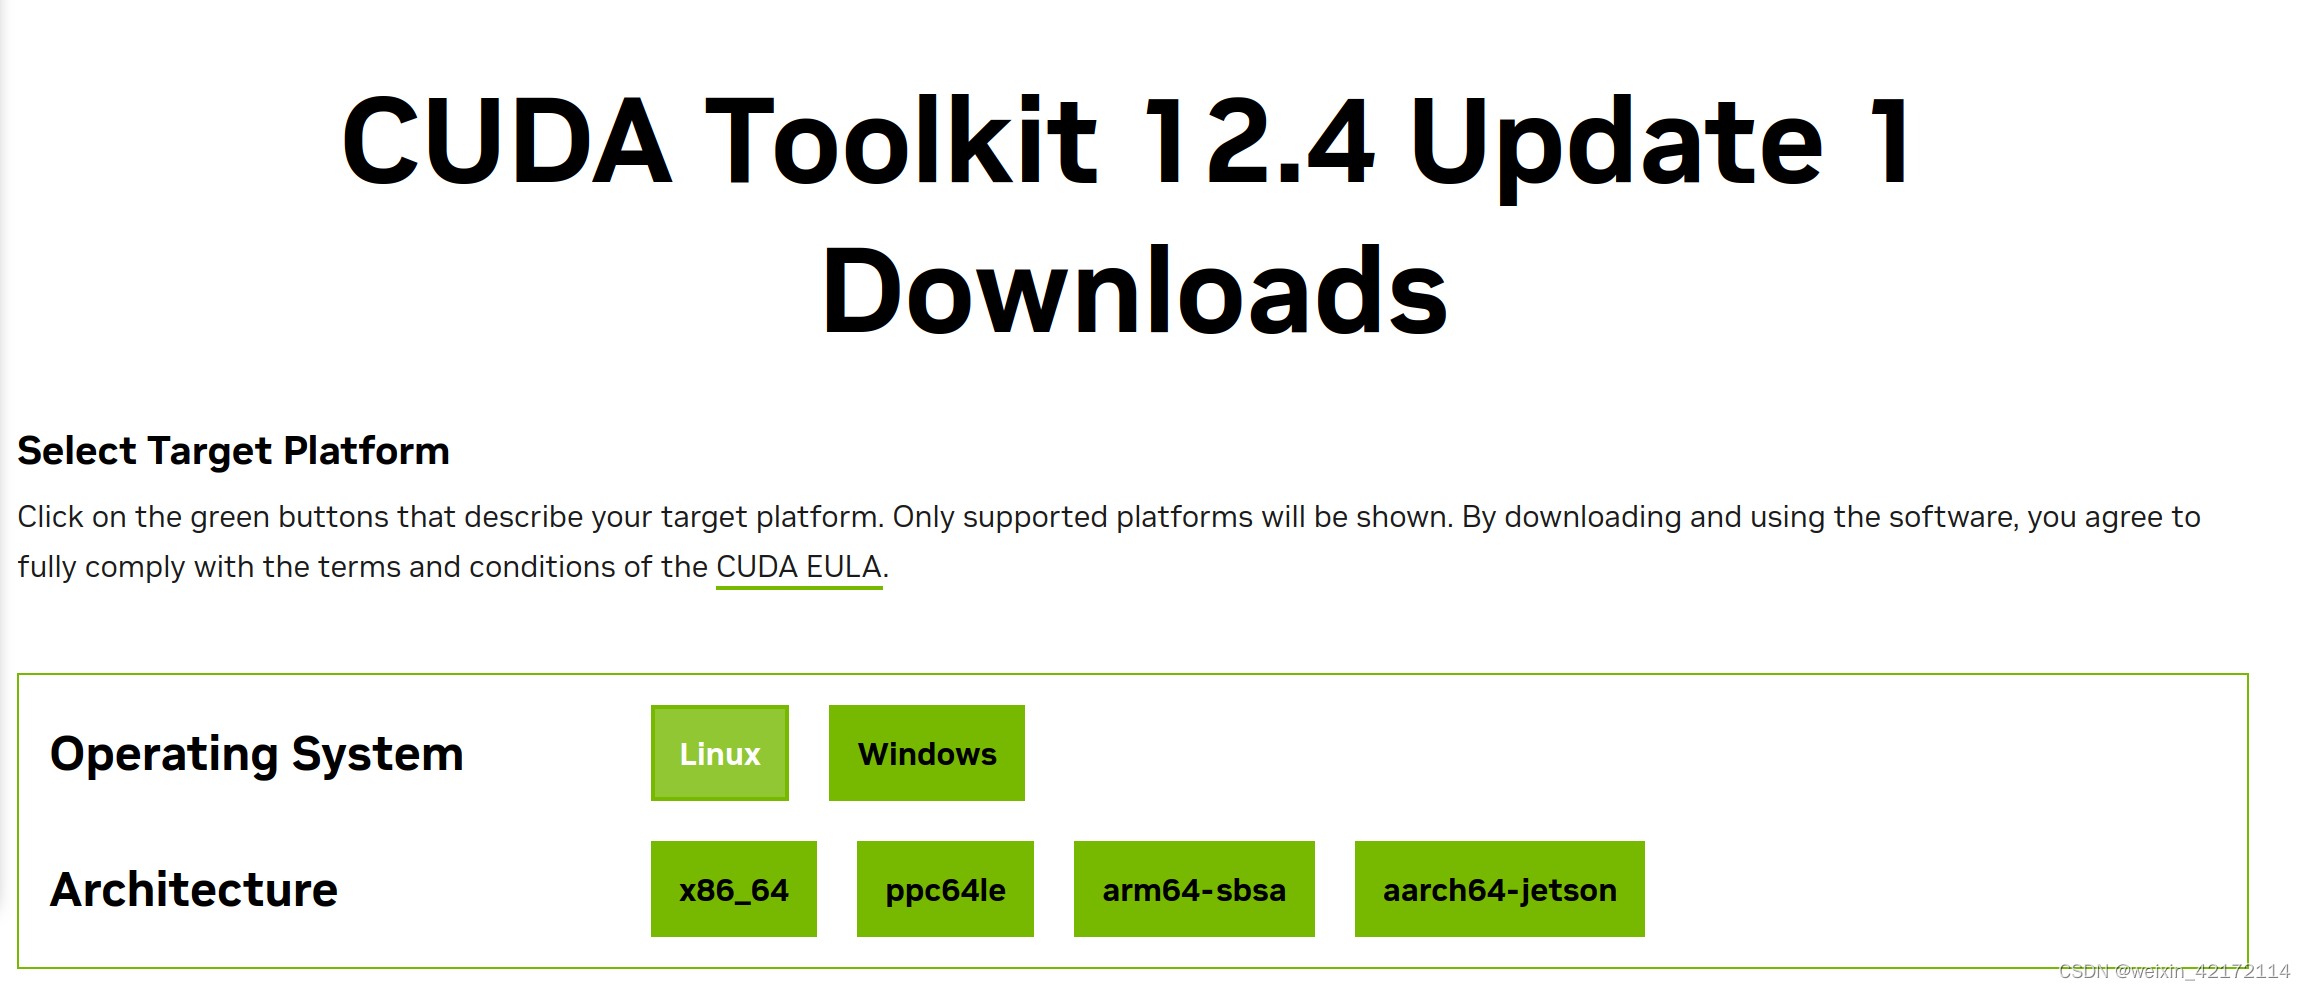
【这部分失败了,不用看了】使用这个版本:CUDA Toolkit 12.1 Update 1 Downloads
 选择后,方式如下:
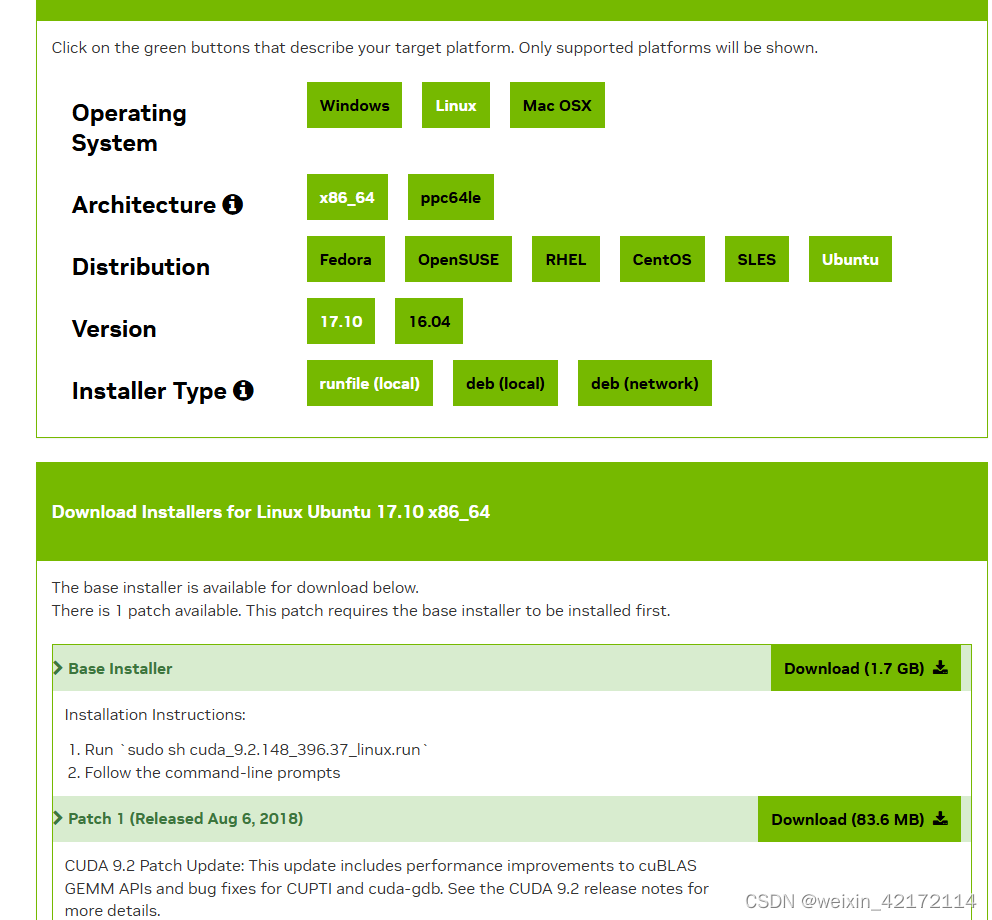
Download Installer for Linux Ubuntu 18.04 x86_64
The base installer is available for download below.

Base Installer
Installation Instructions:

$wget https://developer.download.nvidia.com/compute/cuda/repos/ubuntu1804/x86_64/cuda-ubuntu1804.pin
$sudo mv cuda-ubuntu1804.pin /etc/apt/preferences.d/cuda-repository-pin-600
$wget https://developer.download.nvidia.com/compute/cuda/12.1.1/local_installers/cuda-repo-ubuntu1804-12-1-local_12.1.1-530.30.02-1_amd64.deb
$sudo dpkg -i cuda-repo-ubuntu1804-12-1-local_12.1.1-530.30.02-1_amd64.deb
$sudo cp /var/cuda-repo-ubuntu1804-12-1-local/cuda-*-keyring.gpg /usr/share/keyrings/
$sudo apt-get update
$sudo apt-get -y install cuda
检查CUDA是否安装正确
cat /usr/local/cuda/version.txt
或者【前提是配置好环境变量后】
nvcc --version
如果安装正确,则会输出CUDA的版本信息
配置cuda环境变量:终端输入:
gedit ~/.bashrc
即可打开.bashrc文件。设置环境变量如下:
export LD_LIBRARY_PATH=$LD_LIBRARY_PATH:/usr/local/cuda-9.2/lib64
export PATH=$PATH:/usr/local/cuda-9.2/bin
export CUDA_HOME=$CUDA_HOME:/usr/local/cuda-9.2
刷新环境变量source ~/.bashrc
检验安装,输入nvcc --version:
bruce@bruce-desktop:~$ nvcc --version
nvcc: NVIDIA (R) Cuda compiler driver
Copyright (c) 2005-2018 NVIDIA Corporation
Built on Tue_Jun_12_23:07:04_CDT_2018
Cuda compilation tools, release 9.2, V9.2.148
-------------等待过程中,先安装别的----------------------
检查gcc -v
gcc version 7.5.0 (Ubuntu 7.5.0-3ubuntu1~18.04)
check!!!
在我的wsl中:gcc version 13.2.0 (Ubuntu 13.2.0-23ubuntu4)
检查python -V
Python 3.8.19
check!!!
在我的wsl中:Python 3.12.4
但是pytorch版本1.6,需要重新安装了,我用的是conda
conda create -n myenv python=3.8
conda activate myenv
然后
conda install pytorch=<PyTorch版本号> torchvision torchaudio torchtext -c pytorch
conda search cudatoolkit
查看能安装哪个版本?
【要降版本安装了】
Loading channels: done
# Name                       Version           Build  Channel
cudatoolkit                      7.5               0  anaconda/pkgs/free
cudatoolkit                      7.5               2  anaconda/pkgs/free
cudatoolkit                      8.0               1  anaconda/pkgs/free
cudatoolkit                      8.0               3  anaconda/pkgs/free
cudatoolkit                      9.0      h13b8566_0  anaconda/pkgs/main
cudatoolkit                      9.0      h13b8566_0  pkgs/main
cudatoolkit                      9.2               0  anaconda/pkgs/main
cudatoolkit                      9.2               0  pkgs/main
cudatoolkit                 10.0.130               0  anaconda/pkgs/main
cudatoolkit                 10.0.130               0  pkgs/main
cudatoolkit                 10.1.168               0  anaconda/pkgs/main
cudatoolkit                 10.1.168               0  pkgs/main
cudatoolkit                 10.1.243      h6bb024c_0  anaconda/pkgs/main
cudatoolkit                 10.1.243      h6bb024c_0  pkgs/main
cudatoolkit                  10.2.89      hfd86e86_0  anaconda/pkgs/main
cudatoolkit                  10.2.89      hfd86e86_0  pkgs/main
cudatoolkit                  10.2.89      hfd86e86_1  anaconda/pkgs/main
cudatoolkit                  10.2.89      hfd86e86_1  pkgs/main
cudatoolkit                 11.0.221      h6bb024c_0  anaconda/pkgs/main
cudatoolkit                 11.0.221      h6bb024c_0  pkgs/main
cudatoolkit                   11.3.1      h2bc3f7f_2  anaconda/pkgs/main
cudatoolkit                   11.3.1      h2bc3f7f_2  pkgs/main
cudatoolkit                   11.8.0      h6a678d5_0  anaconda/pkgs/main
cudatoolkit                   11.8.0      h6a678d5_0  pkgs/main
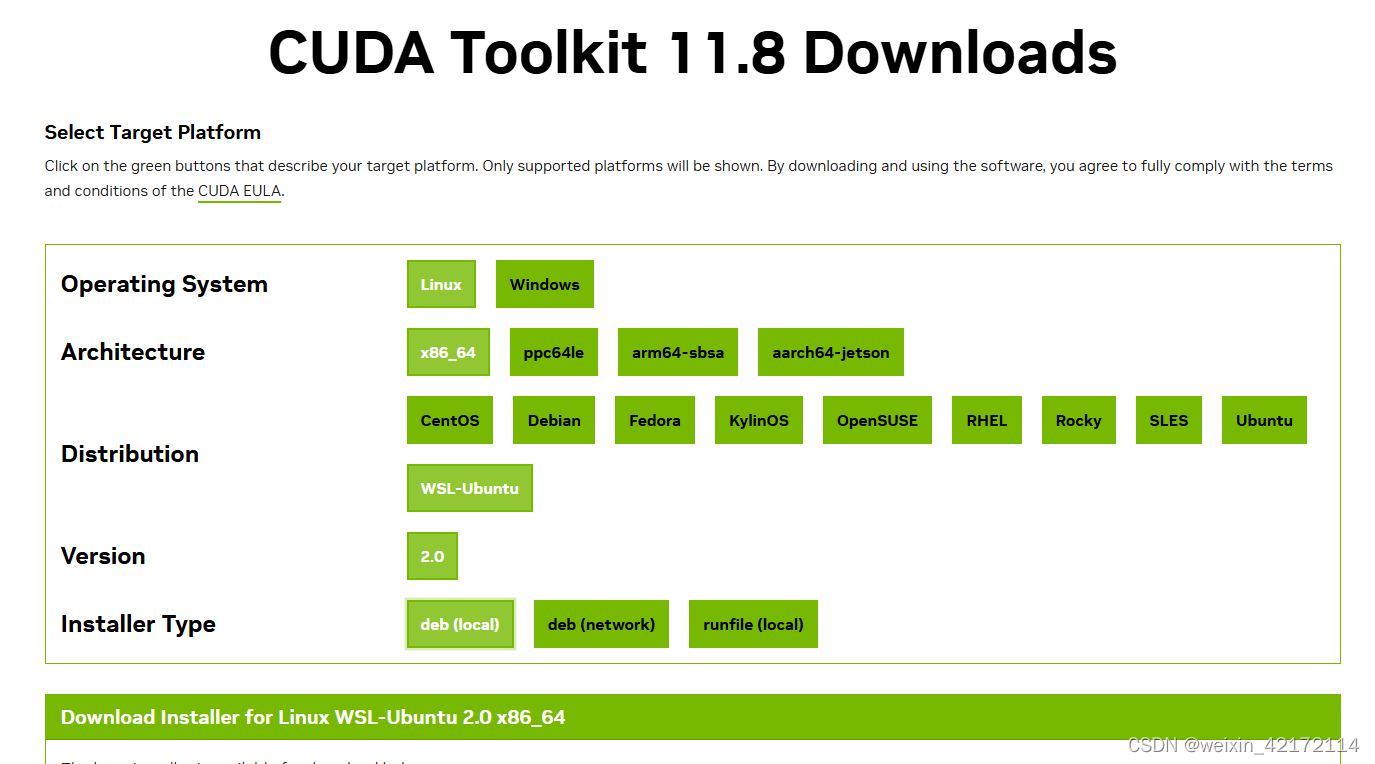
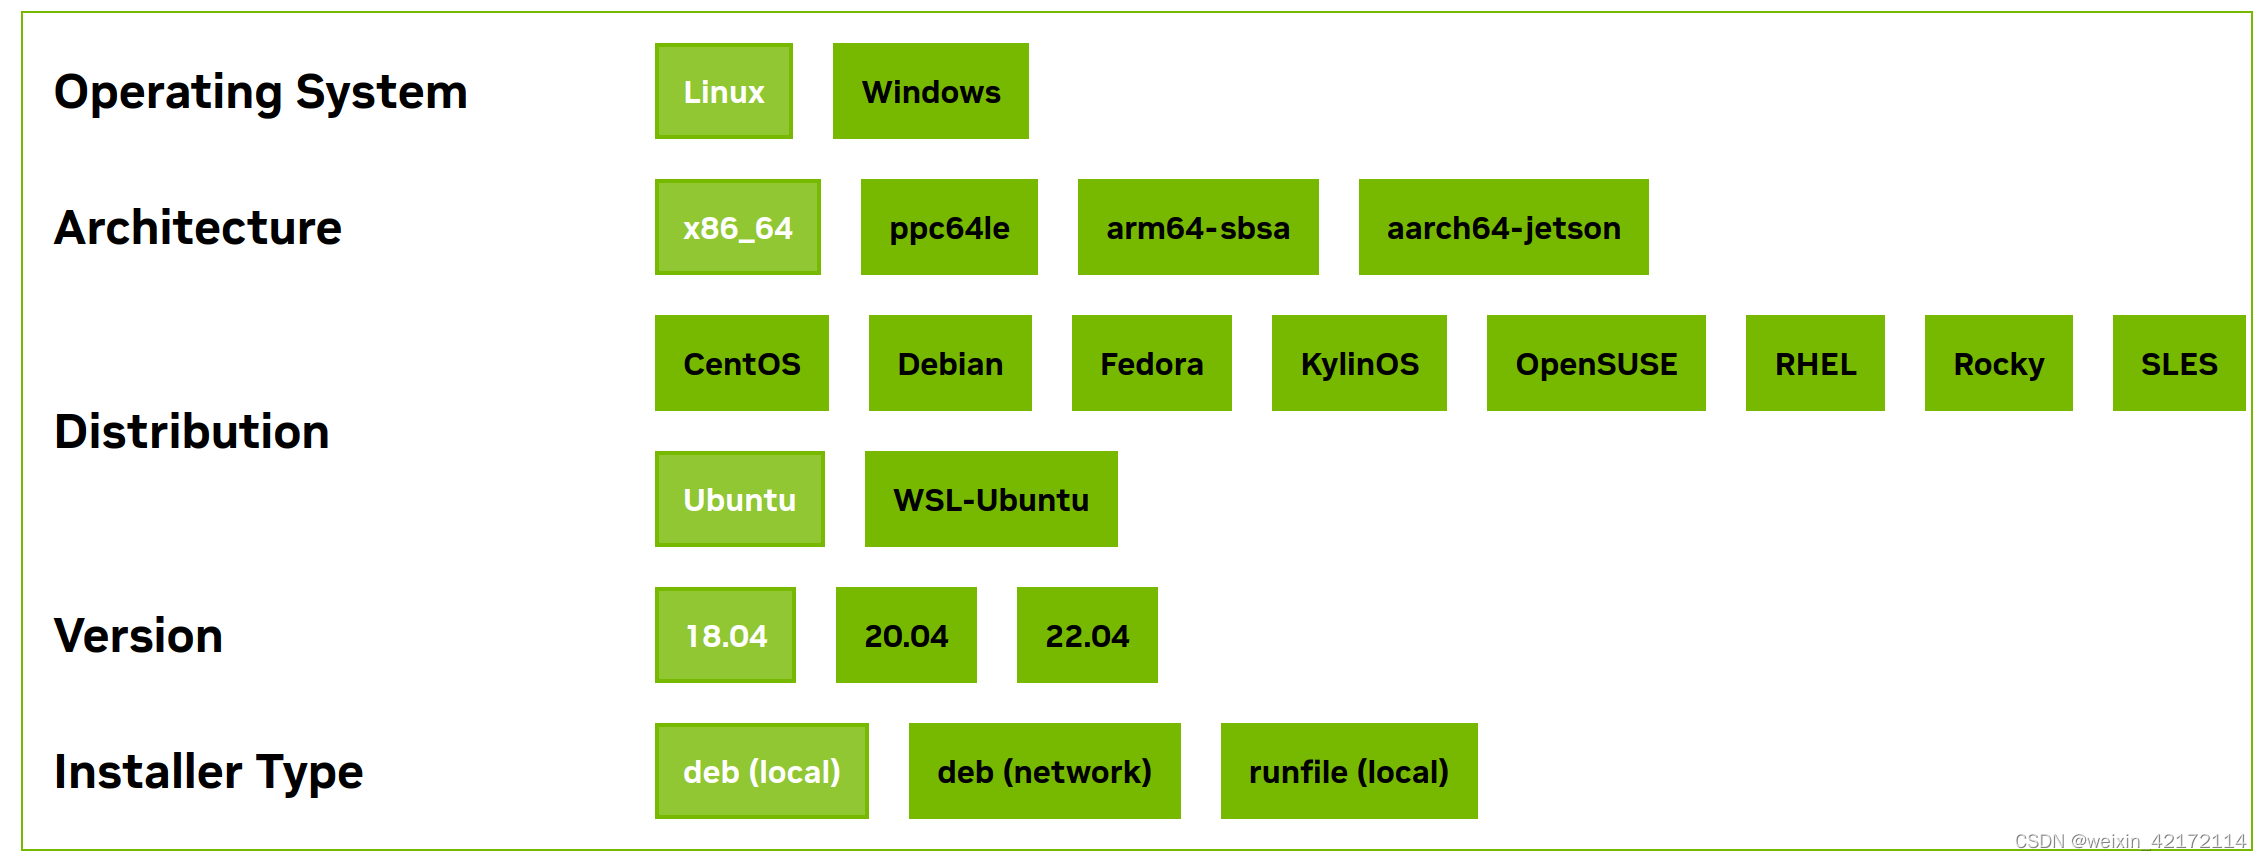
【CUDA Toolkit 11.8 Downloads】
$ wget https://developer.download.nvidia.com/compute/cuda/repos/ubuntu1804/x86_64/cuda-ubuntu1804.pin
$ sudo mv cuda-ubuntu1804.pin /etc/apt/preferences.d/cuda-repository-pin-600
$ wget https://developer.download.nvidia.com/compute/cuda/11.8.0/local_installers/cuda-repo-ubuntu1804-11-8-local_11.8.0-520.61.05-1_amd64.deb
$ sudo dpkg -i cuda-repo-ubuntu1804-11-8-local_11.8.0-520.61.05-1_amd64.deb
$ sudo cp /var/cuda-repo-ubuntu1804-11-8-local/cuda-*-keyring.gpg /usr/share/keyrings/
$ sudo apt-get update
$ sudo apt-get -y install cuda
在WSL中安装成功
nvcc --version
nvcc: NVIDIA (R) Cuda compiler driver
Copyright (c) 2005-2023 NVIDIA Corporation
Built on Fri_Jan__6_16:45:21_PST_2023
Cuda compilation tools, release 12.0, V12.0.140
Build cuda_12.0.r12.0/compiler.32267302_0
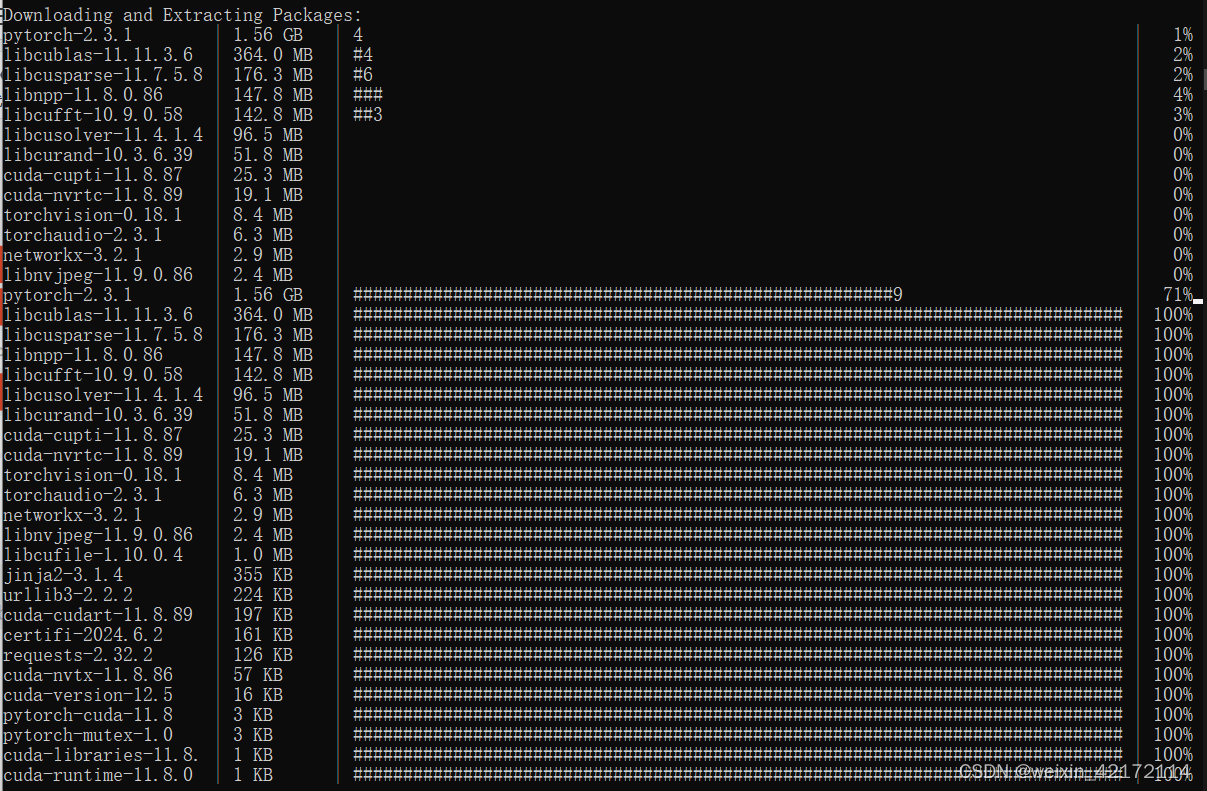
第二步:conda下安装pytorch
https://pytorch.org/
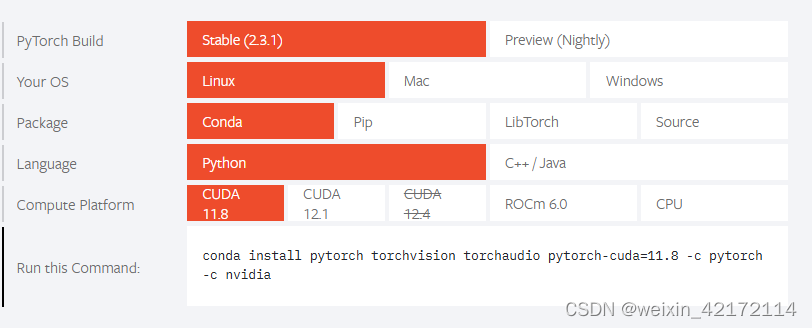
pytorch的安装过程
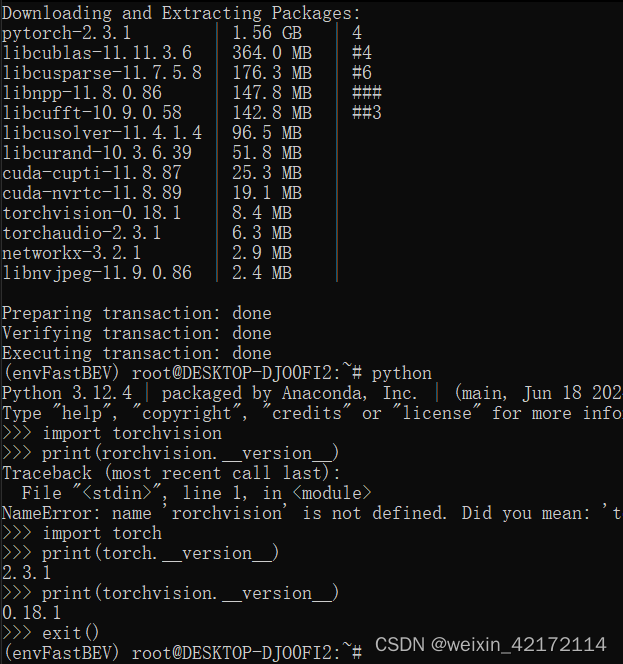
看里面是已经有了torchvision0.18.1,版本也满足【Torchvision>=0.9.1】
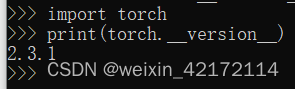
验证安装
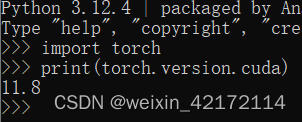
【python -c ‘import torch;print(torch.version)’】这种方式可以不用打开python编辑界面
import torch
import torchvision
print(torch.__version__)
print(torchvision.__version__)
使用 MIM 安装 MMCV[【参考】
pip install -U openmim

Collecting opendatalab (from openmim)
  WARNING: Retrying (Retry(total=4, connect=None, read=None, redirect=None, status=None)) after connection broken by 'ReadTimeoutError("HTTPSConnectionPool(host='files.pythonhosted.org', port=443): Read timed out. (read timeout=15)")': /packages/10/82/28fa3a91b7c4852fbad9ad32c7b49e4b1e212ab7ccf7296736da0935070d/opendatalab-0.0.10-py3-none-any.whl.metadata
  WARNING: Retrying (Retry(total=3, connect=None, read=None, redirect=None, status=None)) after connection broken by 'ProtocolError('Connection aborted.', ConnectionResetError(104, 'Connection reset by peer'))': /packages/10/82/28fa3a91b7c4852fbad9ad32c7b49e4b1e212ab7ccf7296736da0935070d/opendatalab-0.0.10-py3-none-any.whl.metadata


mim install mmcv-full【失败了,很惨烈】
换一种方式
pip install mmcv-full -f https://download.openmmlab.com/mmcv/dist/{cu_version}/{torch_version}/index.html

找到自己对应的版本
pip install mmcv-full==1.3.9 -f https://download.openmmlab.com/mmcv/dist/cu118/torch2.3.0/index.html
替换cuda版本和torch版本
git clone https://github.com/open-mmlab/mmdetection.git
cd mmdetection
pip install -v -e .
# "-v" 指详细说明,或更多的输出
# "-e" 表示在可编辑模式下安装项目,因此对代码所做的任何本地修改都会生效,从而无需重新安装。
【MMCV好多错误,又换了】选择了pip安装:
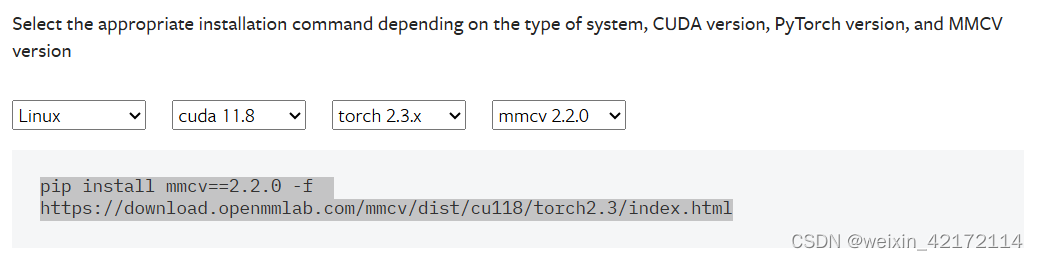
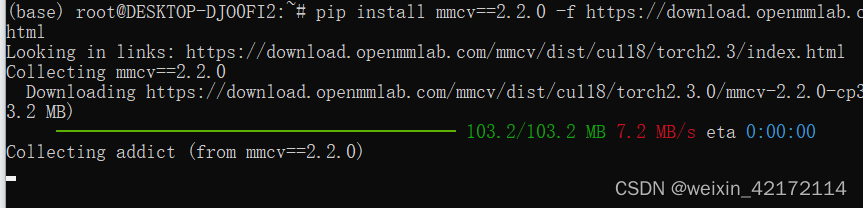
pip install mmcv==2.2.0 -f https://download.openmmlab.com/mmcv/dist/cu118/torch2.3/index.html
If you do not find a corresponding version in the dropdown box above, you probably do not have a pre-built package corresponding to the PyTorch or CUDA or mmcv version, at which point you can build mmcv from source.
-------------------------------------编译MMCV
1-Clone the repo
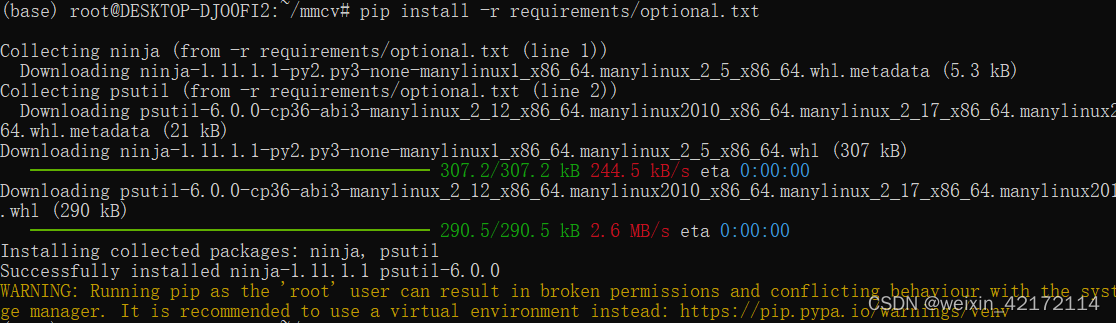
git clone https://github.com/open-mmlab/mmcv.git
cd mmcv
2-Install ninja and psutil to speed up the compilation
pip install -r requirements/optional.txt
3-Check the nvcc version (requires 9.2+. Skip if no GPU available.)
nvcc --version
If the above command outputs the following message, it means that the nvcc setting is OK, otherwise you need to set CUDA_HOME.
	nvcc: NVIDIA (R) Cuda compiler driver
	Copyright (c) 2005-2020 NVIDIA Corporation
	Built on Mon_Nov_30_19:08:53_PST_2020
	Cuda compilation tools, release 11.2, V11.2.67
	Build cuda_11.2.r11.2/compiler.29373293_0
	注解:If you want to support ROCm, you can refer to AMD ROCm to install ROCm.
4-Check the gcc version (requires 5.4+)
gcc --version
5-Start building (takes 10+ min)
pip install -e . -v
6-Validate the installation
python .dev_scripts/check_installation.py
If no error is reported by the above command, the installation is successful. If there is an error reported, please check Frequently Asked Questions to see if there is already a solution.
If no solution is found, please feel free to open an issue.
【又换了一种方式】
打开这个网站,根据自己的cuda和torch版本 https://download.openmmlab.com/mmcv/dist/cu118/torch2.3.0/index.html
Collecting matplotlib (from mmengine>=0.3.0->mmcv==2.2.0)
WARNING: Retrying (Retry(total=4, connect=None, read=None, redirect=None, status=None)) after connection broken by ‘ReadTimeoutError(“HTTPSConnectionPool(host=‘files.pythonhosted.org’, port=443): Read timed out. (read timeout=15)”)’: /packages/cd/ba/412149958e951876096198609b958b90a8a2c9bc07a96eeeaa9e2c480f30/matplotlib-3.8.4-cp312-cp312-manylinux_2_17_x86_64.manylinux2014_x86_64.whl.metadata
Downloading matplotlib-3.8.4-cp312-cp312-manylinux_2_17_x86_64.manylinux2014_x86_64.whl.metadata (5.8 kB)
WARNING: Retrying (Retry(total=4, connect=None, read=None, redirect=None, status=None)) after connection broken by ‘ReadTimeoutError(“HTTPSConnectionPool(host=‘files.pythonhosted.org’, port=443): Read timed out. (read timeout=15)”)’: /packages/c6/66/2a08ecbafb0970f54e79c6a91139d62c7821b9f67eccb204b94412ce344d/matplotlib-3.8.3-cp312-cp312-manylinux_2_17_x86_64.manylinux2014_x86_64.whl.metadata
Downloading matplotlib-3.8.3-cp312-cp312-manylinux_2_17_x86_64.manylinux2014_x86_64.whl.metadata (5.8 kB)
Downloading matplotlib-3.8.2-cp312-cp312-manylinux_2_17_x86_64.manylinux2014_x86_64.whl.metadata (5.8 kB)
Downloading matplotlib-3.8.1-cp312-cp312-manylinux_2_17_x86_64.manylinux2014_x86_64.whl.metadata (5.8 kB)
Downloading matplotlib-3.8.0-cp312-cp312-manylinux_2_17_x86_64.manylinux2014_x86_64.whl.metadata (5.8 kB)
ERROR: Exception:
Traceback (most recent call last):
File “/root/miniconda3/lib/python3.12/site-packages/pip/_vendor/urllib3/response.py”, line 438, in _error_catcher
yield
File “/root/miniconda3/lib/python3.12/site-packages/pip/_vendor/urllib3/response.py”, line 561, in read
data = self._fp_read(amt) if not fp_closed else b""
^^^^^^^^^^^^^^^^^^
File “/root/miniconda3/lib/python3.12/site-packages/pip/_vendor/urllib3/response.py”, line 527, in _fp_read
return self._fp.read(amt) if amt is not None else self._fp.read()
^^^^^^^^^^^^^^^^^^
File “/root/miniconda3/lib/python3.12/site-packages/pip/_vendor/cachecontrol/filewrapper.py”, line 98, in read
data: bytes = self.__fp.read(amt)
如果问题依旧存在,可以尝试手动下载 matplotlib 的.whl文件(如果有适合你系统的版本),然后使用 pip install 本地文件的方式来安装。
示例命令:
pip install --upgrade matplotlib -i https://pypi.tuna.tsinghua.edu.cn/simple
或者设置环境变量:
export PIP_MAX_RETRIES=5
然后正常安装:
pip install mmcv


 442
442

 被折叠的 条评论
为什么被折叠?
被折叠的 条评论
为什么被折叠?
 到【灌水乐园】发言


