


游戏的研发大概有3个月了,都是业余时间边学边做,还是觉得在项目里面实操学得扎实牢靠。
目标平台是手机。。。。(优化后,目前测试的是中高端机型)
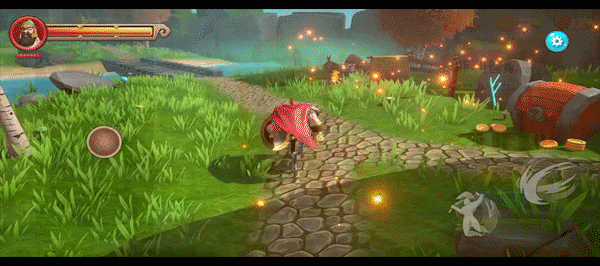
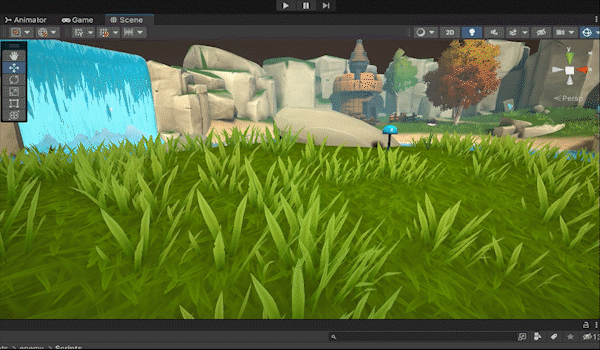
目前是在unity里面实时光的效果打包到手机里的实机画面,后面等完成再优化性能(shader,草的GPU渲染,灯光烘焙等)。整个项目是用的内置渲染管线,shader采用了顶点片元着色器和表面着色器的写法混用。先上GIF动图效果(美术效果由于压缩严重受损!!):


地形:
unity自带的 terrain 有三个问题:1.模型面数极高
2.功能很全面,但是不利于手机平台做定制化的优化
3.种草功能只能基于terrain,不能基于场景模型构建,模拟风效果不 能利用噪声图,摆动动画效果很单一
为了解决这三个问题,我尝试将terrain的部分功能(种草,地形贴图用MASK分层)提取出来,节省性能,风吹草的功能用shader单独调整,种草可以基于场景任意模型的表面(甚至是有斜度的坡面,也能根据法线的方向去智能化生成,完美贴合地形)。
整个地形制作思路:
1.利用unity自带的terrain来刷大型,后续对其面数在DCC软件(Digital Content Creation的缩写, 即数字内容创作)里进行优化减面,展UV。
terrain面数:

减面后的模型面数:


2.因为模型是带有UV的,所以利用Mask贴图和shader就能实现模拟terrain4种不同材质贴图的层级表现:


下面是我自己模拟unity的terrain的一些贴图功能自制的shader,一共有4层贴图,每层有一套包含固有色,法线,粗糙度贴图,NoScaleOffset让贴图的参数不暴露在Inspector面板里,
Shader "Custom/test"
{
    Properties
    {
        _Color ("Grass Color", Color) = (1,1,1,1)
        //草地
        [NoScaleOffset]_MainTex ("Albedo 01", 2D) = "white" {}
        [NoScaleOffset]_Normal01("Normal 01", 2D) = "bump" {}
        _TextureScale01("Texture Scale 01", Float) = 1.0
        _range01("Smooth Range01",Range(0,1)) = 1
        //路
        [NoScaleOffset]_Albedo02 ("Albedo 02", 2D) = "white" {}
        [NoScaleOffset]_Normal02("Normal 02", 2D) = "bump" {}
        _TextureScale02("Texture Scale 02", Float) = 1.0
        _range02("Smooth Range02",Range(0,1)) = 1
        //沙子
        [NoScaleOffset]_Albedo03 ("Albedo 03", 2D) = "white" {}
        [NoScaleOffset]_Normal03("Normal 03", 2D) = "bump" {}
        _TextureScale03("Texture Scale 03", Float) = 1.0
        _range03("Smooth Range03",Range(0,1)) = 1
        //泥土
        [NoScaleOffset]_Albedo04 ("Albedo 04", 2D) = "white" {}
        [NoScaleOffset]_Normal04("Normal 04", 2D) = "bump" {}
        _TextureScale04("Texture Scale 04", Float) = 1.0
        _range04("Smooth Range04",Range(0,1)) = 1
        //遮罩
        [NoScaleOffset]_Mask("Mask", 2D) = "white" {}

    }
    SubShader
    {
        Tags { "RenderType"="Opaque" }
        LOD 200

        CGPROGRAM
        // Physically based Standard lighting model, and enable shadows on all light types
        #pragma surface surf Standard fullforwardshadows
         #pragma target 5.0
        #include "UnityStandardUtils.cginc"
        #include "UnityCG.cginc"
        #include "AutoLight.cginc"
        #include "Tessellation.cginc"


         #if defined(INTERNAL_DATA) && (defined(UNITY_PASS_FORWARDBASE) || defined(UNITY_PASS_FORWARDADD) || defined(UNITY_PASS_DEFERRED) || defined(UNITY_PASS_META))
            #define WorldToTangentNormalVector(data,normal) mul(normal, half3x3(data.internalSurfaceTtoW0, data.internalSurfaceTtoW1, data.internalSurfaceTtoW2))
        #else
            #define WorldToTangentNormalVector(data,normal) normal
        #endif


        sampler2D _MainTex, _Normal01;
        sampler2D _Albedo02, _Normal02;
        sampler2D _Albedo03, _Normal03;
        sampler2D _Albedo04, _Normal04,_Mask;
        half _TextureScale01, _TextureScale02, _TextureScale03, _TextureScale04, _range01, _range02, _range03, _range04;
        half4 _Color;

        struct Input
        {
            float2 uv_MainTex;
        };


        // Add instancing support for this shader. You need to check 'Enable Instancing' on materials that use the shader.
        // See https://docs.unity3d.com/Manual/GPUInstancing.html for more information about instancing.
        // #pragma instancing_options assumeuniformscaling
        UNITY_INSTANCING_BUFFER_START(Props)
            // put more per-instance properties here
        UNITY_INSTANCING_BUFFER_END(Props)

        void surf (Input IN, inout SurfaceOutputStandard o)
        {
            fixed3 MaskColor=tex2D(_Mask,IN.uv_MainTex);
            //草地
            fixed4 Albedo01 = tex2D(_MainTex,IN.uv_MainTex* _TextureScale01)*_Color*(1-MaskColor.r-MaskColor.g-MaskColor.b);
            half3 Normal01 = UnpackNormal(tex2D(_Normal01, IN.uv_MainTex * _TextureScale01)) *(1-MaskColor.r-MaskColor.g-MaskColor.b);
            //路
            fixed4 Albedo02 = tex2D(_Albedo02,IN.uv_MainTex* _TextureScale02)*MaskColor.r;
            half3 Normal02 = UnpackNormal(tex2D(_Normal02, IN.uv_MainTex * _TextureScale02))*MaskColor.r;
            //沙子
            fixed4 Albedo03 = tex2D(_Albedo03,IN.uv_MainTex* _TextureScale03)*MaskColor.g;
            half3 Normal03 = UnpackNormal(tex2D(_Normal03, IN.uv_MainTex * _TextureScale03))*MaskColor.g;
            //泥土
            fixed4 Albedo04 = tex2D(_Albedo04,IN.uv_MainTex* _TextureScale04)*MaskColor.b;
            half3 Normal04 = UnpackNormal(tex2D(_Normal04, IN.uv_MainTex * _TextureScale04)) *MaskColor.b;

            o.Albedo = Albedo01+Albedo02+Albedo03+Albedo04;
            o.Metallic = 0;
            o.Smoothness =Albedo01.a*(1-MaskColor.r-MaskColor.g-MaskColor.b)* _range01 +Albedo02.a* _range02+Albedo03.a* _range03+Albedo04.a* _range04;
            o.Normal =Normal01*(1-MaskColor.r-MaskColor.g-MaskColor.b)+Normal02+Normal03+Normal04;
        }
        ENDCG
    }
    FallBack "Diffuse"
}
种草脚本:
问题 :自带的terrain 是只能在地形上种草,并且草是不方便提取成单独的模型文件来进行编辑
开发一种地形种植的工具来得到种植的就是模型文件,并且有一定随机性,所有模型后续可以放进资源里面,还可以单独编辑,下面看看效果:

在运行的模式下,可以模拟unity种草一样,利用射线方法适用于斜坡的表面垂直种植。
using System.Collections;
using System.Collections.Generic;
using UnityEngine;

public class Syj_GrassBrush : MonoBehaviour
{
    List<trans> posList;
    GameObject grassObj;
    struct trans
    {
        public Vector3 pos;
        public Quaternion rot;
        public Vector3 scale;
    }
    trans tr;

    void Start()
    {
        tr = new trans();
        posList = new List<trans>();
        grassObj=Resources.Load("grass") as GameObject;
        Debug.Log(grassObj.name);
    }

    // Update is called once per frame
    void Update()
    {
        if (Input.GetMouseButtonDown(0))
        {
            Ray ray = Camera.main.ScreenPointToRay(Input.mousePosition);
            RaycastHit hit;
            if (Physics.Raycast(ray, out hit))
            {
                Vector3 point = hit.point;
                for (int i = 0; i < 4; i++)
                {
                    tr.pos = point + new Vector3(Random.insideUnitCircle.x, 0, Random.insideUnitCircle.y);
                    RaycastHit hit1;
                    Ray ray1 = new Ray(tr.pos + Vector3.up * 10, Vector3.down);
                    Physics.Raycast(ray1, out hit1);
                    tr.pos = hit1.point;
                    tr.rot = Quaternion.AngleAxis(Random.Range(0, 6.28f), hit1.normal);
                    tr.scale = new Vector3(1, 1, 1) * Random.Range(0.5f, 1);
                    GameObject go=Instantiate(grassObj,tr.pos,tr.rot) as GameObject;
                    go.transform.LookAt(hit1.point+hit1.normal);   //斜坡种草
                    go.transform.localScale = tr.scale;
                    go.transform.SetParent(this.transform);
                    posList.Add(tr);
                }

            }

        }
    }
}
草的shader:
最开始草的效果是黑色的,没有卡通的通透感,原因在于模型的顶点法线影响。如下图:

在shader里面改变模型的Y方向法线就可以去掉黑色效果:
float3 worldPos = mul (unity_ObjectToWorld, v.vertex).xyz;
v.normal =float3(0,0,1);  //修改Y方向法线
草的顶点动画:
模型的顶点色有四个通道,a通道用来控制每根草根部不能摆动:

rgb通道用来扰动每根草的摆动方向:

配合的shader代码如下:
void vert (inout appdata_full v, out Input o) {


            UNITY_INITIALIZE_OUTPUT(Input,o);

            float3 worldPos = mul (unity_ObjectToWorld, v.vertex).xyz;
            v.normal =float3(0,0,1);//修改法线

            float2 UV = worldPos.xz;
            UV.xy += _Time*2;
            float3 windNoise = tex2Dlod(_WindNoise, float4(UV, 0, 0) * _NoiseScale).rgb;
            v.vertex.z += sin(_Time*20) * v.color.a * _NoiseAmount.z * v.color.r * windNoise.g;
            v.vertex.z += sin(_Time*15) * v.color.a * _NoiseAmount.z * v.color.g * windNoise.g;
            v.vertex.z += sin(_Time*25) * v.color.a * _NoiseAmount.z * v.color.b * windNoise.g;

            v.vertex.x += sin(_Time*20) * v.color.a * _NoiseAmount.x * v.color.r * windNoise.r;
            v.vertex.x += sin(_Time*15) * v.color.a * _NoiseAmount.x * v.color.g * windNoise.r;
            v.vertex.x += sin(_Time*25) * v.color.a * _NoiseAmount.x * v.color.b * windNoise.r;

            v.vertex.y += windNoise.r * _NoiseAmount.y * v.color.a * v.color.r;
            v.vertex.y += windNoise.g * _NoiseAmount.y * v.color.a * v.color.g;
            v.vertex.y += windNoise.b * _NoiseAmount.y * v.color.a * v.color.b;
          }
效果如下:
草的GPU渲染:
gpu instancing:这是最新渲染api提供的一种技术,如果绘制1000个物体,它将一个模型的vbo提交给一次给显卡,至于1000个物体不同的位置,状态,颜色等等将他们整合成一个per instance attribute的buffer给gpu,在显卡上区别绘制,它大大减少提交次数,它在不同平台的实现有差异,例如gles是将per instance attribute也当成一个vbo提交,然后gles3.0支持一种per instance步进读取的vbo特性,来实现不同的instance得到不同的顶点数据,这种技术对于绘制大量的相同模型的物体由于有硬件实现,所以效率最高,最为灵活,避免合批的内存浪费,并且原则上可以做gpu skinning来实现骨骼动画的instancing。
注意:unity在条件合适的情况下自动instance,但是注意这种限制非常多,如不能static batch,不能liaghtmap,不能改变mat,不能带动作,不能cull,等等。

关于gpu instancing技术连接:

下面是我测试有草和没草的数据:


通过 saved by batching可以看出,性能还是有极大提升!!
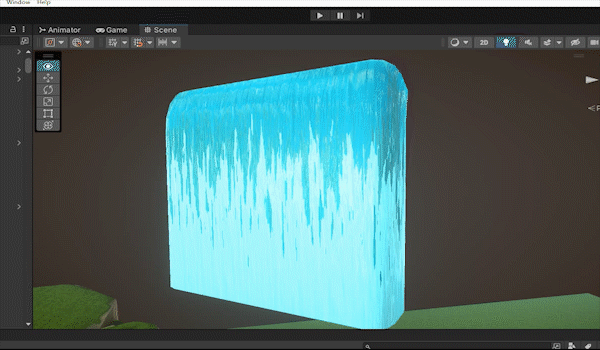
瀑布shader:
瀑布shader是参考许多卡通写实的效果用顶点片元着色器写出来的,为了模拟PBR的效果,加了cubemap(烘焙的场景环境)来采样reflection,性能和效果都能兼顾到。

// Upgrade NOTE: replaced '_Object2World' with 'unity_ObjectToWorld'
// Upgrade NOTE: replaced 'mul(UNITY_MATRIX_MVP,*)' with 'UnityObjectToClipPos(*)'

Shader "Unity Shaders Book/Common/Bumped Specular" {
    Properties {
        _Color ("Color Tint", Color) = (1, 1, 1, 1)
        _NoiseColor ("NoiseColor ", Color) = (1, 1, 1, 1)
        _MainTex ("Main Tex", 2D) = "white" {}
        _Noise01 ("Noise01 ", 2D) = "white" {}
        _Noise02 ("Noise02 ", 2D) = "white" {}
        _BumpMap ("Normal Map", 2D) = "bump" {}
        _Move("Move", Range(0, 2)) = 0.5
        _Treshold("Treshold", Range(0, 2)) = 0.5
        _Specular ("Specular Color", Color) = (1, 1, 1, 1)
        _Gloss ("Gloss", Range(8.0, 256)) = 20
        _NormalStrength("NormalStrength", Range(0,1)) = 1
        _FresnelScale("Fresnel Scale", Range(0, 1)) = 0.5
        _Cubemap("Reflection Cubemap", Cube) = "_Skybox" {}
    }
    SubShader {
        Tags { "RenderType"="Opaque" "Queue"="Geometry"}

        Pass {
            Tags { "LightMode"="ForwardBase" }

            CGPROGRAM

            #pragma multi_compile_fwdbase

            #pragma vertex vert
            #pragma fragment frag

            #include "UnityCG.cginc"
            #include "Lighting.cginc"
            #include "AutoLight.cginc"

            fixed4 _Color;
            fixed4 _NoiseColor;
            sampler2D _MainTex;
            float4 _MainTex_ST;
            sampler2D _Noise01;
            float4 _Noise01_ST;
            sampler2D _Noise02;
            float4 _Noise02_ST;
            sampler2D _BumpMap;
            float4 _BumpMap_ST;
            fixed4 _Specular;
            float _Gloss;
            float _Move;
            float _Treshold;
            float _NormalStrength;
            fixed _FresnelScale;
            samplerCUBE _Cubemap;


            struct a2v {
                float4 vertex : POSITION;
                float3 normal : NORMAL;
                float4 tangent : TANGENT;
                float4 texcoord : TEXCOORD0;
            };

            struct v2f {
                float4 pos : SV_POSITION;
                float4 uv : TEXCOORD0;
                float4 uv1 : TEXCOORD9;
                float4 TtoW0 : TEXCOORD1;
                float4 TtoW1 : TEXCOORD2;
                float4 TtoW2 : TEXCOORD3;
                float3 worldPos : TEXCOORD4;
                fixed3 worldNormal : TEXCOORD5;
                fixed3 worldViewDir : TEXCOORD6;
                fixed3 worldRefl : TEXCOORD7;
                SHADOW_COORDS(8)
            };

            v2f vert(a2v v) {
                 v2f o;
                 o.pos = UnityObjectToClipPos(v.vertex);

                o.uv1.xy = v.texcoord.xy * _MainTex_ST.xy + _MainTex_ST.zw;
                o.uv1.zw = v.texcoord.xy * _Noise02_ST.xy + _Noise02_ST.zw + float2(0, _Time.y*0.5 * _Move);
                 o.uv.xy = v.texcoord.xy * _Noise01_ST.xy + _Noise01_ST.zw + float2(0, _Time.y * _Move);
                 o.uv.zw = v.texcoord.xy * _BumpMap_ST.xy + _BumpMap_ST.zw+ float2(0, _Time.y* _Move);

                o.worldNormal = UnityObjectToWorldNormal(v.normal);

                TANGENT_SPACE_ROTATION;

                float3 worldPos = mul(unity_ObjectToWorld, v.vertex).xyz;
                fixed3 worldNormal = UnityObjectToWorldNormal(v.normal);
                fixed3 worldTangent = UnityObjectToWorldDir(v.tangent.xyz);
                fixed3 worldBinormal = cross(worldNormal, worldTangent) * v.tangent.w;

                o.TtoW0 = float4(worldTangent.x, worldBinormal.x, worldNormal.x, worldPos.x);
                o.TtoW1 = float4(worldTangent.y, worldBinormal.y, worldNormal.y, worldPos.y);
                o.TtoW2 = float4(worldTangent.z, worldBinormal.z, worldNormal.z, worldPos.z);

                  TRANSFER_SHADOW(o);

                 return o;
            }

            fixed4 frag(v2f i) : SV_Target {
                float3 worldPos = float3(i.TtoW0.w, i.TtoW1.w, i.TtoW2.w);
                fixed3 lightDir = normalize(UnityWorldSpaceLightDir(worldPos));
                fixed3 viewDir = normalize(UnityWorldSpaceViewDir(worldPos));

                fixed3 bump = UnpackScaleNormal(tex2D(_BumpMap, i.uv.zw),_NormalStrength);

                bump = normalize(half3(dot(i.TtoW0.xyz, bump), dot(i.TtoW1.xyz, bump), dot(i.TtoW2.xyz, bump)));

                i.worldRefl = reflect(-viewDir, bump);

                fixed3 albedo = _Color.rgb;

                fixed3 noiseAlbedo01 = tex2D(_Noise01, i.uv.xy).rgb ;
                fixed3 noiseAlbedo02 = tex2D(_Noise01, i.uv1.zw).rgb ;

                _Treshold = lerp(0, _Treshold, i.uv1.y);

                fixed cutOff01 = step(_Treshold, noiseAlbedo01);
                fixed cutOff02 = step(_Treshold, noiseAlbedo02);

                fixed3 reflection = texCUBE(_Cubemap, i.worldRefl).rgb;

                fixed fresnel = _FresnelScale + (1 - _FresnelScale) * pow(1 - dot(viewDir, bump), 5);

                albedo = cutOff01*cutOff02 * _NoiseColor + albedo;

                fixed3 ambient = UNITY_LIGHTMODEL_AMBIENT.xyz * albedo;

                 fixed3 diffuse = _LightColor0.rgb * albedo * max(0, dot(bump, lightDir));

                 fixed3 halfDir = normalize(lightDir + viewDir);

                 fixed3 specular = _LightColor0.rgb * _Specular.rgb * pow(max(0, dot(bump, halfDir)), _Gloss);

                UNITY_LIGHT_ATTENUATION(atten, i, worldPos);

                //return fixed4(ambient + (diffuse + specular) * atten, 1.0);
                return fixed4(ambient + lerp(diffuse , reflection, saturate(fresnel)) * atten, 1.0);
            }

            ENDCG
        }


    }
    FallBack "Specular"
}


 被折叠的 条评论
为什么被折叠?
被折叠的 条评论
为什么被折叠?
 到【灌水乐园】发言


