


在前面我们已经分享了会涉及到的一些基础知识,现在我们要结合DEMO工程来看看如何实现,这个工程涵盖了注册、登录、权限配置、角色管理,从而实现了自定义的用户注册、登录以及基于数据库的动态权限管理。
在DEMO中为了便于部署测试,将token下发方与使用方放在一个工程内,体验的小伙伴可以部署两个工程,一个下发一个校验。
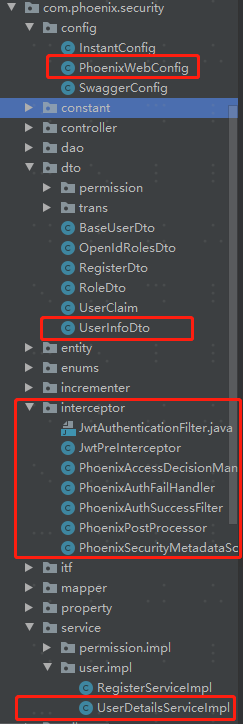
工程结构
PhoenixWebConfig
该配置类继承自WebSecurityConfigurerAdapter,是我们认证鉴权的入口,因为我们的工程以前后端分离为前提,所以在config里面我们重写了入参为HttpSecurity的configure方法。
@Configuration
@EnableWebSecurity
@EnableGlobalMethodSecurity(prePostEnabled = true)
public class PhoenixWebConfig extends WebSecurityConfigurerAdapter {

  @Autowired private UserDetailsServiceImpl userDetailsService;
  @Autowired private PhoenixAuthSuccessFilter phoenixAuthSuccessFilter;
  @Autowired private PhoenixAuthFailHandler phoenixAuthFailHandler;
  // @Autowired private RsaKeyProperties rsaKeyProperties;
  @Autowired private PhoenixAccessDecisionManager phoenixAccessDecisionManager;
  @Autowired private PhoenixSecurityMetadataSource phoenixSecurityMetadataSource;

  /**
   * 指定密码加密算法
   * @return
   */
  @Bean
  public BCryptPasswordEncoder passwordEncoder() {
    return new BCryptPasswordEncoder();
  }

  /**
   * 指定Auth的UserDetailsService实现类以及密码加密方法
   * @param auth
   * @throws Exception
   */
  @Override
  protected void configure(AuthenticationManagerBuilder auth) throws Exception {
    // super.configure(auth);
    auth.userDetailsService(userDetailsService).passwordEncoder(passwordEncoder());
  }

  /**
   * 重写configure方法
   * 关闭csrf及cors拦截,因为我们的请求是来自于其他系统的,不是一个前后一体系统
   * 对于一般请求,通过自定义后置处理器写入配置信息
   * @PhoenixSecurityMetadataSource
   * 在决策处理器中,根据配置信息判断请求是否拦截
   * @PhoenixAccessDecisionManager
   * @param http
   * @throws Exception
   */
  @Override
  protected void configure(HttpSecurity http) throws Exception {
    // super.configure(http);
    http.cors()
        .and()
        .csrf()
        .disable()
        .authorizeRequests()
        .withObjectPostProcessor(
            new ObjectPostProcessor<FilterSecurityInterceptor>() {
              @Override
              public <O extends FilterSecurityInterceptor> O postProcess(O object) {
                object.setSecurityMetadataSource(phoenixSecurityMetadataSource);
                object.setAccessDecisionManager(phoenixAccessDecisionManager);
                return object;
              }
            })
        .antMatchers("/login", "/signup", "/swagger-ui.html", "/v2/api-doc")
        .permitAll()
        .anyRequest()
        .authenticated()
        .and()
        .formLogin()
        .successHandler(phoenixAuthSuccessFilter)
        .failureHandler(phoenixAuthFailHandler)
        .and()
        .sessionManagement()
        .sessionCreationPolicy(SessionCreationPolicy.STATELESS);
    // .addFilter(new JwtAuthenticationFilter(authenticationManager(), rsaKeyProperties));
  }
}
UserInfoDto
UserInfoDto实现了UserDetails接口,这是我们认证与鉴权中非常关键与重要的一个实体,这里也很好的体现了Spring Security的依赖倒置、面向接口编程。
UserDetails接口为我们定义好了一个Spring Security的User一定要具有的一组行为,那么我们在根据我们自己的需要扩展或重写方法,去扩展实现时,都能保证Spring Security能识别我们马甲下的本质。
public class UserInfoDto implements UserDetails {
  @ApiModelProperty("open id")
  private String openId;

  @ApiModelProperty("用户数据")
  private UserDao user;

  @ApiModelProperty("一组角色id")
  private List<Long> roles;

  public UserInfoDto(
      UserDao userDao, UserOpenIdDao userOpenIdDao, List<OpenIdRoleDao> roleDaoList) {
    this.openId = userOpenIdDao.getOpenId();
    this.user = userDao;
    this.roles = getRoleString(roleDaoList);
  }

  private List<Long> getRoleString(List<OpenIdRoleDao> roleDaoList) {
    return roleDaoList.stream().map(OpenIdRoleDao::getRid).collect(Collectors.toList());
  }

  /**
   * 返回权限的集合,是这里非常关键的一步。
   * @return
   */
  @Override
  public Collection<? extends GrantedAuthority> getAuthorities() {
    return this.roles.stream()
        .map(role -> new SimpleGrantedAuthority(role.toString()))
        .collect(Collectors.toList());
  }

  public UserDao getUser() {
    return user;
  }

  public void setUser(UserDao user) {
    this.user = user;
  }

  @Override
  public String getPassword() {
    return this.user.getPassword();
  }

  @Override
  public String getUsername() {
    return this.user.getUsername();
  }

  @Override
  public boolean isAccountNonExpired() {
    return this.user.isExpired();
  }

  @Override
  public boolean isAccountNonLocked() {
    return this.user.isLocked();
  }

  @Override
  public boolean isCredentialsNonExpired() {
    return this.user.isExpired();
  }

  @Override
  public boolean isEnabled() {
    return this.user.isEnabled();
  }
}
UserDetailsServiceImpl
该类实现了UserDetailsService接口,最重要的就是要返回一个UserDetails,而这里的UserDetails就是我们上面的UserInfoDto,其中最重要的方法就是 loadUserByUsername,我们需要根据我们自己的逻辑去实现这个方法,使符合Spring Security的标准,也满足我们的要求。
@Service
public class UserDetailsServiceImpl implements UserDetailsService, PnxUser, Role {
  @Autowired private UserMapper userMapper;
  @Autowired private UserOpenIdMapper userOpenIdMapper;
  @Autowired private OpenIdRoleMapper openIdRoleMapper;

  @Override
  public List<RoleDao> getUserRoles(String openId) {
    return null;
  }

  @Override
  public Long createOrUpdateRole(RoleDao role) {
    return null;
  }

  @Override
  public void createOrUpdateRoles(List<RoleDao> roleList) {}

  @Override
  public void createOrUpdateUserRoles(String openId, List<RoleDao> roleList) {}

  /**
   * 为用户添加角色
   * @param openIdRolesDto
   * @return
   */
  //TODO: 该方法未对插入结果做校验,未对已存在数据做校验
  public boolean createUserRoles(OpenIdRolesDto openIdRolesDto) {
    String openId = openIdRolesDto.getOpenId();
    List<Long> rids = openIdRolesDto.getRids();
    rids.stream()
        .map(
            rid -> {
              openIdRoleMapper.insert(OpenIdRoleDao.builder().openId(openId).rid(rid).build());
              return true;
            });
    return true;
  }

  @Override
  public UserDao getPnxUserByName(String username) {
    return userMapper.selectOne(new QueryWrapper<UserDao>().eq("username", username));
  }

  @Override
  public UserDao getPnxUserById(Long uid) {
    return null;
  }

  @Override
  @Transactional(rollbackFor = SQLDataException.class)
  public Long createOrUpdateUser(BaseUserDto user) {
    return null;
  }

  /**
   * 根据用户名返回UserDetails的实现类对象UserInfoDto
   * @param username
   * @return
   * @throws UsernameNotFoundException
   */
  @Override
  @Cacheable(value = "userInfo", key = "#username")
  public UserDetails loadUserByUsername(String username) throws UsernameNotFoundException {
    UserDao userDao = getPnxUserByName(username);
    if (null == userDao) {
      throw new UsernameNotFoundException(UserRespMsg.NOT_EXIST.getMsg());
    }
    UserOpenIdDao userOpenIdDao =
        userOpenIdMapper.selectOne(new QueryWrapper<UserOpenIdDao>().eq("uid", userDao.getUid()));
    List<OpenIdRoleDao> openIdRoleDaoList =
        openIdRoleMapper.selectList(
            new QueryWrapper<OpenIdRoleDao>().eq("open_id", userOpenIdDao.getOpenId()));
    return new UserInfoDto(userDao, userOpenIdDao, openIdRoleDaoList);
  }
}
PhoenixSecurityMetadataSource
该类实现了FilterInvocationSecurityMetadataSource,这里主要是为了进行配置信息的操作,而我们要做的就是在这个类中解析Token,获取用户信息及权限,并将通过校验的用户信息写入AuthenticationToken,以便后续使用。
@Component
public class PhoenixSecurityMetadataSource implements FilterInvocationSecurityMetadataSource {
  @Autowired private RsaKeyProperties rsaKeyProperties;
  @Autowired private PermissionServiceImpl permissionService;

  @Override
  public Collection<ConfigAttribute> getAttributes(Object object) throws IllegalArgumentException {

    FilterInvocation filterInvocation = (FilterInvocation) object;
    HttpServletRequest request = filterInvocation.getRequest();
    String token = request.getHeader("Authorization");
    //TODO: 这里为了方便登录,没有token默认不拦截,其实应该将没有token与白名单一起校验。
    if (null == token || !token.startsWith("Bearer ")) {
      return null;
    }
    try {
      UsernamePasswordAuthenticationToken upt = getUserAuthToken(token.replace("Bearer ", ""));
    } catch (JsonProcessingException e) {
      e.printStackTrace();
    }
    return getConfigAttributeList(request.getRequestURI());
  }

  /**
   * @param requestURI
   * @return
   */
  private List<ConfigAttribute> getConfigAttributeList(String requestURI) {
    if (isMatchWhiteList(requestURI)) {
      return null;
    }
    List<Long> ridList = permissionService.getPermListByUri(requestURI);
    if (0 == ridList.size()) {
      List<ConfigAttribute> cfgList = new ArrayList<>();
      cfgList.add(new SecurityConfig("ROLE_DENIED"));
      return cfgList;
    }
    return ridList.stream()
        .map(rid -> new SecurityConfig(rid.toString()))
        .collect(Collectors.toList());
  }

  /**
   * check whether this path in the white list.
   *
   * @param requestURI
   * @return
   */
  private boolean isMatchWhiteList(String requestURI) {
    return false;
  }

  /**
   * @param token
   * @return
   */
  private UsernamePasswordAuthenticationToken getUserAuthToken(String token)
      throws JsonProcessingException {
    PayLoad<UserClaim> payload =
        JwtUtils.getInfoFromToken(token, rsaKeyProperties.getPublicKey(), UserClaim.class);
    UserClaim userInfo = payload.getUserInfoDto();
    if (null == userInfo) {
      return null;
    }
    UsernamePasswordAuthenticationToken usernamePasswordAuthenticationToken =
        new UsernamePasswordAuthenticationToken(
            userInfo,
            null,
            userInfo.getRoles().stream()
                .map(role -> new SimpleGrantedAuthority(role.toString()))
                .collect(Collectors.toList()));
    SecurityContextHolder.getContext().setAuthentication(usernamePasswordAuthenticationToken);
    return usernamePasswordAuthenticationToken;
  }

  @Override
  public Collection<ConfigAttribute> getAllConfigAttributes() {
    return null;
  }

  @Override
  public boolean supports(Class<?> clazz) {
    return FilterInvocation.class.isAssignableFrom(clazz);
  }
}
PhoenixAccessDecisionManager
该类实现了AccessDecisionManager,在这里将最终决定本次用户访问是否可以通过鉴权,在这里面我们将用户的角色与访问uri所对应的资源角色进行匹配,如果匹配中则不返回任何数据,表示校验通过。如果没有命中,则抛出AccessDeniedException。
@Component
public class PhoenixAccessDecisionManager implements AccessDecisionManager {
  /**
   * 判断用户是否由权限进行资源访问 如果权限不足则抛出AccessDeniedException
   *
   * @param authentication
   * @param object
   * @param configAttributes
   * @throws AccessDeniedException
   * @throws InsufficientAuthenticationException
   */
  @Override
  public void decide(
      Authentication authentication, Object object, Collection<ConfigAttribute> configAttributes)
      throws AccessDeniedException, InsufficientAuthenticationException {
    if (!isAccessiable(authentication, configAttributes)) {
      throw new AccessDeniedException("这不是开往幼儿园的车");
    }
  }

  /**
   * 根据auth里取出来的用户role与配置中的uri对应roles进行匹配
   * authentication与configAttributes中数据来自于PhoenixSecurityMetadataSource
   *
   * @param authentication
   * @param configAttributes
   * @return
   */
  private boolean isAccessiable(
      Authentication authentication, Collection<ConfigAttribute> configAttributes) {
    if (null == authentication) {
      return false;
    }
    List<String> userRidList =
        authentication.getAuthorities().stream()
            .map(auth -> auth.getAuthority())
            .distinct()
            .sorted()
            .collect(Collectors.toList());
    List<String> uriRidList =
        configAttributes.stream()
            .map(configAttribute -> configAttribute.getAttribute())
            .distinct()
            .sorted()
            .collect(Collectors.toList());

    for (String userRid : userRidList) {
      if (uriRidList.contains(userRid)) {
        return true;
      }
    }

    return false;
  }

  @Override
  public boolean supports(ConfigAttribute attribute) {
    return false;
  }

  @Override
  public boolean supports(Class<?> clazz) {
    return false;
  }
}
到此关键代码我们都已做了简单解释,完整代码请访问,包含了注册、登录的逻辑以及初始化的SQL脚本,SQL脚本会在初次运行程序时自动执行:https://github.com/zerozhao13/spring-security-family
结语
这里便是基于Servlet的Spring Security的部分了,除了关于Spring Security本身的知识外,对于面向接口编程及依赖倒置要有一定的理解,不然这个实现看起来会感觉很抽象。
示例中有类手写实现了建造者模式,不过实际工程中在集成了Lombok的情况下,直接使用@builder注解即可。
后续我们会继续讲到Spring Security与响应式编程的结合,以及如何来做OAuth2的认证与鉴权。


 2万+
2万+


 被折叠的 条评论
为什么被折叠?
被折叠的 条评论
为什么被折叠?
 到【灌水乐园】发言


