


引言
第一篇lettuce源码解析中介绍了如何使用、lettuce客户端启动和连接建立的流程,本文主要介绍lettuce如何复用同一个连接实现命令发送和响应接收。
Lettuce源码详解(一)
Lettuce客户端命令请求发送流程
set命令处理
整体流程包括两个步骤:获取连接、使用连接发送命令,获取连接流程参考Lettuce源码详解(一)
    public void set(String key, String value) {
        redisTemplate.opsForValue().set(key, value);
    }
org.springframework.data.redis.core.DefaultValueOperations#set(K, V)
主要先通过execute方法获取连接,然后回调执行set方法;
这里获取的连接类型是LettuceClusterConnection,是对StatefulRedisClusterConnection的封装。
	public void set(K key, V value) {
		byte[] rawValue = rawValue(value);
		execute(new ValueDeserializingRedisCallback(key) {
			@Override
			protected byte[] inRedis(byte[] rawKey, RedisConnection connection) {
				connection.set(rawKey, rawValue);
				return null;
			}
		});
	}
spring-data-redis中将连接封装为Commands,从而提供不同数据类型的命令操作,LettuceClusterConnection中使用LettuceClusterStringCommands实现string数据结构的操作,该类继承了LettuceStringCommands。
org.springframework.data.redis.connection.lettuce.LettuceClusterConnection类中部分代码:
	private final LettuceClusterGeoCommands geoCommands = new LettuceClusterGeoCommands(this);
	private final LettuceClusterHashCommands hashCommands = new LettuceClusterHashCommands(this);
	private final LettuceClusterHyperLogLogCommands hllCommands = new LettuceClusterHyperLogLogCommands(this);
	private final LettuceClusterKeyCommands keyCommands = new LettuceClusterKeyCommands(this);
	private final LettuceClusterListCommands listCommands = new LettuceClusterListCommands(this);
	private final LettuceClusterStringCommands stringCommands = new LettuceClusterStringCommands(this);
	private final LettuceClusterSetCommands setCommands = new LettuceClusterSetCommands(this);
	private final LettuceClusterZSetCommands zSetCommands = new LettuceClusterZSetCommands(this);
	private final LettuceClusterServerCommands serverCommands = new LettuceClusterServerCommands(this);
set命令执行过程接下来调用了org.springframework.data.redis.connection.lettuce.LettuceStringCommands#set(byte[], byte[])方法,其中使用LettuceInvoker实现同步获取lettuce中异步操作的结果
	public Boolean set(byte[] key, byte[] value) {
		return connection.invoke().from(RedisStringAsyncCommands::set, key, value)
				.get(Converters.stringToBooleanConverter());
	}
接下来真正进入Lettuce内部执行流程。
使用连接发送set命令
首先进入io.lettuce.core.AbstractRedisAsyncCommands#set(K, V)方法:该方法主要是完成命令封装和分发。
    public RedisFuture<String> set(K key, V value) {
        return dispatch(commandBuilder.set(key, value));
    }
命令封装与编码
io.lettuce.core.RedisCommandBuilder#set(K, V)
set命令封装调用流程如下
    Command<K, V, String> set(K key, V value) {
        return createCommand(SET, new StatusOutput<>(codec), key, value);
    }
    protected <T> Command<K, V, T> createCommand(CommandType type, CommandOutput<K, V, T> output, K key, V value) {
        CommandArgs<K, V> args = new CommandArgs<>(codec).addKey(key).addValue(value);
        return createCommand(type, output, args);
    }
    protected <T> Command<K, V, T> createCommand(CommandType type, CommandOutput<K, V, T> output, CommandArgs<K, V> args) {
        return new Command<>(type, output, args);
    }
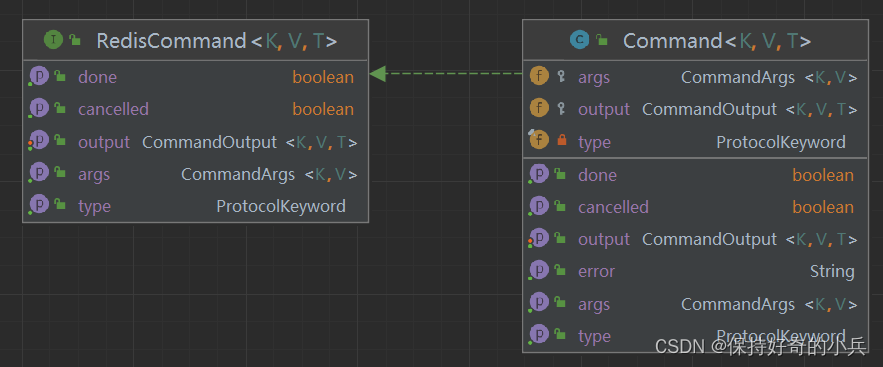
Command类结构如下图所示,其中有3个关键字段:
命令参数:CommandArgs封装了命令操作的key和value
命令类型:对应redis操作命令
输出结果:封装了命令操作的响应结果
Lettuce中RESP协议实现:io.lettuce.core.protocol.Command#encode
    public void encode(ByteBuf buf) {
        buf.touch("Command.encode(…)");
        // '*'表示数组
        buf.writeByte('*');
        // '*'后面紧跟着数组长度:命令类型作为数组中一个元素,加上参数数量为数组长度(SET命令有2参数,总长度3)
        CommandArgs.IntegerArgument.writeInteger(buf, 1 + (args != null ? args.count() : 0));
        buf.writeBytes(CommandArgs.CRLF);
        // 写入命令类型(SET)
        CommandArgs.BytesArgument.writeBytes(buf, type.getBytes());
        if (args != null) {
            // 写入参数
            args.encode(buf);
        }
    }
io.lettuce.core.protocol.CommandArgs.BytesArgument#writeBytes:对命令类型进行编码写入buffer
        static void writeBytes(ByteBuf buffer, byte[] value) {
            buffer.writeByte('$');
            // '$'后紧跟命令类型字节数
            IntegerArgument.writeInteger(buffer, value.length);
            buffer.writeBytes(CRLF);
            buffer.writeBytes(value);
            buffer.writeBytes(CRLF);
        }
io.lettuce.core.protocol.CommandArgs#encode(io.netty.buffer.ByteBuf)
    public void encode(ByteBuf buf) {
        buf.touch("CommandArgs.encode(…)");
        for (SingularArgument singularArgument : singularArguments) {
            // 按添加顺序依次对各参数进行编码
            singularArgument.encode(buf);
        }
    }
参数编码最终会调用方法:io.lettuce.core.protocol.CommandArgs#encode(io.netty.buffer.ByteBuf, io.lettuce.core.codec.ToByteBufEncoder<T,T>, T, io.lettuce.core.protocol.CommandArgs.EncodeFunction)
由CommandBuilder的构造可知,这里默认使用UTF8编码,因此走了else分支;
    static <T> void encode(ByteBuf target, ToByteBufEncoder<T, T> encoder, T item, EncodeFunction<T> encodeFunction) {
        if (encoder.isEstimateExact()) {
            target.writeByte('$');
            IntegerArgument.writeInteger(target, encoder.estimateSize(item));
            target.writeBytes(CRLF);
            encodeFunction.encode(encoder, item, target);
            target.writeBytes(CRLF);
        } else {
            ByteBuf temporaryBuffer = target.alloc().buffer(encoder.estimateSize(item) + 6);
            try {
                // 先将数据写入临时buffer中,便于准确计算字节数
                encodeFunction.encode(encoder, item, temporaryBuffer);
                // 将临时buffer中的字节数据,按RESP协议编码后写入目标buffer,即在数据前加上长度、换行符
                ByteBufferArgument.writeByteBuf(target, temporaryBuffer);
            } finally {
                temporaryBuffer.release();
            }
        }
    }
spring-data-redis中构造客户端时,指定的codec为ByteArrayCodec,因此encodeFunction对应方法为:io.lettuce.core.codec.ByteArrayCodec#encodeKey(byte[], io.netty.buffer.ByteBuf)
    public void encodeKey(byte[] key, ByteBuf target) {
        if (key != null) {
            target.writeBytes(key);
        }
    }
io.lettuce.core.protocol.CommandArgs.ByteBufferArgument#writeByteBuf
        static void writeByteBuf(ByteBuf target, ByteBuf value) {
            target.writeByte('$');
            IntegerArgument.writeInteger(target, value.readableBytes());
            target.writeBytes(CRLF);
            target.writeBytes(value);
            target.writeBytes(CRLF);
        }
关于RESP协议介绍可参考RESP协议介绍
命令预处理
上文介绍了spring-data-redis执行set命令调用lettuce接口的流程,下午继续介绍lettuce如何将封装好的Command发送到redis的。
io.lettuce.core.AbstractRedisAsyncCommands#dispatch(io.lettuce.core.protocol.RedisCommand<K,V,T>)
    public <T> AsyncCommand<K, V, T> dispatch(RedisCommand<K, V, T> cmd) {
        // 封装异步命令,实现reactive访问
        AsyncCommand<K, V, T> asyncCommand = new AsyncCommand<>(cmd);
        // 集群模式下,对应的connect是StatefulRedisClusterConnectionImpl
        RedisCommand<K, V, T> dispatched = connection.dispatch(asyncCommand);
        if (dispatched instanceof AsyncCommand) {
            return (AsyncCommand<K, V, T>) dispatched;
        }
        return asyncCommand;
    }
io.lettuce.core.cluster.StatefulRedisClusterConnectionImpl#dispatch(io.lettuce.core.protocol.RedisCommand<K,V,T>)
    public <T> RedisCommand<K, V, T> dispatch(RedisCommand<K, V, T> command) {
        return super.dispatch(preProcessCommand(command));
    }
    // 命令预处理
    private <T> RedisCommand<K, V, T> preProcessCommand(RedisCommand<K, V, T> command) {
        RedisCommand<K, V, T> local = command;
        if (local.getType().name().equals(AUTH.name())) {
            // 添加AUTH成功后的回调,主要设置连接的用户密码认证信息
            local = attachOnComplete(local, status -> {
                if (status.equals("OK")) {
                    List<char[]> args = CommandArgsAccessor.getCharArrayArguments(command.getArgs());
                    if (!args.isEmpty()) {
                        this.connectionState.setUserNamePassword(args);
                    } else {
                        List<String> stringArgs = CommandArgsAccessor.getStringArguments(command.getArgs());
                        this.connectionState
                                .setUserNamePassword(stringArgs.stream().map(String::toCharArray).collect(Collectors.toList()));
                    }
                }
            });
        }
        // READONLY命令执行成功后,将连接也设置为只读连接
        if (local.getType().name().equals(READONLY.name())) {
            local = attachOnComplete(local, status -> {
                if (status.equals("OK")) {
                    this.connectionState.setReadOnly(true);
                }
            });
        }
        // READWRITE命令执行成功后,将连接设置为读写连接
        if (local.getType().name().equals(READWRITE.name())) {
            local = attachOnComplete(local, status -> {
                if (status.equals("OK")) {
                    this.connectionState.setReadOnly(false);
                }
            });
        }
        return local;
    }
预处理主要是针对几个特殊命令,添加命令执行成功后的回调处理:设置相关连接状态
命令发送
StatefulRedisClusterConnectionImpl继承了抽象类RedisChannelHandler。命令预处理完成后,调用io.lettuce.core.RedisChannelHandler#dispatch(io.lettuce.core.protocol.RedisCommand<K,V,T>)方法,最终会调用io.lettuce.core.cluster.ClusterDistributionChannelWriter#write(io.lettuce.core.protocol.RedisCommand<K,V,T>):
    public <K, V, T> RedisCommand<K, V, T> write(RedisCommand<K, V, T> command) {
        LettuceAssert.notNull(command, "Command must not be null");
        if (closed) {
            command.completeExceptionally(new RedisException("Connection is closed"));
            return command;
        }
        return doWrite(command);
    }
    private <K, V, T> RedisCommand<K, V, T> doWrite(RedisCommand<K, V, T> command) {
        if (command instanceof ClusterCommand && !command.isDone()) {
            ClusterCommand<K, V, T> clusterCommand = (ClusterCommand<K, V, T>) command;
            if (clusterCommand.isMoved() || clusterCommand.isAsk()) {
            // 省略moved、ask响应处理流程
            }
        }
        // 将命令封装为ClusterCommand
        ClusterCommand<K, V, T> commandToSend = getCommandToSend(command);
        CommandArgs<K, V> args = command.getArgs();
        // exclude CLIENT commands from cluster routing
        // SET命令走该if分支
        if (args != null && !CommandType.CLIENT.equals(commandToSend.getType())) {
            // 获取命令第一个参数,用于集群模式下通过hash计算key所在的slot
            ByteBuffer encodedKey = args.getFirstEncodedKey();
            if (encodedKey != null) {
                // 根据第一个参数,即key计算slot(支持使用'{}'指定使用子串计算hash槽)
                int hash = getSlot(encodedKey);
                // 根据命令读写类型判断倾向于使用什么类型的连接
                ConnectionIntent connectionIntent = getIntent(command);
                // 根据命令类型获取指定slot所在节点的连接
                CompletableFuture<StatefulRedisConnection<K, V>> connectFuture = ((AsyncClusterConnectionProvider) clusterConnectionProvider)
                        .getConnectionAsync(connectionIntent, hash);
                if (isSuccessfullyCompleted(connectFuture)) {
                    writeCommand(commandToSend, false, connectFuture.join(), null);
                } else {
                    connectFuture
                            .whenComplete((connection, throwable) -> writeCommand(commandToSend, false, connection, throwable));
                }
                return commandToSend;
            }
        }
        writeCommand(commandToSend, defaultWriter);
        return commandToSend;
    }
命令发送阶段获取指定槽的连接流程
io.lettuce.core.cluster.PooledClusterConnectionProvider#getConnectionAsync(io.lettuce.core.protocol.ConnectionIntent, int)
    public CompletableFuture<StatefulRedisConnection<K, V>> getConnectionAsync(ConnectionIntent connectionIntent, int slot) {
        // 读类型命令、且配置支持从slave节点读取时,使用只读连接,默认配置readFrom为null
        if (connectionIntent == ConnectionIntent.READ && readFrom != null && readFrom != ReadFrom.UPSTREAM) {
            return getReadConnection(slot);
        }
        // 获取可写连接
        return getWriteConnection(slot).toCompletableFuture();
    }
    private CompletableFuture<StatefulRedisConnection<K, V>> getWriteConnection(int slot) {
        CompletableFuture<StatefulRedisConnection<K, V>> writer;// avoid races when reconfiguring partitions.
        // 优先从缓存中获取连接对象
        synchronized (stateLock) {
            writer = writers[slot];
        }
        if (writer == null) {
            // 从本地拓扑结构中获取slot所在的master节点
            RedisClusterNode master = partitions.getMasterBySlot(slot);
            if (master == null) {
                clusterEventListener.onUncoveredSlot(slot);
                return Futures.failed(new PartitionSelectorException("Cannot determine a partition for slot " + slot + ".",
                        partitions.clone()));
            }
            // Use always host and port for slot-oriented operations. We don't want to get reconnected on a different
            // host because the nodeId can be handled by a different host.
            RedisURI uri = master.getUri();
            ConnectionKey key = new ConnectionKey(ConnectionIntent.WRITE, uri.getHost(), uri.getPort());
            // 异步获取连接
            ConnectionFuture<StatefulRedisConnection<K, V>> future = getConnectionAsync(key);
            return future.thenApply(connection -> {
                synchronized (stateLock) {
                    获取连接成功后添加到本地缓存数组中
                    if (writers[slot] == null) {
                        writers[slot] = CompletableFuture.completedFuture(connection);
                    }
                }
                return connection;
            }).toCompletableFuture();
        }
        return writer;
    }
获取连接流程最终会调用io.lettuce.core.internal.AsyncConnectionProvider#getConnection
    public F getConnection(K key) {
        return getSynchronizer(key).getConnection();
    }
    private Sync<K, T, F> getSynchronizer(K key) {
        if (closed) {
            throw new IllegalStateException("ConnectionProvider is already closed");
        }
        //先从本地缓存中获取
        Sync<K, T, F> sync = connections.get(key);
        if (sync != null) {
            return sync;
        }
        AtomicBoolean atomicBoolean = new AtomicBoolean();
        // 本地没有连接则尝试建链,并将结果村到本地map中
        sync = connections.computeIfAbsent(key, connectionKey -> {
            // 在第一篇中提到需要关注PooledClusterConnectionProvider的构造方法,可知
            // 此处的connectionFactory实际是:io.lettuce.core.cluster.PooledClusterConnectionProvider#getConnectionFactory
            // 最终会调用io.lettuce.core.cluster.RedisClusterClient#connectToNodeAsync方法建链
            Sync<K, T, F> createdSync = new Sync<>(key, connectionFactory.apply(key));
            if (closed) {
                createdSync.cancel();
            }
            return createdSync;
        });
        if (atomicBoolean.compareAndSet(false, true)) {
            sync.getConnection().whenComplete((c, t) -> {
                if (t != null) {
                // 建链失败,从本地map中移除建链结果异步对象
                    connections.remove(key);
                }
            });
        }
        return sync;
    }
后续的连接建立流程已在前文有介绍,此处不再赘述,可参考Lettuce源码详解(一)
命令写入流程
上文介绍了根据槽获取连接流程,下文接着介绍如何通过连接将命令发送到服务端。
命令写入最终调用io.lettuce.core.cluster.ClusterDistributionChannelWriter#writeCommand(io.lettuce.core.protocol.RedisCommand<K,V,?>, io.lettuce.core.RedisChannelWriter)方法:
    private static <K, V> void writeCommand(RedisCommand<K, V, ?> command, RedisChannelWriter writer) {
        try {
            // 由集群客户端建链流程可知,构造ClusterDistributionChannelWriter时的defaultWriter为DefaultEndpoint
            getWriterToUse(writer).write(command);
        } catch (Exception e) {
            command.completeExceptionally(e);
        }
    }
io.lettuce.core.protocol.DefaultEndpoint#write(io.lettuce.core.protocol.RedisCommand<K,V,T>)
    public <K, V, T> RedisCommand<K, V, T> write(RedisCommand<K, V, T> command) {
        LettuceAssert.notNull(command, "Command must not be null");
        // 校验命令队列长度限制
        RedisException validation = validateWrite(1);
        if (validation != null) {
            command.completeExceptionally(validation);
            return command;
        }
        try {
            sharedLock.incrementWriters();
            if (inActivation) {
                command = processActivationCommand(command);
            }
            // 默认自动flush
            if (autoFlushCommands) {
                if (isConnected()) {
                    // 连接状态正常,直接写入
                    writeToChannelAndFlush(command);
                } else {
                    // 将命令写入断链缓冲区,用于建链后重发
                    writeToDisconnectedBuffer(command);
                }
            } else {
                writeToBuffer(command);
            }
        } finally {
            sharedLock.decrementWriters();
            if (debugEnabled) {
                logger.debug("{} write() done", logPrefix());
            }
        }
        return command;
    }
io.lettuce.core.protocol.DefaultEndpoint#writeToChannelAndFlush(io.lettuce.core.protocol.RedisCommand<?,?,?>)
    private void writeToChannelAndFlush(RedisCommand<?, ?, ?> command) {
        QUEUE_SIZE.incrementAndGet(this);
        // 调用netty chnnel将命令写入socket缓冲区,netty内部会调用CommandEncoder将Command对象编码为ByteBuffer
        ChannelFuture channelFuture = channelWriteAndFlush(command);
        // 可靠性策略,最多发送一次
        if (reliability == Reliability.AT_MOST_ONCE) {
            // cancel on exceptions and remove from queue, because there is no housekeeping
            channelFuture.addListener(AtMostOnceWriteListener.newInstance(this, command));
        }
        // 可靠性策略,至少发送一次--默认配置
        if (reliability == Reliability.AT_LEAST_ONCE) {
            // commands are ok to stay within the queue, reconnect will retrigger them
            channelFuture.addListener(RetryListener.newInstance(this, command));
        }
    }
netty channel的writeAndFlush方法会从后往前依次调用handler的write方法,Lettuce客户端中主要包括CommandHandler、CommandEncoder(实现将Command对象编码为ByteBuffer);
其中io.lettuce.core.protocol.CommandHandler#write主要是将命令添加到连接的命令栈中:目的将在下文介绍
    private void addToStack(RedisCommand<?, ?, ?> command, ChannelPromise promise) {
        try {
            if (!ActivationCommand.isActivationCommand(command)) {
                validateWrite(1);
            }
            // 没有响应结果的命令直接返回
            if (command.getOutput() == null) {
                // fire&forget commands are excluded from metrics and replies
                complete(command);
            }
            RedisCommand<?, ?, ?> redisCommand = potentiallyWrapLatencyCommand(command);
            // 命令添加到栈中
            stack.add(redisCommand);
            if (!promise.isVoid()) {
                // 发送失败,将命令从栈中移除
                promise.addListener(AddToStack.newInstance(stack, redisCommand));
            }
        } catch (Exception e) {
            command.completeExceptionally(e);
            throw e;
        }
    }
可靠性策略:最多发送一次:io.lettuce.core.protocol.DefaultEndpoint.AtMostOnceWriteListener#operationComplete
        public void operationComplete(ChannelFuture future) {
            try {
                // 命令处理完成,发送队列缩小
                dequeue();
                if (!future.isSuccess() && future.cause() != null) {
                    // 将异常结果响应给调用方
                    complete(future.cause());
                }
            } finally {
                recycle();
            }
        }
可靠性策略:至少重试一次:io.lettuce.core.protocol.DefaultEndpoint.RetryListener#operationComplete
关键逻辑在:io.lettuce.core.protocol.DefaultEndpoint.RetryListener#doComplete
        private void doComplete(Future<Void> future) {
            Throwable cause = future.cause();
            boolean success = future.isSuccess();
            dequeue();
            if (success) {
                return;
            }
            // 部分异常不需要重试
            if (cause instanceof EncoderException || cause instanceof Error || cause.getCause() instanceof Error) {
                complete(cause);
                return;
            }
            Channel channel = endpoint.channel;
            // Capture values before recycler clears these.
            RedisCommand<?, ?, ?> sentCommand = this.sentCommand;
            Collection<? extends RedisCommand<?, ?, ?>> sentCommands = this.sentCommands;
            potentiallyRequeueCommands(channel, sentCommand, sentCommands);
            if (!(cause instanceof ClosedChannelException)) {
                String message = "Unexpected exception during request: {}";
                InternalLogLevel logLevel = InternalLogLevel.WARN;
                if (cause instanceof IOException && SUPPRESS_IO_EXCEPTION_MESSAGES.contains(cause.getMessage())) {
                    logLevel = InternalLogLevel.DEBUG;
                }
                logger.log(logLevel, message, cause.toString(), cause);
            }
        }
        private void potentiallyRequeueCommands(Channel channel, RedisCommand<?, ?, ?> sentCommand,
                Collection<? extends RedisCommand<?, ?, ?>> sentCommands) {
            if (sentCommand != null && sentCommand.isDone()) {
                return;
            }
            if (sentCommands != null) {
                boolean foundToSend = false;
                for (RedisCommand<?, ?, ?> command : sentCommands) {
                    if (!command.isDone()) {
                        foundToSend = true;
                        break;
                    }
                }
                if (!foundToSend) {
                    return;
                }
            }
            // 命令重发,最终会再次调用io.lettuce.core.protocol.DefaultEndpoint#write
            if (channel != null) {
                DefaultEndpoint endpoint = this.endpoint;
                channel.eventLoop().submit(() -> {
                    requeueCommands(sentCommand, sentCommands, endpoint);
                });
            } else {
                requeueCommands(sentCommand, sentCommands, endpoint);
            }
        }
Lettuce客户端命令响应获取流程
前文介绍了lettuce如何将命令通过netty连接发送给服务器,接下来介绍lettuce如何接收服务器的响应并返回给调用方。
netty客户端在收到消息后,会依次从前往后调用连接的handler#channelRead方法,由建链流程介绍可知,lettuce主要通过io.lettuce.core.protocol.CommandHandler#channelRead来处理服务端消息。
    public void channelRead(ChannelHandlerContext ctx, Object msg) throws Exception {
        // ...省略非关键代码
        ByteBuf input = (ByteBuf) msg;
        input.touch("CommandHandler.read(…)");
        try {
            // 想将消息写入本地buffer
            buffer.touch("CommandHandler.read(…)");
            buffer.writeBytes(input);
            // 解码和响应处理
            decode(ctx, buffer);
        } finally {
            // 释放内存
            input.release();
        }
    }
io.lettuce.core.protocol.CommandHandler#decode(io.netty.channel.ChannelHandlerContext, io.netty.buffer.ByteBuf)
    protected void decode(ChannelHandlerContext ctx, ByteBuf buffer) throws InterruptedException {
        while (canDecode(buffer)) {
            if (isPushDecode(buffer)) {
                // 省略push消息相关处理
            } else {
                // 获取本地队列中的第一条命令
                RedisCommand<?, ?, ?> command = stack.peek();
                if (debugEnabled) {
                    logger.debug("{} Stack contains: {} commands", logPrefix(), stack.size());
                }
                pristine = false;
                try {
                    // 消息解码
                    if (!decode(ctx, buffer, command)) {
                        hasDecodeProgress = true;
                        decodeBufferPolicy.afterPartialDecode(buffer);
                        return;
                    }
                } catch (Exception e) {
                    ctx.close();
                    throw e;
                }
                hasDecodeProgress = false;
                if (isProtectedMode(command)) {
                    onProtectedMode(command.getOutput().getError());
                } else {
                    if (canComplete(command)) {
                        // 解码成功,命令执行完成,从本地队列删除Command
                        stack.poll();
                        try {
                            if (debugEnabled) {
                                logger.debug("{} Completing command {}", logPrefix(), command);
                            }
                            // 解码成功,通知调用方响应结果
                            complete(command);
                        } catch (Exception e) {
                            logger.warn("{} Unexpected exception during request: {}", logPrefix, e.toString(), e);
                        }
                    }
                }
                afterDecode(ctx, command);
            }
        }
        decodeBufferPolicy.afterDecoding(buffer);
    }
解码服务端消息流程
消息解码最终调用:io.lettuce.core.protocol.CommandHandler#decode0(io.netty.channel.ChannelHandlerContext, io.netty.buffer.ByteBuf, io.lettuce.core.protocol.RedisCommand<?,?,?>)
    private boolean decode0(ChannelHandlerContext ctx, ByteBuf buffer, RedisCommand<?, ?, ?> command) {
        if (!decode(buffer, command, getCommandOutput(command))) {
            if (command instanceof DemandAware.Sink) {
                // 背压处理
                DemandAware.Sink sink = (DemandAware.Sink) command;
                sink.setSource(backpressureSource);
                ctx.channel().config().setAutoRead(sink.hasDemand());
            }
            return false;
        }
        if (!ctx.channel().config().isAutoRead()) {
            ctx.channel().config().setAutoRead(true);
        }
        return true;
    }

    protected boolean decode(ByteBuf buffer, RedisCommand<?, ?, ?> command, CommandOutput<?, ?, ?> output) {
        return rsm.decode(buffer, output, command::completeExceptionally);
    }
io.lettuce.core.protocol.RedisStateMachine#decode(io.netty.buffer.ByteBuf, io.lettuce.core.output.CommandOutput<?,?,?>, java.util.function.Consumer<java.lang.Exception>)
    public boolean decode(ByteBuf buffer, CommandOutput<?, ?, ?> output, Consumer<Exception> errorHandler) {
        buffer.touch("RedisStateMachine.decode(…)");
        // 增加stack中元素计数,此处实际未赋值
        if (isEmpty(stack)) {
            addHead(stack);
        }
        if (output == null) {
            return isEmpty(stack);
        }
        boolean resp3Indicator = doDecode(buffer, output, errorHandler);
        if (debugEnabled) {
            logger.debug("Decode done, empty stack: {}", isEmpty(stack));
        }
        // 更新协议版本
        if (isDiscoverProtocol()) {
            if (resp3Indicator) {
                setProtocolVersion(ProtocolVersion.RESP3);
            } else {
                setProtocolVersion(ProtocolVersion.RESP2);
            }
        }
        return isEmpty(stack);
    }
io.lettuce.core.protocol.RedisStateMachine#doDecode
    private boolean doDecode(ByteBuf buffer, CommandOutput<?, ?, ?> output, Consumer<Exception> errorHandler) {
        boolean resp3Indicator = false;
        State.Result result;
        while (!isEmpty(stack)) {
            // 获取状态机中最新的一个State元素
            State state = peek(stack);
            if (state.type == null) {
                if (!buffer.isReadable()) {
                    break;
                }
                // 读取buffer中第一字节,并转换为消息类型
                state.type = readReplyType(buffer);
                if (state.type == HELLO_V3 || state.type == MAP) {
                    resp3Indicator = true;
                }
                buffer.markReaderIndex();
            }
            // 根据不同消息类型,执行处理流程,此处以SINGLE('+', RedisStateMachine::handleSingle)为例
            result = state.type.handle(this, state, buffer, output, errorHandler);
            // 响应消息不完整,退出循环,等待下一个数据包后重新执行
            if (State.Result.BREAK_LOOP.equals(result)) {
                break;
            // 批量执行命令,批量响应循环处理
            } else if (State.Result.CONTINUE_LOOP.equals(result)) {
                continue;
            }
            buffer.markReaderIndex();
            // 减小stack中元素计数
            remove(stack);
            output.complete(size(stack));
        }
        return resp3Indicator;
    }
set命令响应结果如下:“+OK\r\n”
io.lettuce.core.protocol.RedisStateMachine#handleSingle
    static State.Result handleSingle(RedisStateMachine rsm, State state, ByteBuf buffer, CommandOutput<?, ?, ?> output,
            Consumer<Exception> errorHandler) {
        ByteBuffer bytes;
        // 读取一行,如消息不完整,退出循环
        if ((bytes = rsm.readLine(buffer)) == null) {
            return State.Result.BREAK_LOOP;
        }
        // 响应非"QUEUED",即代表是正常响应结果
        if (!QUEUED.equals(bytes)) {
            // 将命令输出结果写入CommandOutput中
            rsm.safeSetSingle(output, bytes, errorHandler);
        }
        // 本次命令处理结束
        return State.Result.NORMAL_END;
    }
服务端消息解码完成处理
io.lettuce.core.protocol.CommandHandler#complete
    protected void complete(RedisCommand<?, ?, ?> command) {
        command.complete();
    }
由前文命令封装介绍可知,这里的RedisCommand经过了3层包装:ClusterCommand->AsyncCommand->Command。
首先调用io.lettuce.core.cluster.ClusterCommand#complete,该方法先处理ask或moved响应,然后调用父类方法io.lettuce.core.protocol.CommandWrapper#complete:
    public void complete() {
        Object[] consumers = ONCOMPLETE.get(this);
        if (consumers != COMPLETE && ONCOMPLETE.compareAndSet(this, consumers, COMPLETE)) {
            // 调用原始command的complete方法,此处调用io.lettuce.core.protocol.AsyncCommand#complete
            command.complete();
            // 模板方法,在发布订阅中用到
            doOnComplete();
            // 支持回调处理
            notifyConsumers(consumers);
        }
    }
io.lettuce.core.protocol.AsyncCommand#complete
    public void complete() {
        if (COUNT_UPDATER.decrementAndGet(this) == 0) {
            completeResult();
            // 调用io.lettuce.core.protocol.Command#complete设置命令状态为已完成
            command.complete();
        }
    }

    protected void completeResult() {
        // 无需响应,直接返回null
        if (command.getOutput() == null) {
            complete(null);
            // 响应返回错误,返回异常给调用方
        } else if (command.getOutput().hasError()) {
            doCompleteExceptionally(ExceptionFactory.createExecutionException(command.getOutput().getError()));
        } else {
            // 返回响应结果,唤醒调用线程
            complete(command.getOutput().get());
        }
    }
总结
本文主要介绍了使用redisTemplate发送set命令的主要流程和原理:获取基础连接调用set方法(阻塞等待)->封装命令->获取指定槽的节点连接->命令缓存到队列末尾->命令编码->发送到tcp缓冲区->redis服务端收到请求、处理并返回响应->客户端tcp缓冲区收到响应报文->响应消息解码->从本地队列头部去除缓存命令->响应写入命令CommandOutput对象->返回响应唤醒调用线程。
Lettuce客户端借助命令队列、响应式编程,实现了tcp连接的双工复用,这也是Lettuce在使用单个连接复用的情况下仍然保持高性能的主要原因。


 6560
6560

 被折叠的 条评论
为什么被折叠?
被折叠的 条评论
为什么被折叠?
 到【灌水乐园】发言


