一,公共路径output.publicPath
这个地默认值是:’’,也就是说webpack打包出来地html文件中,会以这个为基准,链接资源。
它的写法有三种情况:
1,写的是http这种带协议的完整路径,就是CDN,链接互联网资源
2,写的是相对于服务的 URL,例如"/assets/"
3,最常见的及默认的“”,都是相对于index.html的相对地址
 output: {
    publicPath: "https://cdn.example.com/assets/", // CDN(总是 HTTPS 协议)
	publicPath: "//cdn.example.com/assets/", // CDN (协议相同)
	publicPath: "/assets/", // 相对于服务(server-relative)
    publicPath: "assets/", // 相对于 HTML 页面
	publicPath: "../assets/", // 相对于 HTML 页面
	publicPath: "", // 相对于 HTML 页面(目录相同)
  },
此外,webpack-dev-server 也会默认从 publicPath 为基准,使用它来决定在哪个目录下启用服务,来访问 webpack 输出的文件。

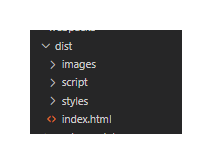
也就是说,按照我们之前的配置,打包出来的文件应该是这个样子的:

这个publicPath就是配置如何去访问这些文件,相对于index.html。
即index.html的绝对路径+publicPath+配置的filename来访问资源。
这里需要注意的一点是,css中引入图片之后,如果抽离css了,需要为它配置publicpath:
 {
        test: /\.(scss|css)$/,
        use: [
          {
            loader: MiniCssExtractPlugin.loader,
            options: {
              // 当前的css所在的文件要相对到dist文件夹
              publicPath: "../"
            }
          },
          "css-loader",
          "sass-loader"
        ]
      },
例如,这几个配置加了一层assets,css中就得也加一层才能返回dist:

二,环境变量
webpack可以通过命令行环境配置的–env参数,允许你传入任意数量的环境变量。并且在webpack.config.js中可以访问这些环境变量。
--env production   //就是production=true(不设置值则值是布尔类型的true)
--env goal=local   //就是goal=local
这样命令行配置之后,要想在webpack的js中获取到。需要修改webpack的写法。module.exports指向配置对象。要使用env变量,你必须将module.exports转化成一个函数:
module.exports=(env)=>{
	return {
		//...其他配置
		mode:env.productiop?'production':'development',
	}
}
于是命令行执行webpack的时候, npx webpack --env production。
在node中运行的webpack打包代码,就可以读取到这个production,然后知道你是要打生产的包。webpack就会以生产的配置进行打包
但是我们发现,现在打包出来的代码还没有进行压缩。按道理生产的js代码是需要进行压缩处理的。

三,生产环境下打包出来的js代码压缩处理
第一步,安装插件
npm i terser-webpack-plugin -D
第二步,引入使用
const TerserPlugin = require("terser-webpack-plugin");
第三步,具体配置
 optimization: {
      minimize: true,//要开启这个才会生效
      minimizer: [
        new CssMinimizerPlugin(),
        new TerserPlugin({
          parallel: true, //多线程压缩
          extractComments: false //不要注释-因为默认会对每个压缩的文件生成一个txt的注释文本。没必要
        })
      ],
    }
这个插件,当mode是production的时候,执行这个配置打包成js压缩的形式,而开发环境时,则是打包成原始的js。
插件的使用文档:https://webpack.docschina.org/plugins/terser-webpack-plugin/
四,拆分开发环境的配置
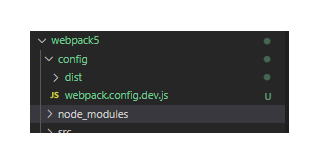
第一步,新建config文件夹,把之前的配置挪到这里来

第二步,仅保留开发环境需要的配置
直接是development了,就不需要env了,所以module.export可以还原成导出对象的形式。

第三步,使用命令行,让webpack执行这里的配置
npx webpack --config ./config/webpack.config.dev.js
会发现,dist文件夹居然生成在config文件夹下:

这是因为output内的path需要修改:(这里需要注意,开发环境不能有publicPath,因为webpack-dev-server 会默认从 publicPath 为基准,使用它来决定在哪个目录下启用服务,来访问 webpack 输出的文件。)

或者开发运行:
npx webpack server --config ./config/webpack.config.dev.js
五,拆分生产环境的配置

npx webpack --config ./config/webpack.config.pro.js
六,配置package.json的script脚本
上文中,我们运行webpack打包都是使用的命令行,谁没事会去记和输入这么一大串的文本呀。于是可以利用package.json的script脚本来执行这段命令:
"scripts": {
    "start": "webpack server --config ./config/webpack.config.dev.js",
    "build": "webpack --config ./config/webpack.config.pro.js"
},
因为本地有依赖了(node_modules)了,就不需要再使用npx了。

七,提取公共配置
新建一个webpack.config.common.js,然后把开发和生产环境的公用配置放置到这里:
const path = require("path"); //这个是node内置的一个模块,用来操作文件路径的方法
const HtmlWebpackPlugin = require("html-webpack-plugin");
const MiniCssExtractPlugin = require("mini-css-extract-plugin");
module.exports = {
  entry: {
    index: "./src/index.js", //设置打包入口,相对于命令行执行的目录
    another: "./src/another_module.js"
  },
  output: {
    path: path.resolve(__dirname, "../dist"), //设置打包的出口,需要是绝对路径,而__dirname是node的一个全局变量,记录当前文件的绝对路径(是这个配置文件在的目录)
    clean: true, //清除上次打包出来的文件
    assetModuleFilename: "assets/images/[contenthash][ext]" //自定义asset module资源打包后的路径和名字
  },
  plugins: [
    new HtmlWebpackPlugin({
      template: "./index.html", //用来做模板的html的文件路径
      filename: "index.html", //生成的html的名字
      inject: "body" //打包出来的那个js文件,放置在生成的body标签内
    }),
    new MiniCssExtractPlugin({
      filename: "assets/styles/[contenthash].css" //配置css打包之后的存放路径
    })
  ],
  module: {
    rules: [
      {
        test: /\.png$/, //正则匹配到png文件时,执行本策略
        type: "asset/resource", //将其分割为单独的文件,并导出url(w文件路径)
        generator: {
          filename: "assets/images/[name]_[contenthash][ext]"
        }
      },
      {
        test: /\.svg$/,
        type: "asset/inline"
      },
      {
        test: /\.txt$/,
        type: "asset/source"
      },
      {
        test: /\.jpg$/,
        type: "asset",
        generator: {
          filename: "assets/images/[name]_[contenthash][ext]"
        },
        parser: {
          dataUrlCondition: {
            maxSize: 4 * 1024 * 1024 //图片大小4m
          }
        }
      },
      {
        test: /\.(scss|css)$/,
        use: [
          {
            loader: MiniCssExtractPlugin.loader,
            options: {
              // 当前的css所在的文件要相对到dist文件夹
              publicPath: "../../"
            }
          },
          "css-loader",
          "sass-loader"
        ]
      },
      {
        test: /\.(woff|woff2|eot|ttf|otf)$/,
        type: "asset/resource"
      },
      {
        test: /\.js$/,
        use: {
          loader: "babel-loader",
          options: {
            presets: ["@babel/preset-env"],
            plugins: [["@babel/plugin-transform-runtime"]],
            //开启缓存
            cacheDirectory: true
          }
        },
        exclude: /node_modules/
      }
    ]
  },
  optimization: {
    splitChunks: {
      //将第三方的依赖抽离成一个js文件
      cacheGroups: {
        vendor: {
          test: /[\\/]node_modules[\\/]/,
          name: "vendors",
          chunks: "all"
        }
      }
    }
  }
};
然后dev文件配置剩下:
module.exports = {
  output: {
    filename: "assets/script/[name]_bundle.js" //设置打包出来的js的文件名
  },
  devServer: {
    static: "./dist" //执行dist作为根目录,这是本地服务器,打包的内容放置在内存中,然后静态资源指定为这个路径
  },
  devtool: "inline-source-map", //映射定位error和warning
  mode: "development" //这里直接设置成开发
};
product文件剩下:
const CssMinimizerPlugin = require("css-minimizer-webpack-plugin");
const TerserPlugin = require("terser-webpack-plugin");
module.exports = {
  output: {
    filename: "assets/script/[name].[contenthash]_bundle.js", //设置打包出来的js的文件名,生产环境,为了避免每次新部署之后,浏览器缓存,所以要加哈希
    publicPath: "./" // index.html中链接资源,以index.html为基准,定位之前配置的image,style,script
  },
  mode: "production",
  optimization: {
    minimize: true,
    minimizer: [
      new CssMinimizerPlugin(),
      new TerserPlugin({
        parallel: true, //多线程压缩
        extractComments: false //不要注释
      })
    ]
  },
  performance: {
    hints: false
  }
};
于是可以知道,这三个文件其实就是三个对象。第一个对象存放共有的属性和值,dev的对象则存放开发环境的对象,pro的则存放生产环境的对象。
当我们想打开发的包时,只需要使用公用的对象和开发的对象的并集即可。也就是这两者要进行合并。
并且是深层的合并,取并集。webpack提供了一个插件来帮助我们完成这个步骤。
八,合并配置
需要使用到一个webpack插件。
npm install webpack-merge -D
然后再在config文件夹下新建:webpack.config.js
const { merge } = require("webpack-merge");
const commonConfig = require("./webpack.config.common");
const developmentConfig = require("./webpack.config.dev");
const productionConfig = require("./webpack.config.pro");
module.exports = (env) => {
  switch (true) {
    case env.development:
      return merge(commonConfig, developmentConfig);
    case env.production:
      return merge(commonConfig, productionConfig);
    default:
      return new Error("no matching configuration");
  }
};
再修改package中的script配置:
  "scripts": {
    "start": "webpack server --config ./config/webpack.config.js --env development",
    "build": "webpack --config ./config/webpack.config.js --env production"
  },
于是当我们执行
npm run start的时候,就是执行抽离出来的公共配置和开发配置的并集。
npm run build的时候,就是执行抽离出来的公共配置和生产配置的并集。


 1490
1490


 被折叠的 条评论
为什么被折叠?


