


今天聊nms时想起了这个 , 这个不需要nms, 目前nms free还不是太好 后处理还是需要, 好了还是搬运今天的主角把, 大佬们勿怪啊~~
TRansformer之前还是发了一些文章的~~ 这里在说一下哈
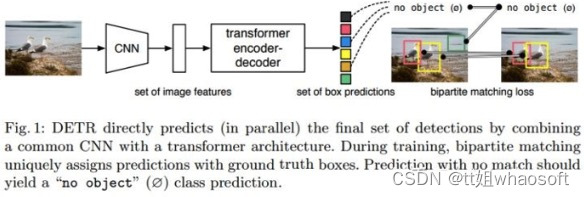
DETR的全称是DEtection TRansformer,是Facebook提出的基于Transformer的端到端目标检测网络
开源代码 GitHub - facebookresearch/detr: End-to-End Object Detection with Transformers
Transformer自2017年被提出以来,迅速得到了广泛应用,不仅仅在NLP领域基本成为了一个统一的范式, 也被应用到一些视觉的领域,比如图像分类、目标检测、行为识别等,在部分功能上取代了CNN,大有一种统一NLP和CV的趋势。
作为Transformer用在目标检测领域的开山之作,DETR是CV领域学习Transformer绕不过的一道坎。前人栽树后人乘凉,学习一些经典的思路和代码对自己的提升也是巨大的。
Transformer最早由Google提出,成功应用于自然语言处理,目前已经在许多自然语言处理任务中取得了SOTA的成果。Transformer本质上仍然是一个Encoder-Decoder的结构,encoder和decoder均是一种Self-Attention模块的多重叠加,结构如图所示:
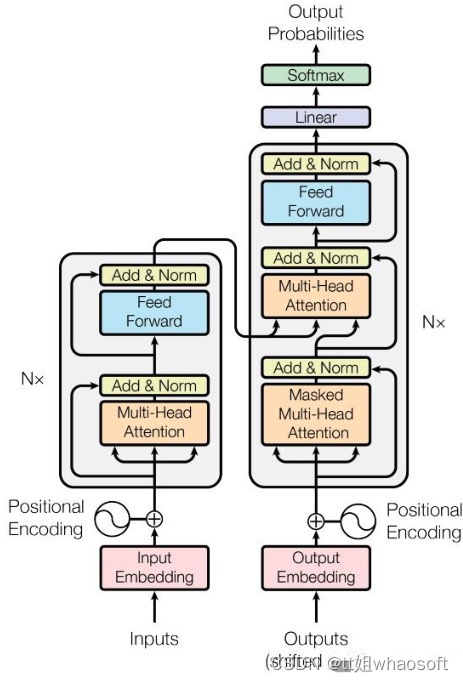
原版Transformer结构
和传统的序列模型如RNN相比,Transformer的主要改进在于:
- 将RNN变为多个自注意力Self-Attention结构的叠加
- 并行计算序列中任意元素相对于其他所有元素的相关性,高效地提取上下文中的相关性,并引入多头注意力Multi-head Attention机制,从多角度提取特征
- 用位置编码来描述序列的前后信息,取代了RNN串行的计算过程
这里推荐几个参考博客,里面有详细的动画展示了序列模型和自注意力机制是如何工作的
图解Transformer:
The Illustrated Transformer – Jay Alammar – Visualizing machine learning one concept at a time.
The Illustrated Transformer:
The Illustrated Transformer – Jay Alammar – Visualizing machine learning one concept at a time.
图解sequence model和Attention:
此外哈佛大学还编写了一个极为详细的注解Attention is All You Need原文的博客,使用代码实现了Transformer的每一个关键步骤。可以在github或Google Colab上找到该项目的源代码:
以及对应的中文翻译版本:
搞懂Transformer结构,看这篇PyTorch实现就够了(上) - 知乎
下面结合PyTorch的接口展示一下Transformer的实际用法。
PyTorch的接口定义参考
Transformer — PyTorch 1.12 documentation
可以看出PyTorch对Transformer的封装是通过torch.nn.Transformer来实现的。该对象的构造函数比较复杂,主要包含以下几个参数:
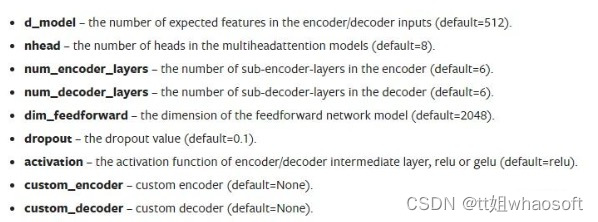
nn.Transformer参数
其中d_model是word embedding的channel数;n_head是多头注意力的个数,论文中为8;num_encoder_layers和num_decoder_layers分别对应编码器和解码器的自注意力模块叠加的次数;dim_feedforward对应编码器-解码器中的Linear层的维度。
nn.Transformer的forward函数实现了编码和解码的过程:
forward的参数也比较多,如图所示:
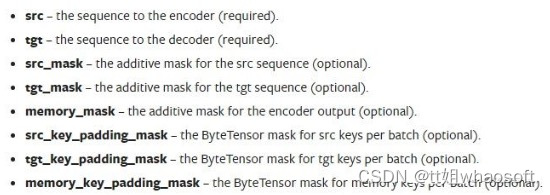
其中必须的两个是src和tgt,分别对应于编码器的输入inputs和解码器的输入outputs。tgt的作用有点类似于一种条件约束。Decoder的第一层的tgt输入是一个词嵌入向量,从第二层开始是前一层的计算结果。
其他可选参数中,[src/tgt/memory]_mask是一个掩码数组,定义了计算Attention的策略,对应于原文的3.1节。一个通俗解释为:一个词序列中,每个词只能被它前面的词所影响,所以这个词后面的所有位置都需要被忽略,所以在计算Attention的时候,该词向量和它后面的词向量的相关性为0。
[src/tgt/memory]_key_padding_mask也是掩码数组,定义了src, tgt和memory中哪些位置需要保留,哪些需要忽略。
这些参数的shape依次为:
- src: (S,N,E)
- tgt: (T,N,E)
- src_mask: (S,S)
- tgt_mask: (T,T)
- memory_mask: (T,S)
- src_key_padding_mask: (N,S)
- tgt_key_padding_mask: (N,T)
- memory_key_padding_mask: (N,S)
Transformer输出的shape为:
- output: (T,N,E)
其中S为源序列的长度,T为目标序列的长度,N为batch size,E为词嵌入向量的维度。
好了下面是今天真正的主角了...
DETR
DETR的思路和传统的目标检测的本质思路有相似之处,但表现方式很不一样。传统的方法比如Anchor-based方法本质上是对预定义的密集anchors进行类别的分类和边框系数的回归。DETR则是将目标检测视为一个集合预测问题(集合和anchors的作用类似)。由于Transformer本质上是一个序列转换的作用,因此,可以将DETR视为一个从图像序列到一个集合序列的转换过程。该集合实际上就是一个可学习的位置编码(文章中也称为object queries或者output positional encoding,代码中叫作query_embed)。
DETR的网络结构如图所示:
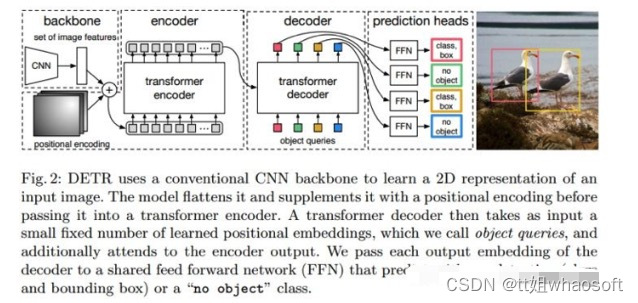
DETR算法流程
DETR使用的Transformer结构和原始版本稍有不同:
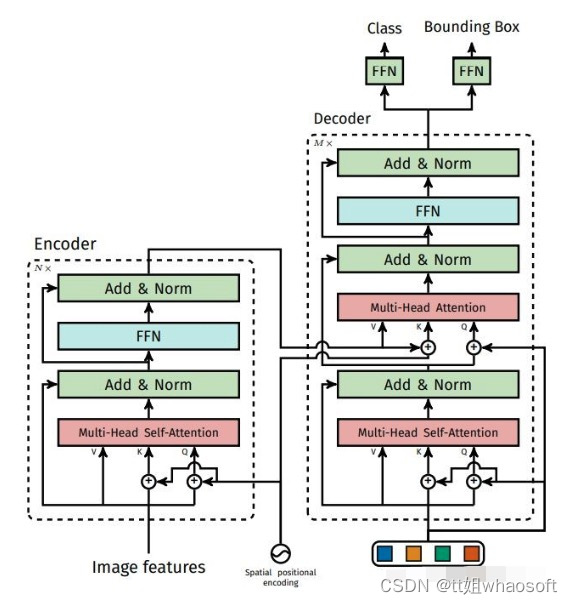
DETR的encoder decoder
spatial positional encoding是作者自己提出的二维空间位置编码方法,该位置编码分别被加入到了encoder的self attention和decoder的cross attention,同时object queries也被加入到了decoder的两个attention中。而原版的Transformer将位置编码加到了input和output embedding中。值得一提的是,作者在消融实验中指出即使不给encoder添加任何位置编码,最终的AP也只比完整的DETR下降了1.3个点。
代码基于PyTorch重写了TransformerEncoderLayer, TransformerDecoderLayer类,用到的PyTorch接口只有nn.MultiheadAttention类。源码需要PyTorch 1.5.0以上版本。
代码核心位于models/transformer.py和models/detr.py。
transformer.py
Transformer类包含了一个Encoder和一个Decoder对象。相关类的实现均可在transformer.py中找到。重点看一下forward函数,有一个对输入tensor的变换操作:# flatten NxCxHxW to HWxNxC。
结合PyTorch中对src和tgt的形状定义可以发现,DETR的思路是将backbone输出特征图的像素展开成一维后当成了序列长度,而batch和channel的定义不变。故而DETR可以计算特征图的每一个像素相对于其他所有像素的相关性,这一点在CNN中是依靠感受野来实现的,可以看出Transformer能够捕获到比CNN更大的感受范围。
DETR在计算attention的时候没有使用masked attention,因为将特征图展开成一维以后,所有像素都可能是互相关联的,因此没必要规定mask。而src_key_padding_mask是用来将zero_pad的部分给去掉。
forward函数中有两个关键变量pos_embed和query_embed。其中pos_embed是位置编码,位于models/position_encoding.py.
position_encoding.py
针对二维特征图的特点,DETR实现了自己的二维位置编码方式。代码如下
的mask是一个位置掩码数组,对于一个没有经过zero_pad的图像,它的mask是一个全为0的数组。
Transformer原文中采用的位置编码方式为正弦编码,计算公式为
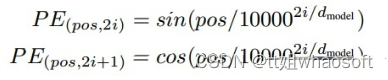
Transformer位置编码
pos是词向量在序列中的位置,而 i 是channel的index。对照代码,可以看出DETR是为二维特征图的 x 和 y 方向各自计算了一个位置编码,每个维度的位置编码长度为num_pos_feats(该数值实际上为hidden_dim的一半),对x或y,计算奇数位置的正弦,计算偶数位置的余弦,然后将pos_x和pos_y拼接起来得到一个NHWD的数组,再经过permute(0,3,1,2),形状变为NDHW,其中D等于hidden_dim。这个hidden_dim是Transformer输入向量的维度,在实现上,要等于CNN backbone输出的特征图的维度。所以pos code和CNN输出特征的形状是完全一样的。
将CNN输出的features和pos code均进行flatten和permute操作,将形状变为SNE,符合PyTorch的输入形状定义。在TransformerEncoder中,会将src和pos_embed相加。可自行查看代码。
detr.py
- class DETR
该类封装了整个DETR的计算流程。首先来看论文中反复提到的object queries到底是什么。
答案就是query_embed。
代码中,query_embed实际上就是一个embedding数组:
其中,num_queries是预定义的目标查询的个数,代码中默认为100。它的意义是:根据Encoder编码的特征,Decoder将100个查询转化成100个目标。通常100个查询已经足够了,很少有图像能包含超过100个目标(除非超密集的任务),相比之下,基于CNN的方法要预测的anchors数目动辄上万,计算代价实在是很大。
Transformer的forward函数中定义了一个和query_embed形状相同的全为0的数组target,然后在TransformerDecoderLayer的forward中把query_embed和target相加(这里query_embed的作用表现的和位置编码类似),在self attention中作为query和key;在multi-head attention中作为query:
object queries在经过decoder的计算以后,会输出一个形状为TNE的数组,其中T是object queries的序列长度,即100,N是batch size,E是特征channel。
最后通过一个Linear层输出class预测,通过一个多层感知机结构输出box预测:
分类输出的通道为num_classes+1,类别从0开始,背景类别为num_classes。
- class SetCriterion
该类负责loss的计算。
基于CNN的方法会计算每个anchor的预测结果,然后利用预测结果和ground truth box之间计算iou,挑选iou大于一定阈值的那些anchors作为正样本,来回归它们的class和box deltas。类似的,DETR也会计算每个object query的prediction,但DETR会直接计算box的四个角的归一化值,而不再基于box deltas:

然后将这些object predictions和ground truth box之间进行二分匹配。DETR使用匈牙利算法来完成这一匹配过程。
DETR set匹配
假如有N个目标,那么100个object predictions中就会有N个能够匹配到这N个ground truth,其他的都会和“no object”匹配成功,这些predictions的类别label就会被分配为num_classes,即表示该prediction是背景。
这样的设计是很不错的,理论上每个object query都有唯一匹配的目标,不会存在重叠,所以DETR不需要nms进行后处理。
根据匹配结果计算loss的公式为:

损失函数
通过self.matcher将outputs_without_aux和targets进行匹配。匈牙利算法会返回一个indices tuple,该tuple包含了src和target的index。具体匹配过程请参考models/matcher.py。
- 分类loss
分类loss采用的是交叉熵损失,针对所有predictions
target_classes_o是按target index获取的所有匹配成功的真值类别,并按src index将其放入target_classes的对应位置。匹配失败的predictions在target_classes中用self.num_classes来填充。函数_get_src_permutation_idx的作用是从indices tuple中取得src的batch index和对应的match index。
2. box loss
box loss采用了l1 loss和giou loss,针对匹配成功的predictions
target_boxes 是按target index获取的所有匹配成功的真值box,src_boxes是按src index获取的匹配成功的predictions,计算它们之间的l1_loss和giou loss
3. mask loss
文章还扩展了全景分割的实验,使用mask loss,用来回归segmentation map,这里就不展开将讲解了,感兴趣可以自行查看代码。
实验
和baseline的对比
下面看一下DETR的实验结果。文章选择与RetinaNet和Faster-RCNN做比较
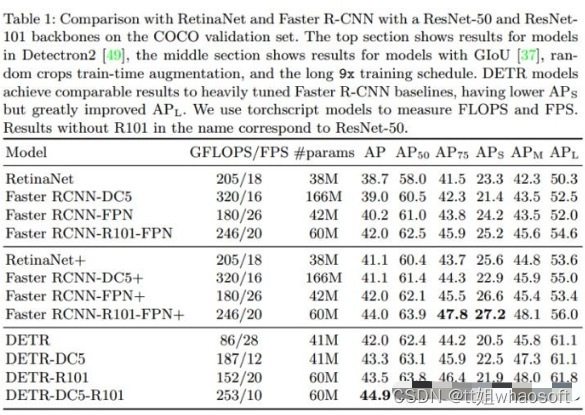
COCO实验对比
可以看出DETR的效果还是很不错的,基于ResNet50的DETR取得了和经过各种finetune的Faster-RCNN相媲美的效果。同时DETR在大目标检测上性能是最好的,但是小目标上稍差,而且基于match的loss导致学习很难收敛。
Deformable DETR的出现较好的解决了这两个问题。
DETR运行需要巨大的显存。作者使用的图像最大的边长为1333,在16个V100上也只能开到batch size=64,训练了三天,共300个epochs。一般实验室还真玩不起==
DETR用于全景分割
为Decoder的每个object embedding加上一个mask head就可以实现像素级分割的功能
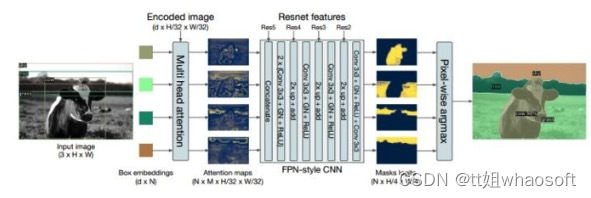
mask head可以和box embed联合训练,也可以训练完了box embed以后再单独训练mask head。
DETR的做法和Mask-RCNN比较像,都是在给定的box prediction的基础上预测该box对应instance的segmentation。这里DETR将mask head输出的attention map进行上采样以后,和backbone的一些分支进行相加,实现一个FPN的功能,然后将所有的box对应的mask map进行bitwise argmax操作,得到最终的分割图。
结语
只想感叹一句,大佬们无论用什么网络结构都能做出惊艳的结果。
个人感觉Transformer最强大的地方还是在于sequence model,而在检测和分割领域,不一定能完全取代CNN,至少目前来看,基于Transformer的结构还是略显臃肿,而且精度不能稳压CNN,尤其是针对小目标,更不要说CNN在移动端、落地应用方面已经打下了坚实的基础,所以将Transformer用在vision任务上,可能更多是停留在学术领域,尤其是一些时序相关的视觉任务,比如行为识别、异常检测、图像理解、图像或视频生成等。


 751
751

 被折叠的 条评论
为什么被折叠?
被折叠的 条评论
为什么被折叠?
 到【灌水乐园】发言


