


前言
这里让我来教大家如何可以从0到1做一个自己的脚手架,vite-eslint-cli为例进行实现,看看我们需要经过哪些步骤呢???
关于vite-eslint-cli
1. 这个脚手架能干什么
- 💡 基于vite 实现了项目以及规范一体化部署
- ⚡️可以从0 到 1快速部署
- 🛠️ 内置实现vue3/ ts/ eslint/ prettier/ commitlint/ husky/ pinia持久化/ vue-router
- 📦 可以快速实现从代码以及规范的搭建
2. 跟vite有什么不同呢
- 💡 内置vite 创建方式,和单独使用vite没有什么不同
- ⚡️ 内置了eslint规范,例如:prettier, eslint, commitlint, husky
- 🛠️ 提供了vue3 的全家桶配置。例如: pinia, pinia-plugin-persist, vue-router
- 📦 提供了pinia 持久化方案
- 🔩 内置了vue-router以及pinia 案例
- 🔑 可以用–template 参数 来替代vite --template参数
3. 去哪里看呢
4. 效果呢
- 效果的话,先不给大家演示了。铁子们可以自己运行
npx vite-eslint-cli myapp --template vue-ts。看下具体的效果。广告时间到此结束,我们要正式进入主题了
从0到1进行实现
1. 用到哪些包呢,这里我们进行简单介绍下
- commander 执行命令的包
- colors 可以在控制台打印不同颜色log的包,主要是为了美观用
- prompts 进行命令行交互的包
- fs-extra 进行fs相关控制的包
- … 还有rollup 以及ts配置的包。更多的信息参照下GitHub源码就行了
2. 目录结构是怎样的呢???
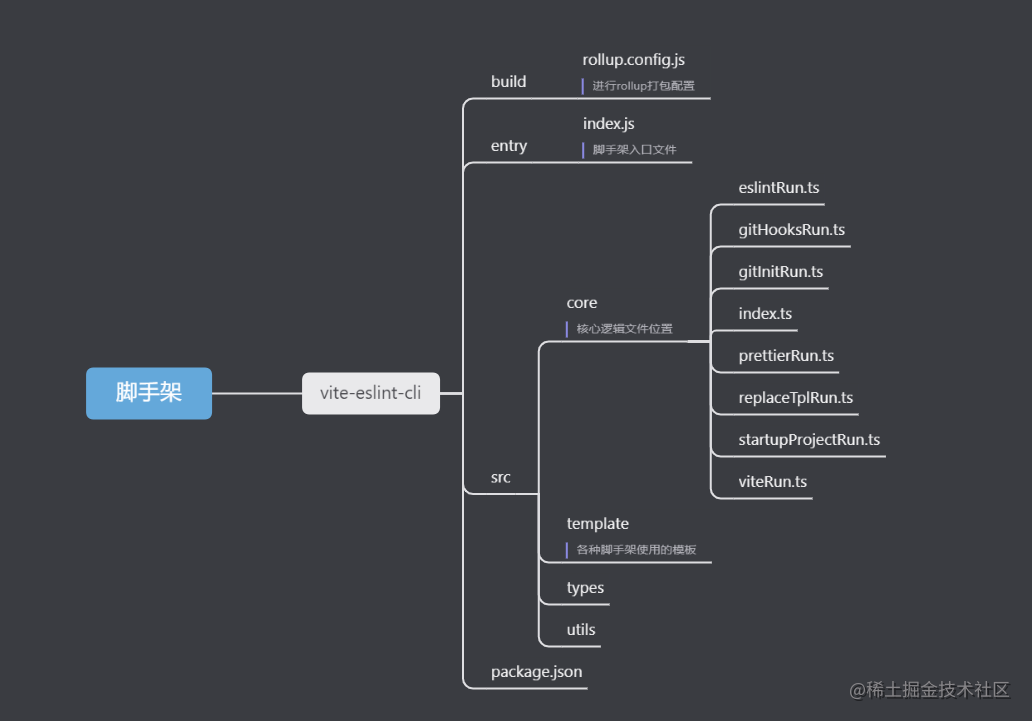
上述是大概的文件目录,更加详细的目录可以参照GitHub中的源码,同时各位也可以建立自己目录。都是ok的
3. 从哪里开始呢???
注意:相对目录都是相对于根目录而言的
1. 建立专属的rollup配置
我们整个脚手架使用ts来写的,原则上将ts转换为js就可以了。不过具体还是看各位的配置。接下来我粘贴出自己的打包配置文件
文件位置:build/rollup.config.js
const path = require('path')
const { nodeResolve } = require('@rollup/plugin-node-resolve')
const commonjs = require('@rollup/plugin-commonjs')
const typescript = require('rollup-plugin-typescript2')
const json = require('@rollup/plugin-json')
const del = require('rollup-plugin-delete')
const resolvePath = url => path.resolve(__dirname, url)
const copy = require('rollup-plugin-copy')

module.exports = {
  input: resolvePath('../src/index.ts'),
  output: {
    file: resolvePath('../dist/index.js'),
    format: 'cjs'
  },
  plugins: [
    del({
      targets: 'dist/*'
    }),
    typescript({
      exclude: ['node_modules'],
      cwd: resolvePath('../')
    }),
    commonjs(),
    nodeResolve(),
    json(),
    copy({
      targets: [
        { src: 'src/template', dest: 'dist/' }
      ]
    })
  ]
}
2. 脚手架入口
文件位置:package.json
- bin 就是我们脚手架执行的入口,其中的名称
vite-eslint-cli. 我们可以在命令行中运行开始执行我们的脚手架- 如果项目还没发布到npm上,可以通过运行
npm link来全局链接,再次执行vite-eslint-cli来运行
- 如果项目还没发布到npm上,可以通过运行
{
  "name": "vite-eslint-cli",
  "version": "1.0.1",
  "description": "基于vite + vue3/ vite + react等, 实现eslint prettier部署,内置vite vue3运行方式,执行代码构建以及eslint部署一体. 内置(pinia,vue-router等)",
  "bin": {
    "vite-eslint-cli": "entry/index.js"
  },
  "scripts": {
    "build": "rollup -c build/rollup.config.js"
  },
  "files": [
    "dist",
    "entry"
  ],
  "keywords": [
    "rollup",
    "vue3",
    "react",
    "eslint",
    "commitlint",
    "prettier"
  ],
  "repository": {
    "type": "git",
    "url": "https://github.com/a572251465/vite-eslint-cli.git"
  },
  "bugs": {
    "url": "https://github.com/a572251465/vite-eslint-cli/issues"
  },
  "homepage": "https://github.com/a572251465/vite-eslint-cli",
  "author": "lihaohao",
  "license": "MIT",
  "devDependencies": {
    "@rollup/plugin-commonjs": "^21.0.2",
    "@rollup/plugin-json": "^4.1.0",
    "@rollup/plugin-node-resolve": "^13.1.3",
    "@types/commander": "^2.12.2",
    "@types/node": "^17.0.21",
    "@types/prompts": "^2.0.14",
    "colors": "^1.4.0",
    "commander": "^9.0.0",
    "eslint": "^8.10.0",
    "fs-extra": "^10.0.1",
    "prettier": "^2.5.1",
    "prompts": "^2.4.2",
    "rollup": "^2.69.0",
    "rollup-plugin-copy": "^3.4.0",
    "rollup-plugin-delete": "^2.0.0",
    "rollup-plugin-typescript2": "^0.31.2",
    "tslib": "^2.3.1",
    "typescript": "^4.6.2"
  }
}
3. node执行入口文件
文件位置:entry/index.js
#! /usr/bin/env node
require('../dist/index')
这个地址会指向打包后的index.js,真正的入口文件是打包前的ts。可以通过rollup配置来看
4. 编写代码入口文件。
几乎所有的脚手架都会让你选择各种选项,选择通过后进行命令创建,这个脚手架也不例外。看下图:
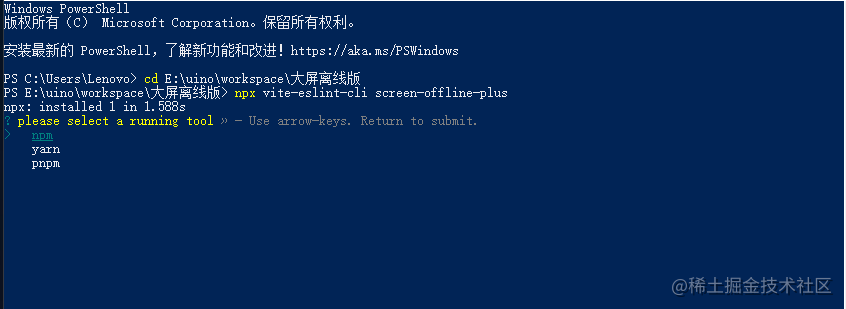
- 通过上图我们就可以得知,首先我们会进入交互命令模式,经过我们的一通选择后,才可以创建项目。那我们就看来看下具体的代码:
- 我们使用插件
commander来执行npx vite-eslint-cli my-app - 上述的代码执行后,可以选择执行工具,这个效果我们其实是通过
prompts插件来实现的 - 接下来看下 源码的实现逻辑
- 我们使用插件
/**
 * @author lihh
 * @description 执行commander入口
 */

import { Command } from 'commander'
import { getCommanderOptions, getConfigFile } from './utils'
import { ICmdOptions, IExecOptions } from './types'
import prompts from 'prompts'
import run from './core'

const path = require('path')

/**
 * @author lihh
 * @description 表示闻讯函数
 * @param tpl 表示模板
 */
const promptHandle = async (tpl: string) => {
  let baseOptions = [{
    type: 'select',
    name: 'tool',
    message: 'please select a running tool',
    choices: ['npm', 'yarn', 'pnpm'].map(item => ({ title: item, value: item }))
  }] as prompts.PromptObject[]

  const res = await prompts(baseOptions)

  return { ...res, isPinia: true, isVueRouter: true }
}

const program = new Command()
// 获取package 文件配置信息
const configInfo = getConfigFile()
// 获取commander options 配置信息
const commanderOptions = getCommanderOptions()

program
  .name(configInfo.name)
  .description(configInfo.description)
  .version(configInfo.version)

program.argument('<project-name>', 'Please enter the project name ')

commanderOptions.forEach(item => {
  program.option(item.keyword, item.description)
})

program.action(async (projectName: string) => {
  const params = program.opts() as ICmdOptions

  // 是否快速创建
  const isY = params.y || false
  // 表示使用模板
  const tpl = isY ? 'vue-ts' : params.template || 'vue-ts'

  // 选择执行工具
  const tool = await promptHandle(tpl)
  const rootPath = process.cwd()
  const projectPath = path.resolve(rootPath, projectName)
  const options = { tpl, ...tool, rootPath, projectName, projectPath } as IExecOptions

  // 开始运行命令
  await run(options)
})

program.parse()
上述代码中的run函数 其实就是我们程序的入口
5. 梳理下主要执行的逻辑
-
- 实现内置的vite初始化,我们对应的是
viteRun.ts文件。 其实我们的工具也是内置vite,运行vite后生成出基本的结构,在这个结构上进行改造
- 实现内置的vite初始化,我们对应的是
-
- 进行git init处理。对应的是
gitInitRun.ts文件。 其实这个逻辑很简单就是执行命令行git init。 因为我们后面的git hook,commitlint都是基于.git文件的
- 进行git init处理。对应的是
-
- 执行eslint相关的配置。对应的是
eslintRun.ts。其中主要是负责一些eslint相关配置安装以及一些忽略文件编写等。就是eslint相关的处理都在这里进行
- 执行eslint相关的配置。对应的是
-
- 执行prettier相关配置。对应的是
prettierRun.ts文件。跟eslint大致类似
- 执行prettier相关配置。对应的是
-
- 执行git hook相关配置。对应的是
gitHooksRun.ts文件。主要是负责一些提交规范相关的内容。例如:commitlint等
- 执行git hook相关配置。对应的是
-
- 执行替换模板配置。对应的是
replaceTplRun.ts文件, 主要是将准备好的模板对原生vue项目模板进行替换。就是启动项目后可以是自己想要的页面
- 执行替换模板配置。对应的是
-
- 下面我会解释下主要是的文件,上述提到的文件各位可以自己编写或是看源码也行。
6. 控制流程的核心文件
import { IExecOptions } from '../types'
import viteRun from './viteRun'
import gitInitRun from './gitInitRun'
import { successLog } from '../utils'
import eslintRun from './eslintRun'
import prettierRun from './prettierRun'
import gitHooksRun from './gitHooksRun'
import startupProjectRun from './startupProjectRun'
import replaceTplRun from './replaceTplRun'

const execStacks = [viteRun, gitInitRun, eslintRun, prettierRun, gitHooksRun, replaceTplRun]
/**
 * @author lihh
 * @description 开始执行命令
 * @param options 通过shell 以及入口 收集的参数
 */
const run = async (options: IExecOptions) => {
  const len = execStacks.length

  // 表示成功的回调
  async function success() {
    successLog(`end: Project initialization succeeded`)

    // 启动后置钩子
    await startupProjectRun.apply(options)
  }

  async function next(index: number) {
    const instance = execStacks[index]
    await instance.apply({
      ...options, callback: async (flags?: string) => {
        const currentIndex = index + 1
        // 如果flags存在值 表示cli中途中断
        if (currentIndex === len || (flags && flags === 'end')) {
          await success()
        } else {
          await next(currentIndex)
        }
      }
    })
  }

  await next(0)
}

export default run
简单解释下上述的代码
- 我们需要执行的每个文件(viteRun.ts等)都是一个类,类中必须包含apply方法。这个函数是类执行的入口
- 我们会将所有需要执行的文件都放到一个数组中,按想要的执行的顺序存放。通过
next函数依次进行调用,通过参数callback函数来通知下一个文件执行,直到最后结束。
结束
脚手架中核心的内容我都解释到了。如果对各位有帮助的话,也请各位老铁给个star,如果还有疑问可以直接issue我。


 2万+
2万+


 被折叠的 条评论
为什么被折叠?
被折叠的 条评论
为什么被折叠?
 到【灌水乐园】发言


