


转自http://www.cnblogs.com/linfenghp/p/5560015.html
先说明一下,本例子是运行在Android Studio下面的。同样的代码复制粘贴到Eclipse运行却会报错。具体原因我也没有细查。知道的哥们,留言通知下呗。
Fragment,也就是碎片,本意是为了适配大屏幕的安卓设备而生的。但是出现后,很多安卓开发者都非常喜欢这个东西。这个东西很好用,但是也不是很容易用。下面我来来细细解说Android中的Fragment。
1、Fragment产生的缘由
运行Android的设备繁多,屏幕大小更是多种多样。针对不同屏幕尺寸,通常情况下,开发者都是先针对手机开发一套源代码,然后拷贝一份,修改布局以适应大屏幕设备,或平板,电视等。为了决解这样的麻烦,Google推出了Fragment。你可以把Fragment当成Activity的一个界面的一个组成部分,甚至Activity的界面可以完全有不同的Fragment组成,Fragment拥有自己的生命周期和接收、处理用户的事件,这样就不必在Activity写一堆控件的事件处理的代码了。更为重要的是,你可以动态的添加、替换和移除某个Fragment。
2、Fragment的生命周期
Fragment必须是依存与Activity而存在的,因此Activity的生命周期会直接影响到Fragment的生命周期。官网这张图很好的说明了两者生命周期的关系:
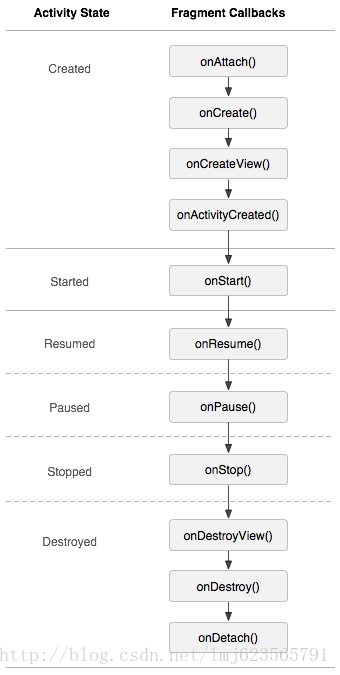
可以看到Fragment比Activity多了几个额外的生命周期回调方法:
onAttach(Activity)
当Fragment与Activity发生关联时调用。
onCreateView(LayoutInflater, ViewGroup,Bundle)
创建该Fragment的视图
onActivityCreated(Bundle)
当Activity的onCreate方法返回时调用
onDestoryView()
与onCreateView想对应,当该Fragment的视图被移除时调用
onDetach()
与onAttach相对应,当Fragment与Activity关联被取消时调用
注意:除了onCreateView,其他的所有方法如果你重写了,必须调用父类对于该方法的实现,
3、静态的使用Fragment
这是使用Fragment最简单的一种方式,把Fragment当成普通的控件,直接写在Activity的布局文件中。步骤:
1、继承Fragment,重写onCreateView决定Fragemnt的布局
2、在Activity中声明此Fragment,就当和普通的View一样
下面展示一个例子(我使用2个Fragment作为Activity的布局,一个Fragment用于标题布局,一个Fragment用于内容布局):
TitleFragment的布局文件:

<?xml version="1.0" encoding="utf-8"?>
<RelativeLayout xmlns:android="http://schemas.android.com/apk/res/android"
    android:layout_width="match_parent"
    android:background="@android:color/darker_gray"
    android:layout_height="45dp">

    <ImageButton
        android:id="@+id/im_button"
        android:layout_width="wrap_content"
        android:layout_height="wrap_content"
        android:src="@android:drawable/star_on"
        />

    <TextView
        android:textSize="25sp"
        android:textColor="@android:color/holo_red_dark"
        android:gravity="center"
        android:text="Fragment制作标题栏"
        android:layout_width="match_parent"
        android:layout_height="match_parent" />

</RelativeLayout>
ContentFragment布局文件
<?xml version="1.0" encoding="utf-8"?>
<RelativeLayout xmlns:android="http://schemas.android.com/apk/res/android"
    android:orientation="vertical" android:layout_width="match_parent"
    android:gravity="center"
    android:layout_height="match_parent">

    <TextView
        android:gravity="center"
        android:textSize="25sp"
        android:text="Fragment当作主面板"
        android:layout_width="wrap_content"
        android:layout_height="wrap_content" />

</RelativeLayout>
MainActivity布局文件
<?xml version="1.0" encoding="utf-8"?>
<RelativeLayout xmlns:android="http://schemas.android.com/apk/res/android"
    xmlns:tools="http://schemas.android.com/tools"
    android:layout_width="match_parent"
    android:layout_height="match_parent"
   >

    <fragment
        android:id="@+id/fg_title"
        android:layout_width="match_parent"
        android:layout_height="45dp"
        android:name="app.linfeng.com.myapplication.TitleFragment"
        />

    <fragment
        android:layout_below="@id/fg_title"
        android:id="@+id/fg_content"
        android:layout_width="match_parent"
        android:layout_height="match_parent"
        android:name="app.linfeng.com.myapplication.ContentFragment"
        />


</RelativeLayout>
TitleFragment源代码
package app.linfeng.com.myapplication;

import android.os.Bundle;
import android.support.v4.app.Fragment;
import android.view.LayoutInflater;
import android.view.View;
import android.view.ViewGroup;
import android.widget.ImageButton;
import android.widget.Toast;


public class TitleFragment extends Fragment {

    private ImageButton im_button;

    @Override
    public View onCreateView(LayoutInflater inflater, ViewGroup container, Bundle savedInstanceState) {

        View view = inflater.inflate(R.layout.title_fragment_layout,container,false);
        im_button = (ImageButton) view.findViewById(R.id.im_button);

        im_button.setOnClickListener(new View.OnClickListener() {
            @Override
            public void onClick(View v) {
                Toast.makeText(getContext(),"业务逻辑写在Fragment上,Activity是不是很整洁了?",Toast.LENGTH_SHORT).show();
            }
        });


        return view;
    }
}
ContentFragment源代码
package app.linfeng.com.myapplication;

import android.os.Bundle;
import android.support.v4.app.Fragment;
import android.view.LayoutInflater;
import android.view.View;
import android.view.ViewGroup;


public class ContentFragment extends Fragment {


    @Override
    public View onCreateView(LayoutInflater inflater,  ViewGroup container,  Bundle savedInstanceState) {
        View view = inflater.inflate(R.layout.content_fragment_layout,container,false);

        return view;
    }
}
MainActivity源代码
package app.linfeng.com.myapplication;

import android.os.Bundle;
import android.support.v7.app.AppCompatActivity;


/**
 * 因为Android Studio新建Activity是自动继承AppCompatActivity,所以我也没有改成
 * Activity,这个和本案例没有关系哈。
 */
public class MainActivity extends AppCompatActivity {

    @Override
    protected void onCreate(Bundle savedInstanceState) {
        super.onCreate(savedInstanceState);
       // requestWindowFeature(Window.FEATURE_NO_TITLE);
        //因为继承的是AppCompatActivity,所以requestWindowFeature()失效了
        getSupportActionBar().hide();
        setContentView(R.layout.activity_main);

    }
}
最后我们看看运行效果

静态使用Fragment其实就是把Fragment当成普通的View一样声明在Activity的布局文件中,然后所有控件的事件处理等代码都由各自的Fragment去处理,瞬间觉得Activity好干净有木有~~代码的可读性、复用性以及可维护性是不是瞬间提升了
v


 2521
2521

 被折叠的 条评论
为什么被折叠?
被折叠的 条评论
为什么被折叠?
 到【灌水乐园】发言


