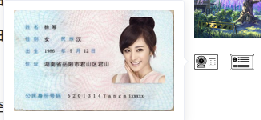
效果展示:
静止效果:身份证正反面示意图

鼠标悬浮放大效果:查看具体信息

代码实现:
父组件:
<Photo_show>是封装的组件,并在其中传需要的参数,封装的原因是项目需要多次使用该效果。
HTML
<template>
	<div>
	   <Photo_show ref="LicenseUpload"  :isLicense='2' :pilot_id="id" />
	   <Photo_show ref="LicenseUpload"  :isLicense='3'  :pilot_id="id"" style="margin-left:15px;"/>
	 </div>
</template>
JS
import Photo_show from '@/components/photo-show'
子组件:
HTML
有后端数据信息时展示v-if
无后端数据时静止图片 v-else
<template>
	<div>
	   <el-popover v-if="imageUrl" trigger="hover" :open-delay='200'>
	       <img  :src="imageUrl" :style="popoverStyle">
	       <img  slot="reference" :src="imageUrl1" :style="photoStyle">
	   </el-popover>
	   <img v-else :src="defaultSrc" :style="photoStyle">
	</div>
</template>
JS
export default {
    data(){
      return{
	      defaultSrc:'',
	      imageUrl: '',
	      imageUrl1: '',
	      photoStyle:'',
	      popoverStyle:'',
	      }
	   }
	   props:{
	     isLicense: {
      }
      pilot_id: {
        type: String,
        default: ''
      },
	   }
	   created(){
	   //后端有数据,获取信息
	    if(this.pilot_id !== ''){
            this.getFiles(this.pilot_id,this.isLicense)
            console.log("获取到id了吗???",this.pilot_id)
        }
     //后端没有数据,展示默认图片
	     if(this.isLicense == '0'){
            this.defaultSrc = "xx.png"
        }
        else if(this.isLicense == '2'){
                  this.defaultSrc =require('../../xxx.png')
        }
        else if(this.isLicense == '3'){
               this.defaultSrc =require('../../yyy.png')
        }
	   }
	   methods: {
	     getFiles(Id,Photo) {
	     if(photoId != ''){
               get(`/flight/pilotAttachment/${photoId}`).then(res=>{
               console.log(res.data)
               let file = res.data
               let buffer = Buffer.from(file.content, 'binary')//创建Buffer类,读图片
               let blob = new Blob([buffer])//使用文件流下载
               let url = URL.createObjectURL(blob)
               _this.imageUrl = url//popver大图片
               //默认缩略图
               if(this.isLicense == '2'){
                   _this.imageUrl1 =require('../../assets/images/IDcard-guohui.png')
               }
               else if(this.isLicense == '3'){
                   _this.imageUrl1 =require('../../assets/images/IDcard-benmian.png')
               }
               else{
                   _this.imageUrl1 = url
               }
           })
           }
	     }
	   }
知识点:
1.Node.js Buffer(缓冲区)
JavaScript 语言自身只有字符串数据类型,没有二进制数据类型。但在处理像TCP流或文件流时,必须使用到二进制数据。因此在 Node.js中,定义了一个 Buffer 类。过使用显式的字符编码,就可以在 Buffer 实例与普通的 JavaScript 字符串之间进行相互转换
1.1创建Buffer类
Buffer.alloc()
Buffer.from()
1.2写入
buf.write()
返回实际写入的大小。如果 buffer 空间不足, 则只会写入部分字符串
1.3读取
buf.toString()


 8021
8021


 被折叠的 条评论
为什么被折叠?


