通过一份关于Chrome插件开发指北 、网页元素圈选两篇文章,基本了解到chrome插件开发,以及元素圈选的实现逻辑,那么咱就可以整自动化工具的chrome插件圈选元素的功能。
模板
这里使用到的是基于vite + react开发chrome插件模板开发.
效果
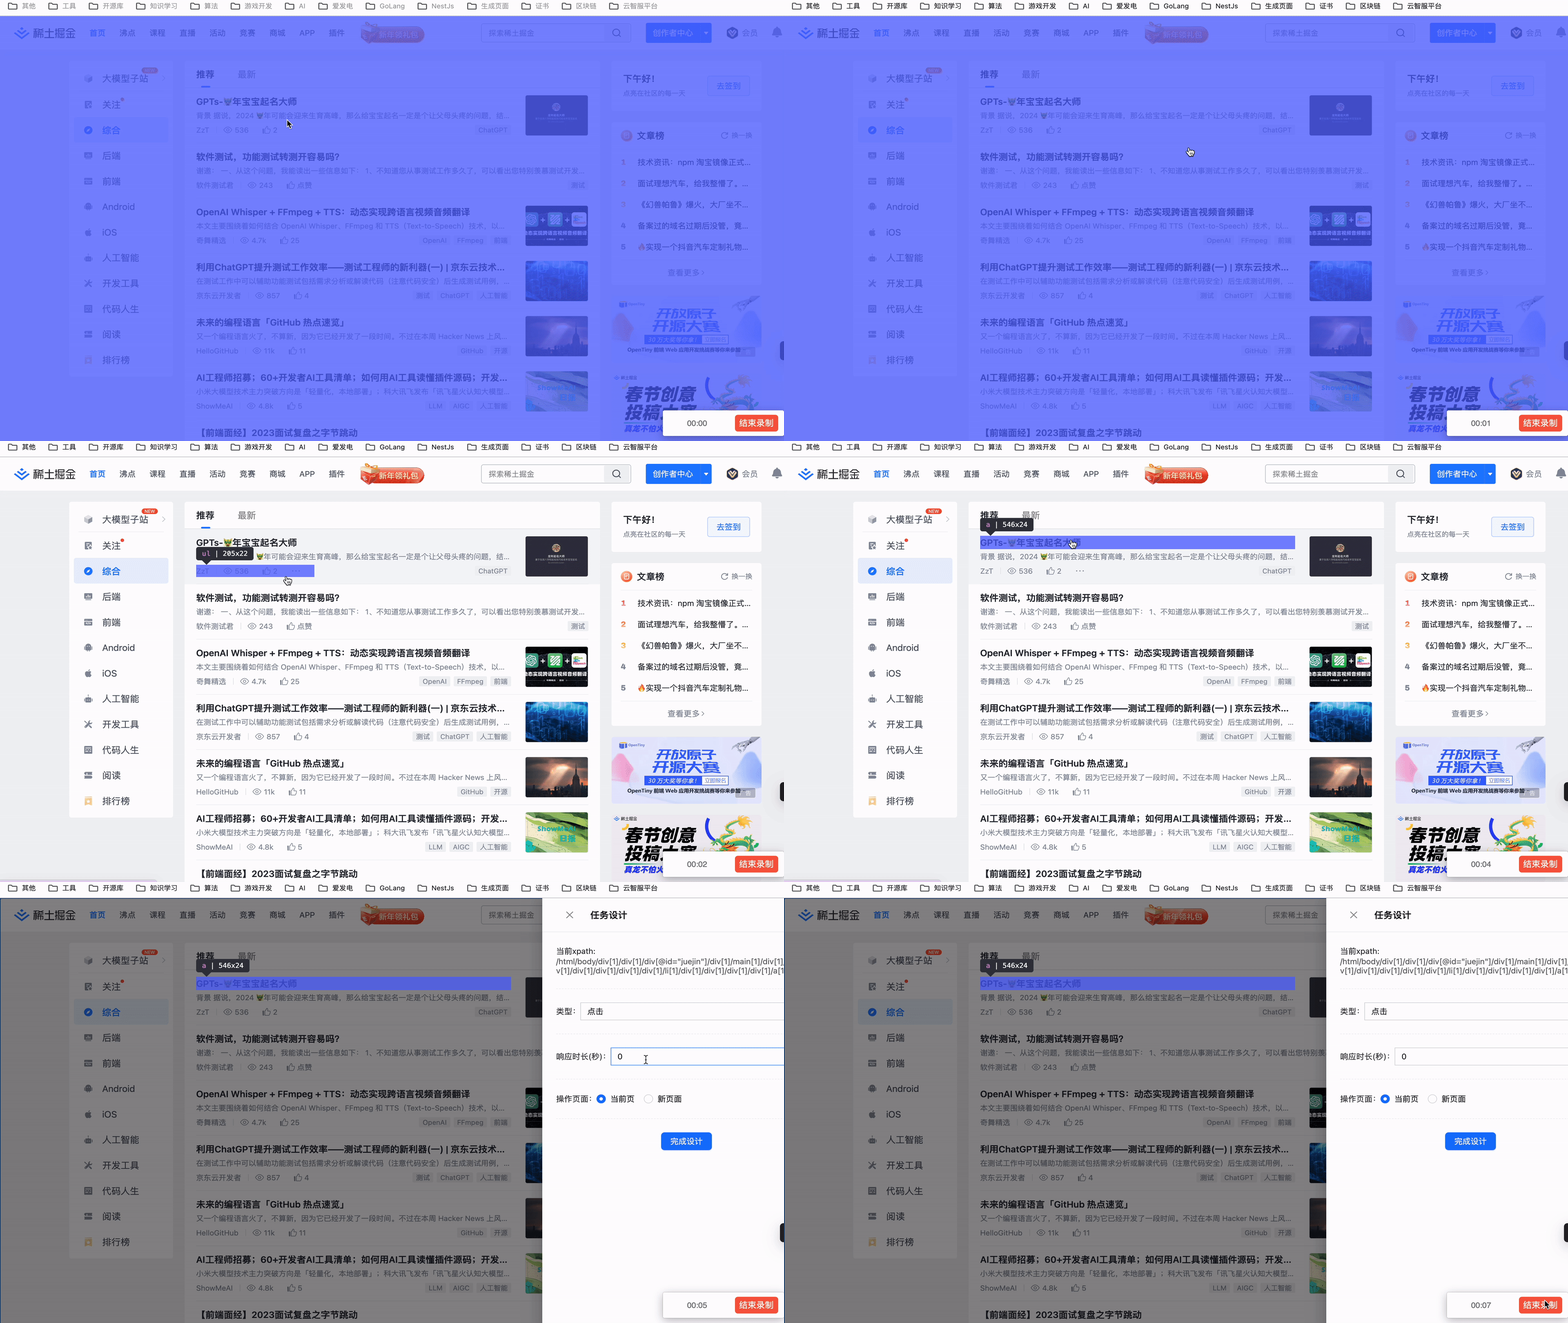
在mk代码之前,先定义功能:鼠标滑动网页元素在选择状态,按下“Q”,确定元素,然后弹出参数窗口,进行填写。如下:

实现步骤
步骤1: 鼠标滑动网页元素在选择状态
步骤2: 按下“Q”确定元素
步骤3: 弹出参数窗口
步骤1: 圈选hook
为了更好的复用性,这里先定义一个(useInspector) 圈选hook
import React, { useState, useEffect, useRef } from 'react'
import $ from 'jquery';


import { getMaxZIndex, createElement, addOverlay, getTouchMouseTargetElement } from '../utils/dom';
import { getXpath } from '../utils/xpath';
import { throttle } from '../utils/utils';

const EVENT = 'mousemove'
const KEY_UP_EVENT = 'keyup'
/** 最大 zindex  */
const maxZIndex = getMaxZIndex() + 1
// 操作maker(html 元素)
const optOverlay = createElement('div', {
  id: 'dom-inspector-root',
  style: `z-index: ${maxZIndex};`,
});
// 创建辅助元素,用于判断圈选器元素是否被缩放
const assistEle = createElement('div', {
  style: `pointer-events: none;
  visibility: hidden;
  width: 100px;
  height: 100px;
  position: absolute;
  top: -100px;`
});

/** 移除圈选蒙层 */
function _remove() {
  optOverlay.innerHTML = '';
}

function useInspector() {
  const [xPath, setXPath] = useState('')
  const [ refresh, setRefresh] = useState(-1)
  const optRef = useRef({
    status: true,
  })
  useEffect(() => {
    // 在 html 中加入而非 body,从而消除对 dom 的影响 及 mutationObserver 的频繁触发
    document.body && document.body.appendChild(optOverlay);
    document.body && document.body.appendChild(assistEle);
    // 当前操作 元素
    let currentTarget = null
    // 缓存 操作元素
    let _cachedTarget = null
    // 当前元素 xpath
    // let currentXpath = ''
    function _onMove(e) {
      // console.log('_onMove', e)
      if (!optRef.current.status) return
      const target = getTouchMouseTargetElement(e)
      if (target && optOverlay && optOverlay.contains(target)) return;
      currentTarget = target;
      if (currentTarget === _cachedTarget) return null;
      _remove()
      _cachedTarget = currentTarget
      addOverlay({
        target: target,
        root: optOverlay,
        assistEle: assistEle,
      });
      // currentXpath = getXpath(target, true)
      // setXPath(currentXpath)
    }
    const _throttleOnMove = throttle(_onMove, 300)
    document.body.addEventListener(EVENT, _throttleOnMove, {
      capture: true,
      passive: true,
    });

    function _onKeyUp(e) {
      console.log(e)
      if (e.keyCode === 81 && optRef.current.status) {
        console.log('currentTarget---', currentTarget)
        const currentXpath = getXpath(currentTarget, true)
        optRef.current.status = false
        setXPath(currentXpath)
        setRefresh(Math.random())
        console.log('_onKeyUp----')
        // setStatus(false)

      }
    }
    const _throttleOnKeyUp = throttle(_onKeyUp, 300)
    document.body.addEventListener(KEY_UP_EVENT, _throttleOnKeyUp)

    return () => {
      document.body.removeEventListener(EVENT, _throttleOnMove)
      document.body.removeEventListener(KEY_UP_EVENT, _throttleOnKeyUp)
    }
  }, [])
  return [xPath, optRef, optRef.current.status, refresh]
}

export default useInspector
步骤2: 监听键盘“Q“
.....
    function _onKeyUp(e) {
      console.log(e)
      if (e.keyCode === 81 && optRef.current.status) {
        console.log('currentTarget---', currentTarget)
        const currentXpath = getXpath(currentTarget, true)
        optRef.current.status = false
        setXPath(currentXpath)
        setRefresh(Math.random())
        console.log('_onKeyUp----')
        // setStatus(false)

      }
    }
    const _throttleOnKeyUp = throttle(_onKeyUp, 300)
    ....
 document.body.removeEventListener(KEY_UP_EVENT, _throttleOnKeyUp)
步骤3: 弹窗
监听圈选的状态,去判断是否弹窗,组件使用的antd;
....
	useEffect(() => {
		console.log('useEffect----', optRef.current.status, xPath, status)
		if (!optRef.current.status && !status && xPath) {
			setOpen(true);
		}
	}, [status])
	....
最后
在获取xptah会存在问题,因为chrome插件会在网页注入元素,因此当选取一个元素在注入元素之后,那么就会存在误差。解决方式:在插件的元素上加一个标识值,当获取xpath时,把层级去掉就好。
/** 判断当前div是否属于插件 */
function checkElByPlugin(ele) {
  const ids = ['dom-inspector-root-jest-pro-scale', 'dom-inspector-root-jest-pro-overlay', 'dom-inspector-root-jest-pro-crx-content', 'dom-inspector-root-jest-pro-crx-container']
  try {
    if (ids.includes(ele.id)) return true
    const drawerEl = document.getElementById('dom-inspector-root-jest-pro-drawer')
    const modalEl = document.getElementById('dom-inspector-root-jest-pro-tips-modal')
    const tipEl = document.getElementById('dom-inspector-root-jest-pro-crx-tip')
    const tipSpanEl = document.getElementById('dom-inspector-root-jest-pro-tip-span')
    return ele.contains(drawerEl) || ele.contains(modalEl) || ele.contains(tipEl) || ele.contains(tipSpanEl);
  } catch (error) {
    return false
  }
}


 本文介绍了如何利用Vite和React构建一个Chrome插件,实现在网页元素上进行鼠标滑动选择并配合键盘按键确定元素,随后弹出参数输入窗口。文章详细展示了使用hooks实现元素圈选和键盘监听的步骤,以及处理由于插件注入元素导致的XPath获取问题。


 835
835


 被折叠的 条评论
为什么被折叠?


