


目录
一、Sentinel核心源码分析
Sentinel是分布式系统的防御系统。以流量为切入点,通过动态设置的流量控制、服务熔断等手段达到 保护系统的目的,通过服务降级增强服务被拒后用户的体验。
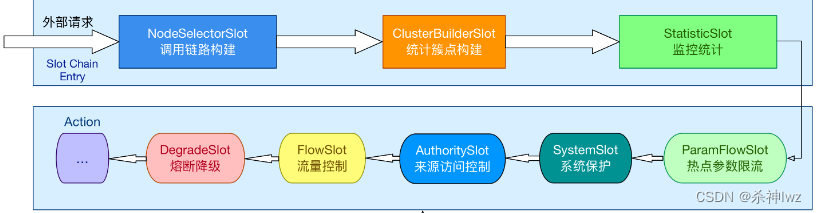
在 Sentinel 里面,所有的资源都对应一个资源名称以及一个 Entry。Entry 可以通过对主流框架的适配自动创建,也可以通过注解的方式或调用SphU API 显式创建;每一个 Entry 创建的时候,同时也会创建一系列功能插槽(slot chain)。这些插槽有不同的职责,例如:
- NodeSelectorSlot 负责收集资源的路径,并将这些资源的调用路径,以树状结构存储起来,用于根据调用路径来限流降级;
- ClusterBuilderSlot 则用于存储资源的统计信息以及调用者信息,例如该资源的 RT, QPS, thread count 等等,这些信息将用作为多维度限流,降级的依据;
- StatisticSlot 则用于记录、统计不同纬度的 runtime 指标监控信息;
- FlowSlot 则用于根据预设的限流规则以及前面 slot 统计的状态,来进行流量控制;
- AuthoritySlot 则根据配置的黑白名单和调用来源信息,来做黑白名单控制;
- DegradeSlot 则通过统计信息以及预设的规则,来做熔断降级;
- SystemSlot 则通过系统的状态,例如 load1 等,来控制总的入口流量;
重要的概念:
- slot chain:插槽
- Node:根节点
- Context:对资源操作时的上下文环境,每个资源操作(`针对Resource进行的entry/exit`)必须属于一个Context,如果程序中未指定Context,会创建name为"sentinel_default_context"的默认Context。一个Context生命周期内可能有多个资源操作,Context生命周期内的最后一个资源exit时会清理该Context,这也预示这真个Context生命周期的结束。
- Entry:表示一次资源操作,内部会保存当前调用信息。在一个Context生命周期中多次资源操作,也就是对应多个Entry,这些Entry形成parent/child结构保存在Entry实例中
总体的框架
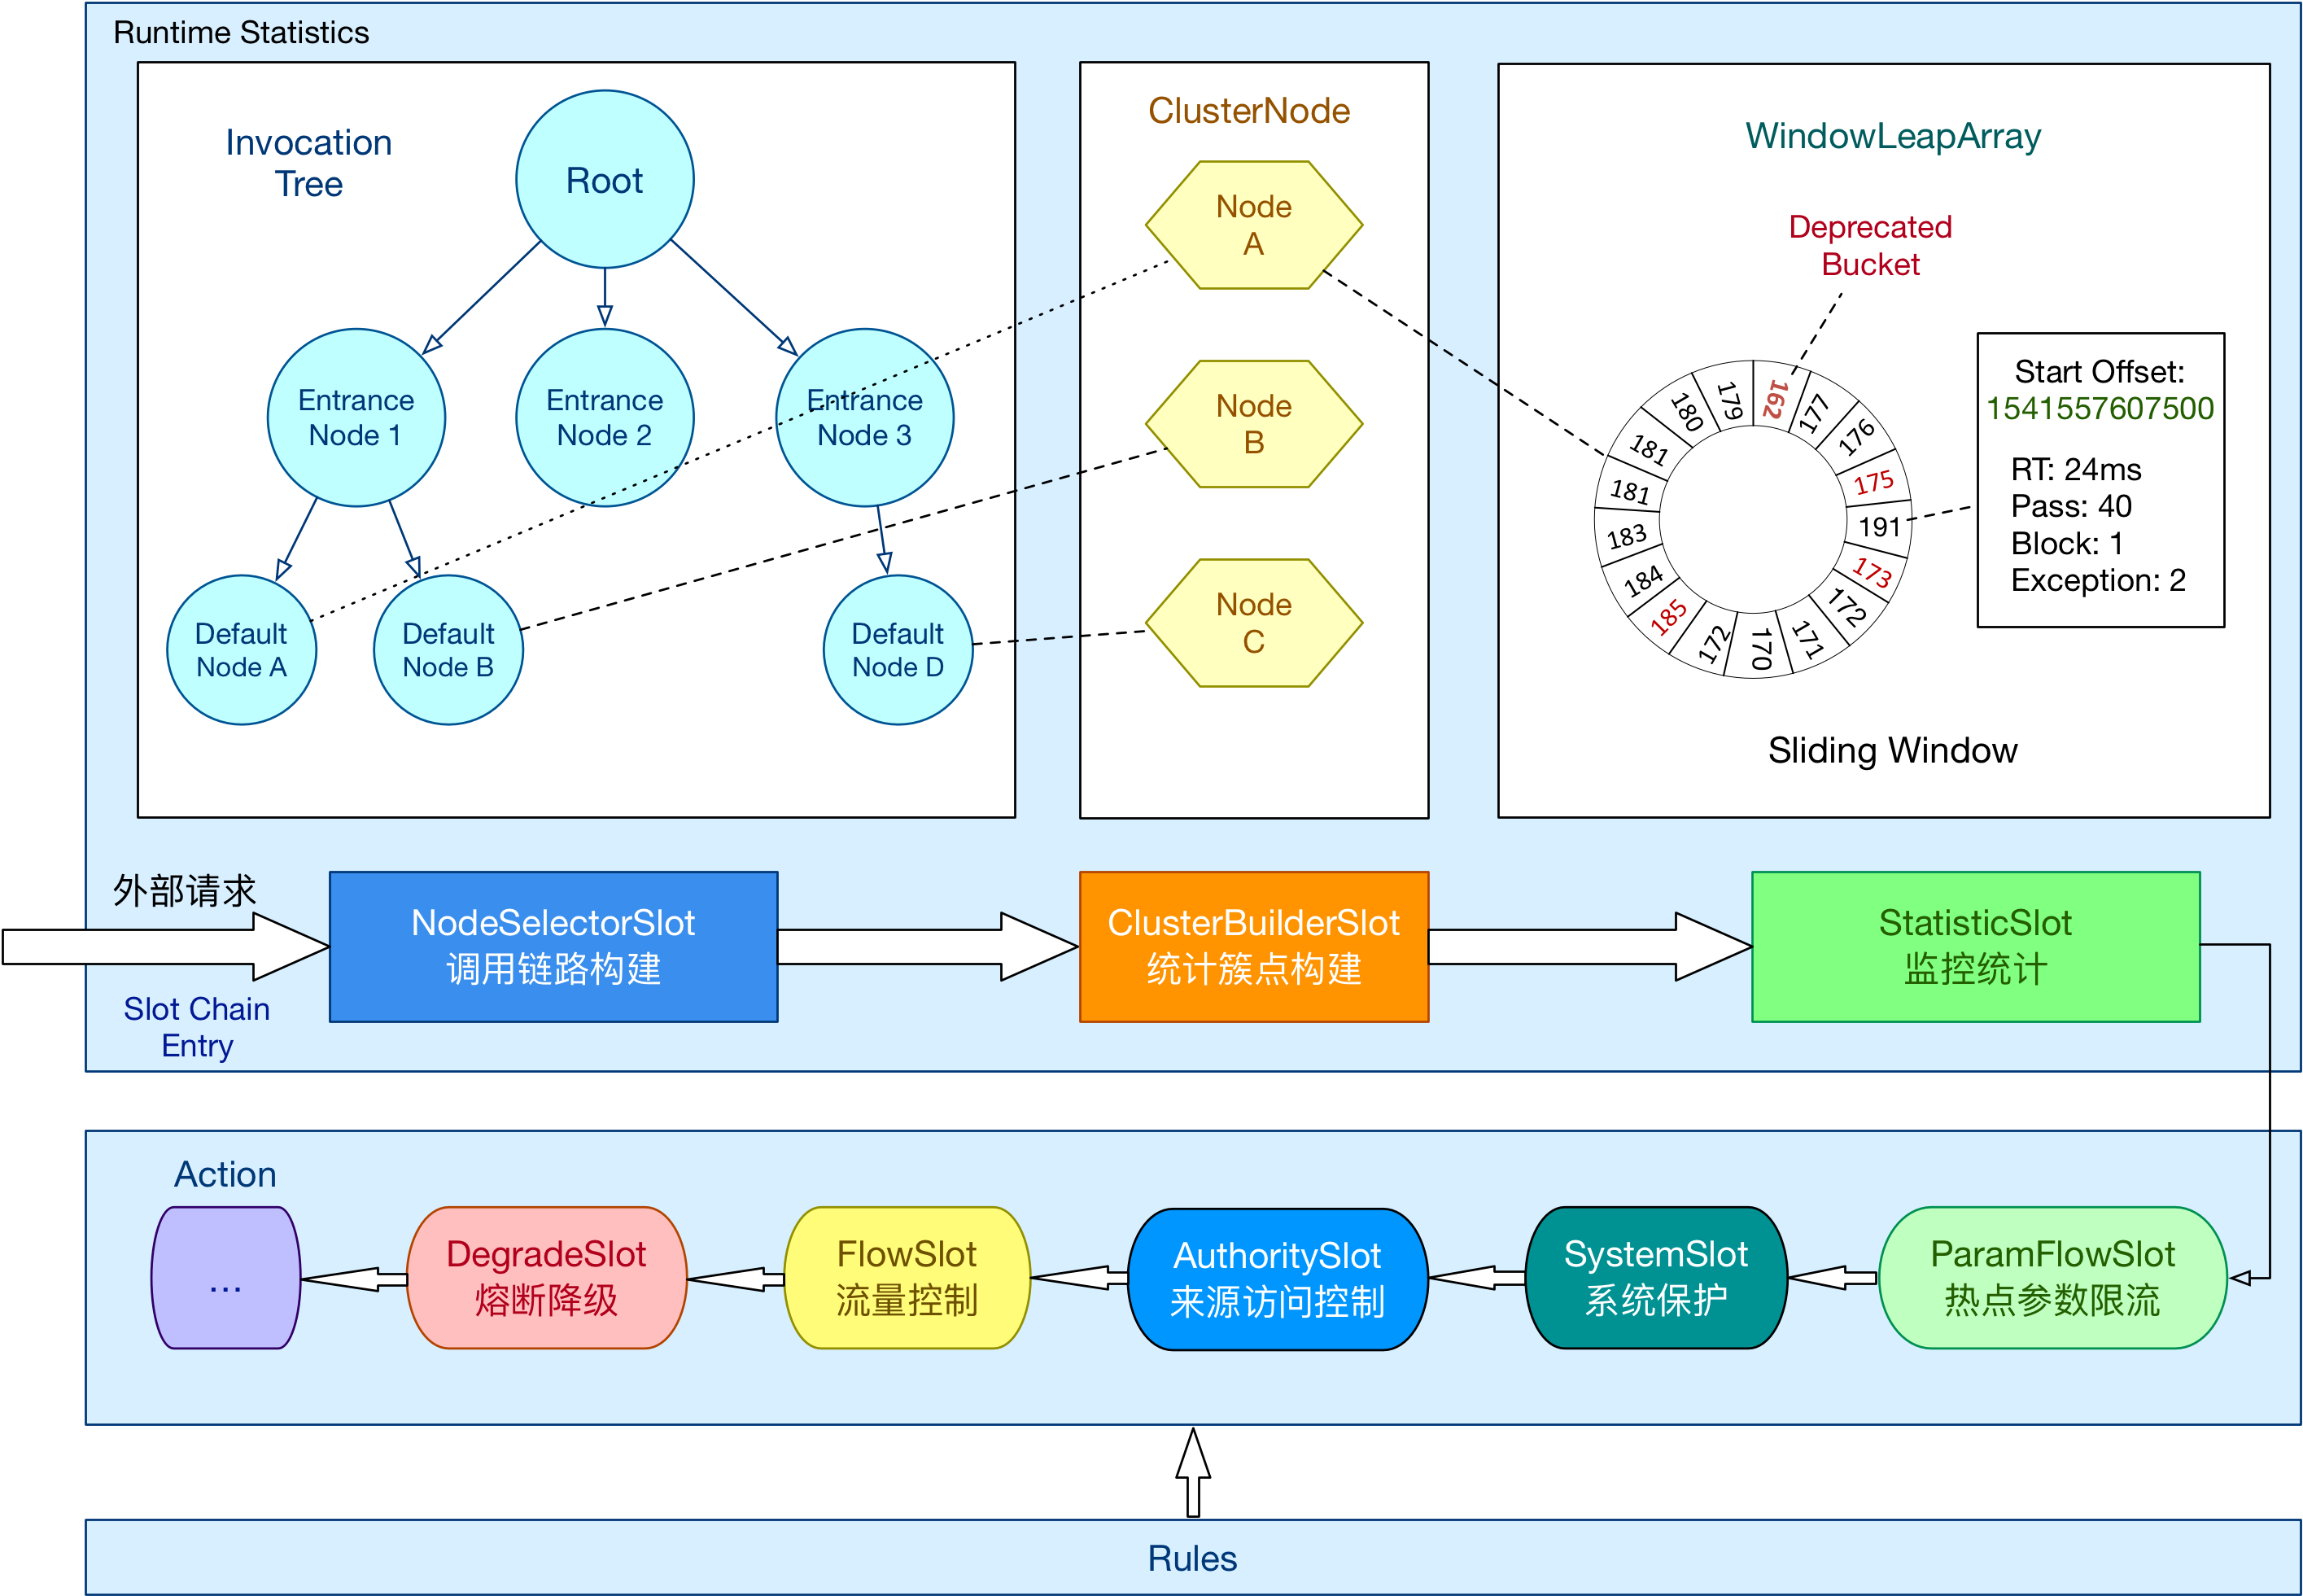
Sentinel 将 ProcessorSlot 作为 SPI 接口进行扩展(1.7.2 版本以前 SlotChainBuilder 作为 SPI),使得 Slot Chain 具备了扩展的能力。您可以自行加入自定义的 slot 并编排 slot 间的顺序,从而可以给 Sentinel 添加自定义的功能。

1、Sentinel核心概念
Sentinel作为ali开源的一款轻量级流控框架,主要以流量为切入点,从流量控制、熔断降级、系统负载保护等多个维度来帮助用户保护服务的稳定性。相比于Hystrix,Sentinel的设计更加简单,在 Sentinel中资源定义和规则配置是分离的,也就是说用户可以先通过Sentinel API给对应的业务逻辑定义资源(埋点),然后在需要的时候再配置规则,通过这种组合方式,极大的增加了Sentinel流控的灵活性。
引入Sentinel带来的性能损耗非常小。只有在业务单机量级超过25W QPS的时候才会有一些显著的影响(5% - 10% 左右),单机QPS不太大的时候损耗几乎可以忽略不计。
Sentinel提供两种埋点方式:
- try-catch 方式(通过 SphU.entry(...)),用户在 catch 块中执行异常处理
- if-else 方式(通过 SphO.entry(...)),当返回 false 时执行异常处理
官方案例:
NodeSelectorSlot
这个 slot 主要负责收集资源的路径,并将这些资源的调用路径,以树状结构存储起来,用于根据调用路径来限流降级。

 ContextUtil.enter("entrance1", "appA");
 Entry nodeA = SphU.entry("nodeA");
 if (nodeA != null) {
    nodeA.exit();
 }
 ContextUtil.exit();
改写Demo
一个资源
import com.alibaba.csp.sentinel.context.ContextUtil;
import com.alibaba.csp.sentinel.slots.block.BlockException;

public class ContextBySingleResourceDemo {
    public void ContextUtil(){
        //创建一个来自appA访问的Context
        //Context的名称为entrance1
        ContextUtil.enter("entrance1", "appA");
        // Entry就是一个资源操作对象
        Entry nodeA = null;
        try {
            //获取资源resource的entry
            nodeA = SphU.entry("resource1");//后续会展开这个位置
            // 如果代码走到这个位置,说明当前资源的请求通过了流控,可以继续进行相关业务处理
        } catch (BlockException e) {
            // 如果没有通过走到了这里,就表示请求被限流,这里进行降级操作
            e.printStackTrace();
        }finally {
            if (nodeA != null) {
                nodeA.exit();
            }
        }
        //释放Context
        ContextUtil.exit();
    }
}
多个资源
import com.alibaba.csp.sentinel.context.ContextUtil;
import com.alibaba.csp.sentinel.slots.block.BlockException;

public class ContextByMultiResourceDemo {
    public void ContextUtil(){
        //创建一个来自appA访问的Context
        //Context的名称为entrance1
        ContextUtil.enter("entrance1", "appA");
        // Entry就是一个资源操作对象
        Entry nodeA = null;
        Entry nodeB = null;
        try {
            //获取资源resource1的entry
            nodeA = SphU.entry("resource1");
            // 如果代码走到这个位置,说明当前资源的请求通过了流控,可以继续进行相关业务处理

            //获取资源resource2的entry
            nodeB = SphU.entry("resource2");
            // 如果代码走到这个位置,说明当前资源的请求通过了流控,可以继续进行相关业务处理
        } catch (BlockException e) {
            // 如果没有通过走到了这里,就表示请求被限流,这里进行降级操作
            e.printStackTrace();
        }finally {
            if (nodeA != null) {
                nodeA.exit();
            }
            if (nodeB != null) {
                nodeB.exit();
            }
        }
        //释放Context
        ContextUtil.exit();
    }
}
1.1、Node之间的关系
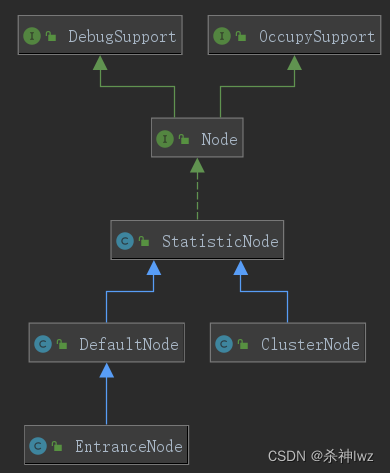
- Node:接口,Sentinel 里面的各种种类的统计节点
- StatisticNode:统计节点,是Node的实现类,用于完成数据统计
- EntranceNode:DefaultNode的子类,入口节点,一个Context会有一个入口节点,用于统计当前Context的总体流量数据,统计维度为Context
- DefaultNode:默认节点,用于统计一个resource在当前Context中的流量数据,DefaultNode持有指定的Context和指定的Resource的统计数据,意味着DefaultNode是以Context和Resource为维度的统计节点
- ClusterNode:ClusterNode保存的是同一个Resource的相关的统计信息,是以Resource为维度的,不区分Context,这个是和DefaultNode的区别
Node之间的关系
Node 接口定义了一个 Node 类所需要提供的各项指标数据统计的相关功能,为外部屏蔽滑动窗口的存在。提供记录请求被拒绝、请求被放行、请求处理异常、请求处理成功的方法,以及获取当前时间窗口统计的请求总数、平均耗时等方法。
2、Sentinel源码入口
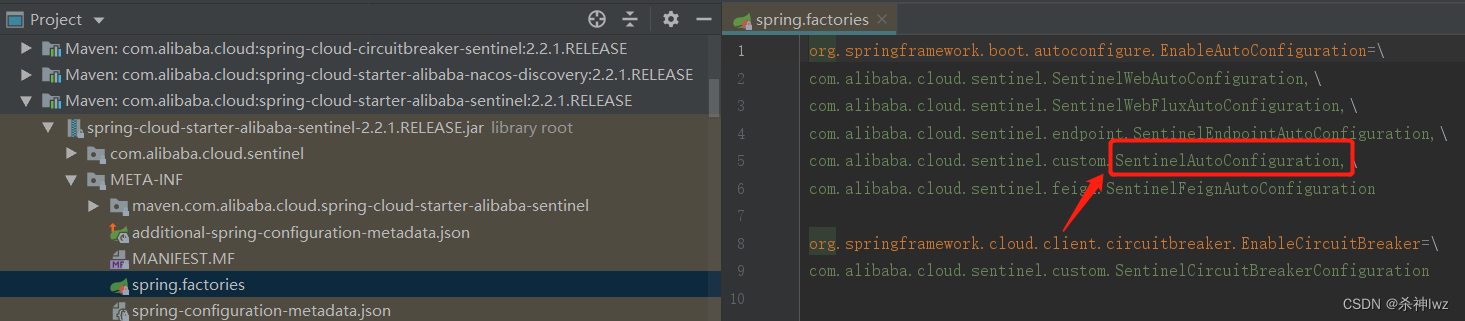
在微服务的使用Sentinel实际工作场景中,我们只需要引入对应依赖:spring-cloud-starter-alibaba-sentinel,就会进行自动装配,所以我们之间看META-INF/spring.factories,然后我们这里从SentinelAutoConfiguration开始看起。
利用@SentinelResource注解作为切点,然后在通过AOP环绕通知,来进行增强,在执行原方法前,来执行对应操作,当然这里我们可以看出,一旦出现了限流或者限流就会走BlockException。
@EnableConfigurationProperties({SentinelProperties.class})
public class SentinelAutoConfiguration {
...
    @Bean
    @ConditionalOnMissingBean
    public SentinelResourceAspect sentinelResourceAspect() {
        return new SentinelResourceAspect();
    }
...
//----------------------------
@Aspect//切面
public class SentinelResourceAspect extends AbstractSentinelAspectSupport {
    public SentinelResourceAspect() {
    }
    //指定切入点为SentinelResource注解
    @Pointcut("@annotation(com.alibaba.csp.sentinel.annotation.SentinelResource)")
    public void sentinelResourceAnnotationPointcut() {
    }
// 环绕通知
@Around("sentinelResourceAnnotationPointcut()")
public Object invokeResourceWithSentinel(ProceedingJoinPoint pjp) throws Throwable {
    Method originMethod = resolveMethod(pjp);

    SentinelResource annotation = originMethod.getAnnotation(SentinelResource.class);
    if (annotation == null) {
        // Should not go through here.
        throw new IllegalStateException("Wrong state for SentinelResource annotation");
    }
    String resourceName = getResourceName(annotation.value(), originMethod);
    EntryType entryType = annotation.entryType();
    int resourceType = annotation.resourceType();
    Entry entry = null;
    try {
        // 创建资源操作对象
        entry = SphU.entry(resourceName, resourceType, entryType, pjp.getArgs());
        // 调用原方法
        return pjp.proceed();
    } catch (BlockException ex) {
        return handleBlockException(pjp, annotation, ex);
    } catch (Throwable ex) {
        Class<? extends Throwable>[] exceptionsToIgnore = annotation.exceptionsToIgnore();
        // The ignore list will be checked first.
        if (exceptionsToIgnore.length > 0 && exceptionBelongsTo(ex, exceptionsToIgnore)) {
            throw ex;
        }
        if (exceptionBelongsTo(ex, annotation.exceptionsToTrace())) {
            traceException(ex);
            return handleFallback(pjp, annotation, ex);
        }

        // No fallback function can handle the exception, so throw it out.
        throw ex;
    } finally {
        if (entry != null) {
            entry.exit(1, pjp.getArgs());
        }
    }
}
在创建资源操作对象的时候我们需要先创建Context,但是明显这里没有显示创建,但是实际上我们如果看Context概念的话,就会知道,如果程序中未指定Context,会创建name为"sentinel_default_context"的默认Context,然后我们继续往下跟踪。
public class SphU {
...
    public static Entry entry(String name, int resourceType, EntryType type, Object[] args) throws BlockException {
        //限流方法
        return Env.sph.entryWithType(name, resourceType, type, 1, args);
    }
进入到entry方法中,这里的entryWithType方法就是我们要看的真正的限流的方法,具体的实现方法在com.alibaba.csp.sentinel.CtSph.entryWithType
public class CtSph implements Sph {
...
    public Entry entryWithType(String name, int resourceType, EntryType entryType, int count, Object[] args) throws BlockException {
        return this.entryWithType(name, resourceType, entryType, count, false, args);
    }

    public Entry entryWithType(String name, int resourceType, EntryType entryType, int count, boolean prioritized, Object[] args) throws BlockException {
        // 这里将资源的名称和信息封装称为资源对象
        StringResourceWrapper resource = new StringResourceWrapper(name, entryType, resourceType);
        // 返回一个Entry资源操作对象
        // prioritized属性表示优先级,默认值为false,表示当前请求不按照优先级执行,直接执行
        return this.entryWithPriority(resource, count, prioritized, args);
    }

    private Entry entryWithPriority(ResourceWrapper resourceWrapper, int count, boolean prioritized, Object... args) throws BlockException {
        // 从当前线程中获取Context
        // 一个请求会占用一个线程,并且绑定一个Context
        Context context = ContextUtil.getContext();
        // 一个请求对应一个Context
   	    // 如果当前类型为NullContext,表示此时请求已经超出了阈值,无需检测规则
        if (context instanceof NullContext) {
            return new CtEntry(resourceWrapper, (ProcessorSlot)null, context);
        } else {
            // 此时如果获取Context为空,就创建默认的sentinel_default_context,并且会放入到当前线程中
            if (context == null) {
                context = CtSph.InternalContextUtil.internalEnter("sentinel_default_context");
            }
            // 判断全局开关,如果是关闭状态,直接返回无需检测规则
            if (!Constants.ON) {
                return new CtEntry(resourceWrapper, (ProcessorSlot)null, context);
            } else {
                /**
                 * 这里是整个架构的核心所在,这里是在构建一个处理链,这个处理链是一个单向链表结构,类似于Filter一样,构建这个链条的
                 * 原因是对业务进行解耦,像限流资源保护有很多,比如限流、降级、热点参数、系统降级等等,如果都写在一起就耦合很严重,我们知道oop的
                 * 思想就是让每个类确定各自的职责,不要让他做不相干的事情,所以这里将业务进行全面解耦,然后在解耦的同时又通过链式编程将它们串起来
                 */
                ProcessorSlot<Object> chain = this.lookProcessChain(resourceWrapper);
                if (chain == null) {
                    return new CtEntry(resourceWrapper, (ProcessorSlot)null, context);
                } else {
                    CtEntry e = new CtEntry(resourceWrapper, chain, context);

                    try {
                        // 针对资源操作
                        chain.entry(context, resourceWrapper, (Object)null, count, prioritized, args);
                    } catch (BlockException var9) {
                        e.exit(count, args);
                        throw var9;
                    } catch (Throwable var10) {
                        RecordLog.info("Sentinel unexpected exception", var10);
                    }

                    return e;
                }
            }
        }
    }
InternalContextUtil.internalEnter(Constants.CONTEXT_DEFAULT_NAME);
    private final static class InternalContextUtil extends ContextUtil {
        static Context internalEnter(String name) {
            // 从这里继续跟踪
            return trueEnter(name, "");
        }

        static Context internalEnter(String name, String origin) {
            return trueEnter(name, origin);
        }
    }
首先这里要明确一下,一个Context的组成实际上需要name(名称)和origin(来源),所以方法上传入这两个参数
    protected static Context trueEnter(String name, String origin) {
        // 从当前线程中获取当前context名称
        Context context = contextHolder.get();
        // 如果当前context为空
        if (context == null) {
            // 从缓存中获取,当前缓存中key值为:Context名称,value值为:EntranceNode
            // (因为后续创建的是EntranceNode),需要它的原因是因为构建Context需要EntranceNode
            Map<String, DefaultNode> localCacheNameMap = contextNameNodeMap;
            // 在缓存中获取EntranceNode
            DefaultNode node = localCacheNameMap.get(name);
            if (node == null) {
                // 当前缓存的size>Context的最大数量,返回NULL_Context类型
                if (localCacheNameMap.size() > Constants.MAX_CONTEXT_NAME_SIZE) {
                    setNullContext();
                    return NULL_CONTEXT;
                } else {
                    LOCK.lock();
                    try {
                        node = contextNameNodeMap.get(name);
                        // 这里两次判断是采用了双重检测锁的机制:为了防止并发创建
                        if (node == null) {
                            if (contextNameNodeMap.size() > Constants.MAX_CONTEXT_NAME_SIZE) {
                                setNullContext();
                                return NULL_CONTEXT;
                            } else {
                                // node赋值为EntranceNode
                                node = new EntranceNode(new StringResourceWrapper(name, EntryType.IN), null);
                                // Add entrance node.
                                // 将新建的EntranceNode添加到ROOT中
                                Constants.ROOT.addChild(node);
                                // 将新建的EntranceNode添加到缓存中
                                Map<String, DefaultNode> newMap = new HashMap<>(contextNameNodeMap.size() + 1);
                                newMap.putAll(contextNameNodeMap);
                                newMap.put(name, node);
                                contextNameNodeMap = newMap;
                            }
                        }
                    } finally {
                        LOCK.unlock();
                    }
                }
            }
            // 将name和node封装成Context
            context = new Context(node, name);
            // 设定来源
            context.setOrigin(origin);
            // 将context写入到当前线程中
            contextHolder.set(context);
        }
        // 返回Context
        return context;
    }
CtSph中,位置的chain.entry方法
//CtSph中entryWithPriority()
try {
    // 针对资源操作
    chain.entry(context, resourceWrapper, (Object)null, count, prioritized, args);
} catch (BlockException var9) {
    e.exit(count, args);
    throw var9;
} catch (Throwable var10) {
    RecordLog.info("Sentinel unexpected exception", var10);
}官方定义:Sentinel 将 ProcessorSlot作为 SPI 接口进行扩展(1.7.2 版本以前 SlotChainBuilder作为 SPI),使得 Slot Chain 具备了扩展的能力。您可以自行加入自定义的 slot 并编排 slot 间的顺序,从而可以给 Sentinel 添加自定义的功能。
2.0、Sentinel源码启动
sentinel-dashboard模块下的sentinel\sentinel-dashboard\src\main\java\com\alibaba\csp\sentinel\dashboard\DashboardApplication.java2.1、SlotChain解析
lookProcessChain()用于构建一个责任链。Sentinel的处理核心都在这个责任链中,链中每一个节点是一个Slot实例,这个链通过BlockException异常来告知调用入口最终的执行情况
//CtSph中entryWithPriority()
// 获取chain链
ProcessorSlot<Object> chain = lookProcessChain(resourceWrapper);
//-------------------------具体看lookProcessChain方法
    ProcessorSlot<Object> lookProcessChain(ResourceWrapper resourceWrapper) {
        // 先从chainMap获取,若是存在,则直接返回
        ProcessorSlotChain chain = chainMap.get(resourceWrapper);
        if (chain == null) {
            synchronized (LOCK) {
                chain = chainMap.get(resourceWrapper);
                if (chain == null) {
                    // Entry size limit.
                    if (chainMap.size() >= Constants.MAX_SLOT_CHAIN_SIZE) {
                        return null;
                    }
                    // 通过SlotChainProvider创建一个slot链
                    chain = SlotChainProvider.newSlotChain();
                    Map<ResourceWrapper, ProcessorSlotChain> newMap = new HashMap<ResourceWrapper, ProcessorSlotChain>(
                        chainMap.size() + 1);
                    newMap.putAll(chainMap);
                    // 添加到Map缓存中
                    newMap.put(resourceWrapper, chain);
                    chainMap = newMap;
                }
            }
        }
        return chain;
    }
这个位置我们要具体分析SlotChainProvider这个类型,它的主要作用就是通过已解析的槽链构建器,创建槽链的提供者
从这里我们可以看出SlotChainBuilder及ProcessorSlot 使用Java SPI技术实现可配置化,即在/META-INF/services/接口全限命名 的文件中配置实现类,然后由ServiceLoader实现加载
public final class SlotChainProvider {
...
    public static ProcessorSlotChain newSlotChain() {
        if (slotChainBuilder != null) {
            return slotChainBuilder.build();
        }
        // 读取配置文件在/META-INF/services/接口全限定命名的文件中配置实现类.
        // Resolve the slot chain builder SPI.
        slotChainBuilder = SpiLoader.of(SlotChainBuilder.class).loadFirstInstanceOrDefault();

        if (slotChainBuilder == null) {
            // Should not go through here.
            RecordLog.warn("[SlotChainProvider] Wrong state when resolving slot chain builder, using default");
            //使用默认的DefaultSlotChainBuilder来构建ProcessorSlotChain
            slotChainBuilder = new DefaultSlotChainBuilder();
        } else {
            RecordLog.info("[SlotChainProvider] Global slot chain builder resolved: {}",
                slotChainBuilder.getClass().getCanonicalName());
        }
        //使用DefaultSlotChainBuilder构建
        return slotChainBuilder.build();
    }

    private SlotChainProvider() {}
}
其实现在使用的是使用DefaultSlotChainBuilder.build()来创建的
在这个其中,做了几件事:
1. 创建DefaultProcessorSlotChain
2. 读取/META-INF/services/中的配置文件
3. 强制转型为AbstractLinkedProcessorSlot(所有插槽的抽象父类)
@Spi(isDefault = true)
public class DefaultSlotChainBuilder implements SlotChainBuilder {

    @Override
    public ProcessorSlotChain build() {
        // 创建DefaultProcessorSlotChain
        ProcessorSlotChain chain = new DefaultProcessorSlotChain();
        // 读取配置文件在/META-INF/services/接口全限定命名的文件
        List<ProcessorSlot> sortedSlotList = SpiLoader.of(ProcessorSlot.class).loadInstanceListSorted();
        for (ProcessorSlot slot : sortedSlotList) {
            if (!(slot instanceof AbstractLinkedProcessorSlot)) {
                RecordLog.warn("The ProcessorSlot(" + slot.getClass().getCanonicalName() + ") is not an instance of AbstractLinkedProcessorSlot, can't be added into ProcessorSlotChain");
                continue;
            }

            chain.addLast((AbstractLinkedProcessorSlot<?>) slot);
        }

        return chain;
    }
}
具体读取内容如下:
# Sentinel default ProcessorSlots
com.alibaba.csp.sentinel.slots.nodeselector.NodeSelectorSlot
com.alibaba.csp.sentinel.slots.clusterbuilder.ClusterBuilderSlot
com.alibaba.csp.sentinel.slots.logger.LogSlot
com.alibaba.csp.sentinel.slots.statistic.StatisticSlot
com.alibaba.csp.sentinel.slots.block.authority.AuthoritySlot
com.alibaba.csp.sentinel.slots.system.SystemSlot
com.alibaba.csp.sentinel.slots.block.flow.FlowSlot
com.alibaba.csp.sentinel.slots.block.degrade.DegradeSlot
com.alibaba.csp.sentinel.slots.block.degrade.DefaultCircuitBreakerSlot
这些就是Sentinel提供的默认功能插槽
分析到这里我们就可以回到CtSph中,查看entry方法这个时候我们就知道了实际上调用entry方法的是DefaultProcessorSlotChain
//CtSph中entryWithPriority()
try {
    // 针对资源操作
    chain.entry(context, resourceWrapper, (Object)null, count, prioritized, args);
} catch (BlockException var9) {
    e.exit(count, args);
    throw var9;
} catch (Throwable var10) {
    RecordLog.info("Sentinel unexpected exception", var10);
}
那我们向下跟踪
public class DefaultProcessorSlotChain extends ProcessorSlotChain {
...
    @Override
    public void entry(Context context, ResourceWrapper resourceWrapper, Object t, int count, boolean prioritized, Object... args)
        throws Throwable {
        // 转到下一个节点
        first.transformEntry(context, resourceWrapper, t, count, prioritized, args);
    }
这个位置是转入到下一个节点,那么下一个节点明显就是NodeSelectorSlot
2.2、NodeSelectorSlot解析
public abstract class AbstractLinkedProcessorSlot<T> implements ProcessorSlot<T> {
...
    void transformEntry(Context context, ResourceWrapper resourceWrapper, Object o, int count, boolean prioritized, Object... args)
        throws Throwable {
        T t = (T)o;
        entry(context, resourceWrapper, t, count, prioritized, args);
    }
//-->NodeSelectorSlot
@Spi(isSingleton = false, order = Constants.ORDER_NODE_SELECTOR_SLOT)
public class NodeSelectorSlot extends AbstractLinkedProcessorSlot<Object> {
    private volatile Map<String, DefaultNode> map = new HashMap<String, DefaultNode>(10);

    @Override
    public void entry(Context context, ResourceWrapper resourceWrapper, Object obj, int count, boolean prioritized, Object... args)
        throws Throwable {
        // 从缓存中获取,创建DefaultNode
        DefaultNode node = map.get(context.getName());
        // 双重判断,如果判断为空
        if (node == null) {
            synchronized (this) {
                node = map.get(context.getName());
                if (node == null) {
                    // 创建一个DefaultNode并且放入到缓存中
                    node = new DefaultNode(resourceWrapper, null);
                    HashMap<String, DefaultNode> cacheMap = new HashMap<String, DefaultNode>(map.size());
                    cacheMap.putAll(map);
                    cacheMap.put(context.getName(), node);
                    map = cacheMap;
                    // Build invocation tree
                    // 将新建的Node添加到调用树中
                    ((DefaultNode) context.getLastNode()).addChild(node);
                }

            }
        }

        context.setCurNode(node);
        // 触发下一个节点
        fireEntry(context, resourceWrapper, node, count, prioritized, args);
    }

    @Override
    public void exit(Context context, ResourceWrapper resourceWrapper, int count, Object... args) {
        fireExit(context, resourceWrapper, count, args);
    }
}
NodeSelectorSlot具体内容官网有给出解释:
这个 slot 主要负责收集资源的路径,并将这些资源的调用路径,以树状结构存储起来,用于根据调用路径来限流降级。
DefaultNode用于统计一个resource在当前Context中的流量数据,所以再结合NodeSelectorSlot,最终得出结论:处理不同的Context name,同一个Resource name的情况
2.3、ClusterBuilderSlot解析
官方定义:ClusterBuilderSlot:则用于存储资源的统计信息以及调用者信息,例如该资源的 RT, QPS, thread count 等等,这些信息将用作为多维度限流,降级的依据;
//NodeSelectorSlot.entry()
// 触发下一个节点
fireEntry(context, resourceWrapper, node, count, prioritized, args);
再触发下一个节点以后,调用的是父级AbstractLinkedProcessorSlot.fireEntry()方法,然后next调用transformEntry
//AbstractLinkedProcessorSlot
    @Override
    public void fireEntry(Context context, ResourceWrapper resourceWrapper, Object obj, int count, boolean prioritized, Object... args)
        throws Throwable {
        if (next != null) {
            next.transformEntry(context, resourceWrapper, obj, count, prioritized, args);
        }
    }
//next就代表循环到下一个节点所以这里调用entry的就是ClusterBuilderSlot
@SuppressWarnings("unchecked")
void transformEntry(Context context, ResourceWrapper resourceWrapper, Object o, int count, boolean prioritized, Object... args)
        throws Throwable {
        T t = (T)o;
        entry(context, resourceWrapper, t, count, prioritized, args);
    }
ClusterBuilderSlot
//ClusterBuilderSlot.entry
    @Override
    public void entry(Context context, ResourceWrapper resourceWrapper, DefaultNode node, int count,
                      boolean prioritized, Object... args)
        throws Throwable {
        if (clusterNode == null) {
            synchronized (lock) {
                if (clusterNode == null) {
                    // Create the cluster node.
                    clusterNode = new ClusterNode(resourceWrapper.getName(), resourceWrapper.getResourceType());
                    // key为资源 value为ClusterNode
                    HashMap<ResourceWrapper, ClusterNode> newMap = new HashMap<>(Math.max(clusterNodeMap.size(), 16));
                    newMap.putAll(clusterNodeMap);
                    newMap.put(node.getId(), clusterNode);

                    clusterNodeMap = newMap;
                }
            }
        }
        // 添加节点
        node.setClusterNode(clusterNode);

        /*
         * if context origin is set, we should get or create a new {@link Node} of
         * the specific origin.
         */
        // 确认资源的来源
        if (!"".equals(context.getOrigin())) {
            Node originNode = node.getClusterNode().getOrCreateOriginNode(context.getOrigin());
            context.getCurEntry().setOriginNode(originNode);
        }

        fireEntry(context, resourceWrapper, node, count, prioritized, args);
    }
总结:
ClusterNode作用就是与DefaultNode进行关联,即不同的DefaultNode都关联了一个ClusterNode,这样我们在不同上下文中都可以拿到当前资源一个总的流量统计情况。
2.4、StatisticSlot解析
StatisticSlot是 Sentinel 最为重要的类之一,用于根据规则判断结果进行相应的统计操作。
entry 的时候:依次执行后面的判断 slot。每个 slot 触发流控的话会抛出异常(BlockException的子类)。若有 BlockException抛出,则记录 block 数据;若无异常抛出则算作可通过(pass),记录 pass 数据。
exit 的时候:若无 error(无论是业务异常还是流控异常),记录 complete(success)以及 RT,线程数-1。
记录数据的维度:线程数+1、记录当前 DefaultNode 数据、记录对应的 originNode 数据(若存在 origin)、累计 IN 统计数据(若流量类型为 IN)。
首先,我们从ClusterNodeSlot中的entry方法中找到调用下一节点方法,然后向下跟踪,道理和之前的都一样,调用的是父级方法
//ClusterBuilderSlot.entry()
fireEntry(context, resourceWrapper, node, count, prioritized, args);
//-----AbstractLinkedProcessorSlot
    @Override
    public void fireEntry(Context context, ResourceWrapper resourceWrapper, Object obj, int count, boolean prioritized, Object... args)
        throws Throwable {
        if (next != null) {
            next.transformEntry(context, resourceWrapper, obj, count, prioritized, args);
        }
    }
找到transformEntry方法,然后此时的下一个节点必然是StatisticSlot
    void transformEntry(Context context, ResourceWrapper resourceWrapper, Object o, int count, boolean prioritized, Object... args)
        throws Throwable {
        T t = (T)o;
        //StatisticSlot
        entry(context, resourceWrapper, t, count, prioritized, args);
}然后我们来看StatisticSlot的核心方法,这里的核心思想就是:封装了基础的流量统计和获取方法
@Spi(order = Constants.ORDER_STATISTIC_SLOT)
public class StatisticSlot extends AbstractLinkedProcessorSlot<DefaultNode> {

    @Override
    public void entry(Context context, ResourceWrapper resourceWrapper, DefaultNode node, int count,
                      boolean prioritized, Object... args) throws Throwable {
        try {
            // Do some checking.
            // 此位置会调用SlotChain中后续的所有Slot,完成所有规则检测。
            fireEntry(context, resourceWrapper, node, count, prioritized, args);

            // Request passed, add thread count and pass count.
            // 代码运行到这个位置,就证明之前的所有Slot检测都通过了,此时就可以统计请求的相应数据了。
            // 增加线程数(+1)
            node.increaseThreadNum();
            // 增加通过请求的数量(这里涉及到滑动窗口算法)
            node.addPassRequest(count);
            // .....以下全部是流量统计的方法
            if (context.getCurEntry().getOriginNode() != null) {
                // Add count for origin node.
                context.getCurEntry().getOriginNode().increaseThreadNum();
                context.getCurEntry().getOriginNode().addPassRequest(count);
            }

            if (resourceWrapper.getEntryType() == EntryType.IN) {
                // Add count for global inbound entry node for global statistics.
                Constants.ENTRY_NODE.increaseThreadNum();
                Constants.ENTRY_NODE.addPassRequest(count);
            }

            // Handle pass event with registered entry callback handlers.
            for (ProcessorSlotEntryCallback<DefaultNode> handler : StatisticSlotCallbackRegistry.getEntryCallbacks()) {
                handler.onPass(context, resourceWrapper, node, count, args);
            }
        } catch (PriorityWaitException ex) {
            node.increaseThreadNum();
            if (context.getCurEntry().getOriginNode() != null) {
                // Add count for origin node.
                context.getCurEntry().getOriginNode().increaseThreadNum();
            }

            if (resourceWrapper.getEntryType() == EntryType.IN) {
                // Add count for global inbound entry node for global statistics.
                Constants.ENTRY_NODE.increaseThreadNum();
            }
            // Handle pass event with registered entry callback handlers.
            for (ProcessorSlotEntryCallback<DefaultNode> handler : StatisticSlotCallbackRegistry.getEntryCallbacks()) {
                handler.onPass(context, resourceWrapper, node, count, args);
            }
        } catch (BlockException e) {
            // Blocked, set block exception to current entry.
            context.getCurEntry().setBlockError(e);

            // Add block count.
            node.increaseBlockQps(count);
            if (context.getCurEntry().getOriginNode() != null) {
                context.getCurEntry().getOriginNode().increaseBlockQps(count);
            }

            if (resourceWrapper.getEntryType() == EntryType.IN) {
                // Add count for global inbound entry node for global statistics.
                Constants.ENTRY_NODE.increaseBlockQps(count);
            }

            // Handle block event with registered entry callback handlers.
            for (ProcessorSlotEntryCallback<DefaultNode> handler : StatisticSlotCallbackRegistry.getEntryCallbacks()) {
                handler.onBlocked(e, context, resourceWrapper, node, count, args);
            }

            throw e;
        } catch (Throwable e) {
            // Unexpected internal error, set error to current entry.
            context.getCurEntry().setError(e);

            throw e;
        }
    }
StatisticSlot向下节点主要分析
//StatisticSlot.entry
fireEntry(context, resourceWrapper, node, count, prioritized, args);
向下的节点调用方式和之前的都一样,所以剩下的节点分别为:

但是其实这里的ParamFlowSlot包括SystemSlot和AuthoritySlot我们在操作的时候其实就已经知道了它们就是根据不同维度进行统计和检测,不再详细分析,这条链路中我们要主要分析流控和熔断:FlowSlot、DegradeSlot
2.5、FlowSlot解析
这个slot 主要根据预设的资源的统计信息,按照固定的次序,依次生效。如果一个资源对应两条或者多条流控规则,则会根据如下次序依次检验,直到全部通过或者有一个规则生效为止:
- 指定应用生效的规则,即针对调用方限流的;
- 调用方为 other 的规则;
- 调用方为 default 的规则。
核心方法的方式和之前的都一样,直接查看
//FlowSlot
    @Override
    public void entry(Context context, ResourceWrapper resourceWrapper, DefaultNode node, int count,
                      boolean prioritized, Object... args) throws Throwable {
        //检测并且应用流量规则
        checkFlow(resourceWrapper, context, node, count, prioritized);
        //触发下一个Slot
        fireEntry(context, resourceWrapper, node, count, prioritized, args);
    }
那我们先来分析checkFlow方法
    void checkFlow(ResourceWrapper resource, Context context, DefaultNode node, int count, boolean prioritized)
        throws BlockException {
        //在这里继续跟踪
        checker.checkFlow(ruleProvider, resource, context, node, count, prioritized);
    }
//------------checkFlow具体实现
public class FlowRuleChecker {

    public void checkFlow(Function<String, Collection<FlowRule>> ruleProvider, ResourceWrapper resource,
                          Context context, DefaultNode node, int count, boolean prioritized) throws BlockException {
        // 判断规则和资源不能为空
        if (ruleProvider == null || resource == null) {
            return;
        }
        // 获取到指定资源的所有流控规则
        Collection<FlowRule> rules = ruleProvider.apply(resource.getName());
        // 逐个应用流控规则。若无法通过则抛出异常,后续规则不再应用
        if (rules != null) {
            for (FlowRule rule : rules) {
                if (!canPassCheck(rule, context, node, count, prioritized)) {
                    // FlowException继承BlockException
                    throw new FlowException(rule.getLimitApp(), rule);
                }
            }
        }
    }
这里我们需要注意一下FlowRule(流控规则),它继承自AbstractRule,那我们来看一下AbstractRule其中的两个类型,分别是资源名称和资源的来源
public abstract class AbstractRule implements Rule {

    private String resource;

    private String limitApp;
那么通过这里我们就可以得知,流控的规则设置其实就是通过这个FlowRule来完成的,同样它的数据来源,就是我们使用的Sentinel-dashboard,当然也可以通过代码来进行设置
public class FlowRule extends AbstractRule {

    public FlowRule() {
        super();
        // 来源默认Default
        setLimitApp(RuleConstant.LIMIT_APP_DEFAULT);
    }

    public FlowRule(String resourceName) {
        super();
        // 资源名称
        setResource(resourceName);
        setLimitApp(RuleConstant.LIMIT_APP_DEFAULT);
    }

    /**
     * The threshold type of flow control (0: thread count, 1: QPS).
     */
    // 设置阈值类型0是线程1为QPS
    private int grade = RuleConstant.FLOW_GRADE_QPS;

    /**
     * Flow control threshold count.
     */
    // 单机阈值
    private double count;

    /**
     * Flow control strategy based on invocation chain.
     * 直接流控
     * {@link RuleConstant#STRATEGY_DIRECT} for direct flow control (by origin);
     * 关联流控
     * {@link RuleConstant#STRATEGY_RELATE} for relevant flow control (with relevant resource);
     * 链路流控
     * {@link RuleConstant#STRATEGY_CHAIN} for chain flow control (by entrance resource).
     */
    // 流控模式
    private int strategy = RuleConstant.STRATEGY_DIRECT;

    /**
     * Reference resource in flow control with relevant resource or context.
     */
    // 关联流控模式,关联的资源设置
    private String refResource;

    /**
     * Rate limiter control behavior.
     * 0. default(reject directly), 1. warm up, 2. rate limiter, 3. warm up + rate limiter
     */
    // 流控效果 0快速失败 1预热(令牌桶算法) 2排队等待(漏斗算法) 3预热+排队等待(目前控制台没有)
    private int controlBehavior = RuleConstant.CONTROL_BEHAVIOR_DEFAULT;

    // warp up预热时长
    private int warmUpPeriodSec = 10;

    /**
     * Max queueing time in rate limiter behavior.
     */
    // 排队等待的超时时间
    private int maxQueueingTimeMs = 500;

    // 是否为集群模式
    private boolean clusterMode;
    /**
     * Flow rule config for cluster mode.
     */
    // 集群模式配置
    private ClusterFlowConfig clusterConfig;

    /**
     * The traffic shaping (throttling) controller.
     */
    private TrafficShapingController controller;

   // ....省略以下方法
}
这里还涉及到两个算法:令牌桶算法和漏斗算法
令牌桶算法:令牌桶算法的原理是系统会以一个恒定的速度往桶里放入令牌,而如果请求需要被处理,则需要先从桶里获取一个令牌,当桶里没有令牌可取时,则拒绝服务。
漏斗算法:漏桶算法思路很简单,请求先进入到漏桶里,漏桶以固定的速度出水,也就是处理请求,当水加的过快,则会直接溢出,也就是拒绝请求,可以看出漏桶算法能强行限制数据的传输速率。
FlowSlot获取全部流控规则
//FlowRuleChecker.checkFlow
        // 获取到指定资源的所有流控规则
        Collection<FlowRule> rules = ruleProvider.apply(resource.getName());
        // 逐个应用流控规则。若无法通过则抛出异常,后续规则不再应用
        if (rules != null) {
            for (FlowRule rule : rules) {
                if (!canPassCheck(rule, context, node, count, prioritized)) {
                    throw new FlowException(rule.getLimitApp(), rule);
                }
            }
        }
//-------------------这里调用的apply方法就是FlowSlot中的对应方法
@Spi(order = Constants.ORDER_FLOW_SLOT)
public class FlowSlot extends AbstractLinkedProcessorSlot<DefaultNode> {
...
    private final Function<String, Collection<FlowRule>> ruleProvider = new Function<String, Collection<FlowRule>>() {
        @Override
        public Collection<FlowRule> apply(String resource) {
            // Flow rule map should not be null.
            // 获取所有资源和对应的流控规则 key为资源名称,value为该资源对应的所有流控规则
            Map<String, List<FlowRule>> flowRules = FlowRuleManager.getFlowRuleMap();
            // 获取指定资源的流控规则
            return flowRules.get(resource);
        }
    };
我们来看apply方法,要注意的是其中的FlowRuleManager其实如果我们通过代码的方式来设置流控就会使用到它,因为它提供了对应的方法FlowRuleManager.loadRules()
//FlowRuleManager
    //添加新的流控规则
    public static void loadRules(List<FlowRule> rules) {
        currentProperty.updateValue(rules);
    }

    static Map<String, List<FlowRule>> getFlowRuleMap() {
        return flowRules;
    }
但是现在这个位置源码用的FlowRuleManager.getFlowRuleMap(),其实通过这个方法我们就可以得知,FlowRuleManager的作用就是设置对应资源的流控规则,资源对应的流控规则(list集合)组成一个Map
// 获取所有资源和对应的流控规则 key为资源名称,value为该资源对应的所有流控规则
Map<String, List<FlowRule>> flowRules = FlowRuleManager.getFlowRuleMap();
//FlowRuleChecker.checkFlow()
if (rules != null) {
for (FlowRule rule : rules) {
// 遍历规则,应用规则,判断是否能够通过规则
if (!canPassCheck(rule, context, node, count, prioritized)) {
// FlowException继承BlockException
throw new FlowException(rule.getLimitApp(), rule);
}
}
}canPassCheck方法
    public boolean canPassCheck(/*@NonNull*/ FlowRule rule, Context context, DefaultNode node, int acquireCount,
                                                    boolean prioritized) {
        // 从规则中获取要限定的来源
        String limitApp = rule.getLimitApp();
        // 如果来源为空,则请求直接通过
        if (limitApp == null) {
            return true;
        }
        // 处理集群流控
        if (rule.isClusterMode()) {
            return passClusterCheck(rule, context, node, acquireCount, prioritized);
        }
         // 处理单机流控
        return passLocalCheck(rule, context, node, acquireCount, prioritized);
    }
passLocalCheck
    private static boolean passLocalCheck(FlowRule rule, Context context, DefaultNode node, int acquireCount,
                                          boolean prioritized) {
        // 根据请求选择节点
        Node selectedNode = selectNodeByRequesterAndStrategy(rule, context, node);
        if (selectedNode == null) {
            return true;
        }
        // 根据配置FlowRule配置的流控效果(流控效果:直接拒绝、排队等待、预热),选择不同的Controller,判断是否通过
        return rule.getRater().canPass(selectedNode, acquireCount, prioritized);
    }
selectNodeByRequesterAndStrategy
    static Node selectNodeByRequesterAndStrategy(/*@NonNull*/ FlowRule rule, Context context, DefaultNode node) {
        // The limit app should not be empty.
        // 获取限定来源(调用方)、流控模式(直接)、获取context中的调用发(从当前上下文环境中获取)
        String limitApp = rule.getLimitApp();
        int strategy = rule.getStrategy();
        String origin = context.getOrigin();
        // 判断来源如果不是Default(默认)和Other(其他)
        if (limitApp.equals(origin) && filterOrigin(origin)) {
            if (strategy == RuleConstant.STRATEGY_DIRECT) {
                // Matches limit origin, return origin statistic node.
                return context.getOriginNode();
            }

            return selectReferenceNode(rule, context, node);
        //如果是默认来源
        } else if (RuleConstant.LIMIT_APP_DEFAULT.equals(limitApp)) {
            // 是否是直接流控模式
            if (strategy == RuleConstant.STRATEGY_DIRECT) {
                // Return the cluster node.
                // 返回统计数据
                return node.getClusterNode();
            }

            return selectReferenceNode(rule, context, node);
            // 其他来源other
        } else if (RuleConstant.LIMIT_APP_OTHER.equals(limitApp)
            && FlowRuleManager.isOtherOrigin(origin, rule.getResource())) {
            if (strategy == RuleConstant.STRATEGY_DIRECT) {
                return context.getOriginNode();
            }

            return selectReferenceNode(rule, context, node);
        }

        return null;
    }
// 根据配置FlowRule配置的流控效果(流控效果:直接拒绝、排队等待、预热),选择不同的Controller,判断是否通过
return rule.getRater().canPass(selectedNode, acquireCount, prioritized);
//------------
TrafficShapingController getRater() {
return controller;
}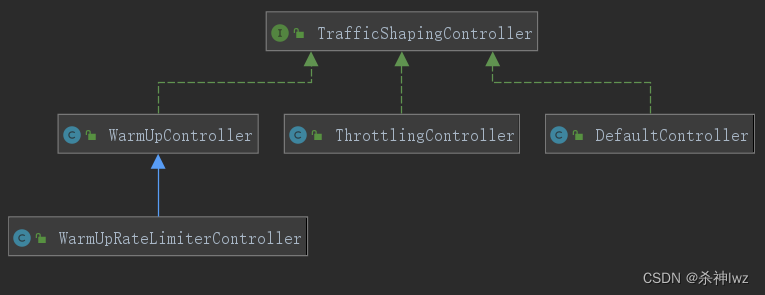
其实从这里我们就能看出针对不同的流控模式,针对不同的控制器来进行处理,那么我们这里演示一个DefaultController。
那我们现在来看一下具体DefaultController的操作,在DefaultController中,首先获取当前的线程数或者QPS数,如果当前的线程数或者QPS+申请的数量>配置的总数,则不通过,如果当前线程数或者QPS+申请的数量<=配置的总数,则直接通过
public class DefaultController implements TrafficShapingController {

    private static final int DEFAULT_AVG_USED_TOKENS = 0;

    private double count;
    private int grade;

    public DefaultController(double count, int grade) {
        this.count = count;
        this.grade = grade;
    }

    @Override
    public boolean canPass(Node node, int acquireCount) {
        return canPass(node, acquireCount, false);
    }

    @Override
    public boolean canPass(Node node, int acquireCount, boolean prioritized) {
        //获取当前node节点的线程数或者请求通过的qps总数
        int curCount = avgUsedTokens(node);
        //当前请求数(请求的令牌)+申请总数是否(已经消耗的令牌)>该资源配置的总数(阈值)
        if (curCount + acquireCount > count) {
            if (prioritized && grade == RuleConstant.FLOW_GRADE_QPS) {
                long currentTime;
                long waitInMs;
                currentTime = TimeUtil.currentTimeMillis();
                waitInMs = node.tryOccupyNext(currentTime, acquireCount, count);
                if (waitInMs < OccupyTimeoutProperty.getOccupyTimeout()) {
                    node.addWaitingRequest(currentTime + waitInMs, acquireCount);
                    node.addOccupiedPass(acquireCount);
                    sleep(waitInMs);

                    // PriorityWaitException indicates that the request will pass after waiting for {@link @waitInMs}.
                    throw new PriorityWaitException(waitInMs);
                }
            }
            return false;
        }
        return true;
    }

    private int avgUsedTokens(Node node) {
        if (node == null) {
            return DEFAULT_AVG_USED_TOKENS;
        }
        return grade == RuleConstant.FLOW_GRADE_THREAD ? node.curThreadNum() : (int)(node.passQps());
    }

    private void sleep(long timeMillis) {
        try {
            Thread.sleep(timeMillis);
        } catch (InterruptedException e) {
            // Ignore.
        }
    }
}
2.6、DegradeSlot解析
熔断降级的Slot
@Spi(order = Constants.ORDER_DEGRADE_SLOT)
public class DegradeSlot extends AbstractLinkedProcessorSlot<DefaultNode> {
..
    @Override
    public void entry(Context context, ResourceWrapper resourceWrapper, DefaultNode node, int count,
                      boolean prioritized, Object... args) throws Throwable {
        // 熔断降级检测
        performChecking(context, resourceWrapper);
        // 触发下一个节点
        fireEntry(context, resourceWrapper, node, count, prioritized, args);
    }
那我们先来跟踪熔断降级检测的方法,在这里我们可以看见,这里其实就是对熔断器的状态进行判断
    void performChecking(Context context, ResourceWrapper r) throws BlockException {
        // 获取所有资源的熔断器
        List<CircuitBreaker> circuitBreakers = DegradeRuleManager.getCircuitBreakers(r.getName());
        // 判断是否获取到熔断器,如果为空直接结束
        if (circuitBreakers == null || circuitBreakers.isEmpty()) {
            return;
        }
        for (CircuitBreaker cb : circuitBreakers) {
            // 判断所有熔断器的状态,如果是开启状态直接抛出异常
            if (!cb.tryPass(context)) {
                // 此异常继承于BlockException
                throw new DegradeException(cb.getRule().getLimitApp(), cb.getRule());
            }
        }
    }
而真正判断是否需要开启熔断器是在exit方法中进行的,这个方法是在业务方法执行以后调用了,熔断器需要手机业务异常或者业务的执行时间来判断是开启熔断
    @Override
    public void exit(Context context, ResourceWrapper r, int count, Object... args) {
        // 如果当前其他的Slot已经有了BlockException,就直接跳过
        Entry curEntry = context.getCurEntry();
        if (curEntry.getBlockError() != null) {
            fireExit(context, r, count, args);
            return;
        }
        // 通过资源名称获取熔断器
        List<CircuitBreaker> circuitBreakers = DegradeRuleManager.getCircuitBreakers(r.getName());
        if (circuitBreakers == null || circuitBreakers.isEmpty()) {
            fireExit(context, r, count, args);
            return;
        }

        if (curEntry.getBlockError() == null) {
            // passed request
            // 调用CircuitBreaker的onRequestComplete()方法
            for (CircuitBreaker circuitBreaker : circuitBreakers) {
                circuitBreaker.onRequestComplete(context);
            }
        }

        fireExit(context, r, count, args);
    }
CircuitBreaker熔断器
public interface CircuitBreaker {

    /**
     * Get the associated circuit breaking rule.
     *获取熔断规则
     * @return associated circuit breaking rule
     */
    DegradeRule getRule();

    /**
     * Acquires permission of an invocation only if it is available at the time of invoking.
     *判断是否需要降级 返回值为false开启降级
     * @param context context of current invocation
     * @return {@code true} if permission was acquired and {@code false} otherwise
     */
    boolean tryPass(Context context);

    /**
     * Get current state of the circuit breaker.
     *当前熔断器状态
     * @return current state of the circuit breaker
     */
    State currentState();

    /**
     * <p>Record a completed request with the context and handle state transformation of the circuit breaker.</p>
     * <p>Called when a <strong>passed</strong> invocation finished.</p>
     *回调方法 当请求通过后触发
     * @param context context of current invocation
     */
    void onRequestComplete(Context context);

    /**
     * Circuit breaker state.
     * 三种熔断器状态:
     * OPEN开启
     * HALF_OPEN半开启
     * CLOSED关闭
     */
    enum State {
        /**
         * In {@code OPEN} state, all requests will be rejected until the next recovery time point.
         */
        OPEN,
        /**
         * In {@code HALF_OPEN} state, the circuit breaker will allow a "probe" invocation.
         * If the invocation is abnormal according to the strategy (e.g. it's slow), the circuit breaker
         * will re-transform to the {@code OPEN} state and wait for the next recovery time point;
         * otherwise the resource will be regarded as "recovered" and the circuit breaker
         * will cease cutting off requests and transform to {@code CLOSED} state.
         */
        HALF_OPEN,
        /**
         * In {@code CLOSED} state, all requests are permitted. When current metric value exceeds the threshold,
         * the circuit breaker will transform to {@code OPEN} state.
         */
        CLOSED
    }
}
熔断策略
对应的实现类有两个ExceptionCircuitBreaker(异常熔断器)、ResponseTimeCircuitBreaker(响应时间熔断器)
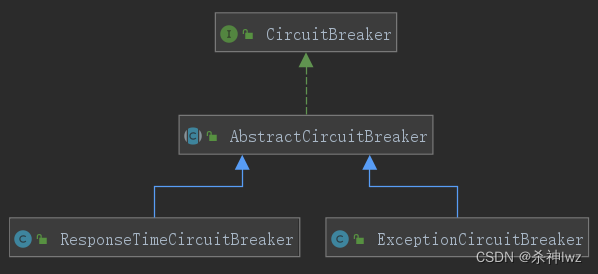
ExceptionCircuitBreaker(异常熔断器),对应的策略是"异常比例"和"异常数"。
看对应回调方法ExceptionCircuitBreaker.onRequestComplete
//ExceptionCircuitBreaker
    @Override
    public void onRequestComplete(Context context) {
        Entry entry = context.getCurEntry();
        if (entry == null) {
            return;
        }
        Throwable error = entry.getError();
        // 异常事件窗口计数器
        SimpleErrorCounter counter = stat.currentWindow().value();
        // 如果有异常,异常数+1
        if (error != null) {
            counter.getErrorCount().add(1);
        }
        // 总异常数+1
        counter.getTotalCount().add(1);

        handleStateChangeWhenThresholdExceeded(error);
    }

    private void handleStateChangeWhenThresholdExceeded(Throwable error) {
        // 如果熔断器已经开启直接返回
        if (currentState.get() == State.OPEN) {
            return;
        }
        // 进入办开启状态
        if (currentState.get() == State.HALF_OPEN) {
            // In detecting request
            if (error == null) {
                // 本次请求没有出现异常,关闭熔断器
                fromHalfOpenToClose();
            } else {
                // 本次请求出现异常,打开熔断
                fromHalfOpenToOpen(1.0d);
            }
            return;
        }

        List<SimpleErrorCounter> counters = stat.values();
        long errCount = 0;//异常数量
        long totalCount = 0;//总异常数
        for (SimpleErrorCounter counter : counters) {
            errCount += counter.errorCount.sum();
            totalCount += counter.totalCount.sum();
        }
        // 请求数量<最小的请求数量时不开启熔断
        if (totalCount < minRequestAmount) {
            return;
        }
        double curCount = errCount;
        // 熔断策略为慢调用比例
        if (strategy == DEGRADE_GRADE_EXCEPTION_RATIO) {
            // Use errorRatio
            // 计算百分比
            curCount = errCount * 1.0d / totalCount;
        }
        // 错误率或者错误数大于阈值时开启熔断
        if (curCount > threshold) {
            transformToOpen(curCount);
        }
    }
Spring Cloud Alibaba - Sentinel(一)
Spring Cloud Alibaba - Sentinel(二)
干我们这行,啥时候懈怠,就意味着长进的停止,长进的停止就意味着被淘汰,只能往前冲,直到凤凰涅槃的一天!


 228
228


 被折叠的 条评论
为什么被折叠?
被折叠的 条评论
为什么被折叠?
 到【灌水乐园】发言


