


一、SpringBoot中的classpath
最近想要总结一下Java中classpath的默认路径与相关资源文件的处理,不仅仅是考虑到之前在使用过程中对其不够清楚,而且在翻看spring-boot-autoconfigure时发现在类ResourceProperties中有这么一串代码:
private static final String[] CLASSPATH_RESOURCE_LOCATIONS = new String[]{
    "classpath:/META-INF/resources/",
    "classpath:/resources/",
    "classpath:/static/",
    "classpath:/public/"};
这段代码代表着Spring在读取资源时默认的环境配置。
可能会有些疑问为什么看着和项目中有区别,这就要说到classpath这个值了
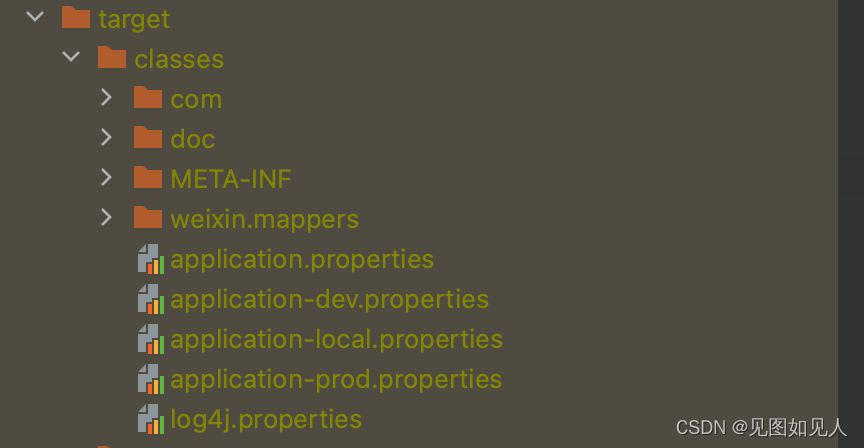
- classpath:代表当前项目中target/classes文件夹下的资源
- classpath*:代表当前项目及依赖jar中target/classes文件夹下的资源
PS:用classpath*需要遍历所有的classpath,所以加载速度比较慢。因此要尽可能规划好资源文件的路径,避免使用classpath*这样的全局搜索
上面代码的默认路径对应到项目中就是:
- /META-INF/resources/:src/main/resources/META-INF/resources(配置文件)
- /resources/:src/main/resources/resources(配置文件)
- /static/:src/main/resources/static(静态资源文件)
- /public/:src/main/resources/public(页面文件)
当然这些默认地址不是一尘不变的,当遇到Spring版本更新或者你手动修改了默认的Sources文件夹默认路径就会因此改变
在SpringMvc这样的web项目中,大家还会有一个文件夹是:src/main/webapp。这个跟java,resource同级的目录专门用于开发前端,也就是存放静态资源文件(JPG、JS、CSS等)、前端页面文件(JSP等)
二、SpringBoot打包流程
SpringBoot打包的配置流程及知识点讲解
配置流程:在build层引入maven打包依赖
<build>
    <plugins>
        <plugin>
            <groupId>org.springframework.boot</groupId>
            <artifactId>spring-boot-maven-plugin</artifactId>
        </plugin>
    </plugins>
</build>
通过运行maven clean->compile->package指令之后项目target文件夹下面出现了两个文件

没有original后缀的则是可运行jar包,有original后缀的则是maven第一次打包项目是生成的文件。maven先将项目打包成普通jar,然后通过repackage进行二次打包生成可运行jar。
知识点:
为什么要使用spring-boot-maven-plugin?
Spring Boot Maven插件作用:在Apache Maven中提供Spring Boot支持。它允许项目打包成可执行 jar或 war包、运行Spring Boot应用程序、生成构建信息(MANIFEST.MF内容)并在运行集成测试之前启动Spring Boot应用程序。
可运行jar的规范
- 在jar文件中,我们必须要将mainclass的入口的那个类放于jar包的根目录中,否则无法启动该jar文件
springboot可运行jar的运行流程
先介绍一下可运行jar的内部结构,打开可运行jar文件后可以发现目录为下图: 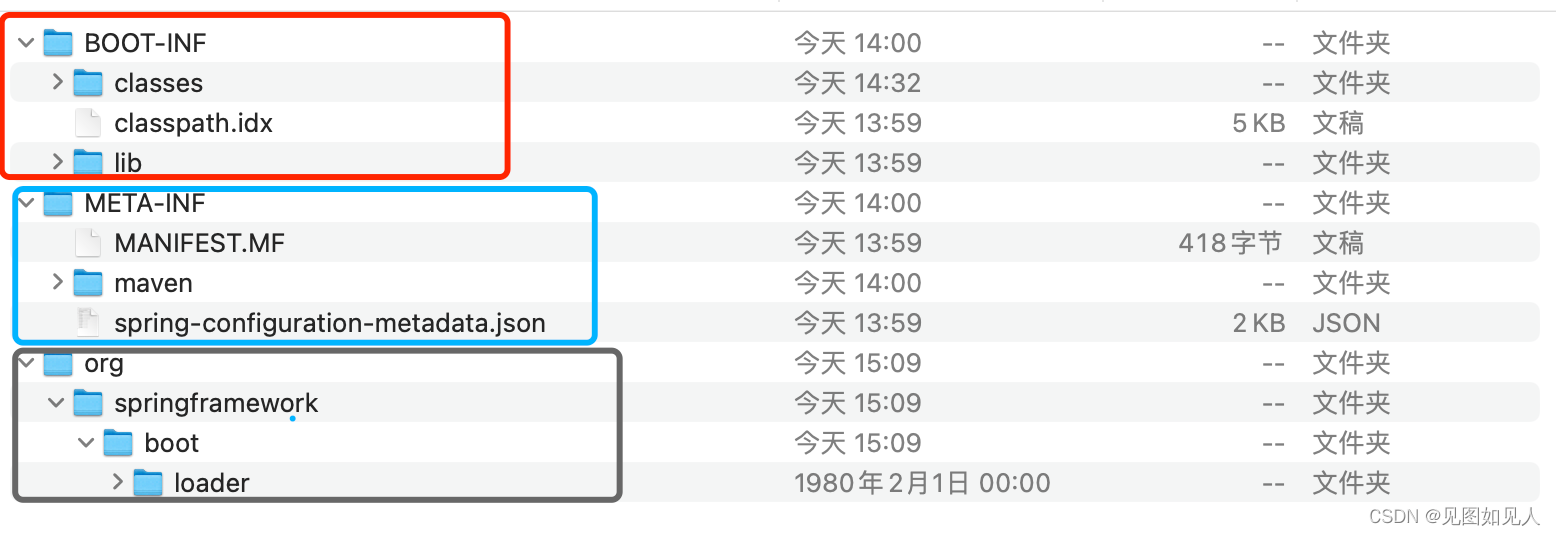
红框:应用程序及第三方依赖
篮框:相关jar包的基础信息、mianclass信息、startclass信息、构建打包项目的版本信息、maven相关信息
黑框:springboot可运行jar包的启动器
- 我们可以通过MANIFEST.MF文件得知jar启动类org.springframework.boot.loader.JarLauncher

这一块也就是spring-boot-maven-plugin插件为我们提供的可运行类入口
- 进入JarLauncher类可以发现main函数中调用了超类Launcher中的launch函数


- 由于isExploded()函数默认返回false,所以JarFile.registerUrlProtocolHandler()一定会执行,用来注册url协议处理器。将springboot自定义的协议处理器(org.springframework.boot.loader.jar.Handler)载入环境变量java.protocol.handler.pkgs中。
JarFile.registerUrlProtocolHandler();
=====================================
public static void registerUrlProtocolHandler() {
    String handlers = System.getProperty("java.protocol.handler.pkgs", "");
    System.setProperty("java.protocol.handler.pkgs",
        "".equals(handlers) ? "org.springframework.boot.loader" : (handlers + "|" + "org.springframework.boot.loader"));
    resetCachedUrlHandlers();
}
private static void resetCachedUrlHandlers() {
    try {
      URL.setURLStreamHandlerFactory(null);
    } catch (Error error) {}
}
注:org.springframework.boot.loader.jar.Handler用于提供jar in jar问题的解决方案,这是由于JDK提供的ClassLoader只能识别jar中的class文件以及加载classpath下的其他jar包中的class文件,对于包含依赖的JAR文件是无法处理的,会爆出classnotfound异常。
- 创建类加载器ClassLoader
ClassLoader classLoader = createClassLoader(getClassPathArchivesIterator());
=============================================================================
使用ExecutableArchiveLauncher子类中的方法,超类中方法已被@Deprecated修饰
protected Iterator<Archive> getClassPathArchivesIterator() throws Exception {
    Archive.EntryFilter searchFilter = this::isSearchCandidate;
    Iterator<Archive> archives = this.archive.getNestedArchives(searchFilter, entry ->
        (isNestedArchive(entry) && !isEntryIndexed(entry)));
    if (isPostProcessingClassPathArchives())
      archives = applyClassPathArchivePostProcessing(archives);
    return archives;
}
=============================================================================
Launcher类:
@Deprecated
protected ClassLoader createClassLoader(List<Archive> archives) throws Exception {
    return createClassLoader(archives.iterator());
}
protected ClassLoader createClassLoader(Iterator<Archive> archives) throws Exception {
    List<URL> urls = new ArrayList<>(50);
    while (archives.hasNext()) {
      Archive archive = archives.next();
      urls.add(archive.getUrl());
      archive.close();
    }
    return createClassLoader(urls.<URL>toArray(new URL[0]));
}- 调用项目原本的启动类
String launchClass = (jarMode != null && !jarMode.isEmpty()) ? "org.springframework.boot.loader.jarmode.JarModeLauncher" : getMainClass();
launch(args, launchClass, classLoader);
====================================================================
ExecutableArchiveLauncher:获取Start-Class
protected String getMainClass() throws Exception {
    Manifest manifest = this.archive.getManifest();
    String mainClass = null;
    if (manifest != null)
      mainClass = manifest.getMainAttributes().getValue("Start-Class");
    if (mainClass == null)
      throw new IllegalStateException("No 'Start-Class' manifest entry specified in " + this);
    return mainClass;
}
====================================================================
Launcher:运行项目启动类
protected void launch(String[] args, String launchClass, ClassLoader classLoader) throws Exception {
    Thread.currentThread().setContextClassLoader(classLoader);
    createMainMethodRunner(launchClass, args, classLoader).run();
}
====================================================================
通过反射的方式执行项目启动类的main函数
public class MainMethodRunner {
  private final String mainClassName;

  private final String[] args;

  public MainMethodRunner(String mainClass, String[] args) {
    this.mainClassName = mainClass;
    this.args = (args != null) ? (String[])args.clone() : null;
  }

  public void run() throws Exception {
    Class<?> mainClass = Class.forName(this.mainClassName, false, Thread.currentThread().getContextClassLoader());
    Method mainMethod = mainClass.getDeclaredMethod("main", new Class[] { String[].class });
    mainMethod.setAccessible(true);
    mainMethod.invoke(null, new Object[] { this.args });
  }
}
自此jar包就开始运行了,鉴于本篇文章包含资源文件相关的知识点。这里也把可运行jar中的PropertiesLauncher说一下:
查看org/springframework/boot/loader下面的PropertiesLauncher代码,也可以发现jar包在运行初始化的时候就默认获取依赖classpath及当前项目classpath:boot-inf路径下的配置文件
private void initializeProperties() throws Exception {
    List<String> configs = new ArrayList<>();
    if (getProperty("loader.config.location") != null) {
      configs.add(getProperty("loader.config.location"));
    } else {
      String[] names = getPropertyWithDefault("loader.config.name", "loader").split(",");
      for (String name : names) {
        configs.add("file:" + getHomeDirectory() + "/" + name + ".properties");
        configs.add("classpath:" + name + ".properties");
        configs.add("classpath:BOOT-INF/classes/" + name + ".properties");
      }
    }
    for (String config : configs) {
      try (InputStream resource = getResource(config)) {
        if (resource != null) {
          debug("Found: " + config);
          loadResource(resource);
          return;
        }
        debug("Not found: " + config);
      }
    }
  }


 3万+
3万+


 被折叠的 条评论
为什么被折叠?
被折叠的 条评论
为什么被折叠?
 到【灌水乐园】发言


