


一、为什么要用vite?
vite:构建工具,对标webpack
vue create vue-project 基于webpack构建
vite速度比webpack快。
二、用vite搭建vue3项目
npm init vite@latest # 使用vite构建
npm init vue@latest  # 使用webpack构建,专门用于vue,有很多配置不需要我们配了
三、模板语法与指令
插值{{}}中可以放一些函数及计算
<template>
<div>
  <!-- 在插值表达式 -->
  {{message.split(',').map(v=>`${v}888`)}}
</div>

</template>

<script setup lang="ts">
const message:string = 'h,e,l,l,o'
</script>

<style scoped>
</style>
v-if(隐藏节点dom),v-show(操作css)
<template>
<div>
  <span v-show="flag">hello,vue!</span>
  <!-- 可以使用比较表达式 -->
  <span v-show="2>1">hello,vue!</span>
  <span v-if="3>1">hello,vue!</span>
</div>

</template>

<script setup lang="ts">
const flag:boolean = false
</script>

<style scoped>
</style>
- v-html 用来展示富文本
- v-on 简写@ 用来给元素添加事件
- v-bind 简写:用来绑定元素的属性Attr
- v-model 双向绑定
- v-for 用来遍历元素
四、为什么要有虚拟DOM
dom上的属性是非常多的,直接操作DOM非常浪费性能,用JS的计算性能来换取操作DOM所消耗的性能。操作JS是非常快的。
五、Vue3 ref
ref 接受一个内部值并返回一个响应式且可变的ref对象。ref对象仅有一个.value property,指向该内部值。
在.vue文件中输入vue3快速模板的设置方法
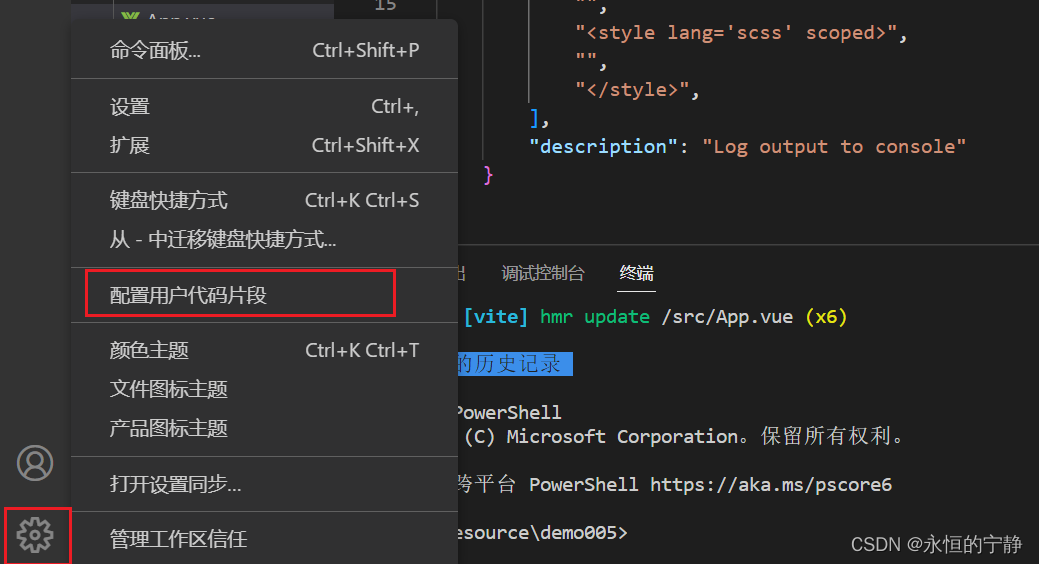
输入vue.json进行配置
{
    "Print to console": {
		"prefix": "vue3",
		"body": [
            "<template>",
			"",
			"    <div></div>",
			"",
			"</template>",
			"",
			"<script setup lang='ts'>",
			"import { ref, reactive } from 'vue'",
			"",
			"</script>",
			"",
			"<style lang='scss' scoped>",
			"",
			"</style>",
		],
		"description": "Log output to console"
	}
}
<template>

    <div>
        <span>{{Person.name}}</span> <br>
        <button @click="change">点击更改</button>
    </div>

</template>

<script setup lang='ts'>
import { ref, reactive, isRef } from 'vue'
// ref的interface
import type { Ref } from 'vue'

// 直接类型推导
// const Person = ref({name: '张三'})


// 定义一个类型
type P = {
  name: string
}


// ref可以定义一个泛型,约束里面定义的对象。
// const Person = ref<P>({name: '张三'})

const Person:Ref<P> = ref({name: '张三'})

const change = ()=>{
  // 需要加上value
  Person.value.name = '李四'
  // isRef函数,判断是否是ref对象
  console.log(isRef(Person))
}


</script>

<style lang='scss' scoped>

</style>
使用ref读取dom
<template>
    <div>
        <span ref="spanhello">hello</span> <br>
        <button @click="change">点击更改</button>
    </div>
</template>

<script setup lang='ts'>
import { ref, reactive, isRef } from 'vue'
// spanhello需要和html中的ref属性一致
const spanhello = ref<HTMLSpanElement>()

const change = ()=>{
  // 读取dom节点的innerText
  console.log(spanhello.value?.innerText)
}


</script>

<style lang='scss' scoped>

</style>
六、Vu3 reactive
ref和reactive都是将我们的变量变成响应式
reactive源码约事了我们的类型,用来绑定复杂数据类型如对象、数组,不可以绑定普通的数据类型。
案例一:
<template>
    <div>
        姓名:{{Person.name}} <br>
        年龄: {{Person.age}} <br>
    </div>
</template>

<script setup lang='ts'>
import { ref, reactive, isRef } from 'vue'
// ref 支持所有的类型,reactive引用类型 Array Object Map Set
// ref 取值 赋值 都需要加.value,reactive是不需要.value

type P = {
  name: string,
  age: number
}
// 用泛型或推导类型都ok
const Person = reactive<P>({name: '张三', age: 18})

</script>

<style lang='scss' scoped>
</style>
案例二:
<template>
    <div>
        <form action="/">
          姓名:<input type="text" v-model="form.name"> <br>
          年龄:<input type="text" v-model="form.age"> <br>
          <button @click.prevent="submit">提交</button>
        </form>
    </div>
</template>

<script setup lang='ts'>
import { ref, reactive, isRef } from 'vue'
// reactive经常用来绑定一些表单数据,实现响应式,数据双向流动

let form = reactive({
  name: '',
  age: 0
})

const submit = () => {
  console.log(form)
}

</script>

<style lang='scss' scoped>

</style>
案例三:
<template>
    <div>
        <ul v-for="item in list">
          <li>{{item}}</li>
        </ul>
        <button @click="add">添加</button>
    </div>
</template>

<script setup lang='ts'>
import { ref, reactive, isRef } from 'vue'
// reactive经常用来绑定一些表单数据,实现响应式,数据双向流动
// reactive是一个proxy,不能直接赋值,直接赋值就不是proxy了,破坏了响应式

let list = reactive<string[]>([])

const add = () => {
  // list.push("hello") 这样写没有问题
  // 这里如果来个异步,模拟从接口获取数据
  setTimeout(()=>{
      let res = ['hello', 'vue', 'reactive']
      //list = res
      //list中的数据有改变,但页面并没有被渲染
      //因为上一个list=res将proxy list的类型覆盖了

      //解决方案一:使用解构
      list.push(...res)
      console.log(list)
  }, 2000)
}

</script>

<style lang='scss' scoped>

</style>
不使用解构就想直接赋值
<template>
    <div>
        <ul v-for="item in list.arr">
          <li>{{item}}</li>
        </ul>
        <button @click="add">添加</button>
    </div>
</template>

<script setup lang='ts'>
import { ref, reactive, isRef } from 'vue'
// reactive经常用来绑定一些表单数据,实现响应式,数据双向流动
// reactive是一个proxy,不能直接赋值,直接赋值就不是proxy了,破坏了响应式

let list = reactive<{arr:string[]}>({arr:[]})

const add = () => {
  // list.push("hello") 这样写没有问题
  // 这里如果来个异步,模拟从接口获取数据
  setTimeout(()=>{
      let res = ['hello', 'vue', 'reactive']
      //list = res
      //list中的数据有改变,但页面并没有被渲染
      //因为上一个list=res将proxy list的类型覆盖了

      //使用对象 原则只要不覆盖list 导致proxy类型改变即可
      list.arr = res
      console.log(list)
  }, 2000)
}

</script>

<style lang='scss' scoped>

</style>
七、toRef toRefs toRaw
toRef: 如果原始对象是非响应式的就不会更新视图,数据是会变的。
toRef: 将响应式对象的一个属性拿出来再做响应式
<template>
    <div>
        {{name}}--{{age}}--{{hobby}}
        {{person.name}}--{{person.age}}--{{person.hobby}}
        <button @click="change1">更改1</button>
        <button @click="change2">更改2</button>
    </div>
</template>

<script setup lang='ts'>
import { toRef, reactive, toRefs, toRaw } from 'vue'

let person = reactive({name: '张三', age: 20, hobby: 'footbar'})

// 将一个响应式对象的属性拿出来再做响应式
// const hobby = toRef(person, 'hobby')
// 应用场景,解构出来赋给一个函数做为参数

// toRefs的应用,解构出来的属性和对象的属性一一对应
// 解构出来的name和person.name的值一样,你变我也变
let {name, age, hobby} = toRefs(person)

const change1 = ()=>{
    person.name = '王五'
}
const change2 = ()=>{
  // 解构出来的属性要赋值须加上.value
  hobby.value = 'beauty'
}

</script>

<style lang='scss' scoped>

</style>
toRaw
<template>
    <div>
        <button @click="change">更改1</button>
    </div>
</template>

<script setup lang='ts'>
import { toRef, reactive, toRefs, toRaw } from 'vue'

let person = reactive({name: '张三', age: 20, hobby: 'footbar'})

// toRaw将响应式对象改成不是响应式的对象
let person1 = toRaw(person)

const change = () => {
  console.log(person, person1)
}


</script>

<style lang='scss' scoped>

</style>


 4778
4778


 被折叠的 条评论
为什么被折叠?
被折叠的 条评论
为什么被折叠?
 到【灌水乐园】发言


