


先上代码直接运行
# -*- coding: utf-8 -*-
"""
--********************************************************************--
--file: 柏森采样示例代码
--author: donganning
--create time: 2023/3/30 14:24
--description:
--********************************************************************--
"""
import random
import numpy as np
import matplotlib.pyplot as plt
from matplotlib.collections import PatchCollection
from scipy.stats import qmc
def get_possiom_sample_by_gpt(width, height, r, k=3000):
"""
使用gpt生成的代码
1。 初始化采样点列表和边界框。采样点列表是用来存储已生成的采样点的数组,边界框是用来限制采样点的生成范围的矩形。
2。 在边界框内随机生成一个起始采样点,并将其添加到采样点列表中。
3。 对于每个已经生成的采样点,随机生成N个候选点(N取决于数据集的大小和维数),并判断它们是否满足一定的条件,如距离大于一定值D,没有与其他采样点重叠等。
4。 如果一个候选点满足条件,将其添加到采样点列表中,并将其放入一个"活跃集合"中。"活跃集合"是一个队列,用来存储需要重新测试的采样点。当新的采样点被添加时,它会加入到"active_samples"的末端。
5。 从"active_samples"中取出一个采样点,并对其周围的候选点进行测试。如果一个候选点满足条件,将其添加到采样点列表中,并将其放入"active_samples"中。
6。 重复步骤5,直到"活跃集合"为空。
当采样点列表达到预设数量时,停止采样。
:param width: 宽度范围
:param height: 高度范围
:param r: 半径
:param k: 采样次数
:return:
"""
# Step1: Initialize variables and data structures
cell = r / np.sqrt(2) # cell size
cols, rows = int(np.ceil(width / cell)), int(np.ceil(height / cell)) # number of columns and rows
grid = [None] * (cols * rows) # grid to store points
samples = [] # list of samples
active_samples = [] # queue of active samples
# Step2: Pick a random point and add it to the samples list and active_samples queue
x = random.uniform(0, width)
y = random.uniform(0, height)
i = int(x / cell)
j = int(y / cell)
samples.append((x, y))
active_samples.append((x, y))
grid[i + j * cols] = x, y
# Step3-6: Generate new samples
while active_samples:
# Step5: Pick a random active sample
idx = random.randint(0, len(active_samples) -1)
x, y = active_samples[idx]
# Step3: Generate k new candidate samples randomly
for _ in range(k):
## gpt原始提供的用来生成随机点的方法,感觉不如random.random()劲
# angle = random.uniform(0,2 * np.pi)
# radius = random.uniform(r,2 * r)
# new_x = x + radius * np.cos(angle)
# new_y = y + radius * np.sin(angle)
new_x = random.random()
new_y = random.random()
# Step4: Check if the new sample is inside the boundary
if (new_x >=0 and new_x <= width and new_y >=0 and new_y <= height):
i = int(new_x / cell)
j = int(new_y / cell)
else:
continue
# intersect表示在新随机生成的样本点和旧样本点之间是否存在冲突,
# 即新样本点是否与任何旧样本点过于接近。
# 如果新样本点与任何旧样本点过于接近,则intersect会被设置为True,这将导致新样本点被舍弃。
# 如果新样本点与所有旧样本点的距离都足够远,则intersect将保持为False,新样本点将被添加到样本列表中。
intersect = False
# Step4: Check if the new sample is too close to any existing sample
for dj in range(-2,3):
for di in range(-2,3):
if (i + di >=0 and i + di < cols and j + dj >=0 and j + dj < rows and grid[(i + di) + (j + dj) * cols]):
dx = new_x - grid[(i + di) + (j + dj) * cols][0]
dy = new_y - grid[(i + di) + (j + dj) * cols][1]
dist = np.sqrt(dx * dx + dy * dy)
if (dist < r):
intersect = True
break
if intersect:
break
# Step4: If the new sample is far enough from other samples, add it to the samples list and active_samples queue
if not intersect:
if grid[i + j * cols] == None:
samples.append((new_x, new_y))
active_samples.append((new_x, new_y))
grid[i + j * cols] = new_x, new_y
# Step6: Remove the sample from the active_samples queue
if len(active_samples) >1:
active_samples.pop(idx)
else:
active_samples = []
# Step7: Return the list of samples
return np.array(samples)
# https://docs.scipy.org/doc/scipy/reference/generated/scipy.stats.qmc.PoissonDisk.html
def get_possiom_sample(r, k=3000):
"""
qmc.PoissonDisk方法自带参数
:param r: 半径
:param k: 采样点个数
:return:
"""
rng = np.random.default_rng()
# d=2维度
engine = qmc.PoissonDisk(d=2, radius=r, seed=rng)
center_of_samples = engine.random(k)
return center_of_samples
if __name__ == '__main__':
# radius =np.sqrt(2)/2 # 调试gpt代码时候用的半径参数
r = 0.2
k = 2000
# 用qmc.PoissonDisk方法
sample = get_possiom_sample(r)
print("采样完毕")
# 用手撸代码方法
# sample = get_possiom_sample_by_gpt(1,1,r,k)
print("gpt采样完毕")
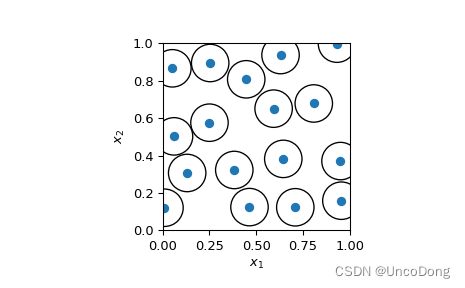
# 画图
fig, ax = plt.subplots()
_ = ax.scatter(sample[:, 0], sample[:, 1])
circles = [plt.Circle((xi, yi), radius=r / 2, fill=False)
for xi, yi in sample]
collection = PatchCollection(circles, match_original=True)
ax.add_collection(collection)
_ = ax.set(aspect='equal', xlabel=r'$x_1$', ylabel=r'$x_2$',
xlim=[0, 1], ylim=[0, 1])
plt.show()
基本概念
直接复制粘贴别人博客了
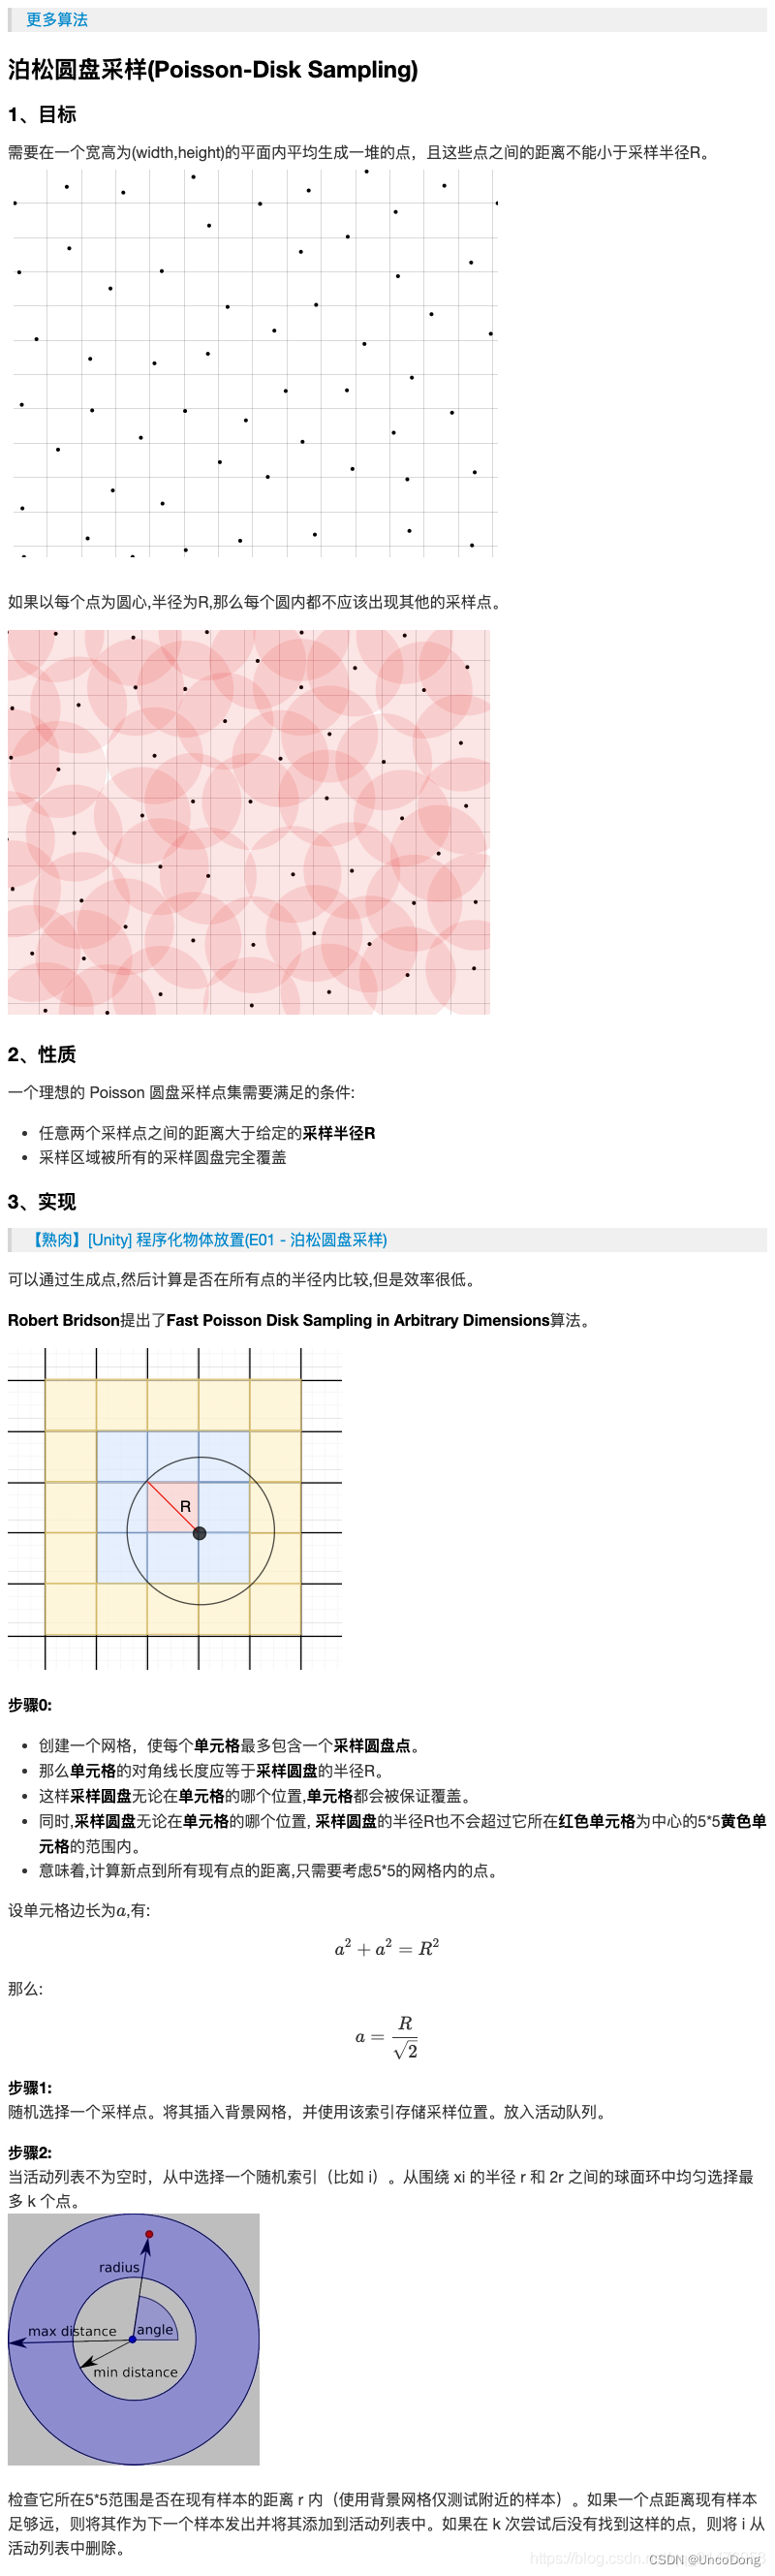
总的来说,该方法有这些好处
- 尽可能均匀地在一片区域上采样
- 由于使用画格子的算法,只需要遍历附近的格子,不用遍历全部,大大降低了计算复杂度。
遇到问题
其实用qmc.PoissonDisk方法就能实现采样,但问题是公司服务器上是Python3.6,scipy版本1.5
根据ImportError: cannot import name ‘qmc’ from ‘scipy.stats’ 解决办法中提到,“qmc模块是在scipy的1.7.0版本(2021年7月左右)中添加的。 故需要更新软件包。
然而去Pypi官网看了一下,scipy 1.7至少得Python3.7去运行,因此没发通过直接倒入包的方式来调用了,只能根据算法原理手撸了。
感谢ChatGPT,实现了绝大部分代码,调试半天终于实现了几乎一样的采样功能。不得不说真的要被替代了。。。


 502
502


 被折叠的 条评论
为什么被折叠?
被折叠的 条评论
为什么被折叠?
 到【灌水乐园】发言


