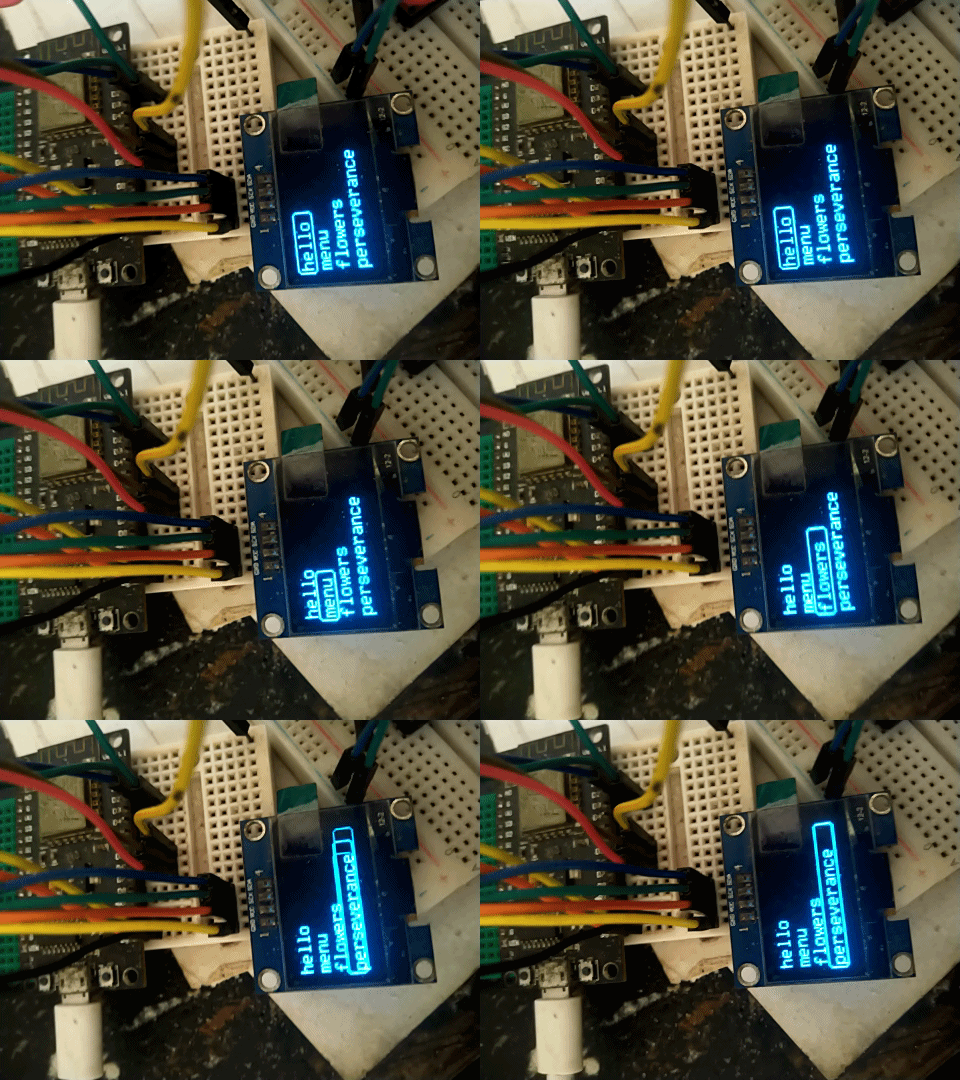
U8g2菜单界面+按键操作在线模拟控制

✨利用U8g2库在线模拟菜单功能,可以很方便的快速调试效果。
🌼Demo1代码
- 📌仿真地址:
https://wokwi.com/projects/291572875238834696
/*
 * Very simple menu on an OLED display (with 8 lines of text).
 * Displays menu items from the array menu. Max. number of items is 7.
 *
 * This sketch uses the library "U8g2", "Bounce2" and uses 3 buttons (up/down/select).
 *
 */

#include <U8g2lib.h>
#include <Bounce2.h>

byte button_pins[] = {9, 5, 6}; // button pins, 4,5 = up/down, 6 = select
#define NUMBUTTONS sizeof(button_pins)
Bounce * buttons = new Bounce[NUMBUTTONS];

U8X8_SSD1306_128X64_NONAME_HW_I2C display(U8X8_PIN_NONE);

#define MENU_SIZE 5
char *menu[MENU_SIZE] = { "Option 1", "Option 2", "Option 3", "Option 4", "Option 5" };

int cursor=0;

void setup() {
  Serial.begin(9600);

  // Make input & enable pull-up resistors on switch pins
  for (int i=0; i<NUMBUTTONS; i++) {
    buttons[i].attach( button_pins[i], INPUT_PULLUP); // setup the bounce instance for the current button
    buttons[i].interval(25); // interval in ms
  }

  display.begin();
  display.setPowerSave(0);
  display.setFont(u8x8_font_pxplusibmcgathin_f);

  showMenu();
}

void loop() {
  // process button press:
  for (int i = 0; i<NUMBUTTONS; i++) {
    buttons[i].update(); // Update the Bounce instance
    if ( buttons[i].fell() ) { // If it fell
      if (i==2) { // select
         display.clearLine(7);
         display.setCursor(0,7);
         display.print(">>");
         display.print(menu[cursor]);
         executeChoice(cursor);
      }
      else {
        // erase previous cursor:
        display.setCursor(0,cursor);
        display.print(' ');
        if (i==0) { // up
          cursor++;
          if (cursor>(MENU_SIZE-1)) cursor=0;
        }
        else { // down
          cursor--;
          if (cursor<0) cursor=(MENU_SIZE-1);
        }
        // show cursor at new line:
        display.setCursor(0,cursor);
        display.print('>');
      }
    } // end if button fell...
  } // end for-loop of button check
}

/**
 * Clear display and show the menu.
 */
void showMenu() {
  cursor=0;
  display.clearDisplay();
  // show menu items:
  for (int i = 0; i<MENU_SIZE; i++) {
    display.drawString(2,i,menu[i]);
  }
  display.setCursor(0,0);
  display.print('>');
}

/**
 * Execute the task which matches the chosen menu item.
 */
void executeChoice(int choice) {
  switch(choice) {
      case 0 :
                Serial.print("Execute choice "); Serial.print(choice); Serial.print(" - "); Serial.println(menu[choice]);
                break;
      case 1 :
                Serial.print("Execute choice "); Serial.print(choice); Serial.print(" - "); Serial.println(menu[choice]);
                break;
      case 2 :
                Serial.print("Execute choice "); Serial.print(choice); Serial.print(" - "); Serial.println(menu[choice]);
                break;
      case 3 :
                Serial.print("Execute choice "); Serial.print(choice); Serial.print(" - "); Serial.println(menu[choice]);
                break;
      case 4 :
                Serial.print("Execute choice "); Serial.print(choice); Serial.print(" - "); Serial.println(menu[choice]);
                break;
      default :
                Serial.print("Execute choice "); Serial.print(choice); Serial.print(" - "); Serial.println(menu[choice]);
                break;
  }

}
🌻Demo2代码
-
📍滚动菜单


-
📌
https://wokwi.com/projects/353353893815793665
#include <U8g2lib.h>
#include <Wire.h>
#include <math.h>

typedef struct
{
  byte val;
  byte last_val;
}KEY_T;
typedef struct
{
  byte id;
  byte press;
  byte update_flag;
  byte res;
}KEY_MSG;

typedef struct
{
  char* str;
  byte len;
}SETTING_LIST;

SETTING_LIST list[] =
{
  {"hello",5},
  {"menu",4},
  {"flowers",7},
  {"perseverance",12},
};
U8G2_SH1106_128X64_NONAME_F_HW_I2C u8g2(U8G2_R0, /* reset=*/ U8X8_PIN_NONE);//该驱动是1.3寸的OLED屏幕。---------U8G2_SSD1306_128X64_NONAME_F_HW_I2C u8g2(U8G2_R0, /* reset=*/ U8X8_PIN_NONE);这是比较常用的0.9寸的OLED显示器的驱动
short x,x_trg; //x当前位置数值,x_trg 目标坐标值
short y = 15,y_trg = 15;

short frame_len,frame_len_trg;//框框的宽度
short frame_y,frame_y_trg;//框框的y

char ui_select = 0;

int state;
KEY_T key[2] = {0};
KEY_MSG key_msg = {0};

byte get_io_val(byte ch)
{
  if(ch == 0)
  {
    return digitalRead(2);
  }
  else
  {
    return digitalRead(3);
  }
}

void key_init(void)
{
  for(int i = 0;i<2;i++)
  {
    key[i].val = key[i].last_val = get_io_val(i);
  }
}

void key_scan(void)
{
  for(int i = 0;i<2;i++)
  {
    key[i].val =  get_io_val(i);
    if(key[i].val != key[i].last_val)
    {
      key[i].last_val = key[i].val;
      if(key[i].val == 0)
      {
        key_msg.id = i;
        key_msg.press = 1;
        key_msg.update_flag = 1;
      }
    }
  }
}

int ui_run(short *a,short *a_trg,u8 step,u8 slow_cnt)
{
  u8 temp;

  temp = abs(*a_trg-*a) > slow_cnt ? step : 1;
  if(*a < *a_trg)
  {
    *a += temp;
  }
  else if( *a > *a_trg)
  {
    *a -= temp;
  }
  else
  {
    return 0;
  }
  return 1;
}

void setup(void)
{
 	pinMode(2, INPUT_PULLUP);
  pinMode(3, INPUT_PULLUP);
  key_init();
  u8g2.begin();
  u8g2.setFont(u8g2_font_t0_16_tf ); //设置字体
  frame_len = frame_len_trg = list[ui_select].len*10;
}

void ui_show(void)
{
  int list_len = sizeof(list) / sizeof(SETTING_LIST);
  u8g2.clearBuffer();         // 清除内部缓冲区
  for(int i = 0 ;i < list_len;i++)
  {
    u8g2.drawStr(x+2,y+i*14,list[i].str);  // 第一段输出位置
  }
  u8g2.drawRFrame(x,frame_y+2,frame_len,16,3);
  ui_run(&frame_y,&frame_y_trg,5,4);
  ui_run(&frame_len,&frame_len_trg,10,5);
  u8g2.sendBuffer();          // transfer internal memory to the displa
}

void ui_proc(void)
{
  int list_len = sizeof(list) / sizeof(SETTING_LIST);

  if(key_msg.update_flag && key_msg.press)
  {
    key_msg.update_flag = 0;
    if(key_msg.id)
    {
     ui_select++;
     if(ui_select >= list_len)
     {
        ui_select = list_len - 1;
     }
    }
    else
    {
      ui_select--;
      if(ui_select < 0)
      {
        ui_select = 0;
      }
    }
    frame_y_trg = ui_select*14;
    frame_len_trg = list[ui_select].len*10;
  }
  ui_show();
}

void loop(void)
{
  key_scan();
  ui_proc();
}


 1115
1115


 被折叠的 条评论
为什么被折叠?


