


我们认证授权使用springsecurity 和oauth2技术尽心实现具体实现流程见第五章文档,这里就是记录一下我们的技术方案
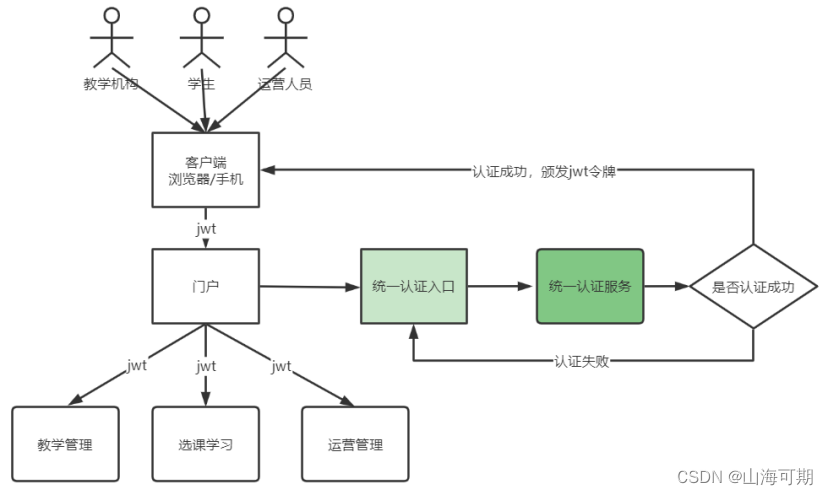
这是最开始的技术方案,我们通过认证为服务获取令牌然后使用令牌访问微服务,微服务解析令牌即可。但是缺点就是每个微服务都要做同样的操作就要配置同样的东西,因此需要改进
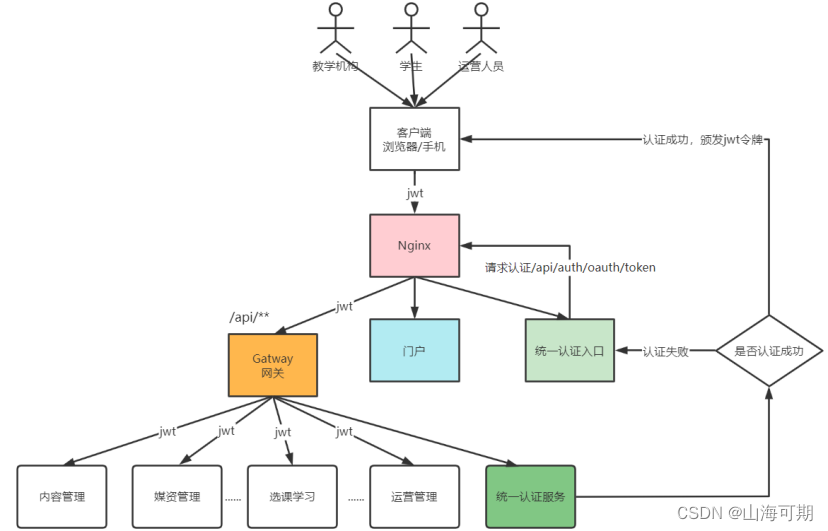
这就是改进的方案,就是使用gateway网关进行认证,微服务校验权限合法性。这样总结下来,网关的作用就是:认证,校验jwt令牌合法性;路由;维护一份白名单用户。
下面我来说一下这个图的具体流程,首先用户通过Nginx访问统一认证入口,这个访问是不需要令牌的,然后统一认证入口输入完用户名和密码之后就会访问我们的认证服务生成jwt令牌,注意访问的网址是我们引入了坐标和配置好东西之后就可以访问并不是我们自己定义的api接口(认证服务的具体配置见文档中)访问api接口就会自动进入到我们Nginx中域名下面配置的路径进行访问,也就是通过Nginx访问了网关,这时候我们网关会直接访问我们的统一认证服务,不需要jwt令牌,因为我们在gateway中配置了白名单网址,我们的统一认证就是白名单中的网址,然后统一认证服务通过我们的用户名从数据库中进行查询,并且返回一个UserDetails对象并且把用户名和数据库中·查询的密码进行封装,这样我们的springscruty就会自动进行密码的验证。当认证成功之后就会给我们用户颁发一个令牌,这个令牌信息存储在安全上下文中,当我们访问我们的微服务的时候我们就会拿着令牌进入网关,网关对认证进行了配置(具体配置流程见文档)简单的说就是在网关中配置了一个拦截器,我们的请求会被拦截,当然是有白名单的请求的,当我们访问微服务的请求被拦截之后我们就会获得我们的jwt令牌,之后对令牌进行验证,如果验证通过就放行,这时候我们就可以访问我们的微服务,如果验证失败则直接在网关就直接提示报错信息。
具体实现流程见第五章文档网关认证。
下面我们来说一下学了springscruty之后我们需要实现的重要技术。
第一个就是我们需要自己实现UserDetailsService
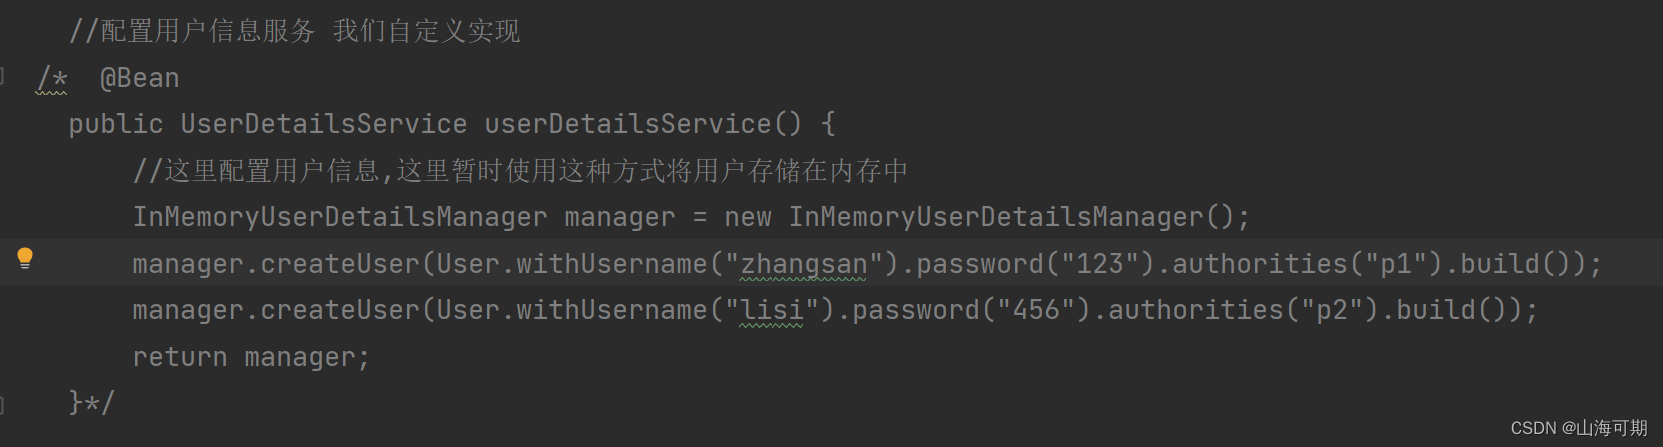
为什么要实现这个类呢。因为上面的方式是我们直接将用户信息注册到了内存中,但是我们的期望是我们经过统一认证之后从数据库中查询用户信息,而不是从内存中进行·查询用户的信息,因此我们要实现UserDetailsService类并且注册成bean。 下面是具体的实现代码
package com.xuecheng.ucenter.service.impl;

import com.alibaba.fastjson.JSON;
import com.baomidou.mybatisplus.core.conditions.query.LambdaQueryWrapper;
import com.xuecheng.ucenter.mapper.XcUserMapper;
import com.xuecheng.ucenter.model.po.XcUser;
import org.springframework.beans.factory.annotation.Autowired;
import org.springframework.security.core.userdetails.User;
import org.springframework.security.core.userdetails.UserDetails;
import org.springframework.security.core.userdetails.UserDetailsService;
import org.springframework.security.core.userdetails.UsernameNotFoundException;
import org.springframework.stereotype.Service;

/**
 * @author Mr.M
 * @version 1.0
 * @description TODO
 * @date 2022/9/28 18:09
 */
@Service
public class UserServiceImpl implements UserDetailsService {

    @Autowired
    XcUserMapper xcUserMapper;

    /**
     * @description 根据账号查询用户信息
     * @param s  账号
     * @return org.springframework.security.core.userdetails.UserDetails
     * @author Mr.M
     * @date 2022/9/28 18:30
     */
    @Override
    public UserDetails loadUserByUsername(String s) throws UsernameNotFoundException {

        XcUser user = xcUserMapper.selectOne(new LambdaQueryWrapper<XcUser>().eq(XcUser::getUsername, s));
        if(user==null){
            //返回空表示用户不存在
            return null;
        }
        //取出数据库存储的正确密码
        String password  =user.getPassword();
        //用户权限,如果不加报Cannot pass a null GrantedAuthority collection
        String[] authorities= {"p1"};
        //为了安全令牌中不妨密码
        user.setPassword(null);
        //将user对象装换成json
        String userString = JSON.toJSONString(user);
        //创建UserDetails对象,权限信息待实现授权功能时再向UserDetail中加入 我们只需要将数据库中查询的密码封装进去,springscruty会自动帮我们进行校验密码是否正确
        UserDetails userDetails = User.withUsername(userString).password(password).authorities(authorities).build();

        return userDetails;
    }


}
第二个要提到的就是我们要扩展userDetails中用户信息

我们可以看到我们的UserDetail中好像只有UserName Password信息,实际上它的属性信息确实很少,有什么呢看下图。
public interface UserDetails extends Serializable {
Collection<? extends GrantedAuthority> getAuthorities();
String getPassword();
String getUsername();
boolean isAccountNonExpired();
boolean isAccountNonLocked();
boolean isCredentialsNonExpired();
boolean isEnabled();
}
可以看到他有这些信息,注意这个类不是我们自己定义的,这是springScruty内部使用的类,我们自这个上面进行扩展太麻烦了,所以提出来直接在withUsername(userString)中传入一个我们从数据库中查询的对象json。然后我们的微服务就可以获取json然后将json转化成一个对象。
微服务中的获取代码如下(我是使用工具类封装的功能)
package com.xuecheng.content.util;

import com.alibaba.fastjson.JSON;
import lombok.Data;
import lombok.extern.slf4j.Slf4j;
import org.springframework.security.core.context.SecurityContextHolder;

import java.io.Serializable;
import java.time.LocalDateTime;

/**
 * @author Mr.M
 * @version 1.0
 * @description 获取当前用户身份工具类
 * @date 2022/10/18 18:02
 */
@Slf4j
public class SecurityUtil {

    public static XcUser getUser() {
        try {
            Object principalObj = SecurityContextHolder.getContext().getAuthentication().getPrincipal();
            if (principalObj instanceof String) {
                //取出用户身份信息
                String principal = principalObj.toString();
                //将json转成对象
                XcUser user = JSON.parseObject(principal, XcUser.class);
                return user;
            }
        } catch (Exception e) {
            log.error("获取当前登录用户身份出错:{}", e.getMessage());
            e.printStackTrace();
        }

        return null;
    }


    @Data
    public static class XcUser implements Serializable {

        private static final long serialVersionUID = 1L;

        private String id;

        private String username;

        private String password;

        private String salt;

        private String name;
        private String nickname;
        private String wxUnionid;
        private String companyId;
        /**
         * 头像
         */
        private String userpic;

        private String utype;

        private LocalDateTime birthday;

        private String sex;

        private String email;

        private String cellphone;

        private String qq;

        /**
         * 用户状态
         */
        private String status;

        private LocalDateTime createTime;

        private LocalDateTime updateTime;


    }


}
下面是我接口中使用工具类进行实现的代码
@GetMapping("/course/{courseId}")
@ApiOperation("根据课程id查询课程信息")
public CourseBaseInfoDto getCourseBaseById(@PathVariable Long courseId){
    //Object principal = SecurityContextHolder.getContext().getAuthentication().getPrincipal();
    //System.out.println(principal);
    SecurityUtil.XcUser user = SecurityUtil.getUser();
    System.out.println(user.getUsername());
    CourseBaseInfoDto courseBaseInfo = courseBaseInfoService.getCourseBaseInfo(courseId);
    return courseBaseInfo;
}
这样我们就能轻而易举的拿到我们令牌中的存储的登录信息。
第三个我们要重写daoAuthenticationProvider 实现我们统一认证功能。
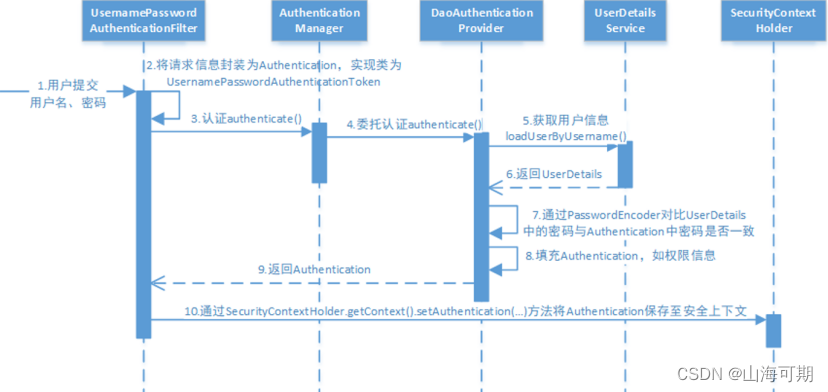
我们之前的逻辑是让DaoAuthenticationProvider调用我们的UserDetailsService获取我们的UserDetails,然后我们的UserDetailsService中不进行校验,只是对UserDetails进行一个封装,但是我们进行统一登录之后我们由于登录方式的多样性,我们不能让校验工作在DaoAuthenticationProvider类中进行,我们要在我们的userDetails中进行校验(使用观察者模式)然后DaoAuthenticationProvider只进行填充令牌信息并返回令牌。
具体流程如下:
(1)定义同意认证实体类
因为我们的登录方式可能是用户密码登录还可能是短信验证码登录,还可能是微信扫码登录,因此我们需要定一个实体类包含了各种方式登录的字段信息。具体实体类信息如下:
package com.xuecheng.ucenter.model.dto;

import lombok.Data;

import java.util.HashMap;
import java.util.Map;

/**
 * @author Mr.M
 * @version 1.0
 * @description 认证用户请求参数
 * @date 2022/9/29 10:56
 */
@Data
public class AuthParamsDto {

    private String username; //用户名
    private String password; //域  用于扩展
    private String cellphone;//手机号
    private String checkcode;//验证码
    private String checkcodekey;//验证码key
    private String authType; // 认证的类型   password:用户名密码模式类型    sms:短信模式类型
    private Map<String, Object> payload = new HashMap<>();//附加数据,作为扩展,不同认证类型可拥有不同的附加数据。如认证类型为短信时包含smsKey : sms:3d21042d054548b08477142bbca95cfa; 所有情况下都包含clientId


}
(2)统一认证入口
之后要实现我们的统一认证入口,我们上面定义了我们的统一认证实体类,之后我们在userdetailservice中的loadUserByUsername方法中要接受我们实体类的json字符串,然后再封装我们的UserDetails 封装完成之后按照我们上面图示的默认逻辑应该是交给DaoAuthactionProvider中的additionalAuthenticationChecks方法进行检验我们密码的正确性,但是现在我们是统一认证了当然不能再这么干了,也就是我们可能不是用户名密码登录,那么springscruty中的默认实现方法显然不再适合,我们需要自己定义统一认证接口,自己实现我们的检验逻辑。
下面重写daoAuthenticationProvider不让走它的默认逻辑
package com.xuecheng.auth.config;

import com.sun.javaws.IconUtil;
import lombok.extern.slf4j.Slf4j;
import org.springframework.beans.factory.annotation.Autowired;
import org.springframework.security.authentication.BadCredentialsException;
import org.springframework.security.authentication.UsernamePasswordAuthenticationToken;
import org.springframework.security.authentication.dao.DaoAuthenticationProvider;
import org.springframework.security.core.AuthenticationException;
import org.springframework.security.core.userdetails.UserDetails;
import org.springframework.security.core.userdetails.UserDetailsService;
import org.springframework.stereotype.Component;

/**
 * @description 重写了DaoAuthenticationProvider的校验密码的方法,因为我们同意了认证入口。有一些认证不需要校验密码
 * @author Mr.M
 * @date 2022/9/29 10:31
 * @version 1.0
 */
@Slf4j
@Component
public class DaoAuthenticationProviderCustom extends DaoAuthenticationProvider {

    /**
     * 这是一种注入方式,在参数中可以拿到我们已经注入好的bean然后我们将她赋值道我们的父类当中
     * @param userDetailsService
     */
    @Autowired
    public void setUserDetailsService(UserDetailsService userDetailsService) {
        super.setUserDetailsService(userDetailsService);
    }

    /**
     * 重写这个放发是因为我们DaoAuthenticationProvider类调用完我们的
     * UserDetails之后要进行校验,娇艳的地方就是我们的additionalAuthenticationChecks方法
     * 但是我们现在要实现统一认证功能,因此我们不能使用springscruty默认的密码校验模式,因为可能还是短信验证呢
     * @param userDetails
     * @param authentication
     * @throws AuthenticationException
     */
    //屏蔽密码对比
    protected void additionalAuthenticationChecks(UserDetails userDetails, UsernamePasswordAuthenticationToken authentication) throws AuthenticationException {
        System.out.println("fdsf");

    }

}
之后我们还要配置springscruty使用我们自己重写的东西在webSecurityConfig中加入如下配置
@Autowired
DaoAuthenticationProviderCustom daoAuthenticationProviderCustom;


@Override
protected void configure(AuthenticationManagerBuilder auth) throws Exception {
    auth.authenticationProvider(daoAuthenticationProviderCustom);
}
最后在我们的userserviceImpl中使用我们的统一认证实体类进行接收并处理
@Service
@Slf4j
public class UserServiceImpl implements UserDetailsService {

    @Autowired
    XcUserMapper xcUserMapper;
    //使用这个是因为我们使用了观察者模式 也就是一个接口多个实现类,然后我们每个实现类有自己的名字,我们可以使用容器直接使用名字获取相应的实现累的bean
    @Autowired
    ApplicationContext applicationContext;
@Override
public UserDetails loadUserByUsername(String s) throws UsernameNotFoundException {
    // 采用统一认证之后我们的s就是一个authparamsDto的json字符串
    AuthParamsDto authParamsDto = null;
    try {
        //将认证参数转为AuthParamsDto类型
        authParamsDto = JSON.parseObject(s, AuthParamsDto.class);
    } catch (Exception e) {
        log.info("认证请求不符合项目要求:{}",s);
        throw new RuntimeException("认证请求数据格式不对");
    }
    // 我们不在使用 mybatis提供的框架了我们专门定义了一个处理认证请求的接口处理不同请求
    //String userName = authParamsDto.getUsername();
    //XcUser user = xcUserMapper.selectOne(new LambdaQueryWrapper<XcUser>().eq(XcUser::getUsername, userName));
    //认证方法
    String authType = authParamsDto.getAuthType();
    AuthService authService =  applicationContext.getBean(authType + "_authservice", AuthService.class);
    XcUserExt user = authService.execute(authParamsDto);
    //取出数据库存储的正确密码
    String password  =user.getPassword();
    //用户权限,如果不加报Cannot pass a null GrantedAuthority collection
    String[] authorities= {"p1"};
    //为了安全令牌中不妨密码
    user.setPassword(null);
    //将user对象装换成json
    String userString = JSON.toJSONString(user);
    //创建UserDetails对象,权限信息待实现授权功能时再向UserDetail中加入 我们只需要将数据库中查询的密码封装进去,springscruty会自动帮我们进行校验密码是否正确
    UserDetails userDetails = User.withUsername(userString).password(password).authorities(authorities).build();

    return userDetails;
}
可以看到上图中有代码
AuthService authService = applicationContext.getBean(authType + "_authservice", AuthService.class); XcUserExt user = authService.execute(authParamsDto);
这其实是我们统一认证接口的内容了,刚才说了我们不让我们的业务走daoAuthenticationProvider的默认逻辑也就是检查密码正确的逻辑,我们直接重写了additionalAuthenticationChecks里面什么都没干。那么我们怎么检验我们的密码或者验证码,或者微信扫码是否正确呢,我们要定义统一的认证接口来分门别类的处理。
(3)统一认证接口
我们的统一认证接口要有多个实现类,因为什么呢,因为我们可能使用好几种认证方式,当然每种认证方式要实现不同的逻辑,那么我们使用接口注入的时候怎么确定拿到的是哪一个实现类呢,我们可以使用@Service("uh")这种方式指定我们bean的name 然后我们使用容器applicationcontext根据名称获取bean就像
@Autowired ApplicationContext applicationContext;
AuthService authService = applicationContext.getBean(authType + "_authservice", AuthService.class);
然后就可以使用我们固定的impl实现累了
下面是我们的service和serviceimpl
package com.xuecheng.ucenter.service;

import com.xuecheng.ucenter.model.dto.AuthParamsDto;
import com.xuecheng.ucenter.model.dto.XcUserExt;
import com.xuecheng.ucenter.model.po.XcUser;

/**
 * @description 认证service
 * @author Mr.M
 * @date 2022/9/29 12:10
 * @version 1.0
 */
public interface AuthService {

    /**
     * @description 认证方法
     * @param authParamsDto 认证参数
     * @return com.xuecheng.ucenter.model.po.XcUser 用户信息
     * @author Mr.M
     * @date 2022/9/29 12:11
     */
    XcUserExt execute(AuthParamsDto authParamsDto);

}
package com.xuecheng.ucenter.service.impl;

import com.baomidou.mybatisplus.core.conditions.query.LambdaQueryWrapper;
import com.xuecheng.ucenter.mapper.XcUserMapper;
import com.xuecheng.ucenter.model.dto.AuthParamsDto;
import com.xuecheng.ucenter.model.dto.XcUserExt;
import com.xuecheng.ucenter.model.po.XcUser;
import com.xuecheng.ucenter.service.AuthService;
import org.springframework.beans.BeanUtils;
import org.springframework.beans.factory.annotation.Autowired;
import org.springframework.security.crypto.bcrypt.BCryptPasswordEncoder;
import org.springframework.security.crypto.password.PasswordEncoder;
import org.springframework.stereotype.Service;

/**
 * @description 账号密码认证
 * @author Mr.M
 * @date 2022/9/29 12:12
 * @version 1.0
 */
@Service("password_authservice")
public class PasswordAuthServiceImpl implements AuthService {

    @Autowired
    XcUserMapper xcUserMapper;

    @Autowired
    PasswordEncoder passwordEncoder;


    @Override
    public XcUserExt execute(AuthParamsDto authParamsDto) {

        //账号
        String username = authParamsDto.getUsername();
        XcUser user = xcUserMapper.selectOne(new LambdaQueryWrapper<XcUser>().eq(XcUser::getUsername, username));
        if(user==null){
            //返回空表示用户不存在
            throw new RuntimeException("账号不存在");
        }
        XcUserExt xcUserExt = new XcUserExt();
        BeanUtils.copyProperties(user,xcUserExt);
        //校验密码
        //取出数据库存储的正确密码
        String passwordDb  =user.getPassword();
        String passwordForm = authParamsDto.getPassword();
        boolean matches = passwordEncoder.matches(passwordForm, passwordDb);
        if(!matches){
            throw new RuntimeException("账号或密码错误");
        }
        return xcUserExt;
    }
}
package com.xuecheng.ucenter.service.impl;

import com.xuecheng.ucenter.model.dto.AuthParamsDto;
import com.xuecheng.ucenter.model.dto.XcUserExt;
import com.xuecheng.ucenter.service.AuthService;
import org.springframework.stereotype.Service;

/**
 * @description:
 * @author: 22162
 * @time: 2023/8/26 12:33
 */
@Service("wx_authservice")
public class WxAuthServiceImpl implements AuthService {
    @Override
    public XcUserExt execute(AuthParamsDto authParamsDto) {
        return null;
    }
}
当我们返回userdetails之后按照图片流程我们DaoAuthenticationProvider就会填充令牌信息,并且返回令牌操作,然后将我们的令牌信心保存在安全上下文,当我们访问content服务的时候网关会校验我们令牌的信息,通过后,我们可以从安全上下文获取令牌中存储的信息,这有益于我们在detail中存储的信息,这些信息都活出现在令牌中
public UserDetails getUserPrincipal(XcUserExt user){
    //用户权限,如果不加报Cannot pass a null GrantedAuthority collection
    String[] authorities = {"p1"};
    String password = user.getPassword();
    //为了安全在令牌中不放密码
    user.setPassword(null);
    //将user对象转json
    String userString = JSON.toJSONString(user);
    //创建UserDetails对象
    UserDetails userDetails = User.withUsername(userString).password(password ).authorities(authorities).build();
    return userDetails;
}
然后我们在content服务中就可以取出令牌中的这些信息
@GetMapping("/course/{courseId}")
@ApiOperation("根据课程id查询课程信息")
public CourseBaseInfoDto getCourseBaseById(@PathVariable Long courseId){
    //Object principal = SecurityContextHolder.getContext().getAuthentication().getPrincipal();
    //System.out.println(principal);
    SecurityUtil.XcUser user = SecurityUtil.getUser();
    System.out.println(user.getUsername());
    CourseBaseInfoDto courseBaseInfo = courseBaseInfoService.getCourseBaseInfo(courseId);
    return courseBaseInfo;
}
工具类如下
package com.xuecheng.content.util;

import com.alibaba.fastjson.JSON;
import lombok.Data;
import lombok.extern.slf4j.Slf4j;
import org.springframework.security.core.context.SecurityContextHolder;

import java.io.Serializable;
import java.time.LocalDateTime;

/**
 * @author Mr.M
 * @version 1.0
 * @description 获取当前用户身份工具类
 * @date 2022/10/18 18:02
 */
@Slf4j
public class SecurityUtil {

    public static XcUser getUser() {
        try {
            Object principalObj = SecurityContextHolder.getContext().getAuthentication().getPrincipal();
            if (principalObj instanceof String) {
                //取出用户身份信息
                String principal = principalObj.toString();
                //将json转成对象
                XcUser user = JSON.parseObject(principal, XcUser.class);
                return user;
            }
        } catch (Exception e) {
            log.error("获取当前登录用户身份出错:{}", e.getMessage());
            e.printStackTrace();
        }

        return null;
    }


    @Data
    public static class XcUser implements Serializable {

        private static final long serialVersionUID = 1L;

        private String id;

        private String username;

        private String password;

        private String salt;

        private String name;
        private String nickname;
        private String wxUnionid;
        private String companyId;
        /**
         * 头像
         */
        private String userpic;

        private String utype;

        private LocalDateTime birthday;

        private String sex;

        private String email;

        private String cellphone;

        private String qq;

        /**
         * 用户状态
         */
        private String status;

        private LocalDateTime createTime;

        private LocalDateTime updateTime;


    }


}
下面再看这张图,我们梳理一下整体的流程。首先用户通过网关进入统一登录入口,这是不需要走网关的直接走Nginx就行,因为静态页面都存储在Nginx中,然后我们可以选择认证的方式,我们有账号密码登录,有微信扫码登录。点击登录后我们就会请求网址/api/auth/oauth/token(这个地址使我们SpringScruty提供的)然后我们Nginx会自动映射到我们的统一认证服务的地址,当然这个地址是经过网关的,但是这时候我们的统一认证地址是在一个白名单用户中,可以直接路由到我们的统一认证服务,然后我们开始走springScruty的逻辑 (下图)最后就会调用我们的DaoAuthenticationProvider 和UserDetails 我们为了是实现统一认证,选择重写DaoAuthenticationProvider 中的方法
protected void additionalAuthenticationChecks(UserDetails userDetails, UsernamePasswordAuthenticationToken authentication) throws AuthenticationException {

}
重写userdetailsservice是为了实现不同登录方式采用不同的实现类进行验证,并且能够从数据库中查询用户信息,而不是单纯地从内存中进行指定。我们在UserServiceimpl执行了认证之后我们返回userdetails到DaoAuthenticationProvider因为我们重写了 additionalAuthenticationChecks因此我们不会再进行再一次的认证工作,而是直接填充令牌,并且返回令牌将令牌存储在我们的上下文中。之后用户再访问我们的微服务的时候就会携带令牌,然后经过网关进行验证令牌合发性,合法了在路由到我们的微服务,之后在微服务中可以从上下文中拿到令牌中我们想要的信息。


 527
527


 被折叠的 条评论
为什么被折叠?
被折叠的 条评论
为什么被折叠?
 到【灌水乐园】发言


