


文章目录
1、NIO
1.1、NIO通道客户端
- 客户端实现步骤
- 打开通道
- 指定IP和端口号
- 写出数据
- 释放资源
- 示例代码
public class NIOClient {
    public static void main(String[] args) throws IOException {
        //1.打开通道
        SocketChannel socketChannel = SocketChannel.open();

        //2.指定IO和端口号
        socketChannel.connect(new InetSocketAddress("127.0.0.1",10000));

        //3.写出数据
        ByteBuffer byteBuffer = ByteBuffer.wrap("一点寒芒先到".getBytes());
        socketChannel.write(byteBuffer);

        //释放资源
        socketChannel.close();
    }
}
1.2、NIO通道服务端
- NIO通道
- 服务端通道:只负责建立,不负责传递数据
- 客户端通道:建立并将数据传递给服务端
- 缓冲区:客户端发送的数据都在缓冲区中
- 服务端通道内部创建出来的客户端通道:相当于客户端通道的延伸来传递数据
- 服务端实现步骤
- 打开一个服务端通道
- 绑定对应的端口号
- 通道默认是阻塞的,需要设置为非阻塞
- 此时没有门卫大爷,所以需要经常看一下有没有连接发过来没有?
- 如果由客户端来连接了,则在服务端通道内部,再创建一个客户端通道,相当于是客户端通道的延伸
- 获取客户端传递过来的数据,并把数据放在byteBuffer1这个缓冲区中
- 给客户端写数据
- 释放资源
- 示例代码
public class NIOServer {
    public static void main(String[] args) throws IOException {
        //1.打开一个服务端通道
        ServerSocketChannel serverSocketChannel = ServerSocketChannel.open();
        //2.绑定对应的端口号
        serverSocketChannel.bind(new InetSocketAddress(10000));
        //3.通道默认是阻塞的,需要设置为非阻塞的
        //如果传递true,表示通道设置为阻塞通道...默认值
        //如果传递false,表示通道设置为非阻塞通道
        serverSocketChannel.configureBlocking(false);
        //4.此时没有门卫大爷,所以需要经常看一下有么有连接发送过来
        while(true){
            //5.如果有客户端来连接了,则在服务端通道内部,再创建一个客户端通道,相当于客户端通道的延伸
            //此时已经设置了通道为非阻塞
            //所以在调用方法的时候,如果有客户来连接,那么就会创建一个SocketChannel对象
            //如果在调用方法的时候,没有客户端来连接,那么他会返回一个null
            SocketChannel socketChannel = serverSocketChannel.accept();
            System.out.println(socketChannel);
            if(socketChannel!=null){
                //6.客户端将缓冲区通过通道传递给服务端,就到了这个延伸通道socketChannel里面
                //7.服务端创建一个空的缓冲区装数据并输出
                ByteBuffer byteBuffer = ByteBuffer.allocate(1024);
                //获取传递过来的数据,并把它们放在byteBuffer缓冲区中
                //返回值:
                    //正数:表示本次读到的有效字节个数
                    //0:表示本次没有读到有效字节
                    //-1:表示读到了末尾
                int len = socketChannel.read(byteBuffer);
                System.out.println(new String(byteBuffer.array(),0,len));
                //释放资源
                socketChannel.close();
            }
        }
    }
}
1.3、NIO通道练习
- 客户端
- 实现步骤
- 打开通道
- 指定IP和端口号
- 写出数据
- 读取服务器写回的数据
- 释放资源
- 实现步骤
- 示例代码
public class Client {
    public static void main(String[] args) throws IOException {
        //1.打开通道
        SocketChannel socketChannel = SocketChannel.open();
        //2.指定IP和端口号
        socketChannel.connect(new InetSocketAddress(("127.0.0.1"),10000));
        //3.写出数据
        ByteBuffer byteBuffer1 = ByteBuffer.wrap("吃俺老孙一棒棒".getBytes());
        socketChannel.write(byteBuffer1);
        //手动写入结束标记
        socketChannel.shutdownOutput();
        //4.读取服务器写回的数据
        ByteBuffer byteBuffer2 = ByteBuffer.allocate(1024);
        int len;
        while((len=socketChannel.read(byteBuffer2))!=-1){
            byteBuffer2.flip();
            System.out.println(new String(byteBuffer2.array(),0,len));
            byteBuffer2.clear();
        }
        //5.释放资源
        socketChannel.close();
    }
}
- 服务端
- 实现步骤
- 打开一个服务端通道
- 绑定对应的端口号
- 通道默认是阻塞的,需要设置为非阻塞
- 此时没有门卫大爷,所以需要经常看一下有没有连接发过来?
- 如果有客户端来连接了,则在服务端通道内部,再创建一个客户端通道,相当于是客户端通道的延伸
- 获取客户单传递过来的数据,并把数据放在byteBuffer1这个缓冲区中
- 给客户端回写数据
- 释放资源
- 实现步骤
- 示例代码
public class Server {
    public static void main(String[] args) throws IOException {
        //1.打开一个服务端通道
        ServerSocketChannel serverSocketChannel = ServerSocketChannel.open();
        //2.绑定对应的端口号
        serverSocketChannel.bind(new InetSocketAddress(10003));
        //3.通道默认是阻塞的,需要设置为非阻塞
        serverSocketChannel.configureBlocking(false);
        //4.此时没有门卫大爷,所以需要经常看一下有没有连接发送过来
        while(true){
            //5.如果有客户端来连接了,则在服务器端通道内部,再创建一个客户端通道,相当于是客户端通道的延伸
            SocketChannel socketChannel = serverSocketChannel.accept();
            if(socketChannel != null){
                System.out.println("此时有客户端来连接了");
                //6.获取客户端传递过来的数据,并把数据放在byteBuffer1这个缓冲区中
                ByteBuffer byteBuffer1 = ByteBuffer.allocate(1024);
                int len;
                //针对于缓冲区来讲
                    //如果 从添加数据 ---> 获取数据 flip
                    //如果 从获取数据 ---> 添加数据 clear
                while((len = socketChannel.read(byteBuffer1))!=-1){
                    byteBuffer1.flip();
                    System.out.println(new String(byteBuffer1.array(),0,len));
                    byteBuffer1.clear();
                }
                System.out.println("接收数据完毕,准备开始往客户端回写数据");
                //7.给客户端回写数据
                ByteBuffer byteBuffer2 = ByteBuffer.wrap("哎哟,真疼啊!!!!".getBytes());
                socketChannel.write(byteBuffer2);
                //释放资源
                socketChannel.close();
            }
        }
    }
}
1.4、NIO通道练习优化
- 存在问题:服务端内部获取客户端通道在读取时,如果读取不到结束标记就会一直阻塞
- 解决方案:将服务端内部获取的客户端通道设置为非阻塞的
- 示例代码
public class Client {
    public static void main(String[] args) throws IOException {
        SocketChannel socketChannel = SocketChannel.open();
        socketChannel.connect(new InetSocketAddress("127.0.0.1",10003));
        ByteBuffer byteBuffer1 = ByteBuffer.wrap("吃俺老孙一棒".getBytes());
        socketChannel.write(byteBuffer1);
        System.out.println("数据已经写给服务器");
        ByteBuffer byteBuffer2 = ByteBuffer.allocate(1024);
        int len;
        while((len = socketChannel.read(byteBuffer2))!=-1){
            System.out.println("客户端接收回写数据");
            byteBuffer2.flip();
            System.out.println(new String(byteBuffer2.array(),0,len));
            byteBuffer2.clear();
        }
        socketChannel.close();
    }
}
----------------------------------------------------
public class Server {
    public static void main(String[] args) throws IOException {
        ServerSocketChannel serverSocketChannel = ServerSocketChannel.open();
        serverSocketChannel.bind(new InetSocketAddress(10003));
        serverSocketChannel.configureBlocking(false);
        while (true){
            SocketChannel socketChannel = serverSocketChannel.accept();
            if(socketChannel != null){
                System.out.println("此时有客户端来连接了");
                //将服务端内部获取的客户端通道设置为非阻塞的
                socketChannel.configureBlocking(false);
                //获取客户端传递过来的数据,并把数据放在byteBuffer1这个缓冲区中
                ByteBuffer byteBuffer1 = ByteBuffer.allocate(1024);
                int len;
                //针对于缓冲区来讲
                    //如果从添加数据--->获取数据 flip
                    //如果从获取数据--->添加数据 clear
                while ((len=socketChannel.read(byteBuffer1))>0){
                    System.out.println("服务端接收发送数据");
                    byteBuffer1.flip();
                    System.out.println(new String(byteBuffer1.array(),0,len));
                    byteBuffer1.clear();
                }
                System.out.println("接收数据完毕,准备开始往客户端回写数据");
                ByteBuffer byteBuffer2 = ByteBuffer.wrap("哎哟,真疼啊!!!".getBytes());
                socketChannel.write(byteBuffer2);
                socketChannel.close();
            }
        }
    }
}
1.5、NIO选择器
- 概述
- 选择器可以监视通道的状态,多路复用
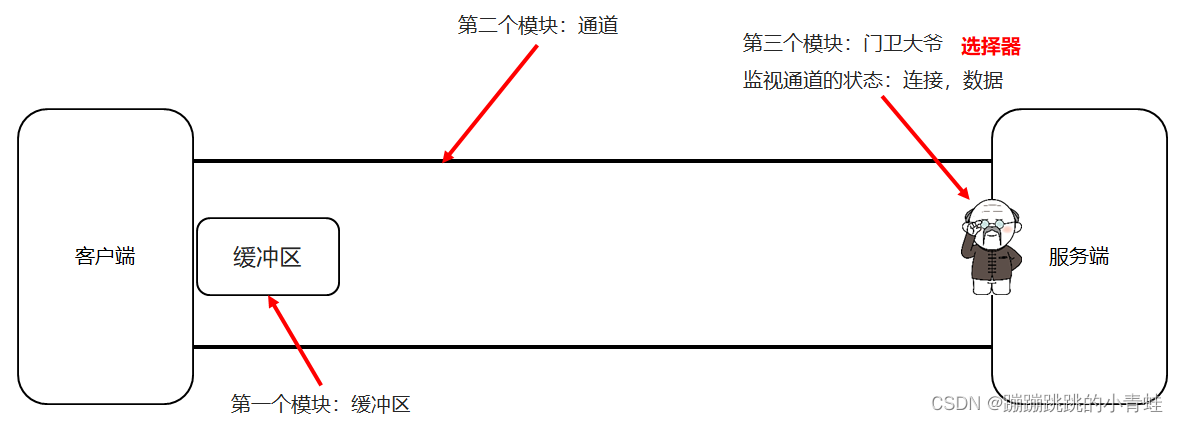
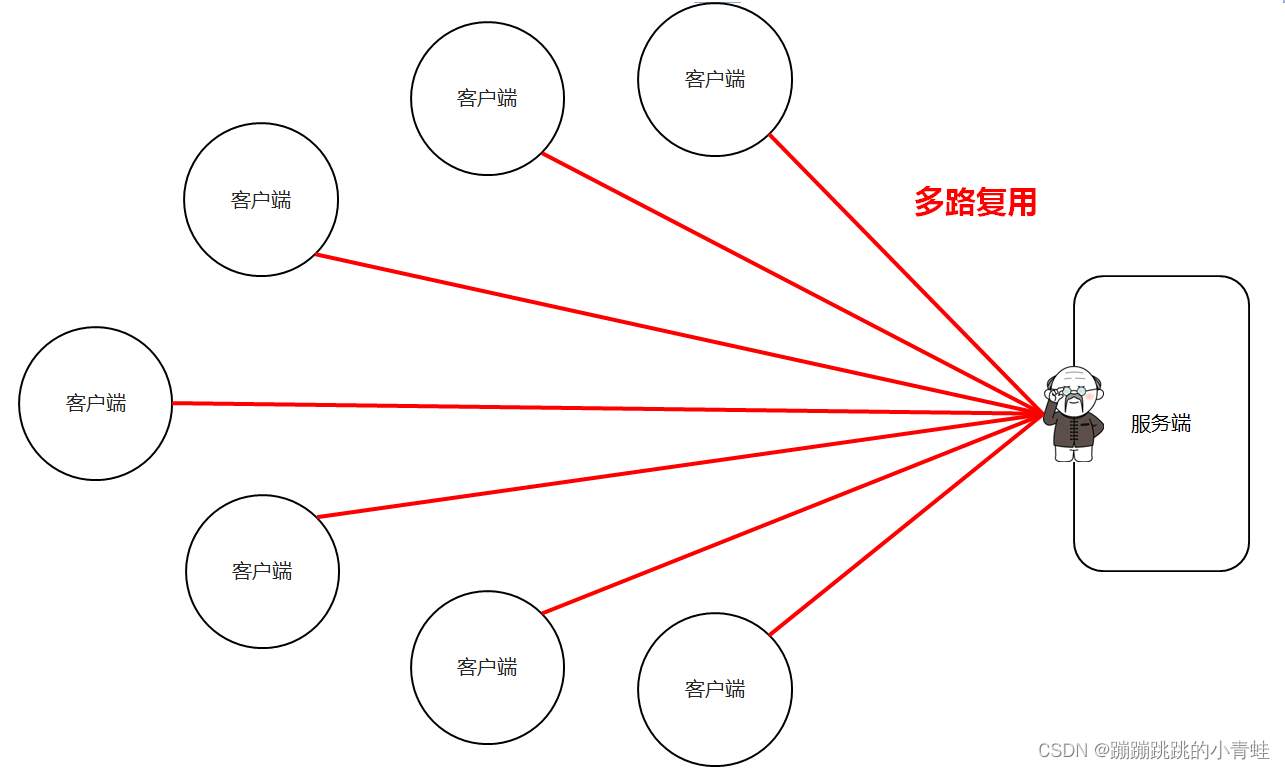
- 选择器可以监视通道的状态,多路复用
- 选择器对象
- Selector:选择器对象
- SelectionKey:绑定的key
- SelectableChannel:能使用选择器的通道
- SocketChannel
- ServerSocketChannel
1.6、NIO选择器改写服务端
- 实现步骤
- 打开一个服务端通道(open)
- 绑定对应的端口号
- 通道默认是阻塞的,需要设置为非阻塞
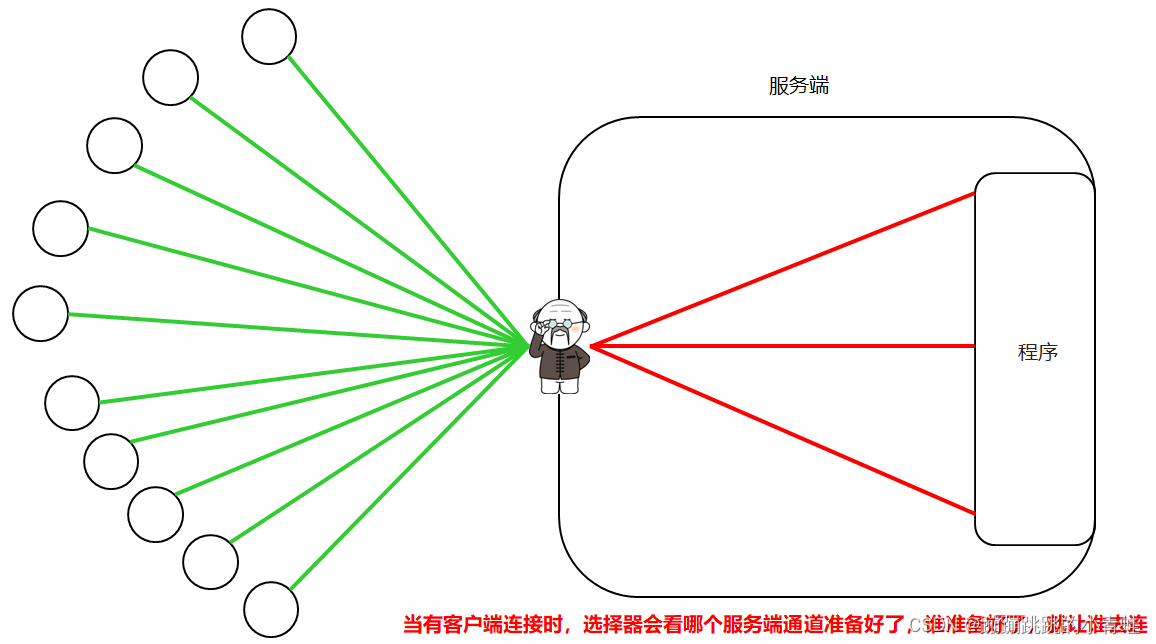
- 打开一个选择器(门卫大爷)
- 将选择器绑定服务器通道,并监视服务端是否准备好
- 如果有客户端来连接了,大爷会遍历所有的服务端通道,谁准备好了,就让谁来连接,连接后,在服务端通道内部,再创建一个客户端延伸通道
- 如果客户端把数据传递过来了,大爷会遍历所有的延伸通道,谁准备好了,谁去接收数据
- 代码实现
//客户端
public class Client {
    public static void main(String[] args) throws IOException {
        SocketChannel socketChannel = SocketChannel.open();

        socketChannel.connect(new InetSocketAddress("127.0.0.1", 10005));

        ByteBuffer byteBuffer1 = ByteBuffer.wrap("吃俺老孙一棒".getBytes());
        socketChannel.write(byteBuffer1);

        System.out.println("数据已经写给服务器");

        ByteBuffer byteBuffer2 = ByteBuffer.allocate(1024);
        int len;
        while ((len = socketChannel.read(byteBuffer2)) != -1) {
            System.out.println("客户端接收回写数据");
            byteBuffer2.flip();
            System.out.println(new String(byteBuffer2.array(), 0, len));
            byteBuffer2.clear();
        }
        socketChannel.close();
    }
}
---------------------------------------------
//服务端
public class Server {
    public static void main(String[] args) throws IOException {
        //1.打开服务端通道
        ServerSocketChannel serverSocketChannel = ServerSocketChannel.open();
        //2.让这个通道绑定一个端口
        serverSocketChannel.bind(new InetSocketAddress(10005));
        //3.设置通道为非阻塞
        serverSocketChannel.configureBlocking(false);
        //4.打开一个选择器
        //Selector---选择器
        //SelectionKey---绑定通道后返回那个令牌
        //SelectableChannel---可以使用选择器通道
        Selector selector = Selector.open();
        //5.绑定选择器和服务端通道
        serverSocketChannel.register(selector, SelectionKey.OP_ACCEPT);

        while(true){
            System.out.println("11");
            //选择器会监视客户端通道的状态
            //6.返回值就表示此时有多少个客户端来连接
            int count = selector.select();
            System.out.println("222");
            if(count!=0){
                System.out.println("有客户端来连接了");
                //7.会遍历所有的服务端通道,看谁准备好了,谁准备好了,就让谁去连接
                //获取所有服务端的令牌,并将他们都放到一个集合中,将集合返回
                Set<SelectionKey> selectionKeys = selector.selectedKeys();
                Iterator<SelectionKey> iterator = selectionKeys.iterator();
                while (iterator.hasNext()){
                    //selectKey 依次表示每一个服务端通道的令牌
                    SelectionKey selectionKey = iterator.next();
                    if(selectionKey.isAcceptable()){
                        //可以通过令牌来获取一个已经就绪的服务端通道
                        ServerSocketChannel ssc = (ServerSocketChannel)selectionKey.channel();
                        //客户端的延伸通道
                        SocketChannel socketChannel = ssc.accept();
                        //将客户端延伸通道设置为非阻塞的
                        socketChannel.configureBlocking(false);
                        socketChannel.register(selector,SelectionKey.OP_READ);
                        //当客户端来连接的时候,所有的步骤已经全部执行完毕
                    }else if(selectionKey.isReadable()){
                        //当前通道已经做好了读取的准备(延伸通道)
                        SocketChannel socketChannel = (SocketChannel)selectionKey.channel();
                        ByteBuffer byteBuffer1 = ByteBuffer.allocate(1024);
                        int len;
                        while((len = socketChannel.read(byteBuffer1))>0){
                            byteBuffer1.flip();
                            System.out.println(new String(byteBuffer1.array(),0,len));
                            byteBuffer1.clear();
                        }
                        //给客户端的回写数据
                        socketChannel.write(ByteBuffer.wrap("哎哟喂好痛啊!!!".getBytes()));
                        socketChannel.close();
                    }
                    iterator.remove();
                }
            }
        }
    }
}
2、HTTP协议
2.1、概述
超文本传输协议(关于超文本的概念javaWeb再进行学习),是建立在TCP/IP协议基础上,是网络应用层的协议。
由请求和响应构成,是一个标准的客户端和服务器模型
2.2、URL
- 概述
- 统一资源定位符,常见的如:http://bbs.itheima.com/forum.php
- 完整的格式:http://bbs.itheima.com:80/forum.php
- 详解:

2.3、抓包工具的使用
- 使用步骤
- 在谷歌浏览器网页中按F12或者网页空白处右键,点击检查,可以调出工具
- 点击network,进入到查看网络相关信息界面
- 这时在浏览器中发起请求,进行访问,工具中就会显示出请求和响应相关的信息

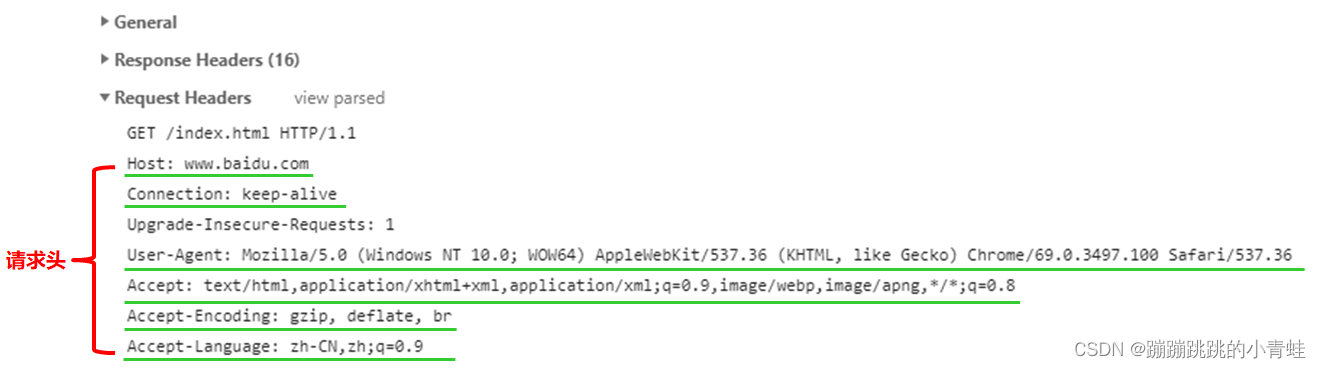
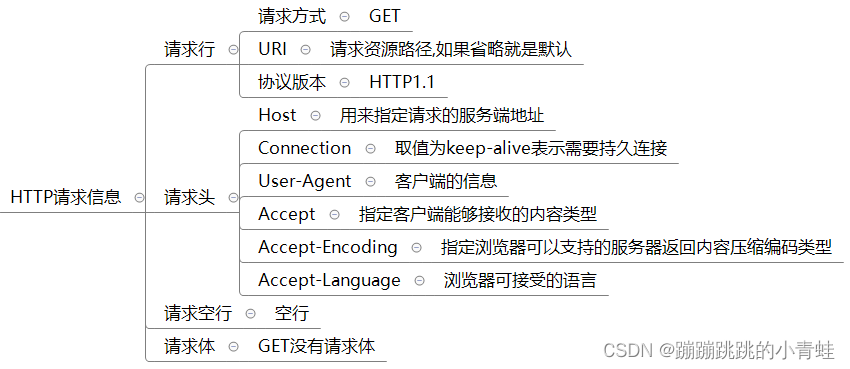
2.4、请求信息
- 组成
- 请求行
- 请求头
- 请求空行
- 请求体
- 请求行
- 格式

- 请求方式
- GET,POST,HEAD,PUT,DELETE,CONNECT,OPTIONS,TRACE,PATCH
- URL
- 请求资源路径,统一资源表示符
- 请求资源路径,统一资源表示符
- 格式
- 请求头
- 格式

- 请求头名称:
- Host:用来指定请求的服务端地址
- Connect:取值为keep-alive表示需要持久连接
- User-Agent:客户端信息
- Accept:指定客户端能够接收的内容类型
- Accept-Encoding:指定浏览器可以支持的服务器返回内容压缩编码类型
- Accept-Language:浏览器可接受的语言
- 格式
- 小结
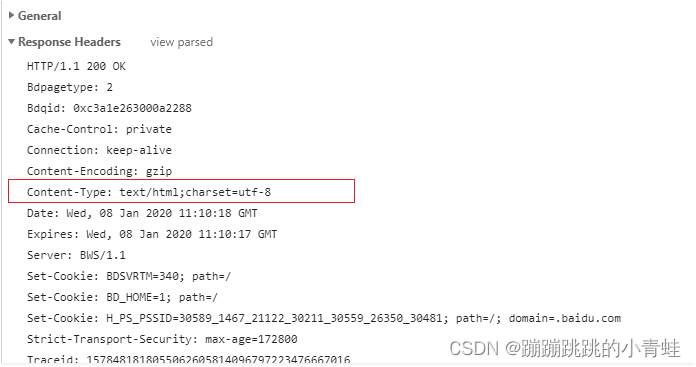
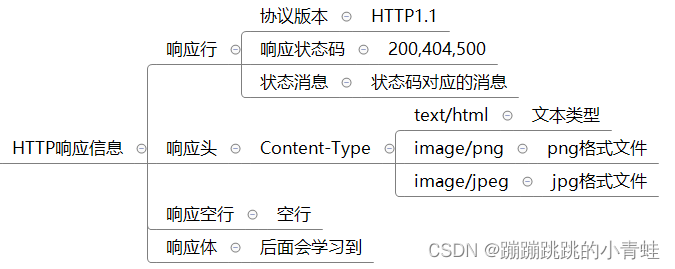
2.5、响应信息
- 组成
- 响应行
- 响应头
- 响应空行
- 响应体
- 响应体
- 格式

- 协议版本
- HTTP1.0:每次请求和响应都需要建立一个单独的连接
- HTTP1.1:支持长连接
- 响应状态码
- 1xx:指示信息(表示请求已接收,继续处理)
- 2xx:成功(表示请求已被成功接收、理解、接受)
- 3xx:请求重定向(要完成请求必须进行更进一步的操作)
- 4xx:客户端错误(请求有语法错误或请求无法实现)
- 5xx:服务端错误(服务器未能实现合法的请求)
- 状态信息
- 200 OK
- 404 Not Found
- 500 Internal Server Error
- 响应头
- 响应头名称
- Content-Type:告诉客户端实际返回内容的网络媒体类型(互联网媒体类型,也叫做MIME类型)
- 响应头值
- text/html —> 文本类型
- image/png —> png格式文件
- image/jpep—>jpg格式文件
- 响应头名称
- 格式
- 小结
3、HTTP服务器
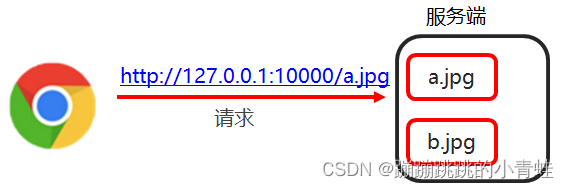
3.1、需求
- 编写服务端代码,实现可以解析浏览器的请求,给浏览器响应数据
3.2、环境搭建
- 实现步骤
- 编写HttpServer类,实现可以接收浏览器发出的请求
- 其中获取连接的代码可以单独抽取到一个类中
- 代码实现


 2131
2131


 被折叠的 条评论
为什么被折叠?
被折叠的 条评论
为什么被折叠?
 到【灌水乐园】发言


