 深入理解Angular服务:组件间通信与数据共享的实践指南


 本文介绍了Angular中的service概念,探讨了如何通过service实现组件间的有效通信,以及如何利用DependencyInjection管理和数据共享,对比了与React的差异,展示了service在状态管理、API抽象和util功能中的应用.
[Angular 基础] - service 服务
之前的笔记就列举三个好了……没想到 Angular 东西这么多(ー ー;)……全加感觉越来越凑字数了
Angular 的 service 如果后端出身的应该很熟悉,它是 Angular 自行管理,并使用 Dependency Injection 去实现的一个类。因此它比较合适使用的场景是,多个嵌套组件需要互相沟通,并需要传递值。
举例说明:
|- a
|  |- b
|  |  |- d
|  |- c
|  |  |- e
这个情况下,a 如果需要和 d 与 e 进行沟通的话,那么
b和c也需要通过@Input去获取从a传来的值,并将其传到d和e中去;b和c也需要通过@Output去获取从d和e传来的事件,并将其传到a中去
这就是一个不可避免的沟通环节。
使用 service 就可以比较有效的解决这个问题
创建一个新的案例
这个案例相对比较简单,就是按照上面的结构创建一个项目。在这个简单的案例里,b 和 c 没有任何作用,只是作为 a <--> d 和 a <--> e 之间的承接桥梁。在真实的项目中,b 和 c 的作用可能会包括一些数据处理、选择渲染之类的。
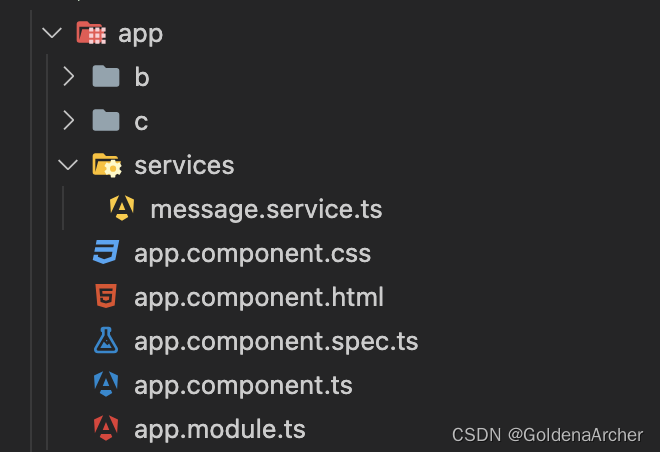
项目结构如下:
❯ tree src/app/
src/app/
├── app.component.css
├── app.component.html
├── app.component.spec.ts
├── app.component.ts
├── app.module.ts
├── b
│   ├── b.component.css
│   ├── b.component.html
│   ├── b.component.ts
│   └── d
│       ├── d.component.css
│       ├── d.component.html
│       └── d.component.ts
└── c
    ├── c.component.css
    ├── c.component.html
    ├── c.component.ts
    └── e
        ├── e.component.css
        ├── e.component.html
        └── e.component.ts

5 directories, 17 files
a 的实现
这里主要还是传值+绑定事件,具体内容在 [Angular 基础] - 自定义事件 & 自定义属性 里,这里就不多做赘述,直接放代码了:
-
V 层
<div class="container"> <div class="row"> <div class="col-xs-12 col-md-8 col-md-offset-2"> <app-b [message]="aToD" (messageFromB)="onRecieveMessageFromB"></app-b> <app-c [message]="aToE"></app-c> </div> </div> </div> -
VM 层:
import { Component, EventEmitter, OnInit, Output } from '@angular/core';

@Component({
  selector: 'app-root',
  templateUrl: './app.component.html',
  styleUrls: ['./app.component.css'],
})
export class AppComponent {
  aToD = 'message from a to d';
  aToE = 'message from a to e';

  @Output() messageFromB = new EventEmitter<string>();

  onRecieveMessageFromB($event: string): void {
    this.aToD = $event;
    console.log('message from b to a: ', $event);
  }
}
b 的实现
实现基本和 a 一致,这里也就放代码了:
-
V 层
<div class=""> <app-d [message]="message" (messageToB)="onRecieveMessage($event)"></app-d> </div> -
VM 层
import {
  Component,
  EventEmitter,
  Input,
  OnInit,
  Output,
} from '@angular/core';

@Component({
  selector: 'app-b',
  templateUrl: './b.component.html',
  styleUrl: './b.component.css',
})
export class BComponent implements OnInit {
  @Input() message: string;
  @Output() messageToA = new EventEmitter<string>();

  ngOnInit(): void {}

  onRecieveMessage($event: string): void {
    this.message = $event;
    this.messageToA.emit(this.message);
    console.log('message from b to a: ', this.message);
  }
}
d 的实现
-
V 层
<input type="text" [value]="message" (input)="onChangeText($event)" /> -
VM 层
import {
  Component,
  EventEmitter,
  Input,
  OnInit,
  Output,
} from '@angular/core';

@Component({
  selector: 'app-d',
  templateUrl: './d.component.html',
  styleUrl: './d.component.css',
})
export class DComponent implements OnInit {
  @Input() message: string;
  @Output() messageToB = new EventEmitter<string>();

  ngOnInit(): void {}

  onChangeText($event: Event): void {
    this.message = ($event.target as HTMLInputElement).value;
    this.messageToB.emit(this.message);
    console.log('message from d to b: ', this.message);
  }
}
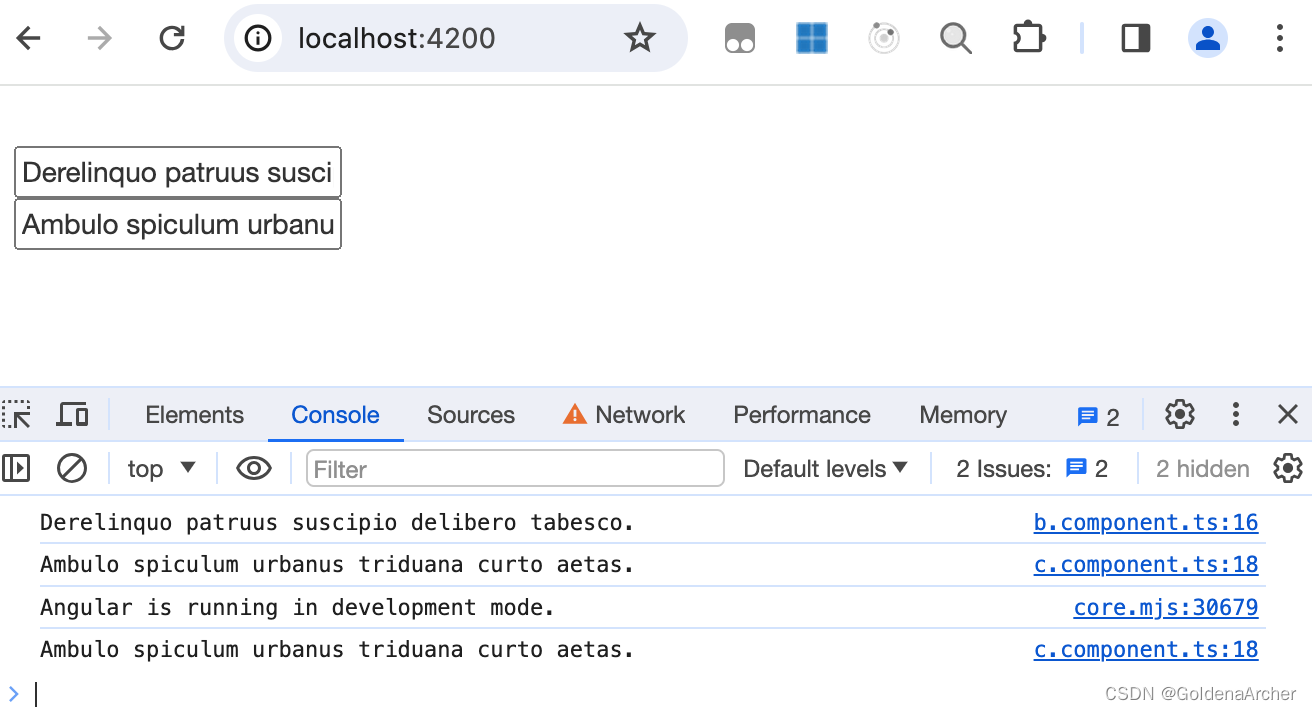
最后实现效果如下:

如果说 React 只是将 onChangeHandler 一个个向子组件里传递,做 props drilling,那么 Angular 除了要在 HTML Template 中传值之外,还需要在组件中实现 @Input 和 @Output 去接受从父组件中传下来的值,并且将事件送到父组件中,对比起来操作更加的麻烦
使用 service 代替
这里使用 service 代替上下传递 @Input 和 @Outpu 进行实现
创建 service
这里依旧使用 cli 去创建 service:
❯ ng generate service services/message --skip-tests
CREATE src/app/services/message.service.ts (136 bytes)
此时结构如下:
实现如下:
import { Injectable } from '@angular/core';

@Injectable({
  providedIn: 'root',
})
export class MessageService {
  passedMessage = 'message from a to e';

  constructor() {}

  updateMessage(msg: string) {
    this.passedMessage = msg;
  }
}
具体实现会在下一个 section 说明
调用 service
调用方式是在构造函数中让 Angular 自动使用 dependency injection 实现
a 的修改:
export class AppComponent {
  // 这里的 dependency injection 是由 angular 实现的
  constructor(private messageService: MessageService) {}
}
c 的实现
import { Component, DoCheck, Input } from '@angular/core';
import { MessageService } from '../services/message.service';

@Component({
  selector: 'app-c',
  templateUrl: './c.component.html',
  styleUrl: './c.component.css',
})
export class CComponent implements DoCheck {
  message: string;

  constructor(private messageService: MessageService) {
    this.message = this.messageService.passedMessage;
  }

  ngDoCheck(): void {
    console.log(this.messageService.passedMessage);
  }
}
HTML Template 中只需要渲染一个 e 即可:
<app-e></app-e>
⚠️:这里主要是 log 一下 service 中变化的值。因为 message 是一个 primitive,所以想要正确的获取 message 的变化是要使用 Observable 的,目前暂时没有涉及到这个部分,因此只是在 ngDoCheck 中输出一下值,表示当前的变化已经被获取了
e 的实现
import { Component, Input } from '@angular/core';
import { MessageService } from '../../services/message.service';

@Component({
  selector: 'app-e',
  templateUrl: './e.component.html',
  styleUrl: './e.component.css',
})
export class EComponent {
  message: string;

  constructor(private messageService: MessageService) {
    this.message = this.messageService.passedMessage;
  }

  onChangeText($event: Event): void {
    this.messageService.updateMessage((<HTMLInputElement>$event.target).value);
  }
}
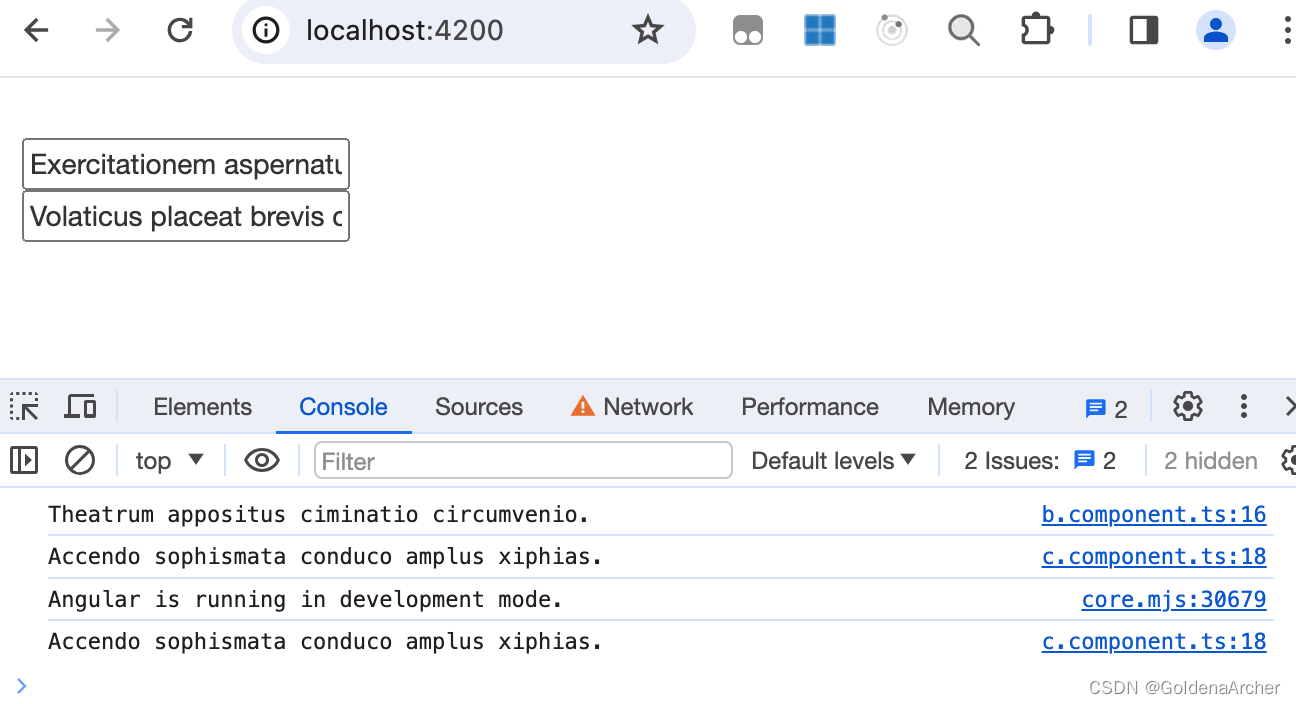
最终效果:

可以看到,对比 a <--> b <--> d 的沟通, a <--> c <--> e 中使用 service 更加的简洁
深入了解 service
Injectable
这个 decorator 在新版的 Angular 是推荐每个 service 都放上,现在默认使用 cli 就会自动带上 Injectable
providedIn 则是挂载的范围,默认情况下挂载的范围是全局。换言之所有的 component 都共享一个 singleton。如果将 providedIn 删除的话,那么 Angular 就可以创建多个 instance
多个 instance & providers
这里首先需要将 Injectable 中的 providedIn 去掉,只保留 @Injectable 这个 decorator 或者去除都行——新版 Angular 是推荐保留 decorator 的
随后需要修改 @Component decorator,这里是修改 B/C 两个组件中的 decorator:
@Component({
  selector: 'app-b',
  templateUrl: './b.component.html',
  styleUrl: './b.component.css',
  providers: [MessageService],
})
这样当前 component 及其后代 component 都会共享同一个 service:
⚠️:这里页面显示的(d/e 从 MessageService 中接受的信息)与 log 中是一致的
如果修改 d/e decorator 中的 providers 的话,d/e 二者也会有自己的 service instance:
⚠️:这里页面显示的(d/e 从 MessageService 中接受的信息)与 log 中是不一致的
这是因为 providers 是 Angular 接受参数用来配置 Dependency Injection 的地方,提供值就会新建一个新的 instance。因此如果想要组件内共享同一个 service 的话,就需要在最近祖先节点修改对应的 providers
👀:传的信息内容我通过 Faker 的随机 lorem 生成,所以每个 service 会不一样
service 注入 service
我这里的实现是两个 service 都会有 @Injectable 这个装饰器,这样的实现会方便一些。MessageService 的实现基本不变,需要修改的就是在构造函数内,通过依赖注入绑定一个 LoggingService,修改如下:
import { Injectable } from '@angular/core';
import { faker } from '@faker-js/faker';
import { LoggingService } from './logging.service';

@Injectable()
export class MessageService {
  passedMessage = faker.lorem.sentence();

  constructor(private loggingService: LoggingService) {
    this.loggingService.logMessage(
      'MessageService constructor created message to ' + this.passedMessage
    );
  }

  updateMessage(msg: string) {
    this.passedMessage = msg;
    this.loggingService.logMessage('MessageService updated message to ' + msg);
  }
}
LoggingService 则是一个实现了输出信息的 service:
import { Injectable } from '@angular/core';

@Injectable({ providedIn: 'root' })
export class LoggingService {
  constructor() {}

  logMessage(msg: string) {
    console.log(`${msg} received at ${new Date().toLocaleTimeString()}`);
  }
}
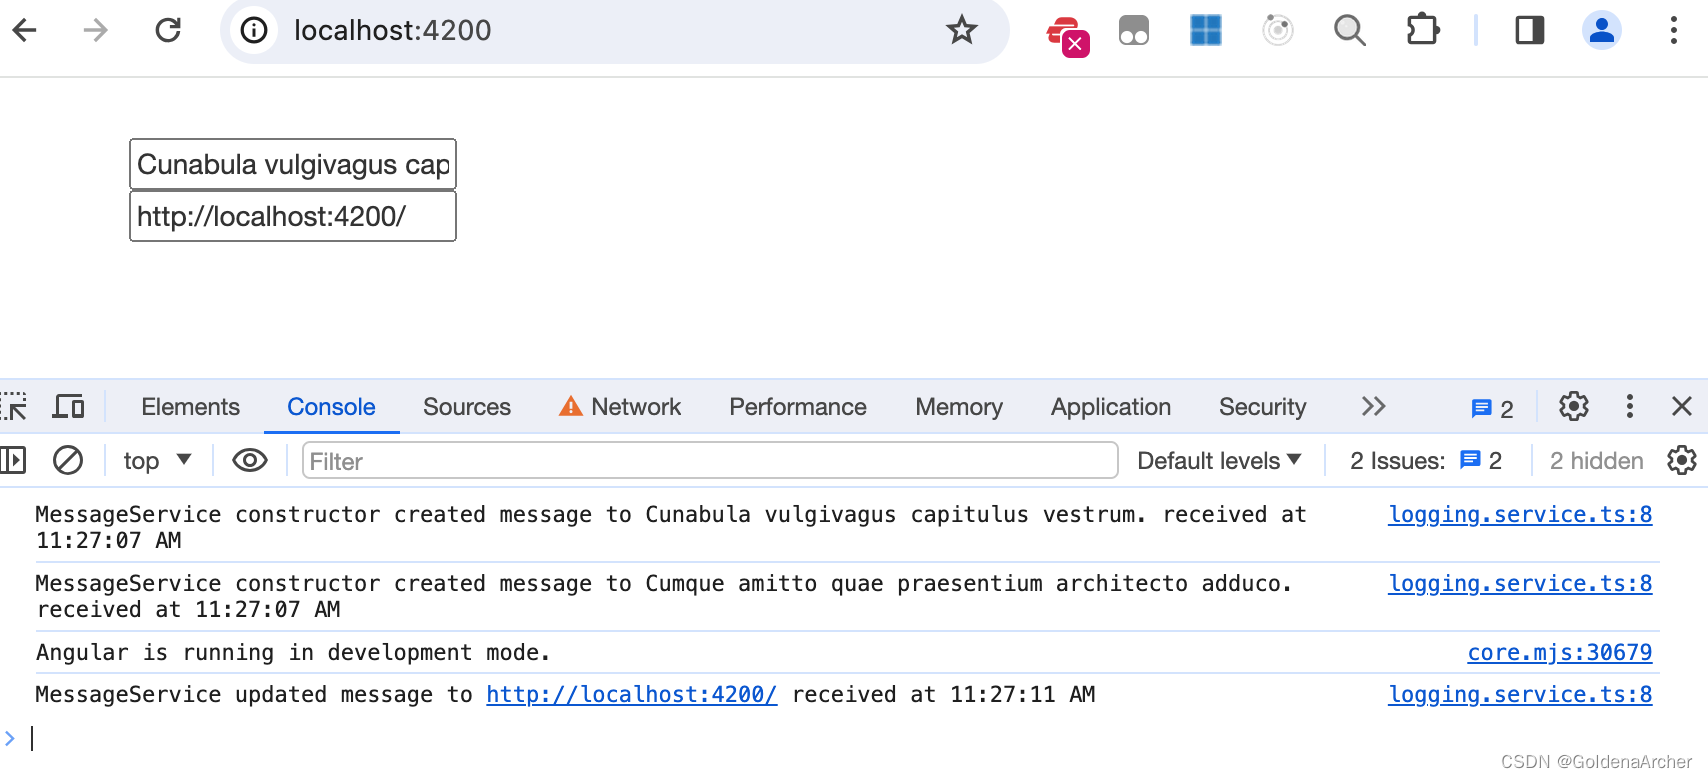
这样每次当 MessageService 被实例化和变动的时候,都会调用一次输出日志方法:
services 的应用场景
根据案例可以看出来,它可以实现以下几个功能:
-
数据共享
不用使用
@Input进行不同层级的数据传递 -
状态管理
这个作用和 React 的 Context 有点相似,在层级内控制状态,并且通过状态进行数据和组件的对应渲染
-
API 交互
HTTP 请求的抽象实现,比如说实现一个 API 层级的 CRUD 封装,这样所有的组件都可以较为方便的调用
-
业务逻辑实现
也是属于功能的一种抽象,如果某些功能不是特定属于几个组件内,那么就可以将其抽离出来进行共享
-
util
也是属于功能的一种抽象,如果某些功能不是特定属于几个组件内,那么就可以将其抽离出来进行共享
其中一个例子就是上面实现的 logging util


 3495
3495

 被折叠的 条评论
为什么被折叠?
被折叠的 条评论
为什么被折叠?
 到【灌水乐园】发言


