


默认的upstrem带有被动探测。
被动探测的优点是它不需要额外的资源来执行定期的健康检查请求,因此对系统的性能影响较小。但是,它依赖于客户端请求来触发健康检查,这可能意味着问题的发现时间相对较长,特别是在负载较低时。
在Nginx官方模块提供的模块中,没有对负载均衡后端节点的健康检查模块
但可以使用第三方模块 nginx_upstream_check_module 来检测后端服务器的健康状态。
我安装Nginx的方式,是通过 yum 安装的,通过 yum 安装的没有 nginx_upstream_check_module 这个模块,所以我们需要先给 Nginx 把这个模块安装好。
实现的具体步骤:
1、安装依赖包
yum -y install gcc glibc gcc-c++ openssl-devel pcre-devel patch
2、下载nginx源码包和nginx_upstream_check模块第三方模块
根据你 yum 安装 Nginx 的版本不同,去 Nginx 的官网上下载对应的 Nginx 版本。
Nginx 官方地址:
nginx: download
https://nginx.org/en/download.html
2.1、先查看Nginx的版本
nginx -v
nginx version: nginx/1.21.5
2.2、下载 Nginx/1.21的版本
wget https://nginx.org/download/nginx-1.21.5.tar.gz
2.3、下载 nginx_upstream_check_module
wget https://github.com/yaoweibin/nginx_upstream_check_module/archive/refs/heads/master.zip
该第三方模块在 github 上的地址为:可以去查看,也给出了配置的示例,很详细。
https://github.com/yaoweibin/nginx_upstream_check_module
3、解压Nginx源码包和第三方模块
tar -zxvf nginx-1.21.4.tar.gz
unzip master.zip
4、添加Nginx模块--重要!!!
进入Nginx目录,给Nginx进行打补丁,把nginx_upstream_check_module模块添加到 Nginx中
cd nginx-1.21.5/
p1代表在Nginx目录,p0是不在Nginx目录
patch -p1 < ../nginx_upstream_check_module-master/check_1.20.1+.patch
5、编译Nginx,需要添加upstream_check第三方模块
通过 nginx -V 查看
将以上内容复制下来
重新编译的时候加上 --add-module=/usr/local/nginx_patch/nginx_upstream_check_module-master。 模块地址就是你下载 nginx_upstream_check_module 到本地的地址。
最终为:
./configure --prefix=/etc/nginx --sbin-path=/usr/sbin/nginx --modules-path=/usr/lib64/nginx/modules --conf-path=/etc/nginx/nginx.conf --error-log-path=/var/log/nginx/error.log --http-log-path=/var/log/nginx/access.log --pid-path=/var/run/nginx.pid --lock-path=/var/run/nginx.lock --http-client-body-temp-path=/var/cache/nginx/client_temp --http-proxy-temp-path=/var/cache/nginx/proxy_temp --http-fastcgi-temp-path=/var/cache/nginx/fastcgi_temp --http-uwsgi-temp-path=/var/cache/nginx/uwsgi_temp --http-scgi-temp-path=/var/cache/nginx/scgi_temp --user=nginx --group=nginx --with-compat --with-file-aio --with-threads --with-http_addition_module --with-http_auth_request_module --with-http_dav_module --with-http_flv_module --with-http_gunzip_module --with-http_gzip_static_module --with-http_mp4_module --with-http_random_index_module --with-http_realip_module --with-http_secure_link_module --with-http_slice_module --with-http_ssl_module --with-http_stub_status_module --with-http_sub_module --with-http_v2_module --with-mail --with-mail_ssl_module --add-module=/usr/local/nginx_patch/nginx_upstream_check_module-master --with-stream --with-stream_realip_module --with-stream_ssl_module --with-stream_ssl_preread_module
6、make && make install
7.配置
upstream test_load_balance {
server 192.168.10.200:80;
server 192.168.10.200:82;# 第三方健康检查
# interval 检测间隔时间,单位是毫秒
# rise 表示请求2次正常,标记此后端的状态为 up
# fall 表示请求3次失败,标记此后端的状态为 down
# type 类型为 tcp
# timeout 为超时时间,单位是毫秒
#check interval=2000 rise=2 fall=3 timeout=2000 type=tcp;
}server {
listen 8080;location / {
proxy_pass http://test_load_balance;
proxy_set_header Host $http_host;
proxy_set_header X-Real-IP $remote_addr;
proxy_set_header X-Forwarded-For $proxy_add_x_forwarded_for;
proxy_connect_timeout 60s;
proxy_read_timeout 60s;
proxy_send_timeout 60s;
proxy_buffering on;
proxy_buffer_size 8k;
proxy_buffers 8 128k;
proxy_http_version 1.1;
proxy_next_upstream error timeout http_500 http_502 http_503 http_504;
}# 重要 - 访问该地址用来查看 Nginx 负载均衡的健康状态
location /upstream_check_status {
check_status;
access_log off;
#allow SOME.IP.ADD.RESS;
#deny all;
}
}
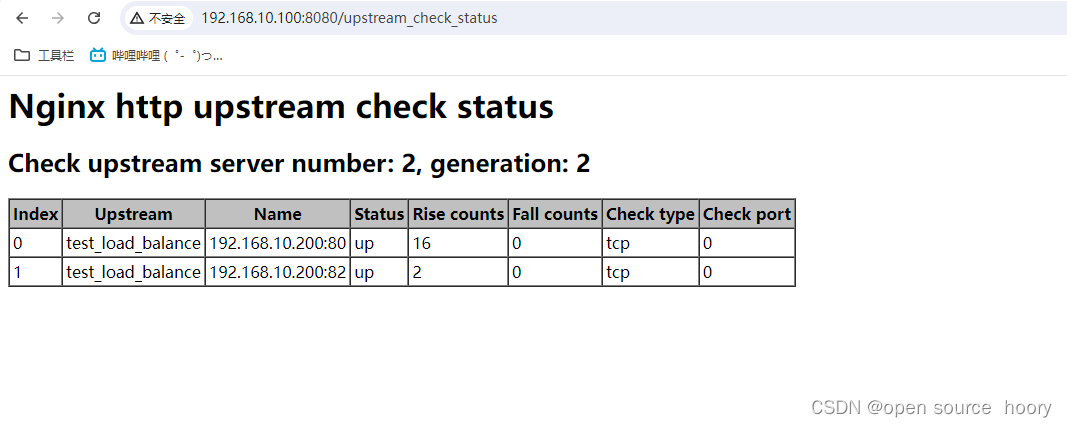
8.查看负载状态
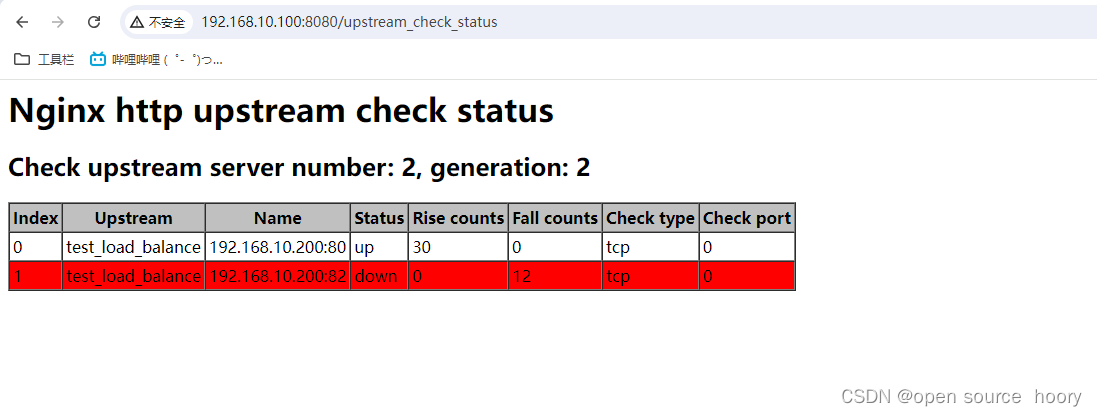
9.停止测试
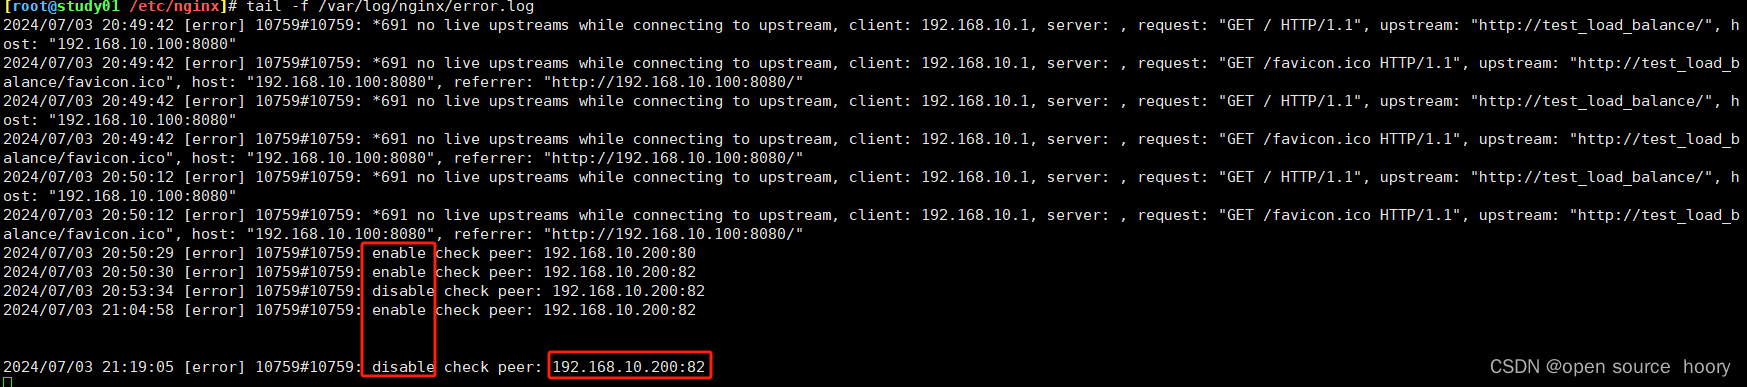
查看日志,是主动探测。


 281
281


 被折叠的 条评论
为什么被折叠?
被折叠的 条评论
为什么被折叠?
 到【灌水乐园】发言


