


 本文详细介绍如何使用Gradle进行依赖统一管理,包括定义versions.gradle文件、编辑版本内容、引用和使用依赖管理文件的步骤,有效提升团队协作效率。
使用Gradle进行依赖统一管理
前言
我们为什么需要对依赖进行统一管理?目的在哪里?
答案不言而喻,当然是便于维护.
场景: 一个项目,为了解耦,封装,扩展,所以会延伸多个module出来.我们每个module中的build.gradle文件会有多个版本控制,版本依赖等等各种,如果项目组人多的情况下,每次新加入一个依赖,都需要考虑版本依赖是否一致的问题,这样下来导致我们的各种成本都会相对应提高,此时如果使用依赖统一管理,我们的同事在使用的时候,只需要找到对应的版本进行添加即可,无需在想版本依赖不一致的情况了,这样对于我们的开发时间以及开发成本会有很大的提高
依赖统一管理使用步骤
- 在项目下定义versions.gradle文件,与project的build.gradle文件一级
- 在其中进行版本定义
- 在project的build.gradle进行引用
- 在module的build.gradle使用定义好的内容
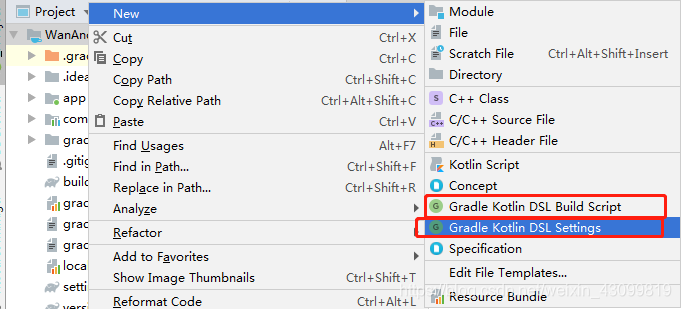
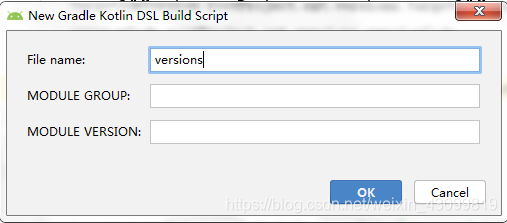
第一步:定义versions.gradle文件
右键项目->new->选择Gradle开头的两个选项,定义文件名称,versions.gradle
第二步:编辑版本内容
- 声明ext变量
- 定义三方库的依赖版本
- 定义三方库的完整依赖
/**
 *
 * 本地依赖配置统一管理
 * 当前文件需要在全局的build.gradle文件中进行引用
 *
 */
ext{
    /**
     *
     * 定义是否为module,如果为module,则为true,如果为application,则为false
     *  我们使用这个属性来控制应用程序是属于module还是application
     */
    isModule = false

    /**
     * 此处定义三方库的版本
     */
    versions = [
            applicationId :"com.xx.xxx",

            compileSdkVersion : 28,
            minSdkVersion : 21,
            targetSdkVersion : 28,
            versionCode : 1,
            versionName : "1.0",
            testInstrumentationRunner : "androidx.test.runner.AndroidJUnitRunner",


            appcompat: "1.0.2",
            constraintlayout:"1.1.3",
            junit:"4.12",
            runner:"1.1.1",
            espresso:"3.1.1"

    ]
    /**
     * 此处定义三方库的依赖名称
     */
    dependencies = [
        "appcompat":"androidx.appcompat:appcompat:${versions["appcompat"]}",
        "constraintlayout":"androidx.constraintlayout:constraintlayout:${versions["constraintlayout"]}",
        "junit":"junit:junit:${versions["junit"]}",
        "runner":"androidx.test:runner:${versions["runner"]}",
        "espresso":"androidx.test.espresso:espresso-core:${versions["espresso"]}"
    ]

}
第三步:在project的build.gradle进行引用我们新建的versions.gradle文件
// Top-level build file where you can add configuration options common to all sub-projects/modules.
/**
 * 下面这段代码,就是我们引用进我们新建的版本依赖管理的文件
 */
apply from: "versions.gradle"

buildscript {
    repositories {
        google()
        jcenter()

    }
    dependencies {
        classpath 'com.android.tools.build:gradle:3.5.0'

        // NOTE: Do not place your application dependencies here; they belong
        // in the individual module build.gradle files
    }
}

allprojects {
    repositories {
        google()
        jcenter()

    }
}

task clean(type: Delete) {
    delete rootProject.buildDir
}
第四步:我们进行使用我们做好的依赖管理文件
apply plugin: 'com.android.application'


android {
    compileSdkVersion rootProject.ext.versions.compileSdkVersion
    defaultConfig {
        applicationId rootProject.ext.versions.applicationId
        minSdkVersion rootProject.ext.versions.minSdkVersion
        targetSdkVersion rootProject.ext.versions.targetSdkVersion
        versionCode rootProject.ext.versions.versionCode
        versionName rootProject.ext.versions.versionName
        testInstrumentationRunner rootProject.ext.versions.testInstrumentationRunner
    }
    buildTypes {
        release {
            minifyEnabled false
            proguardFiles getDefaultProguardFile('proguard-android-optimize.txt'), 'proguard-rules.pro'
        }
    }
}

dependencies {
    implementation fileTree(dir: 'libs', include: ['*.jar'])
    implementation rootProject.ext.dependencies.appcompat
    implementation rootProject.ext.dependencies.constraintlayout
    testImplementation rootProject.ext.dependencies.junit
    androidTestImplementation rootProject.ext.dependencies.runner
    androidTestImplementation rootProject.ext.dependencies.espresso
}
结语
以上内容,就是我们的依赖管理的所有内容,所有内容根据自己的项目内容进行统一替换即可使用


 977
977


 到【灌水乐园】发言


