


文章目录
前言
在本节我们将创建我们自己的框架并创建一个Win32窗口,并且在后面我们会一步一步地完善框架。
本节需要创建的文件如下
- framework.cpp
- framework.h
- graphics.cpp
- graphics.h
- input.cpp
- input.h
- main.cpp
框架将被封装到framework.h,然后我们会在input.h和graphics.h分别创建InputClass和GraphicsClass两个类,用来处理用户输入和渲染。将渲染与处理用户输入部分分离出来可以使我们的思路更清晰。
结构如下
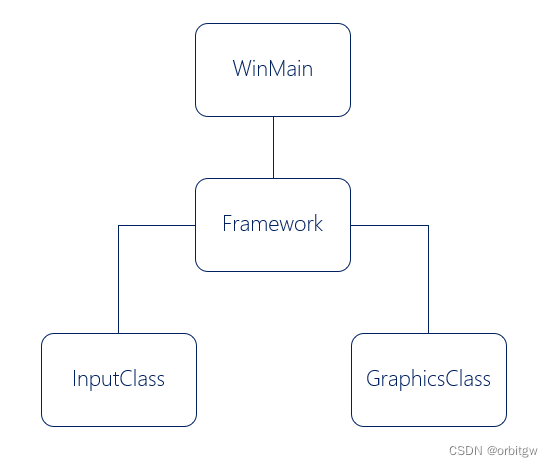
Framework
我们开始来编写框架
framework.h
我们这里引入Windows.h头文件,在前面我们可以定义 WIN32_LEAN_AND_MEAN 这可以排除一些我们不常用的一些API,提高构建的速度。
#define WIN32_LEAN_AND_MEAN
#include <windows.h>
然后包含头文件input.h和graphics.h。
#include "input.h"
#include "graphics.h"
Framework类:
class Framework {
public:
	Framework(HINSTANCE hInstance);
	Framework(const Framework&);
	~Framework();

	bool Initialize();
	void Shutdown();
	void Run();

	LRESULT CALLBACK MessageHandler(HWND, UINT, WPARAM, LPARAM);

private:
	bool Frame();
	void InitializeWindows();
	void ShutdownWindows();

private:
	struct {
		LPWSTR m_title = L"DX11 Window";
		LPCWSTR m_APP_NAME = L"DX11 Engine";
		HINSTANCE m_hInstance;
		HWND m_hWnd;
		UINT width = 800;
		UINT height = 600;
		bool fullscreen = false;
	}window;

	InputClass* m_Input;
	GraphicsClass* m_Graphics;
};
其中,有初始化、关闭和运行函数。还有一个MessageHandler函数来处理窗口消息。我们会在回调函数WndProc里调用它最后将其注册到上下文里。
此外还有一些私有函数。最后,我们有一些私有变量window ,m_Input和m_Graphics,第一个储存了窗口的一些信息,后面两个为指向将处理图形和输入的两个对象的指针。
然后,我们要声明一下WndProc函数
static LRESULT CALLBACK WndProc(HWND, UINT, WPARAM, LPARAM);
最后声明全局指针对象appHandle
static Framework* appHandle = nullptr;
framework.cpp
先包含framework.h,然后我们在framework.cpp里实现Framework类
#include "framework.h"
下面是构造,拷贝构造和析构。为了内存安全我们还是显式地写了拷贝构造和析构。构造函数初始化 m_Input 和 m_Graphics 为空指针。然后将传入实例句柄绑定到成员m_hInstance上,方便内部引用。
Framework::Framework(HINSTANCE hInstance) {
	m_Input = nullptr;
	m_Graphics = nullptr;
	window.m_hInstance = hInstance;
}
Framework::Framework(const Framework&){}
Framework::~Framework() {}
初始化框架部分:
bool Framework::Initialize()
{
	bool result;

	InitializeWindows();

	m_Input = new InputClass;
	m_Input->Initialize();

	m_Graphics = new GraphicsClass;
	if (!m_Graphics->Initialize(window.width, window.height, window.fullscreen, window.m_hWnd))
	{
		return false;
	}
	return true;
}
退出框架部分:
void Framework::Shutdown()
{
	if (m_Graphics)
	{
		m_Graphics->Shutdown();
		delete m_Graphics;
		m_Graphics = nullptr;
	}

	if (m_Input)
	{
		delete m_Input;
		m_Input = nullptr;
	}

	ShutdownWindows();
}
运行部分:
void Framework::Run()
{
	MSG msg = {};

	while (GetMessage(&msg, nullptr, 0, 0) > 0)
	{
		TranslateMessage(&msg);
		DispatchMessage(&msg);

		if (!Frame()){
			PostQuitMessage(0);
		}
	}
}
这里就是窗口主循环部分,如果获取到窗口消息为WM_QUIT就退出主循环。否则执行Frame函数。
Frame函数,也就是执行每一帧的函数:
bool Framework::Frame()
{
	bool result;

	if (m_Input->IsKeyDown(VK_ESCAPE))
	{
		return false;
	}

	result = m_Graphics->Frame();
	if (!result)
	{
		return false;
	}

	return true;
}
检测如果按下ESC键就返回false,在上一个我们看到了,如果为false就退出循环了。这里就是实现了按ESC退出。然后就是调用渲染帧函数m_Graphics->Frame。具体的这些,我们会在后面实现。
下面的是我们的消息处理函数,它将被WndProc调用然后注册到上下文中。
LRESULT CALLBACK Framework::MessageHandler(HWND hWnd, UINT uMsg, WPARAM wParam, LPARAM lParam)
{
	switch (uMsg)
	{
	case WM_KEYDOWN:
	{
		m_Input->KeyDown((unsigned int)wParam);
		return 0;
	}
	case WM_KEYUP:
	{
		m_Input->KeyUp((unsigned int)wParam);
		return 0;
	}
	default:
	{
		return DefWindowProc(hWnd, uMsg, wParam, lParam);
	}
	}
}
然后我们来初始化窗口,并获取指向此对象的外部指针appHandle。
void Framework::InitializeWindows(int& screenWidth, int& screenHeight){
	appHandle = this;
}
注册窗口类
	WNDCLASSEX wcex;

	wcex.style = CS_HREDRAW | CS_VREDRAW | CS_OWNDC;
	wcex.lpfnWndProc = WndProc;
	wcex.cbClsExtra = 0;
	wcex.cbWndExtra = 0;
	wcex.hInstance = window.m_hInstance;
	wcex.hIcon = LoadIcon(nullptr, IDI_WINLOGO);
	wcex.hIconSm = wcex.hIcon;
	wcex.hCursor = LoadCursor(nullptr, IDC_ARROW);
	wcex.hbrBackground = (HBRUSH)GetStockObject(BLACK_BRUSH);
	wcex.lpszMenuName = nullptr;
	wcex.lpszClassName = window.m_APP_NAME;
	wcex.cbSize = sizeof(WNDCLASSEX);

	RegisterClassEx(&wcex);
计算窗口位置,使其在最中间出现
	int posX = (GetSystemMetrics(SM_CXSCREEN) - window.width) / 2;
	int posY = (GetSystemMetrics(SM_CYSCREEN) - window.height) / 2;
创建窗口
	window.m_hWnd = CreateWindowEx(WS_EX_APPWINDOW,
		window.m_APP_NAME, window.m_title,
		WS_OVERLAPPEDWINDOW,
		posX, posY, window.width, window.height,
		nullptr, nullptr, window.m_hInstance, nullptr);
然后显示,并将其置于顶层,获得焦点
	ShowWindow(window.m_hWnd, SW_SHOW);
	SetForegroundWindow(window.m_hWnd);
	SetFocus(window.m_hWnd);
退出窗口,释放资源
void Framework::ShutdownWindows()
{
	DestroyWindow(window.m_hWnd);
	window.m_hWnd = nullptr;

	UnregisterClass(window.m_APP_NAME, window.m_hInstance);
	window.m_hInstance = nullptr;

	appHandle = nullptr;
}
下面就是回调函数WndProc
LRESULT CALLBACK WndProc(HWND hWnd, UINT uMsg, WPARAM wParam, LPARAM lParam)
{
	switch (uMsg)
	{
	case WM_DESTROY:
	{
		PostQuitMessage(0);
		return 0;
	}

	case WM_CLOSE:
	{
		PostQuitMessage(0);
		return 0;
	}

	default:
	{
		return appHandle->MessageHandler(hWnd, uMsg, wParam, lParam);
	}
	}
}
至此,framework编写结束
InputClass
我们开始编写处理用户输入的部分
input.h
input.h的内容相对简单
class InputClass
{
public:
	InputClass();
	InputClass(const InputClass&);
	~InputClass();

	void Initialize();

	void KeyDown(unsigned int);
	void KeyUp(unsigned int);

	bool IsKeyDown(unsigned int);

private:
	bool m_keys[256];
};
input.cpp
#include "input.h"

InputClass::InputClass(){}
InputClass::InputClass(const InputClass& other){}
InputClass::~InputClass(){}

void InputClass::Initialize()
{
	int i;
	for(i=0; i<256; i++){
		m_keys[i] = false;
	}
}


void InputClass::KeyDown(unsigned int input){
	m_keys[input] = true;
}


void InputClass::KeyUp(unsigned int input){
	m_keys[input] = false;
}

bool InputClass::IsKeyDown(unsigned int key){
	return m_keys[key];
}
GraphicsClass
下面编写渲染类
graphics.h
包含头文件
#include <windows.h>
然后是声明GraphicsClass
class GraphicsClass
{
public:
	GraphicsClass();
	GraphicsClass(const GraphicsClass&);
	~GraphicsClass();

	bool Initialize(int, int, bool, HWND);
	void Shutdown();
	bool Frame();

private:
	bool Render();
public:
	struct {
		bool vsync_enable = true;
		float screen_depth = 1000.0f;
		float screen_near = 0.1f;
	}cfg;
};
graphics.cpp
我们这节只需搭建一下渲染的框架
#include "graphics.h"


GraphicsClass::GraphicsClass(){
}


GraphicsClass::GraphicsClass(const GraphicsClass& other){
}


GraphicsClass::~GraphicsClass(){
}


bool GraphicsClass::Initialize(int width, int height, bool fullscreen, HWND hwnd){

	return true;
}


void GraphicsClass::Shutdown(){

	return;
}


bool GraphicsClass::Frame(){

	return true;
}


bool GraphicsClass::Render(){

	return true;
}
主函数
最后只需要我们调用框架即可
#include "framework.h"

int WINAPI wWinMain(HINSTANCE hInstance, HINSTANCE hPrevInstance, PWSTR cmdline, int cmdShow) {
	Framework* frame = new Framework(hInstance);

	if (frame->Initialize()) {
		frame->Run();
	}

	frame->Shutdown();
	delete frame;

	return 0;
}
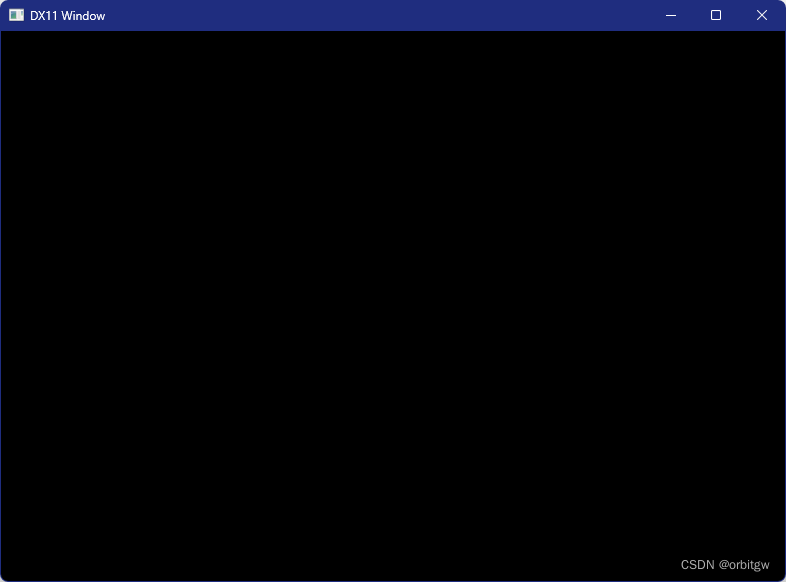
如果你得到了下面的窗口,恭喜你,这一步成功了。
完整代码


 418
418


 被折叠的 条评论
为什么被折叠?
被折叠的 条评论
为什么被折叠?
 到【灌水乐园】发言


