


1 创建项目
这里与之前创建项目相同就不在进行赘述,创建好的项目如下图
其中 bootstrap.properties 文件里面的内容可以配置在application.properties里 也可以单独配置 这里为了方便直接写进application.properties文件里。

2 添加pom依赖
<?xml version="1.0" encoding="UTF-8"?>
<project xmlns="http://maven.apache.org/POM/4.0.0" xmlns:xsi="http://www.w3.org/2001/XMLSchema-instance"
	xsi:schemaLocation="http://maven.apache.org/POM/4.0.0 http://maven.apache.org/xsd/maven-4.0.0.xsd">
	<modelVersion>4.0.0</modelVersion>
	<parent>
		<groupId>org.springframework.boot</groupId>
		<artifactId>spring-boot-starter-parent</artifactId>
		<version>1.4.0.RELEASE</version>
		<relativePath/> <!-- lookup parent from repository -->
	</parent>

	<groupId>com.example</groupId>
	<artifactId>demo-client</artifactId>
	<version>0.0.1-SNAPSHOT</version>
	<name>demo-client</name>
	<description>Demo project for Spring Boot</description>

	<properties>
		<project.build.sourceEncoding>UTF-8</project.build.sourceEncoding>
		<project.reporting.outputEncoding>UTF-8</project.reporting.outputEncoding>
		<java.version>1.8</java.version>
	</properties>

	<dependencies>
		<dependency>
			<groupId>org.springframework.boot</groupId>
			<artifactId>spring-boot-starter-web</artifactId>
		</dependency>
		<dependency>
			<groupId>org.springframework.cloud</groupId>
			<artifactId>spring-cloud-starter-config</artifactId>
		</dependency>
		<!-- sping cloud 注册服务 -->
		<dependency>
			<groupId>org.springframework.cloud</groupId>
			<artifactId>spring-cloud-starter-eureka</artifactId>
		</dependency>
		<dependency>
			<groupId>org.springframework.cloud</groupId>
			<artifactId>spring-cloud-starter-feign</artifactId>
		</dependency>

		<dependency>
			<groupId>org.springframework.boot</groupId>
			<artifactId>spring-boot-starter-test</artifactId>
			<scope>test</scope>
		</dependency>
		<dependency>
			<groupId>org.springframework.boot</groupId>
			<artifactId>spring-boot-starter-web</artifactId>
		</dependency>
	</dependencies>

	<dependencyManagement>
		<dependencies>
			<dependency>
				<groupId>org.springframework.cloud</groupId>
				<artifactId>spring-cloud-dependencies</artifactId>
				<version>Dalston.RELEASE</version>
				<type>pom</type>
				<scope>import</scope>
			</dependency>
		</dependencies>
	</dependencyManagement>

	<build>
		<plugins>
			<plugin>
				<groupId>org.springframework.boot</groupId>
				<artifactId>spring-boot-maven-plugin</artifactId>
			</plugin>
		</plugins>
	</build>
</project>
3 配置application.properties 文件
spring.application.name=spring-cloud-client
server.port=9000
eureka.client.serviceUrl.defaultZone=http://localhost:8761/eureka/
4 测试微服务接口
1 control 层代码如下
package com.example.democlient.web;

import com.example.democlient.service.TestService;
import org.springframework.beans.factory.annotation.Autowired;
import org.springframework.web.bind.annotation.PathVariable;
import org.springframework.web.bind.annotation.RequestMapping;
import org.springframework.web.bind.annotation.RestController;

/**
 * @Auther: zhoudepeng
 * @Date: 2019/4/18
 * @Description:
 */
@RestController
public class Control {

    @Autowired
    TestService HelloRemote;

    @RequestMapping("/hello/{name}")
    public String index(@PathVariable("name") String name) {
        return HelloRemote.hello(name);
    }
}
2 service 层代码如下
package com.example.democlient.service;

import org.springframework.cloud.netflix.feign.FeignClient;
import org.springframework.web.bind.annotation.RequestMapping;
import org.springframework.web.bind.annotation.RequestParam;

/**
 * @Auther: zhoudepeng
 * @Date: 2019/4/18
 * @Description:
 */
@FeignClient(name= "spring-cloud-service")
public interface TestService {
    @RequestMapping(value = "/hello")
    String hello(@RequestParam(value = "name") String name);
}
3 浏览器请求效果
注册中心的效果
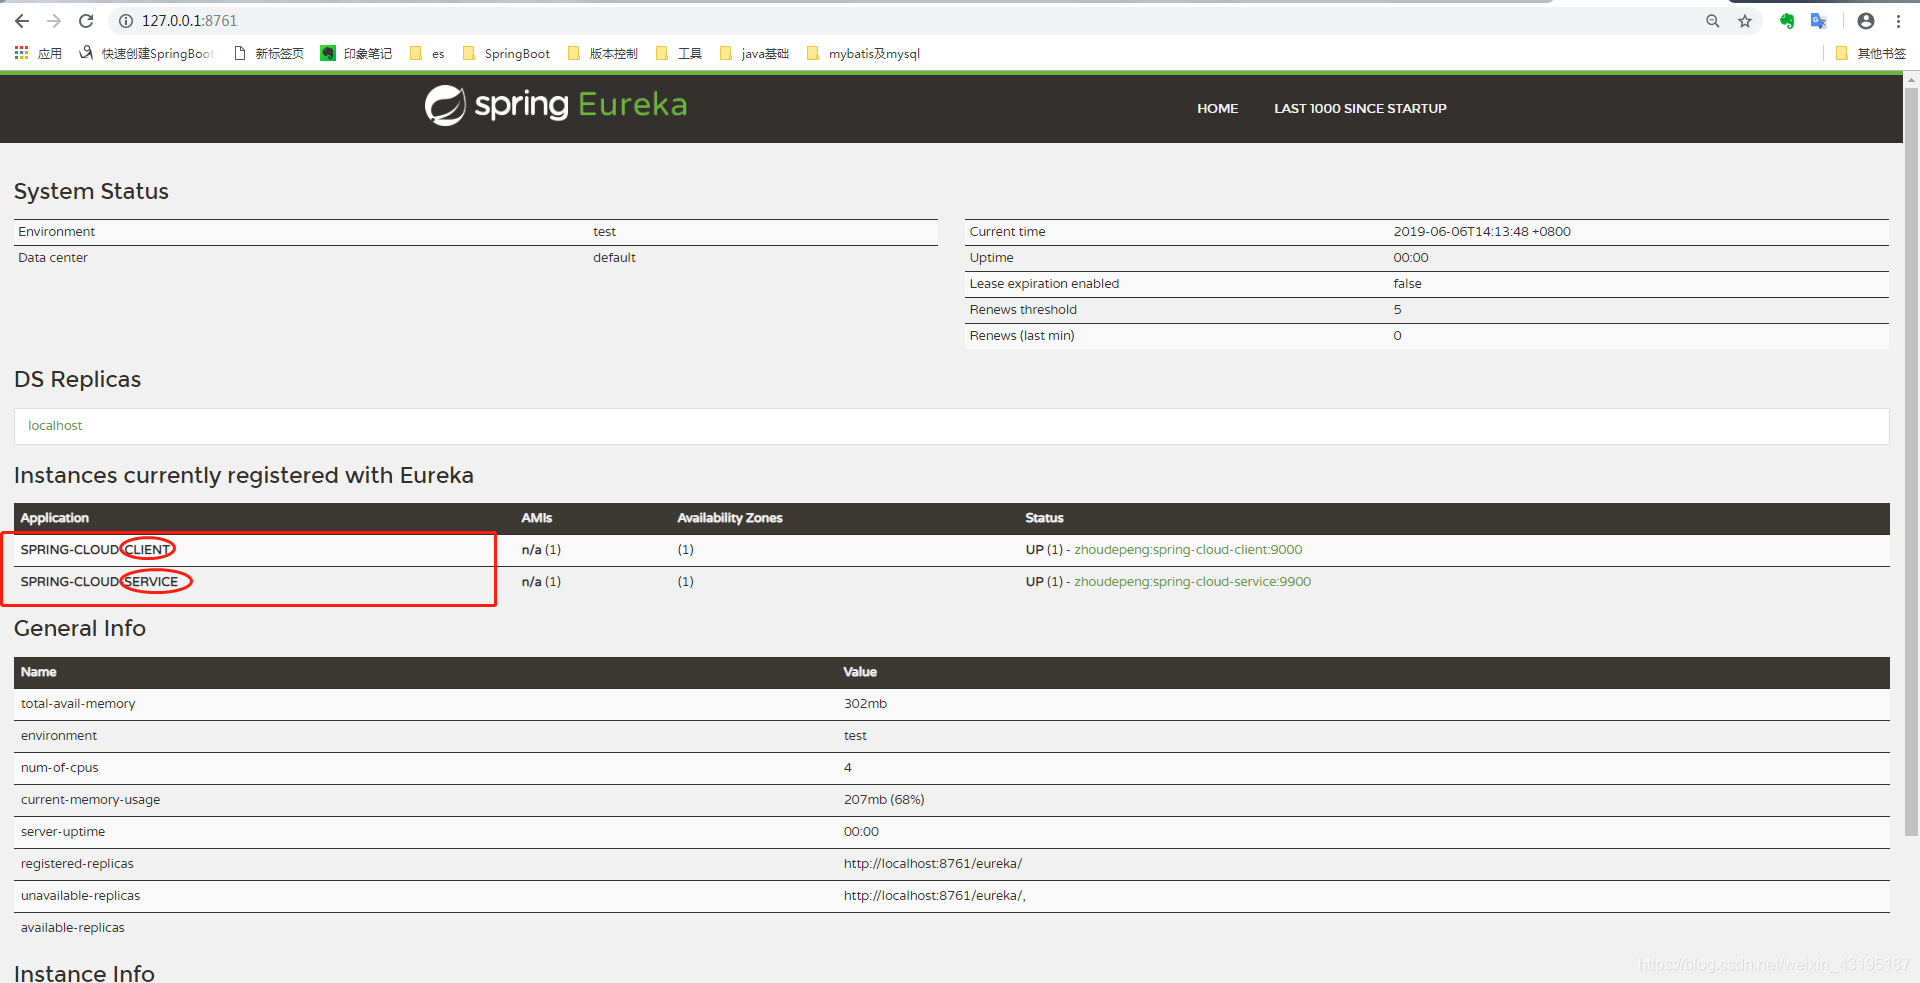
发现service 与client 都已经注册成功。
直接请求client 的接口查看效果 如下图

发现已经成功 请求成功 hello word 是service 拼接返回的


 289
289


 被折叠的 条评论
为什么被折叠?
被折叠的 条评论
为什么被折叠?
 到【灌水乐园】发言


