


K8S四层代理Service
四层负载均衡Service:概念、原理解读
为什么要有Service
- 在kubernetes中,Pod是有生命周期的,如果Pod重启它的IP很有可能会发生变化。如果我们的服务都是将Pod的IP地址写死,Pod挂掉或者重启,和刚才重启的pod相关联的其他服务将会找不到它所关联的Pod,为了解决这个问题,在kubernetes中定义了service资源对象,Service 定义了一个服务访问的入口,客户端通过这个入口即可访问服务背后的应用集群实例,service是一组Pod的逻辑集合,这一组Pod能够被Service访问到,通常是通过Label Selector实现的。
可以看下面的图:
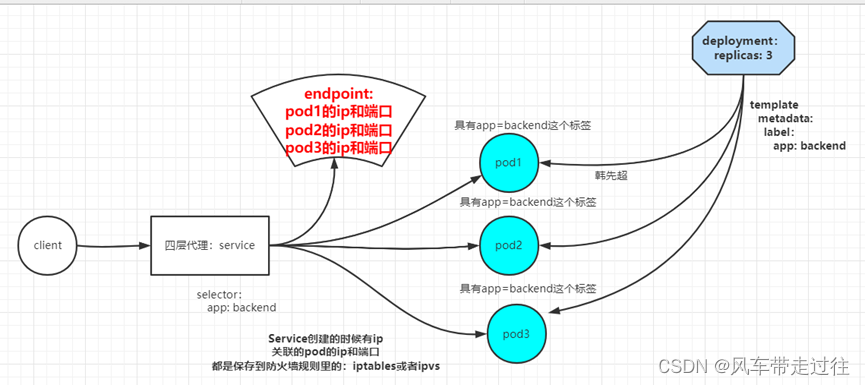
- pod ip经常变化,service是pod的代理,我们客户端访问,只需要访问service,就会把请求代理到Pod
- pod ip在k8s集群之外无法访问,所以需要创建service,这个service可以在k8s集群外访问的。
Service概述
service是一个固定接入层,客户端可以通过访问service的ip和端口访问到service关联的后端pod,这个service工作依赖于在kubernetes集群之上部署的一个附件,就是kubernetes的dns服务(不同kubernetes版本的dns默认使用的也是不一样的,1.11之前的版本使用的是kubeDNs,较新的版本使用的是coredns),service的名称解析是依赖于dns附件的,因此在部署完k8s之后需要再部署dns附件,kubernetes要想给客户端提供网络功能,需要依赖第三方的网络插件(flannel,calico等)。每个K8s节点上都有一个组件叫做kube-proxy,kube-proxy这个组件将始终监视着apiserver中有关service资源的变动信息,需要跟master之上的apiserver交互,随时连接到apiserver上获取任何一个与service资源相关的资源变动状态,这种是通过kubernetes中固有的一种请求方法watch(监视)来实现的,一旦有service资源的内容发生变动(如创建,删除),kube-proxy都会将它转化成当前节点之上的能够实现service资源调度,把我们请求调度到后端特定的pod资源之上的规则,这个规则可能是iptables,也可能是ipvs,取决于service的实现方式。
Service工作原理
k8s在创建Service时,会根据标签选择器selector(lable selector)来查找Pod,据此创建与Service同名的endpoint对象,当Pod 地址发生变化时,endpoint也会随之发生变化,service接收前端client请求的时候,就会通过endpoint,找到转发到哪个Pod进行访问的地址。(至于转发到哪个节点的Pod,由负载均衡kube-proxy决定)
kubernetes集群中有三类IP地址
- Node Network(节点网络):物理节点或者虚拟节点的网络,如ens33接口上的网路地址
ip addr
ens33: <BROADCAST,MULTICAST,UP,LOWER_UP> mtu 1500 qdisc pfifo_fast state UP
    link/ether 00:0c:29:87:60:d5 brd ff:ff:ff:ff:ff:ff
inet 192.168.1.63/24 brd 192.168.1.255 scope global noprefixroute ens33
- Pod network(pod 网络),创建的Pod具有的IP地址
Node Network和Pod network这两种网络地址是我们实实在在配置的,其中节点网络地址是配置在节点接口之上,而pod网络地址是配置在pod资源之上的,因此这些地址都是配置在某些设备之上的,这些设备可能是硬件,也可能是软件模拟的
kubectl get pods -o wide
NAME             READY   STATUS          IP               NODE
frontend-h78gw   1/1       Running       10.244.187.76    k8s2
- Cluster Network(集群地址,也称为service network),这个地址是虚拟的地址(virtual ip),没有配置在某个接口上,只是出现在service的规则当中。
kubectl get svc
NAME               TYPE        CLUSTER-IP      EXTERNAL-IP   PORT(S)
kubernetes         ClusterIP   10.96.0.1           <none>        443/TCP
查看定义Service资源需要的字段有哪些
kubectl explain service
KIND:     Service
VERSION:  v1
DESCRIPTION:
     Service is a named abstraction of software service (for example, mysql)
     consisting of local port (for example 3306) that the proxy listens on, and
     the selector that determines which pods will answer requests sent through
     the proxy.
FIELDS:
   apiVersion	<string>  #service资源使用的api组
   kind	<string>           #创建的资源类型
   metadata	<Object>      #定义元数据
   spec	<Object>
#查看service的spec字段如何定义?
kubectl explain service.spec
KIND:     Service
VERSION:  v1
RESOURCE: spec <Object>
DESCRIPTION:
     Spec defines the behavior of a service.
     https://git.k8s.io/community/contributors/devel/sig-architecture/api-conventions.md#spec-and-status
     ServiceSpec describes the attributes that a user creates on a service.
FIELDS:
   allocateLoadBalancerNodePorts	<boolean>
   clusterIP	<string>
#动态分配的地址,也可以自己在创建的时候指定,创建之后就改不了了
   clusterIPs	<[]string>
   externalIPs	<[]string>
   externalName	<string>
   externalTrafficPolicy	<string>
   healthCheckNodePort	<integer>
   ipFamilies	<[]string>
   ipFamilyPolicy	<string>
   loadBalancerIP	<string>
   loadBalancerSourceRanges	<[]string>
   ports	<[]Object>  #定义service端口,用来和后端pod建立联系
   publishNotReadyAddresses	<boolean>
   selector	<map[string]string> #通过标签选择器选择关联的pod有哪些
   sessionAffinity	<string>
   sessionAffinityConfig	<Object>
#service在实现负载均衡的时候还支持sessionAffinity,sessionAffinity
什么意思?会话联系,默认是none,随机调度的(基于iptables规则调度的);如果我们定义sessionAffinity的client ip,那就表示把来自同一客户端的IP请求调度到同一个pod上
   topologyKeys	<[]string>
   type	<string>  #定义service的类型
Service的四种类型
kubectl explain service.spec.type
ExternalName, ClusterIP, NodePort, and LoadBalancer
Service的端口
查看service的spec.ports字段如何定义
kubectl explain service.spec.ports
KIND:     Service
VERSION:  v1
RESOURCE: ports <[]Object>
DESCRIPTION:
     The list of ports that are exposed by this service. More info:
     https://kubernetes.io/docs/concepts/services-networking/service/#virtual-ips-and-service-proxies
     ServicePort contains information on service's port.
FIELDS:
   appProtocol	<string>
   name	<string>  #定义端口的名字
   nodePort	<integer>   #service在物理机映射的端口,默认在 30000-32767 之间
   port	<integer> -required-  #service的端口,这个是k8s集群内部服务可访问的端口
   protocol	<string>
   targetPort	<string>
# targetPort是pod上的端口,从port和nodePort上来的流量,经过kube-proxy流入到后端pod的targetPort上,最后进入容器。
创建Service:type类型是ClusterIP
创建Pod
把nginx.tar.gz上传到节点服务器
链接:https://pan.baidu.com/s/1zpzhW46AQz7Hf8sqI4ZeOQ?pwd=9fve
提取码:9fve
ctr -n=k8s.io images import nginx.tar.gz
cat pod_test.yaml
apiVersion: apps/v1
kind: Deployment
metadata:
  name: my-nginx
spec:
  selector:
    matchLabels:
      run: my-nginx
  replicas: 2
  template:
    metadata:
      labels:
        run: my-nginx
    spec:
      containers:
      - name: my-nginx
        image: nginx
        imagePullPolicy: IfNotPresent
        ports:
        - containerPort: 80  #pod中的容器需要暴露的端口
        startupProbe:
           periodSeconds: 5
           initialDelaySeconds: 60
           timeoutSeconds: 10
           httpGet:
             scheme: HTTP
             port: 80
             path: /
        livenessProbe:
           periodSeconds: 5
           initialDelaySeconds: 60
           timeoutSeconds: 10
           httpGet:
             scheme: HTTP
             port: 80
             path: /
        readinessProbe:
           periodSeconds: 5
           initialDelaySeconds: 60
           timeoutSeconds: 10
           httpGet:
             scheme: HTTP
             port: 80
             path: /
更新资源清单文件
kubectl apply -f pod_test.yaml
查看刚才创建的Pod ip地址
kubectl get pods -l run=my-nginx -o wide
NAME                             STATUS           IP                   NODE
my-nginx-5b56ccd65f-26vcz       Running         10.244.187.101        k8s2
my-nginx-5b56ccd65f-95n7p       Running         10.244.209.149         k8s1
请求pod ip地址,查看结果
curl 10.244.187.101

<!DOCTYPE html>
<html>
<h1>Welcome to nginx!</h1>
</body>
</html>
curl 10.244.209.149

<!DOCTYPE html>
<html>
<h1>Welcome to nginx!</h1>
</body>
</html>
kubectl exec -it my-nginx-5b56ccd65f-26vcz -- /bin/bash
root@my-nginx-5b56ccd65f-26vcz:/# curl 10.244.209.149
<!DOCTYPE html>
<html>
<h1>Welcome to nginx!</h1>
</html>
root@my-nginx-5b56ccd65f-26vcz:/#exit
需要注意的是,pod虽然定义了容器端口,但是不会使用调度到该节点上的80端口,也不会使用任何特定的NAT规则去路由流量到Pod上。 这意味着可以在同一个节点上运行多个 Pod,使用相同的容器端口,并且可以从集群中任何其他的Pod或节点上使用IP的方式访问到它们。
误删除其中一个Pod:
kubectl delete pods my-nginx-5b56ccd65f-26vcz
pod "my-nginx-5b56ccd65f-26vcz" deleted
kubectl get pods -l run=my-nginx -o wide
NAME                          STATUS         IP               NODE
my-nginx-5b56ccd65f-7xzr4    Running       10.244.187.102    k8s2
my-nginx-5b56ccd65f-95n7p     Running     10.244.209.149     k8s1
通过上面可以看到重新生成了一个pod :my-nginx-5b56ccd65f-7xzr4,ip是10.244.187.102,在k8s中创建pod,如果pod被删除了,重新生成的pod ip地址会发生变化,所以需要在pod前端加一个固定接入层。接下来创建service:
查看pod标签:
kubectl get pods --show-labels
cat service_test.yaml
apiVersion: v1
kind: Service
metadata:
  name: my-nginx
  labels:
    run: my-nginx
spec:
  type: ClusterIP
  ports:
  - port: 80   #service的端口,暴露给k8s集群内部服务访问
    protocol: TCP
    targetPort: 80    #pod容器中定义的端口
  selector:
    run: my-nginx  #选择拥有run=my-nginx标签的pod
上述yaml文件将创建一个 Service,具有标签run=my-nginx的Pod,目标TCP端口 80,并且在一个抽象的Service端口(targetPort:容器接收流量的端口;port:抽象的 Service 端口,可以使任何其它 Pod访问该 Service 的端口)上暴露。
kubectl apply -f service_test.yaml
service/my-nginx created
kubectl get svc -l run=my-nginx
NAME       TYPE        CLUSTER-IP      EXTERNAL-IP   PORT(S)   AGE
my-nginx   ClusterIP   10.99.198.177   <none>        80/TCP    143m
在k8s控制节点访问service的ip:端口就可以把请求代理到后端pod
curl 10.99.198.177:80
<!DOCTYPE html>
<html>
<h1>Welcome to nginx!</h1>
</html>
通过上面可以看到请求service IP:port跟直接访问pod ip:port看到的结果一样,这就说明service可以把请求代理到它所关联的后端pod
注意:上面的10.99.198.177:80地址只能是在k8s集群内部可以访问,在外部无法访问,比方说我们想要通过浏览器访问,那么是访问不通的,如果想要在k8s集群之外访问,是需要把service type类型改成nodePort的
查看service详细信息
kubectl describe svc my-nginx
Name:              my-nginx
Namespace:         default
Labels:            run=my-nginx
Annotations:       <none>
Selector:          run=my-nginx
Type:              ClusterIP
IP Families:       <none>
IP:                10.99.198.177
IPs:               10.99.198.177
Port:              <unset>  80/TCP
TargetPort:        80/TCP
Endpoints:         10.244.187.102:80,10.244.209.149:80
Session Affinity:  None
Events:            <none>
kubectl get ep my-nginx
NAME       ENDPOINTS                             AGE
my-nginx   10.244.187.102:80,10.244.209.149:80   142m
- service可以对外提供统一固定的ip地址,并将请求重定向至集群中的pod。其中“将请求重定向至集群中的pod”就是通过endpoint与selector协同工作实现。selector是用于选择pod,由selector选择出来的pod的ip地址和端口号,将会被记录在endpoint中。endpoint便记录了所有pod的ip地址和端口号。当一个请求访问到service的ip地址时,就会从endpoint中选择出一个ip地址和端口号,然后将请求重定向至pod中。具体把请求代理到哪个pod,需要的就是kube-proxy的轮询实现的。service不会直接到pod,service是直接到endpoint资源,就是地址加端口,再由endpoint再关联到pod。
- service只要创建完成,我们就可以直接解析它的服务名,每一个服务创建完成后都会在集群dns中动态添加一个资源记录,添加完成后我们就可以解析了
- 资源记录格式是:
SVC_NAME.NS_NAME.DOMAIN.LTD.
服务名.命名空间.域名后缀
集群默认的域名后缀是svc.cluster.local.
就像我们上面创建的my-nginx这个服务,它的完整名称解析就是
my-nginx.default.svc.cluster.local
kubectl exec -it my-nginx-5b56ccd65f-7xzr4 -- /bin/bash
root@my-nginx-5b56ccd65f-7xzr4:/# curl my-nginx.default.svc.cluster.local
<!DOCTYPE html>
<h1>Welcome to nginx!</h1>
root@my-nginx-5b56ccd65f-7xzr4:/# exit
创建Service:type类型是NodePort
创建一个pod资源
cat pod_nodeport.yaml
apiVersion: apps/v1
kind: Deployment
metadata:
  name: my-nginx-nodeport
spec:
  selector:
    matchLabels:
      run: my-nginx-nodeport
  replicas: 2
  template:
    metadata:
      labels:
        run: my-nginx-nodeport
    spec:
      containers:
      - name: my-nginx-nodeport-container
        image: nginx
        imagePullPolicy: IfNotPresent
        ports:
        - containerPort: 80
更新资源清单文件
kubectl apply -f pod_nodeport.yaml
查看pod是否创建成功
kubectl get pods -l run=my-nginx-nodeport
NAME                                 READY   STATUS    RESTARTS   AGE
my-nginx-nodeport-6f8c64fc6c-86wnc   1/1     Running   0          67s
my-nginx-nodeport-6f8c64fc6c-8wrpq   1/1     Running   0          67s
kubectl get pods -l run=my-nginx-nodeport -owide
NAME                                 READY   STATUS    RESTARTS   AGE     IP              NODE            NOMINATED NODE   READINESS GATES
my-nginx-nodeport-7776f84758-9w5mh   1/1     Running   0          6m53s   10.244.121.36   k8s1            <none>           <none>
my-nginx-nodeport-7776f84758-h6hk8   1/1     Running   0          6m53s   10.244.102.86   k8s2            <none>           <none>
创建service,代理pod
cat service_nodeport.yaml
apiVersion: v1
kind: Service
metadata:
  name: my-nginx-nodeport
  labels:
    run: my-nginx-nodeport
spec:
  type: NodePort
  ports:
  - port: 80
    protocol: TCP
    targetPort: 80
    nodePort: 30380
  selector:
    run: my-nginx-nodeport
更新资源清单文件
kubectl apply -f service_nodeport.yaml
查看刚才创建的service
kubectl get svc -l run=my-nginx-nodeport
NAME                TYPE       CLUSTER-IP     EXTERNAL-IP   PORT(S)
my-nginx-nodeport   NodePort   10.100.156.7   <none>        80:30380/TCP
访问service
curl 10.100.156.7
<!DOCTYPE html>
<h1>Welcome to nginx!</h1>
</html>
10.100.156.7是k8s集群内部的service ip地址,只能在k8s集群内部访问,在集群外无法访问。
在集群外访问service
curl 192.168.40.180:30380
<!DOCTYPE html>
<h1>Welcome to nginx!</h1>
</html>
在浏览器访问service

数据转发流程:
ipvsadm -Ln

IP Virtual Server version 1.2.1 (size=4096)
Prot LocalAddress:Port Scheduler Flags
  -> RemoteAddress:Port           Forward Weight ActiveConn InActConn
TCP  172.17.0.1:30380 rr
  -> 10.244.102.86:80             Masq    1      0          0
  -> 10.244.121.36:80             Masq    1      0          0

客户端请求http://192.168.40.180:30380->docker0虚拟网卡:172.17.0.1:30380->10.244.121.36:80,10.244.102.86:80
创建Service:type类型是ExternalName
应用场景:跨名称空间访问
需求:default名称空间下的client 服务想要访问nginx-ns名称空间下的nginx-svc服务
需要把busybox.tar.gz上传到节点服务器
链接:https://pan.baidu.com/s/1Npi2iNzcZr-IY4PMFHUDPA?pwd=n3cu
提取码:n3cu
ctr -n=k8s.io images import busybox.tar.gz
kubectl create ns nginx-ns
cat server_nginx.yaml
apiVersion: apps/v1
kind: Deployment
metadata:
  name: nginx
  namespace: nginx-ns
spec:
  replicas: 1
  selector:
    matchLabels:
      app: nginx
  template:
   metadata:
    labels:
      app: nginx
   spec:
     containers:
     - name: nginx
       image: nginx
       imagePullPolicy: IfNotPresent
kubectl apply -f server_nginx.yaml
查看pod是否创建成功
kubectl get pods -n nginx-ns
NAME                     READY   STATUS    RESTARTS   AGE
nginx-7cf7d6dbc8-lzm6j   1/1     Running   0          10m
cat nginx_svc.yaml
apiVersion: v1
kind: Service
metadata:
  name: nginx-svc
  namespace: nginx-ns
spec:
  selector:
    app: nginx
  ports:
   - name: http
     protocol: TCP
     port: 80
     targetPort: 80
kubectl apply -f nginx_svc.yaml
cat client.yaml
apiVersion: apps/v1
kind: Deployment
metadata:
  name: client
spec:
  replicas: 1
  selector:
    matchLabels:
      app: busybox
  template:
   metadata:
    labels:
      app: busybox
   spec:
     containers:
     - name: busybox
       image: busybox
       imagePullPolicy: IfNotPresent
       command: ["/bin/sh","-c","sleep 36000"]
kubectl apply -f client.yaml
cat client_svc.yaml
apiVersion: v1
kind: Service
metadata:
  name: client-svc
spec:
  type: ExternalName
  externalName: nginx-svc.nginx-ns.svc.cluster.local
  ports:
  - name: http
    port: 80
    targetPort: 80
该文件中指定了到 nginx-svc 的软链,让使用者感觉就好像调用自己命名空间的服务一样。
查看pod是否正常运行
kubectl get pods
NAME                                 READY   STATUS      RESTARTS
client-76b6556d97-xk7mg              1/1     Running      0
kubectl apply -f client_svc.yaml
登录到client pod
kubectl exec -it  client-76b6556d97-xk7mg -- /bin/sh
/ # wget -q -O - client-svc.default.svc.cluster.local
    wget -q -O - nginx-svc.nginx-ns.svc.cluster.local
 #上面两个请求的结果一样
k8s最佳实践:映射外部服务案例分享
场景1:k8s集群引用外部的mysql数据库
在k8s2上安装mysql数据库:
yum install mariadb-server.x86_64 -y
systemctl start mariadb
cat mysql_service.yaml
apiVersion: v1
kind: Service
metadata:
  name: mysql
spec:
  type: ClusterIP
  ports:
  - port: 3306
kubectl apply -f mysql_service.yaml
kubectl get svc | grep mysql
mysql               ClusterIP      10.107.232.103              3306/TCP
kubectl describe svc mysql
Name:              mysql
Namespace:         default
Labels:            <none>
Annotations:       <none>
Selector:          <none>
Type:              ClusterIP
IP Families:       <none>
IP:                10.107.232.103
IPs:               10.107.232.103
Port:              <unset>  3306/TCP
TargetPort:        3306/TCP
Endpoints:         <none>  #还没有endpoint
Session Affinity:  None
Events:            <none>
cat mysql_endpoint.yaml
apiVersion: v1
kind: Endpoints
metadata:
  name: mysql
subsets:
- addresses:
  - ip: 192.168.40.182
  ports:
  - port: 3306
kubectl apply -f mysql_endpoint.yaml
kubectl describe svc mysql
Name:              mysql
Namespace:         default
Labels:            <none>
Annotations:       <none>
Selector:          <none>
Type:              ClusterIP
IP Families:       <none>
IP:                10.107.232.103
IPs:               10.107.232.103
Port:              <unset>  3306/TCP
TargetPort:        3306/TCP
Endpoints:         192.168.1.62:3306  #这个就是定义的外部数据库
Session Affinity:  None
Events:            <none>
上面配置就是将外部IP地址和服务引入到k8s集群内部,由service作为一个代理来达到能够访问外部服务的目的。
Service服务发现:coredns组件详解
DNS是什么
DNS全称是Domain Name System:域名系统,是整个互联网的电话簿,它能够将可被人理解的域名翻译成可被机器理解IP地址,使得互联网的使用者不再需要直接接触很难阅读和理解的IP地址。域名系统在现在的互联网中非常重要,因为服务器的 IP 地址可能会经常变动,如果没有了 DNS,那么可能 IP 地址一旦发生了更改,当前服务器的客户端就没有办法连接到目标的服务器了,如果我们为 IP 地址提供一个『别名』并在其发生变动时修改别名和 IP 地址的关系,那么我们就可以保证集群对外提供的服务能够相对稳定地被其他客户端访问。DNS 其实就是一个分布式的树状命名系统,它就像一个去中心化的分布式数据库,存储着从域名到 IP 地址的映射。
CoreDNS
CoreDNS 其实就是一个 DNS 服务,而 DNS 作为一种常见的服务发现手段,所以很多开源项目以及工程师都会使用 CoreDNS 为集群提供服务发现的功能,Kubernetes 就在集群中使用 CoreDNS 解决服务发现的问题。 作为一个加入 CNCF(Cloud Native Computing Foundation)的服务, CoreDNS 的实现非常简单。
验证coredns
把dig.tar.gz上传到节点服务器
链接:https://pan.baidu.com/s/1yf6gD0YBucjxYuwjx0f7CQ?pwd=0i7o
提取码:0i7o
ctr -n=k8s.io images import dig.tar.gz
cat dig.yaml
apiVersion: v1
kind: Pod
metadata:
  name: dig
  namespace: default
spec:
  containers:
  - name: dig
    image:  k8s/dig:latest
    imagePullPolicy: IfnotPresent
    command:
      - sleep
      - "3600"
    imagePullPolicy: IfNotPresent
  restartPolicy: Always
更新资源清单文件
kubectl apply -f dig.yaml
查看默认名称空间的kubernetes服务
kubectl get svc | grep kubernetes
kubernetes          ClusterIP      10.96.0.1        443/TCP        5d13h
解析dns,如有以下返回说明dns安装成功
kubectl exec -it dig -- nslookup kubernetes
Server:		10.96.0.10
Address:	10.96.0.10#53
Name:	kubernetes.default.svc.cluster.local
Address: 10.96.0.1

kubernetes.default.svc.cluster.local
服务名.名称空间.默认后缀
在k8s中创建service之后,service默认的FQDN是..svc.cluster.local,那么k8s集群内部的服务就可以通过FQDN访问
使用CLI 创建service
使用expose 参数 --help参数可以查询到使用模板
kubectl expose -h
Expose a resource as a new Kubernetes service.

 Looks up a deployment, service, replica set, replication controller or pod by name and uses the selector for that
resource as the selector for a new service on the specified port. A deployment or replica set will be exposed as a
service only if its selector is convertible to a selector that service supports, i.e. when the selector contains only
the matchLabels component. Note that if no port is specified via --port and the exposed resource has multiple ports, all
will be re-used by the new service. Also if no labels are specified, the new service will re-use the labels from the
resource it exposes.

 Possible resources include (case insensitive):

 pod (po), service (svc), replicationcontroller (rc), deployment (deploy), replicaset (rs)

Examples:
  # Create a service for a replicated nginx, which serves on port 80 and connects to the containers on port 8000
  kubectl expose rc nginx --port=80 --target-port=8000

  # Create a service for a replication controller identified by type and name specified in "nginx-controller.yaml",
which serves on port 80 and connects to the containers on port 8000
  kubectl expose -f nginx-controller.yaml --port=80 --target-port=8000

  # Create a service for a pod valid-pod, which serves on port 444 with the name "frontend"
  kubectl expose pod valid-pod --port=444 --name=frontend

  # Create a second service based on the above service, exposing the container port 8443 as port 443 with the name
"nginx-https"
  kubectl expose service nginx --port=443 --target-port=8443 --name=nginx-https

  # Create a service for a replicated streaming application on port 4100 balancing UDP traffic and named 'video-stream'.
  kubectl expose rc streamer --port=4100 --protocol=UDP --name=video-stream

  # Create a service for a replicated nginx using replica set, which serves on port 80 and connects to the containers on
port 8000
  kubectl expose rs nginx --port=80 --target-port=8000

  # Create a service for an nginx deployment, which serves on port 80 and connects to the containers on port 8000
  kubectl expose deployment nginx --port=80 --target-port=8000

Options:
      --allow-missing-template-keys=true: If true, ignore any errors in templates when a field or map key is missing in
the template. Only applies to golang and jsonpath output formats.
      --cluster-ip='': ClusterIP to be assigned to the service. Leave empty to auto-allocate, or set to 'None' to create
a headless service.
      --dry-run='none': Must be "none", "server", or "client". If client strategy, only print the object that would be
sent, without sending it. If server strategy, submit server-side request without persisting the resource.
      --external-ip='': Additional external IP address (not managed by Kubernetes) to accept for the service. If this IP
is routed to a node, the service can be accessed by this IP in addition to its generated service IP.
      --field-manager='kubectl-expose': Name of the manager used to track field ownership.
  -f, --filename=[]: Filename, directory, or URL to files identifying the resource to expose a service
      --generator='service/v2': The name of the API generator to use. There are 2 generators: 'service/v1' and
'service/v2'. The only difference between them is that service port in v1 is named 'default', while it is left unnamed
in v2. Default is 'service/v2'.
  -k, --kustomize='': Process the kustomization directory. This flag can't be used together with -f or -R.
  -l, --labels='': Labels to apply to the service created by this call.
      --load-balancer-ip='': IP to assign to the LoadBalancer. If empty, an ephemeral IP will be created and used
(cloud-provider specific).
      --name='': The name for the newly created object.
  -o, --output='': Output format. One of:
json|yaml|name|go-template|go-template-file|template|templatefile|jsonpath|jsonpath-as-json|jsonpath-file.
      --override-type='merge': The method used to override the generated object: json, merge, or strategic.
      --overrides='': An inline JSON override for the generated object. If this is non-empty, it is used to override the
generated object. Requires that the object supply a valid apiVersion field.
      --port='': The port that the service should serve on. Copied from the resource being exposed, if unspecified
      --protocol='': The network protocol for the service to be created. Default is 'TCP'.
  -R, --recursive=false: Process the directory used in -f, --filename recursively. Useful when you want to manage
related manifests organized within the same directory.
      --save-config=false: If true, the configuration of current object will be saved in its annotation. Otherwise, the
annotation will be unchanged. This flag is useful when you want to perform kubectl apply on this object in the future.
      --selector='': A label selector to use for this service. Only equality-based selector requirements are supported.
If empty (the default) infer the selector from the replication controller or replica set.)
      --session-affinity='': If non-empty, set the session affinity for the service to this; legal values: 'None',
'ClientIP'
      --show-managed-fields=false: If true, keep the managedFields when printing objects in JSON or YAML format.
      --target-port='': Name or number for the port on the container that the service should direct traffic to.
Optional.
      --template='': Template string or path to template file to use when -o=go-template, -o=go-template-file. The
template format is golang templates [http://golang.org/pkg/text/template/#pkg-overview].
      --type='': Type for this service: ClusterIP, NodePort, LoadBalancer, or ExternalName. Default is 'ClusterIP'.

Usage:
  kubectl expose (-f FILENAME | TYPE NAME) [--port=port] [--protocol=TCP|UDP|SCTP] [--target-port=number-or-name]
[--name=name] [--external-ip=external-ip-of-service] [--type=type] [options]

Use "kubectl options" for a list of global command-line options (applies to all commands).
创建一个service,名字为front-end-svc,暴露deployment的http端口,deployment名字为front-end 端口默认80,并且service的类型为NodePort。
kubectl expose deployment front-end --name=front-end-svc --port=80 --target-port=http --type=NodePort


 2936
2936

 被折叠的 条评论
为什么被折叠?
被折叠的 条评论
为什么被折叠?
 到【灌水乐园】发言


