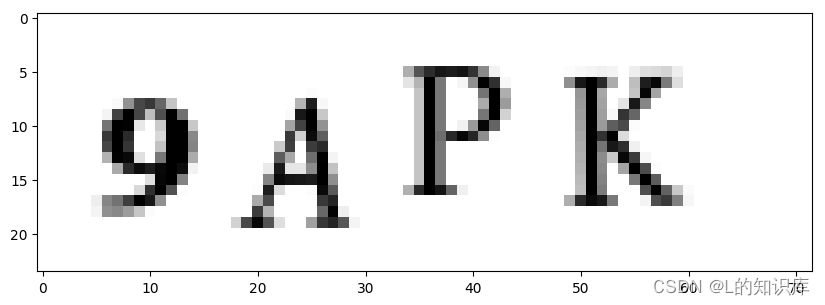
最近在做的一个小项目,进行简单的分享。现在不论是手机APP、网页、电脑客户端等,只要涉及用户登录的界面基本都需要输入验证码核实身份真伪。因此有时,我们也会有自动识别验证码的需求,例如:希望实现业务流程自动化时,用户登录作为流程第一步可能就会用到验证码的识别,将该模型部署为接口进行调用就可以完成该功能。
本项目基于非常经典的文本识别算法CRNN来进行验证码识别模型的训练,整个流程是基于PaddlePaddle来训练的,后边也会放上Pytorch版本的模型代码。项目中代码直接使用时,需要自己加上 import python包 的部分。
1. 数据准备
1.1 数据集准备
这次分享的项目其实是一个简单的示例,使用一个比较简单的大写字母加数字的数据集进行训练,因此字符的丰富度可能比较有限,在真实场景下可以基于自己的需要找更加合适的数据集进行训练。这里把我找数据集的链接发给大家,就不放自己的数据集了,把大概准备数据的过程分享给大家。
1.2 准备标签文件
准备标签文件,这里因为我的数据集图片命名就是label的值,所以准备标签的方式比较简单。这里只是一种比较简单的数据准备方式,大家可以根据自己数据的情况进行标注和标签文件的准备。
#生成总的标签文件
train_path = "pic"
SUM = []
for root,dirs, files in os.walk(train_path): # 分别代表根目录、文件夹、文件
    for file in files:
        imgpath = os.path.join(root, file)
        SUM.append(imgpath+"\t"+file.split(".")[0]+"\n")
    # 生成总标签文件
    allstr = ''.join(SUM)
    f = open('total_list.txt','w',encoding='utf-8')
    f.write(allstr)
    f.close
print("数据集数量:{}".format(len(SUM)))
生成总的标签文件后就可以划分训练集和验证集,训练集和验证集的比例也可以自己去定。
random.shuffle(SUM)
train_len = int(len(SUM) * 0.8)
test_list = SUM[:train_len]
train_list = SUM[:train_len]
print('训练集数量: {}, 验证集数量: {}'.format(len(train_list),len(test_list)))
#生成训练集的标签文件
train_txt = ''.join(train_list)
f_train = open('train_list.txt','w',encoding='utf-8')
f_train.write(train_txt)
f_train.close()
#生成测试集的标签文件
test_txt = ''.join(test_list)
f_test = open('test_list.txt','w',encoding='utf-8')
f_test.write(test_txt)
f_test.close()
1.3 准备数据字典
在OCR-文本识别任务中,有一个特别需要准备的文件就是字典。文本识别的结果最终包含于字典文件中的字符集,也就是字典文件中有的字符才有可能作为最终识别的结果,没有的字符也就不会作为结果进行输出。在这个项目里,字典中的字符集也就应该是所有大写字母加上数字的集合。
#准备字典
class_set = set()
lines = []
file = open("total_list.txt","r",encoding="utf-8")#待转换文档,这里我们使用的是数据集的标签文件
for i in file:
    a=i.strip('\n').split('\t')[-1]
    lines.append(a)
file.close
for line in lines:
    for e in line:
        class_set.add(e)
class_list = list(class_set)
class_list.sort()
print("class num: {0}".format(len(class_list)))
with codecs.open("new_dict.txt", "w", encoding='utf-8') as label_list:
    for id, c in enumerate(class_list):
        label_list.write("{0}\n".format(c))
1.4 可视化观察一张样本
img = Image.open('9APK.png')
img = np.array(img)

# 画出读取的图片
plt.figure(figsize=(10, 10))
plt.imshow(img)

2. 数据预处理
在数据灌入模型前,需要对数据进行预处理操作,使得图片和标签满足网络训练和预测的需要。这里简单实现了如下方法:
- 图像解码:将图像转为Numpy格式;
- 编码标签:将标签按照CTC(Connectionist temporal classification)算法要求进行编码。其中,字符串中每个字符替换为其在字符字典中的索引值,规定标签的最大长度max_text_len,如果标签中字符个数小于max_text_len,则剩余位置补0,例如规定max_text_len=10,标签为[2322],字符字典为[0,1,2,3,4,5,6,7,8,9],则编码后的标签为[2,3,2,2,0,0,0,0,0,0];
- 缩放图像并归一化:将原图片的高度统一缩放到32,归一化后贴在尺寸为[3,32,100]的空白画布上;
- 返回图像、标签、长度:将保存在字典中的数据取出,以列表的形式返回,列表中元素顺序分别为 image, label, length。
图像解码
class DecodeImage(object):
    # 图像解码
    def __init__(self, img_mode='BGR', channel_first=False):
        self.img_mode = img_mode
        self.channel_first = channel_first

    def __call__(self, data):
        # 解码图像并返回结果
        img = data['image']
        img = np.frombuffer(img, dtype='uint8')
        img = cv2.imdecode(img, 1)
        if img is None:
            return None
        if self.img_mode == 'GRAY':
            img = cv2.cvtColor(img, cv2.COLOR_GRAY2BGR)
        elif self.img_mode == 'RGB':
            assert img.shape[2] == 3, 'invalid shape of image[%s]' % (img.shape)
            img = img[:, :, ::-1]

        if self.channel_first:
            img = img.transpose((2, 0, 1))

        data['image'] = img
        return data
编码标签
将字符格式的标签转换为索引格式,如果不足 max_text_len 个,则在最后进行补零。
def encode(text, max_text_len, dict_index):
    # 将字符标签转换为对应的索引值
    # 如果没有字符或字符个数超过上限,返回None
    if len(text) == 0 or len(text) > max_text_len:
        return None
    # 将字符的索引值依次保存到text_list
    text_list = []
    for char in text:
        # 如果字符在字符字典没有出现,不进行保存
        if char not in dict_index:
            continue
        text_list.append(dict_index[char])
    if len(text_list) == 0:
        return None
    return text_list
class CTCLabelEncode(object):
    # 编码标签
    def __init__(self, max_text_length=25, character_dict_path='new_dict.txt'):
        self.max_text_length = max_text_length
        # 将标签编码为CTC格式
        character_str = ""
        # 读取字符字典
        with open(character_dict_path, "rb") as fin:
            lines = fin.readlines()
            for line in lines:
                line = line.decode('utf-8').strip("\n").strip("\r\n")
                character_str += line
        dict_character = list(character_str)
        # 添加类别:分隔符
        dict_character = ['blank'] + dict_character
        # 将每个类别对应的索引保存到字典中
        self.dict_index = {
   }
        for i, char in enumerate(dict_character):
            self.dict_index[char] = i

    def __call__(self, data):
        # 获取数据的标签
        text = data['label']
        # 将标签转换为索引
        text = encode(text, self.max_text_length, self.dict_index)
        if text is None:
            return None
        data['length'] = np.array(len(text))
        text = text + [0] * (self.max_text_length - len(text))
        data['label'] = np.array(text)
        return data
缩放图像并标准化
class RecResizeImg(object):
    def __init__(self, image_shape=[3, 32, 100]):
        self.image_shape = image_shape

    def __call__(self, data):
        img = data['image']
        norm_img = self.resize_norm_img(img, self.image_shape)
        data['image'] = norm_img
        return data

    def resize_norm_img(self, img, image_shape):
        # 缩放图像并对图像进行归一化
        # 缩放图像
        imgC, imgH, imgW = image_shape
        h = img.shape[0]
        w = img.shape[1]
        ratio = w / float(h)
        # 如果 w 大于等于100,令 resized_w = 100
        if math.ceil(imgH * ratio) > imgW:
            resized_w = imgW
        # 如果 w 小于100,令 resized_w 为 w 向上取整
        else:
            resized_w = int(math.ceil(imgH * ratio))
        resized_image = cv2.resize(img, (resized_w, imgH))
        # 对图片进行归一化
        resized_image = resized_image.astype('float32')
        resized_image = resized_image.transpose((2, 0, 1)) / 255
        resized_image -= 0.5
        resized_image /= 0.5
        # 新建大小为[3, 32, 100]的空白图像,将缩放后的图像贴到对应位置,其他位置补0
        padding_im = np.zeros((imgC, imgH, imgW), dtype=np.float32)
        padding_im[:, :, 0:resized_w] = resized_image
        return padding_im
返回图像、标签、长度
class KeepKeys(object):
    # 将字典格式的数据转换为列表格式返回
    def __init__(self, keep_keys=['image', 'label', 'length']):
        self.keep_keys = keep_keys

    def __call__(self, data):
        data_list = []
        for key in self.keep_keys:
            data_list.append(data[key])
        return data_list
汇总上述方法
# 图像预处理方法汇总
def transform(data, mode='train'):
    # 图像解码
    decode_image = DecodeImage()
    # 编码标签
    encode_label = CTCLabelEncode()
    # 缩放图像并标准化
    resize_image = RecResizeImg()
    data = decode_image(data)
    if mode == 'train' or mode == 'val':
        data = encode_label(data)
        keep_keys=['image', 'label', 'length']
    else:
        keep_keys = ['image']
    # 返回图像、标签、长度
    keepkeys = KeepKeys(keep_keys=keep_keys)
    data = resize_image(data)
    data = keepkeys(data)
    return data
定义数据读取类SimpleDataSet,实现数据批量读取和预处理。具体代码如下:
class SimpleDataSet(Dataset):
    def __init__(self, mode, label_file, data_dir, seed=None):
        super(SimpleDataSet, self).__init__()
        self.mode = mode.lower()
        # 标注文件中,使用'\t'作为分隔符区分图片名称与标签
        self.delimiter = '\t'
        # 数据集路径
        self.data_dir = data_dir
        # 随机数种子
        self.seed = seed
        # 获取所有数据,以列表形式返回
        self.data_lines = self.get_image_info_list(label_file)
        # 新建列表存放数据索引
        self.data_idx_order_list = list(range(


 最低0.47元/天 解锁文章


 199
199


 被折叠的 条评论
为什么被折叠?


