


 本文详细解析了el-upload组件的使用,包括完整代码封装、属性设置、方法(如预览、删除、重置和下载)以及如何让父组件接收值和调用方法。重点介绍了图片上传流程和组件与父组件的通信机制。
el-upload组件使用
文章目录
一、组件封装的完整代码
将el-upload组件进行封装,项目中要求是,修改界面是需要“加号”图表,详情界面需要隐藏“加号”并且,隐藏删除icon图表
<template>
  <div class="upload-imagesList">
    <el-upload action=" "
               list-type="picture-card"
               :limit="10"
               :disabled="fileList.length === 10"
               :on-change="handleChange"
               :file-list="fileList"
               :class="{disabled: uploadDisabled}"
               :auto-upload="false">
      <i slot="default"
         class="el-icon-plus">
      </i>
      <div slot="file"
           slot-scope="{file}">
        <img class="el-upload-list__item-thumbnail"
             :src="file.url"
             alt="">
        <span class="el-upload-list__item-actions">
          <span class="el-upload-list__item-preview"
                @click="handlePictureCardPreview(file)">
            <i class="el-icon-zoom-in"></i>
          </span>
          <span class="el-upload-list__item-delete"
                @click="handleDownload(file)">
            <i class="el-icon-download"></i>
          </span>
          <span v-if="!uploadDisabled"
                class="el-upload-list__item-delete"
                @click="handleRemove(file)">
            <i class="el-icon-delete"></i>
          </span>
        </span>
      </div>
    </el-upload>
    <el-dialog :visible.sync="dialogVisible"
               append-to-body>
      <img width="100%"
           :src="dialogImageUrl"
           alt="">
    </el-dialog>
  </div>
</template>

<script>
import { uploadFile } from '@/api/workOrder/management'
import filtersMixin from '../filtersMixin/index.js'
export default {
  mixins: [filtersMixin],
  props: {
    indexValue: {
      type: Number,
      default: 0,
    },
    imageList: {
      type: Array,
      default: () => [],
    },
    uploadDisabled: {
      type: Boolean,
      default: false,
    },
  },
  data() {
    return {
      dialogImageUrl: '',
      dialogVisible: false,
      fileList: [],
    }
  },
  watch: {
    imageList: {
      handler(newVal) {
        newVal.forEach((item, index) => {
          const checkItem = this.fileList.find(
            (subItem) => subItem.url === item
          )
          if (!checkItem) {
            const fileItem = {
              uid: index,
              url: item,
            }
            this.fileList.push(fileItem)
          }
        })
      },
      deep: true,
      immediate: true,
    },
  },
  methods: {
    /*  放大*/
    handlePictureCardPreview(file) {
      this.dialogImageUrl = file.url
      this.dialogVisible = true
    },
    /* 下载 */
    handleDownload(file) {
      const checkItem = this.fileList.find((item) => item.uid === file.uid)
      this.download(checkItem.url)
    },
    /* 移除 */
    handleRemove(file) {
      this.fileList.forEach((item, index) => {
        if (item.uid === file.uid) {
          this.fileList.splice(index, 1)
        }
      })
    },
    /* 更改 */
    handleChange(file) {
      const formData = new FormData()
      formData.append('file', file.raw)
      uploadFile(formData).then((res) => {
        const fileItem = {
          uid: file.uid,
          url: res.data.msg,
        }
        this.fileList.push(fileItem)
        this.$emit('getImageList', this.fileList, this.indexValue)
      })
    },
    /* 重置 */
    resetImageList() {
      this.fileList = []
    },
  },
}
</script>

<style lang="scss">
.upload-imagesList {
  width: 100%;
  .el-upload-list--picture-card .el-upload-list__item {
    width: 120px !important;
    height: 120px !important;
  }
  .el-upload--picture-card {
    width: 120px !important;
    height: 120px !important;
    line-height: 120px !important;
  }
  .disabled .el-upload--picture-card {
    display: none !important;
  }
}
</style>
二、组件分步解析
2.1 属性值
list-type=“picture-card”
:limit=“10”
:disabled=“fileList.length === 10”
:on-change=“handleChange”
:file-list=“fileList”
:class=“{disabled: uploadDisabled}”
:auto-upload=“false”
- list-type="picture-card"上传的文件列表:图片类型
- limit 最大允许上传个数
- disabled 是否禁用
- on-change 选择文件的时候会调取此方法,项目中一般对于图片处理有单独的接口,处理文件上传一般前端封装的request.js的axios请求都无法满足,最好单独编写一下,上传文件时,转化上传类型:
const formData = new FormData()
formData.append(‘file’, file.raw)
上传文件可通过后端回传回图片的线上地址,将该图片线上地址暂存在fileList里面,也就是说图片选中的同时就完成了上传操作,回显的图片是上传后的线上地址,方便保存操作
    /* 更改 */
    handleChange(file) {
      const formData = new FormData()
      formData.append('file', file.raw)
      uploadFile(formData).then((res) => {
        const fileItem = {
          uid: file.uid,
          url: res.data.msg,
        }
        this.fileList.push(fileItem)
        this.$emit('getImageList', this.fileList, this.indexValue)
      })
    },
接口示例:
其中:Content-Type文件类型修改为“multipart/form-data”,(默认:application/json)
// 创建axios实例
const service = axios.create({
  // axios中请求配置有baseURL选项,表示请求URL公共部分
  baseURL: process.env.VUE_APP_BASE_API,
  // 超时
  timeout: 10000
});
export function uploadFile (data) {
  return service({
    headers: {
      Authorization: "Bearer " + getToken(),
      'Content-Type': "multipart/form-data"
    },
    url: "/file/uploadFile",
    method: 'post',
    data: data
  });
}
- file-list 上传的文件列表,该列表很重要 因为后续详情所需的回显也是主要靠给其赋值完成的,注意fileList的数组内元素要以对象形式,切图片路径字段使用url(官方示例的字段,也可修改),因为后续的回显img默认file.url
- class 的值判断disabled: uploadDisabled主要以控制disabled的类选择器是否显示来实现详情的时候“加号”隐藏的功能(注意不要加scope,会不生效,可以加一下当前组件最外层类名以实现私有化不影响全局)
- auto-upload=“false” 是否自动上传,此处一般关闭,大多都是个性化传递比较多,可在onchange事件里面使用
<style lang="scss">
	.upload-imagesList {
	  .disabled .el-upload--picture-card {
	    display: none !important;
	  }
	}
</style>
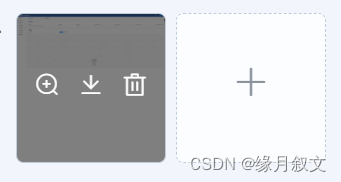
- 功能图标解析
 <i slot="default"
        class="el-icon-plus">
     </i>
     <div slot="file"
          slot-scope="{file}">
           <!-- 显示图片 -->
       <img class="el-upload-list__item-thumbnail"
            :src="file.url"
            alt="">
       <span class="el-upload-list__item-actions">
       		<!-- 放大图片(对话框的方式) -->
         <span class="el-upload-list__item-preview"
               @click="handlePictureCardPreview(file)">
           <i class="el-icon-zoom-in"></i>
         </span>
	         <!-- 下载图片 -->
         <span class="el-upload-list__item-delete"
               @click="handleDownload(file)">
           <i class="el-icon-download"></i>
         </span>
         	<!-- 移除指定图片 -->
         <span v-if="!uploadDisabled"
               class="el-upload-list__item-delete"
               @click="handleRemove(file)">
           <i class="el-icon-delete"></i>
         </span>
       </span>
     </div>
2.2 方法解析
2.2.1 父组件接收值
  props: {
    indexValue: {
      type: Number,
      default: 0,
    },
    imageList: {
      type: Array,
      default: () => [],
    },
    uploadDisabled: {
      type: Boolean,
      default: false,
    },
  },
- indexValue 主要用于动态添加的索引值(当只是普通引用的话,可不使用)
- imageList 文件列表,主要用于详情或者修改,就是用户之前已经上传了图片列表,来进行回显(如果单纯的监听该列表内容再赋值的话会有一些显示bug,加个判断即可,图片地址是否在文件列表列表已经存在,不存在就进行追加)
  watch: {
    imageList: {
      handler(newVal) {
        newVal.forEach((item, index) => {
          const checkItem = this.fileList.find(
            (subItem) => subItem.url === item
          )
          if (!checkItem) {
            const fileItem = {
              uid: index,
              url: item,
            }
            this.fileList.push(fileItem)
          }
        })
      },
      deep: true,
      immediate: true,
    },
  },
2.2.2 放大方法(handlePictureCardPreview)
就是打开弹窗,弹窗内容只放置图片标签,img的url就是点击事件中的file.url
   handlePictureCardPreview(file) {
     this.dialogImageUrl = file.url
     this.dialogVisible = true
   }
    <el-dialog :visible.sync="dialogVisible"
               append-to-body>
      <img width="100%"
           :src="dialogImageUrl"
           alt="">
    </el-dialog>
2.2.3 删除方法(handleRemove)
将选中的file在this.fileList数组中删除即可
    /* 移除 */
    handleRemove(file) {
      this.fileList.forEach((item, index) => {
        if (item.uid === file.uid) {
          this.fileList.splice(index, 1)
        }
      })
    },
2.2.4 重置方法(resetImageList)
主要用于父组件用于关闭修改时清空操作(防止页面缓存)
    /* 重置 */
    resetImageList() {
      this.fileList = []
    },
2.2.5 下载方法(handleDownload)
拿到img的url直接动态创建a标签
    /* 下载 */
    download (href, name) {
      let eleLink = document.createElement('a');
      eleLink.download = name;
      eleLink.href = href;
      eleLink.click();
      eleLink.remove();
    }
2.3 父组件调取
2.3.1 父组件接收值
import uploadImagesList from './uploadImagesList.vue'
  components: {
    uploadImagesList,
  },
 <uploadImagesList ref="uploadImagesRef"
                   :imageList="item.images"
                   @getImageList="getImageList"
                    />


 1万+
1万+

 被折叠的 条评论
为什么被折叠?
被折叠的 条评论
为什么被折叠?
 到【灌水乐园】发言


