


介绍
在linux kernel中通过
module_platform_driver来实现模块化平台驱动。
大量的设备驱动程序都基于该种方式来实现,使用频次非常的高,在linux kernel 5.4.124的代码中搜索module_platform_driver共有2356次引用。

这个宏的使用方式大相径庭,有一套成熟的代码书写方式,将驱动程序入口符号作为宏的参数,基本格式如下:

历史
它的定义在include/linux/platform_device.h中,从文件的名字来看可知它存在的意义是基于platform_device的。platform_device.h这个文件在2005年的linux-2.6.15就存在了。

platform_device.h在创建初期并没有现在这么多丰富的功能,通过platform_xxx_register来注册驱动和设备,并没有提供module_platform_driver这个辅助宏。
 /*
 * platform_device.h - generic, centralized driver model
 *
 * Copyright (c) 2001-2003 Patrick Mochel <mochel@osdl.org>
 *
 * This file is released under the GPLv2
 *
 * See Documentation/driver-model/ for more information.
 */

#ifndef _PLATFORM_DEVICE_H_
#define _PLATFORM_DEVICE_H_

#include <linux/device.h>

struct platform_device {
	const char	* name;
	u32		id;
	struct device	dev;
	u32		num_resources;
	struct resource	* resource;
};

#define to_platform_device(x) container_of((x), struct platform_device, dev)

extern int platform_device_register(struct platform_device *);
extern void platform_device_unregister(struct platform_device *);

extern struct bus_type platform_bus_type;
extern struct device platform_bus;

extern struct resource *platform_get_resource(struct platform_device *, unsigned int, unsigned int);
extern int platform_get_irq(struct platform_device *, unsigned int);
extern struct resource *platform_get_resource_byname(struct platform_device *, unsigned int, char *);
extern int platform_get_irq_byname(struct platform_device *, char *);
extern int platform_add_devices(struct platform_device **, int);

extern struct platform_device *platform_device_register_simple(char *, unsigned int, struct resource *, unsigned int);

extern struct platform_device *platform_device_alloc(const char *name, unsigned int id);
extern int platform_device_add_resources(struct platform_device *pdev, struct resource *res, unsigned int num);
extern int platform_device_add_data(struct platform_device *pdev, void *data, size_t size);
extern int platform_device_add(struct platform_device *pdev);
extern void platform_device_put(struct platform_device *pdev);

struct platform_driver {
	int (*probe)(struct platform_device *);
	int (*remove)(struct platform_device *);
	void (*shutdown)(struct platform_device *);
	int (*suspend)(struct platform_device *, pm_message_t state);
	int (*resume)(struct platform_device *);
	struct device_driver driver;
};

extern int platform_driver_register(struct platform_driver *);
extern void platform_driver_unregister(struct platform_driver *);

#define platform_get_drvdata(_dev)	dev_get_drvdata(&(_dev)->dev)
#define platform_set_drvdata(_dev,data)	dev_set_drvdata(&(_dev)->dev, (data))

#endif /* _PLATFORM_DEVICE_H_ */
platform_xxx_register这类宏在linux kernel 5.4.124中也在使用。
不能通过引用计数少或者版本迭代的原因来评价这两类宏谁好谁坏,各自有各自的应用场景。当使用platform_xxx_register时,基本格式也是比较固定的,例如:
static int __init ehci_platform_init(void)
{
	if (usb_disabled())
		return -ENODEV;

	ehci_init_driver(&ehci_platform_hc_driver, &platform_overrides);
	return platform_driver_register(&ehci_mv_driver);
}
module_init(ehci_platform_init);

static void __exit ehci_platform_cleanup(void)
{
	platform_driver_unregister(&ehci_mv_driver);
}
module_exit(ehci_platform_cleanup);

MODULE_DESCRIPTION("Marvell EHCI driver");
MODULE_AUTHOR("Chao Xie <chao.xie@marvell.com>");
MODULE_AUTHOR("Neil Zhang <zhangwm@marvell.com>");
MODULE_ALIAS("mv-ehci");
MODULE_LICENSE("GPL");
MODULE_DEVICE_TABLE(of, ehci_mv_dt_ids);
从2012年linux kernel 3.xx开始增加了module_platform_driver这个宏,一直延续至今。从module_platform_driver的定义处可以发现,它是platform_driver_register的一个封装应用。
#define module_platform_driver(__platform_driver) \
	module_driver(__platform_driver, platform_driver_register, \
			platform_driver_unregister)
存在的意义和原理
正如前面介绍的module_init这个宏,在使用它的时候要定义两个函数以及生命两个宏。而使用了module_platform_driver这个宏之后,只需要一行代码就可以实现这些功能。
将module_platform_driver这个宏展开之后,就是module_init这一部分代码内容。
#define module_platform_driver(__platform_driver) \
	module_driver(__platform_driver, platform_driver_register, \
			platform_driver_unregister)


#define module_driver(__driver, __register, __unregister, ...) \
static int __init __driver##_init(void) \
{ \
	return __register(&(__driver) , ##__VA_ARGS__); \
} \
module_init(__driver##_init); \
static void __exit __driver##_exit(void) \
{ \
	__unregister(&(__driver) , ##__VA_ARGS__); \
} \
module_exit(__driver##_exit);
驱动的注册与卸载方法采用了platform.c中提供的通用API。
/**
 * __platform_driver_register - register a driver for platform-level devices
 * @drv: platform driver structure
 * @owner: owning module/driver
 */
int __platform_driver_register(struct platform_driver *drv,
				struct module *owner)
{
	drv->driver.owner = owner;
	drv->driver.bus = &platform_bus_type;
	drv->driver.probe = platform_drv_probe;
	drv->driver.remove = platform_drv_remove;
	drv->driver.shutdown = platform_drv_shutdown;

	return driver_register(&drv->driver);
}
EXPORT_SYMBOL_GPL(__platform_driver_register);
module_init这个宏在include/linux/module.h中定义,在kernel初始化过程中调用do_initcall()或插入驱动ko文件时得到执行。每个驱动模块仅需实现一个module_init与module_exit即可。
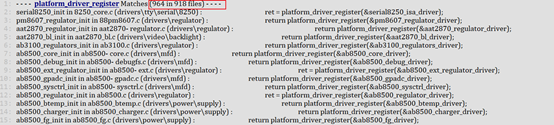
驱动代码在使用module_platform_driver注册驱动时,经过编译后的文件内容如下:

module_init宏最终是调用了__initcall(x),定义了程序链接时的初始化等级为1。
#define module_init(x)	__initcall(x);
#define __initcall(fn) __define_initcall("1", fn)
关于initcall:
#ifdef CONFIG_HAVE_ARCH_PREL32_RELOCATIONS
#define ___define_initcall(fn, id, __sec)			\
	__ADDRESSABLE(fn)					\
	asm(".section	\"" #__sec ".init\", \"a\"	\n"	\
	"__initcall_" #fn #id ":			\n"	\
	    ".long	" #fn " - .			\n"	\
	    ".previous					\n");
#else
#define ___define_initcall(fn, id, __sec) \
	static initcall_t __initcall_##fn##id __used \
		__attribute__((__section__(#__sec ".init"))) = fn;
#endif
而通过module_init定义的驱动API编译后的符号表示都增加了initcall的前缀

最后,透过一张图看清module_platform_driver声明的驱动调用流程:


 9104
9104


 被折叠的 条评论
为什么被折叠?
被折叠的 条评论
为什么被折叠?
 到【灌水乐园】发言


