


红帽初级考试模拟题
考试相关
300分 考210分 过
exam-setup
124/134
在考试期间,除了您就坐位置的台式机之外,还将使用多个虚拟系统。您不具有台式机系统的根访问权,但具有对虚拟系统的完全根访问权。
系统信息
| 系统 | IP 地址 |
|---|---|
mars.domain250.example.com | 172.25.250.100 |
venus.domain250.example.com | 172.25.250.200 |
您使用的系统属于 DNS 域 domain250.example.com。该域中的所有系统都位于 172.25.250.0/255.255.255.0 子网中,该子网中的所有系统都位于 domain250.example.com 中。
针对这些系统列出的 IP 地址是应该分配给系统的地址。您可能需要为一个或两个系统配置网络,以便能够通过上述地址访问您的地址。
帐户信息
mars 的根密码已经设置为 flectrag 。
除非另有指定,否则这将是用于访问其他系统和服务的密码。此外,除非另有指定,否则应将该密码用于您创建的什么问题帐户或者需要设置密码的任意服务。
其他信息
您可以通过 SSH 或控制台访问考试系统(参见下文所述)。请注意,SSH 访问权可能取决于您解答其他考试项目的情况。
如果您需要在系统上安装其他软件,可以使用位于以下地址的存储库:
http://content/rhel8.0/x86_64/dvd/BaseOShttp://content/rhel8.0/x86_64/dvd/AppStream
重要评测信息
您的系统会在重新引导后进行评测,因此务必确保您实施的的所有配置和服务在重新引导后仍然保留。服务必须在没有人工干预的情况下启动。
同样,本次考试使用的所有虚拟实例都必须 能够重新引导至适当的多用户目标,而无需任何人工辅助。在无法引导或无法进行无人干预引导的系统上完成的所有操作都将为零分。
考试要求
在您的系统上执行以下所有步骤。
在 mars.domain250.example.com 上执行以下任务。
○ 复查 ○ 完成 配置网络设置
将 mars 配置为具有以下网络配置:
- 主机名:
mars.domain250.example.com- IP 地址:
172.25.250.100- 子网掩码:
255.255.255.0- 网关:
172.25.250.254
[root@clear ~]# hostnamectl set-hostname mars.domain250.example.com
[root@clear ~]# hostnamectl
   Static hostname: mars.domain250.example.com
         Icon name: computer-vm
           Chassis: vm
        Machine ID: 88394775ca9147439ae63aab9c500045
           Boot ID: 1b4ec854b7c946ceae140c3c1edaaa6c
    Virtualization: kvm
  Operating System: Red Hat Enterprise Linux 8.0 (Ootpa)
       CPE OS Name: cpe:/o:redhat:enterprise_linux:8.0:GA
            Kernel: Linux 4.18.0-80.el8.x86_64
      Architecture: x86-64


[root@mars ~]# nmcli connection show
NAME                UUID                                  TYPE      DEVICE
Wired connection 1  6bc56692-0f3b-3bf9-941f-8bc9f5ff7941  ethernet  enp1s0
[root@mars ~]# nmcli connection modify "Wired connection 1" ipv4.addresses 172.25.250.100/24 gw4 172.25.250.254 ipv4.dns 172.25.250.254 ipv4.method manual
[root@mars ~]# nmcli connection reload "Wired connection 1"
[root@mars ~]# nmcli connection down  "Wired connection 1"
[root@mars ~]# nmcli connection up "Wired connection 1"
[root@mars ~]# nmcli connection show
NAME                UUID                                  TYPE      DEVICE
Wired connection 1  6bc56692-0f3b-3bf9-941f-8bc9f5ff7941  ethernet  enp1s0

[root@mars ~]# ip a
1: lo: <LOOPBACK,UP,LOWER_UP> mtu 65536 qdisc noqueue state UNKNOWN group default qlen 1000
    link/loopback 00:00:00:00:00:00 brd 00:00:00:00:00:00
    inet 127.0.0.1/8 scope host lo
       valid_lft forever preferred_lft forever
    inet6 ::1/128 scope host
       valid_lft forever preferred_lft forever
2: enp1s0: <BROADCAST,MULTICAST,UP,LOWER_UP> mtu 1500 qdisc fq_codel state UP group default qlen 1000
    link/ether 52:54:00:00:fa:0a brd ff:ff:ff:ff:ff:ff
    inet 172.25.250.100/24 brd 172.25.250.255 scope global noprefixroute enp1s0
       valid_lft forever preferred_lft forever
    inet6 fe80::e6c5:468e:edb6:9b52/64 scope link noprefixroute
       valid_lft forever preferred_lft forever
[root@mars ~]# nmcli connection show "Wired connection 1"
connection.id:                          Wired connection 1
connection.uuid:                        6bc56692-0f3b-3bf9-941f-8bc9f5ff7941
connection.stable-id:                   --
connection.type:                        802-3-ethernet  //检查
connection.interface-name:              --
connection.autoconnect:                 yes
connection.autoconnect-priority:        -999
connection.autoconnect-retries:         -1 (default)
connection.multi-connect:               0 (default)
connection.auth-retries:                -1
connection.timestamp:                   1634200507
connection.read-only:                   no
connection.permissions:                 --
connection.zone:                        --
connection.master:                      --
connection.slave-type:                  --
connection.autoconnect-slaves:          -1 (default)
connection.secondaries:                 --
connection.gateway-ping-timeout:        0
connection.metered:                     unknown
connection.lldp:                        default
connection.mdns:                        -1 (default)
connection.llmnr:                       -1 (default)
802-3-ethernet.port:                    --
802-3-ethernet.speed:                   0
802-3-ethernet.duplex:                  --
802-3-ethernet.auto-negotiate:          no
802-3-ethernet.mac-address:             52:54:00:00:FA:0A
802-3-ethernet.cloned-mac-address:      --
802-3-ethernet.generate-mac-address-mask:--
802-3-ethernet.mac-address-blacklist:   --
802-3-ethernet.mtu:                     auto
802-3-ethernet.s390-subchannels:        --
802-3-ethernet.s390-nettype:            --
802-3-ethernet.s390-options:            --
802-3-ethernet.wake-on-lan:             default
802-3-ethernet.wake-on-lan-password:    --
ipv4.method:                            manual   //检查
ipv4.dns:                               172.25.250.254  //检查
ipv4.dns-search:                        lab.example.com,example.com
ipv4.dns-options:                       ""
ipv4.dns-priority:                      0
ipv4.addresses:                         172.25.250.100/24   //检查
ipv4.gateway:                           172.25.250.254     //检查
ipv4.routes:                            --
ipv4.route-metric:                      -1
ipv4.route-table:                       0 (unspec)
ipv4.ignore-auto-routes:                no
ipv4.ignore-auto-dns:                   yes
ipv4.dhcp-client-id:                    --
ipv4.dhcp-timeout:                      0 (default)
ipv4.dhcp-send-hostname:                yes
ipv4.dhcp-hostname:                     --
ipv4.dhcp-fqdn:                         --
ipv4.never-default:                     no
ipv4.may-fail:                          yes
ipv4.dad-timeout:                       -1 (default)
ipv6.method:                            auto
ipv6.dns:                               --
ipv6.dns-search:                        --
ipv6.dns-options:                       ""
ipv6.dns-priority:                      0
ipv6.addresses:                         --
ipv6.gateway:                           --
ipv6.routes:                            --
ipv6.route-metric:                      -1
ipv6.route-table:                       0 (unspec)
ipv6.ignore-auto-routes:                no
ipv6.ignore-auto-dns:                   yes
ipv6.never-default:                     no
ipv6.may-fail:                          yes
ipv6.ip6-privacy:                       -1 (unknown)
ipv6.addr-gen-mode:                     stable-privacy
ipv6.dhcp-duid:                         --
ipv6.dhcp-send-hostname:                yes
ipv6.dhcp-hostname:                     --
ipv6.token:                             --
proxy.method:                           none
proxy.browser-only:                     no
proxy.pac-url:                          --
proxy.pac-script:                       --
GENERAL.NAME:                           Wired connection 1
GENERAL.UUID:                           6bc56692-0f3b-3bf9-941f-8bc9f5ff7941
GENERAL.DEVICES:                        enp1s0
GENERAL.STATE:                          activated
GENERAL.DEFAULT:                        yes
GENERAL.DEFAULT6:                       no
GENERAL.SPEC-OBJECT:                    --
GENERAL.VPN:                            no
GENERAL.DBUS-PATH:                      /org/freedesktop/NetworkManager/ActiveC>
GENERAL.CON-PATH:                       /org/freedesktop/NetworkManager/Setting>
GENERAL.ZONE:                           --
GENERAL.MASTER-PATH:                    --
IP4.ADDRESS[1]:                         172.25.250.100/24
IP4.GATEWAY:                            172.25.250.254
IP4.ROUTE[1]:                           dst = 172.25.250.0/24, nh = 0.0.0.0, mt>
IP4.ROUTE[2]:                           dst = 0.0.0.0/0, nh = 172.25.250.254, m>
IP4.DNS[1]:                             172.25.250.254
IP6.ADDRESS[1]:                         fe80::e6c5:468e:edb6:9b52/64
IP6.GATEWAY:                            --
IP6.ROUTE[1]:                           dst = fe80::/64, nh = ::, mt = 100
IP6.ROUTE[2]:                           dst = ff00::/8, nh = ::, mt = 256, tabl>
lines 81-102/102 (END)
○ 复查 ○ 完成 配置您的系统以使用默认存储库
配置您 的系统以使用默认存储库
- YUM 存储库已可以从
http://content/rhel8.0/x86_64/dvd/BaseOS和http://content/rhel8.0/x86_64/dvd/AppStream使用配置您的系统,以将这些位置用作默认存储库。
[root@mars ~]# cd /etc/yum.repos.d/
[root@mars yum.repos.d]# ls
aaa.repo
[root@mars yum.repos.d]# vi aaa.repo
[root@mars yum.repos.d]# cat aaa.repo
[BaseOS]
name=BaseOS
gpgcheck=0
baseurl=http://content/rhel8.0/x86_64/dvd/BaseOS
enabled=1

[AppStream]
name=AppStream
gpgcheck=0
baseurl=http://content/rhel8.0/x86_64/dvd/AppStream
enabled=1


[root@mars yum.repos.d]# yum clean all
12 files removed
[root@mars yum.repos.d]# yum makecache
AppStream                                                                       30 MB/s | 5.3 MB     00:00
BaseOS                                                                          8.2 MB/s | 2.2 MB     00:00
Last metadata expiration check: 0:00:01 ago on Thu 14 Oct 2021 04:49:17 PM CST.
Metadata cache created.


[root@mars yum.repos.d]# yum repolist
Last metadata expiration check: 0:00:16 ago on Thu 14 Oct 2021 04:47:18 PM CST.
repo id                                             repo name                                         status
AppStream                                           AppStream                                          4,672
BaseOS                                              BaseOS                                             1,658


[root@mars yum.repos.d]# yum -y install vim   //安装vim测试
Last metadata expiration check: 0:01:28 ago on Thu 14 Oct 2021 04:45:21 PM CST.
Dependencies resolved.
==============================================================================================================
 Package                     Arch                Version                         Repository              Size
==============================================================================================================
Installing:
 vim-enhanced                x86_64              2:8.0.1763-10.el8               AppStream              1.4 M
Installing dependencies:
 vim-common                  x86_64              2:8.0.1763-10.el8               AppStream              6.3 M
 vim-filesystem              noarch              2:8.0.1763-10.el8               AppStream               48 k

Transaction Summary
==============================================================================================================
Install  3 Packages

Total download size: 7.7 M
Installed size: 30 M
Downloading Packages:
(1/3): vim-filesystem-8.0.1763-10.el8.noarch.rpm                              262 kB/s |  48 kB     00:00
(2/3): vim-enhanced-8.0.1763-10.el8.x86_64.rpm                                3.5 MB/s | 1.4 MB     00:00
(3/3): vim-common-8.0.1763-10.el8.x86_64.rpm                                  9.4 MB/s | 6.3 MB     00:00
--------------------------------------------------------------------------------------------------------------
Total                                                                          12 MB/s | 7.7 MB     00:00
Running transaction check
Transaction check succeeded.
Running transaction test
Transaction test succeeded.
Running transaction
  Preparing        :                                                                                      1/1
  Installing       : vim-filesystem-2:8.0.1763-10.el8.noarch                                              1/3
  Installing       : vim-common-2:8.0.1763-10.el8.x86_64                                                  2/3
  Installing       : vim-enhanced-2:8.0.1763-10.el8.x86_64                                                3/3
  Running scriptlet: vim-enhanced-2:8.0.1763-10.el8.x86_64                                                3/3
  Running scriptlet: vim-common-2:8.0.1763-10.el8.x86_64                                                  3/3
  Verifying        : vim-common-2:8.0.1763-10.el8.x86_64                                                  1/3
  Verifying        : vim-enhanced-2:8.0.1763-10.el8.x86_64                                                2/3
  Verifying        : vim-filesystem-2:8.0.1763-10.el8.noarch                                              3/3

Installed:
  vim-enhanced-2:8.0.1763-10.el8.x86_64                   vim-common-2:8.0.1763-10.el8.x86_64
  vim-filesystem-2:8.0.1763-10.el8.noarch

Complete!
####○ 复查 ○ 完成 调试 SELinux
调试 SELinux
非标准端口
82上运行的 Web 服务器在提供内容时遇到问题。根据需要调试并解决问题,使其满足以下条件:
- 系统上的 Web 服务器能够提供
/var/www/html中所有现有的 HTML 文件(注:不要删除或以其他方式改动现有的文件内容)- Web 服务器在端口
82上提供此内容- Web 服务器在系统启动时
自动启动
[root@mars ~]# systemctl restart httpd
Job for httpd.service failed because the control process exited with error code.
See "systemctl status httpd.service" and "journalctl -xe" for details.

[root@mars ~]# yum -y install httpd
Last metadata expiration check: 0:06:11 ago on Thu 14 Oct 2021 04:58:11 PM CST.
Package httpd-2.4.37-10.module+el8+2764+7127e69e.x86_64 is already installed.
Dependencies resolved.
Nothing to do.
Complete!

[root@mars ~]#journalctl -xe
-- The result is RESULT.
Oct 14 16:50:58 mars.domain250.example.com dbus-daemon[656]: [system] Activating service name='org.fedoraproject.Setroubleshootd' requested by>
Oct 14 16:50:59 mars.domain250.example.com dbus-daemon[656]: [system] Successfully activated service 'org.fedoraproject.Setroubleshootd'
Oct 14 16:51:06 mars.domain250.example.com setroubleshoot[4698]: SELinux is preventing /usr/sbin/httpd from name_bind access on the tcp_socket>
Oct 14 16:51:06 mars.domain250.example.com platform-python[4698]: SELinux is preventing /usr/sbin/httpd from name_bind access on the tcp_socke>
                                                              *****  Plugin bind_ports (99.5 confidence) suggests   **********************>

                                                                  If you want to allow /usr/sbin/httpd to bind to network port 82
                                                                  Then you need to modify the port type.
                                                                  Do
                                                                  # semanage port -a -t PORT_TYPE -p tcp 82  //找到红色的错误
[root@mars ~]# firewall-cmd --add-port=82/tcp --permanent
[root@mars ~]# firewall-cmd --reload

[root@mars ~]# semanage port -l |grep http
http_cache_port_t              tcp      8080, 8118, 8123, 10001-10010
http_cache_port_t              udp      3130
http_port_t                    tcp      80, 81, 443, 488, 8008, 8009, 8443, 9000
pegasus_http_port_t            tcp      5988
pegasus_https_port_t           tcp      5989

[root@mars ~]# semanage port -a -t http_port_t   -p tcp 82

[root@mars ~]# semanage port -l |grep http
http_cache_port_t              tcp      8080, 8118, 8123, 10001-10010
http_cache_port_t              udp      3130
http_port_t                    tcp      82, 80, 81, 443, 488, 8008, 8009, 8443, 9000
pegasus_http_port_t            tcp      5988
pegasus_https_port_t           tcp      5989


[root@mars ~]# systemctl restart httpd
[root@mars ~]# systemctl enable httpd
[root@mars ~]# ls -lZ /var/www/html/
total 12
-rw-r--r--. 1 root root unconfined_u:object_r:default_t:s0           14 Oct 14 15:50 file1
-rw-r--r--. 1 root root unconfined_u:object_r:httpd_sys_content_t:s0 14 Oct 14 15:50 file2
-rw-r--r--. 1 root root unconfined_u:object_r:httpd_sys_content_t:s0 14 Oct 14 15:50 file3

[root@mars ~]# cd /var/www/html/
[root@mars html]# semanage fcontext -d /var/www/html/file1

[root@mars html]# ls -lZ
total 12
-rw-r--r--. 1 root root unconfined_u:object_r:default_t:s0           14 Oct 14 15:50 file1
-rw-r--r--. 1 root root unconfined_u:object_r:httpd_sys_content_t:s0 14 Oct 14 15:50 file2
-rw-r--r--. 1 root root unconfined_u:object_r:httpd_sys_content_t:s0 14 Oct 14 15:50 file3

[root@mars html]# semanage fcontext -a -t  "/var/www/html(/.*)?"
[root@mars html]# restorecon -RvF /var/www/html/file1
Relabeled /var/www/html/file1 from unconfined_u:object_r:default_t:s0 to system_u:object_r:httpd_sys_content_t:s0
[root@mars html]# ls -lZ
total 12
-rw-r--r--. 1 root root system_u:object_r:httpd_sys_content_t:s0     14 Oct 14 15:50 file1
-rw-r--r--. 1 root root unconfined_u:object_r:httpd_sys_content_t:s0 14 Oct 14 15:50 file2
-rw-r--r--. 1 root root unconfined_u:object_r:httpd_sys_content_t:s0 14 Oct 14 15:50 file3

[root@mars html]# getenforce
Enforcing
[root@mars html]# cat /etc/selinux/config

# This file controls the state of SELinux on the system.
# SELINUX= can take one of these three values:
#     enforcing - SELinux security policy is enforced.
#     permissive - SELinux prints warnings instead of enforcing.
#     disabled - No SELinux policy is loaded.
SELINUX=enforcing
# SELINUXTYPE= can take one of these three values:
#     targeted - Targeted processes are protected,
#     minimum - Modification of targeted policy. Only selected processes are protected.
#     mls - Multi Level Security protection.
SELINUXTYPE=targeted

[root@mars html]# vi /etc/httpd/conf/httpd.conf
Listen 82

[root@mars html]# systemctl restart httpd
[root@mars html]# curl http://localhost:82/file1
EX200 Testing
[root@mars html]# curl http://localhost:82/file2
EX200 Testing
[root@mars html]# curl http://localhost:82/file3
EX200 Testing
○ 复查 ○ 完成 创建用户帐户
创建用户帐户
创建下列用户、组和组成员资格:
- 名为
sysmgrs的组- 用户
natasha,作为次要组从属于sysmgrs- 用户
harry,作为次要组还从属于sysmgrs- 用户
sarah,无权访问系统上的交互式 shell且不是sysmgrs的成员natasha、harry和sarah的密码应当都是flectrag- 允许sysmgrs组成员sudo时不需要密码
- 创建新用户时,默认密码策略为20天后,密码会过期
[root@mars ~]# groupadd sysmgrs
[root@mars ~]# useradd -G sysmgrs natasha
[root@mars ~]# useradd -G sysmgrs harry
[root@mars ~]# useradd -s /sbin/nologin sarah
[root@mars ~]#
[root@mars ~]# echo "flectrag" | passwd --stdin natasha
Changing password for user natasha.
passwd: all authentication tokens updated successfully.
[root@mars ~]# echo "flectrag" | passwd --stdin harry
Changing password for user harry.
passwd: all authentication tokens updated successfully.
[root@mars ~]# echo "flectrag" | passwd --stdin sarah
Changing password for user sarah.
passwd: all authentication tokens updated successfully.
[root@mars ~]# tail -10 /etc/group
libstoragemgmt:x:987:
slocate:x:21:
devops:x:1001:
apache:x:48:
remoteuser1:x:1002:
jacques:x:1003:
sysmgrs:x:1004:natasha,harry
natasha:x:1005:
harry:x:1006:
sarah:x:1007:
[root@mars ~]# id natasha
uid=1004(natasha) gid=1005(natasha) groups=1005(natasha),1004(sysmgrs)
[root@mars ~]# id harry
uid=1005(harry) gid=1006(harry) groups=1006(harry),1004(sysmgrs)
[root@mars ~]# tail /etc/passwd
tcpdump:x:72:72::/:/sbin/nologin
student:x:1000:1000:Student User:/home/student:/bin/bash
libstoragemgmt:x:991:987:daemon account for libstoragemgmt:/var/run/lsm:/sbin/nologin
devops:x:1001:1001::/home/devops:/bin/bash
apache:x:48:48:Apache:/usr/share/httpd:/sbin/nologin
remoteuser1:x:1002:1002::/rhome/remoteuser1:/bin/bash
jacques:x:1003:1003::/home/jacques:/bin/bash
natasha:x:1004:1005::/home/natasha:/bin/bash
harry:x:1005:1006::/home/harry:/bin/bash
sarah:x:1006:1007::/home/sarah:/sbin/nologin

visudo  $
#在第111行添加
%sysmgrs  ALL=(ALL) NOPASSWD:ALL


[root@servera ~]# vi /etc/login.defs
[root@servera ~]# cat /etc/login.defs |grep PASS_MAX_DAYS
#       PASS_MAX_DAYS   Maximum number of days a password may be used.
# 将99999修改为20天
PASS_MAX_DAYS   20
○ 复查 ○ 完成 配置 cron 作业
配置 cron 作业
配置
cron作业,该作业每隔 2 分钟运行并执行以下命令:
logger "EX200 in progress",以用户natasha身份运行
[root@mars ~]# yum  provides  crond
cronie-1.5.2-2.el8.x86_64 : Cron daemon for executing programs at set times
Repo        : @System
Matched from:
Filename    : /usr/sbin/crond

cronie-1.5.2-2.el8.x86_64 : Cron daemon for executing programs at set times
Repo        : BaseOS
Matched from:
Filename    : /usr/sbin/crond


[root@mars ~]# yum -y install Crond
Last metadata expiration check: 0:00:56 ago on Thu 14 Oct 2021 08:33:33 PM CST.
No match for argument: Crond
Error: Unable to find a match
[root@mars ~]# systemctl restart crond
[root@mars ~]# systemctl enable  crond
[root@mars ~]# crontab -u natasha -e
no crontab for natasha - using an empty one
crontab: installing new crontab
[root@mars ~]# systemctl restart crond
[root@mars ~]# crontab -u  natasha  -l
*/2 * * * * logger "EX200 in progress"

*    *    *    *    *
-    -    -    -    -
|    |    |    |    |
|    |    |    |    |
|    |    |    |    +----- day of week (0 - 7) (Sunday=0 or 7)
|    |    |    +---------- month (1 - 12)
|    |    +--------------- day of month (1 - 31)
|    +-------------------- hour (0 - 23)
+------------------------- min (0 - 59)
○ 复查 ○ 完成 创建协作目录
创建具有以下特征的协作目录
/home/managers:
/home/managers的组用权是sysmgrs- 目录应当可被
sysmgrs的成员读取、写入和访问,但任何其他用户不具这些权限。(当然,root 用户有权访问系统上的所有文件和目录)/home/managers中创建的文件自动将组所有权设置到sysmgrs组
[root@mars ~]# mkdir /home/managers
[root@mars ~]# chgrp sysmgrs /home/managers/
[root@mars ~]# chmod g=rwx /home/managers/
[root@mars ~]# chmod o=--- /home/managers/
[root@mars ~]# chmod g+s /home/managers/
[root@mars ~]# ls -ld /home/managers/
drwxrws---. 2 root sysmgrs 6 Oct 14 20:44 /home/managers/
[root@mars ~]# cd /home/managers/
[root@mars managers]# touch a
[root@mars managers]# ls
a
[root@mars managers]# ls -l
total 0
-rw-r--r--. 1 root sysmgrs 0 Oct 14 20:47 a
○ 复查 ○ 安装内核升级:
内核下载地址:http://classroom.example.com/content/rhel7.0/x86_64/errata/Packages/更新内核作为系统启动的默认内核,原来的内核在系统启动的时候依然有效和可引导
[root@server0 ~]# wget  http://classroom.example.com/content/rhel7.0/x86_64/extras/Packages/kernel-3.10.0-123.1.2.el7.x86_64.rpm

[root@server0 ~]#rpm -ivh kernel-3.10.0-123.1.2.el7.x86_64.rpm
[root@server0 ~]# cd /boot
[root@server0 boot]# ls
config-3.10.0-123.1.2.el7.x86_64
config-3.10.0-123.el7.x86_64
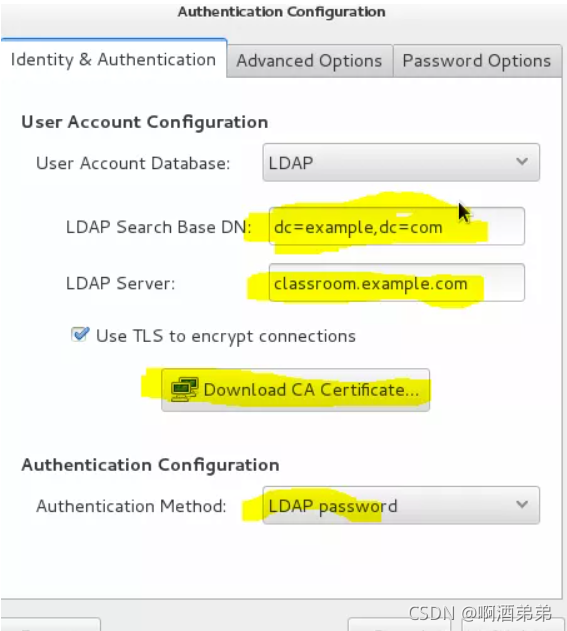
绑定外部验证服务器:
系统 classrom.example.com 提供了一个 LDAP 的验证服务,你的系统应该按以下内容绑 定服务器:验证服务的 DN:dc=example,dc=com 服务器地址:classroom.example.com 证书地址:http://classroom.example.com/pub/example-ca.crt 当正确的配置后,ldapuser1 可以登录你的系统,但是没有 home 目录,直到你完成 autofs 题目之后才可以。
#配置DNS服务器:
[root@server0 pub]# cat /etc/resolv.conf
# Generated by NetworkManager
domain example.com
search example.com
nameserver 172.25.254.254
[root@server0 pub]#
ping example.com
yum -y install sssd krb5-workstation nss-pam-ldapd authconfig-gtk
authconfig-gtk
systemctl status sssd
id ldapuser1
○ 复查 ○ 完成 配置 NTP
配置 NTP
配置您的系统,使其成为
materials.example.com的 NTP 客户端。(注:materials.example.com是classroom.example.com的 DNS 别名)
[root@mars managers]# yum provides chronyd
Last metadata expiration check: 0:14:35 ago on Thu 14 Oct 2021 08:33:33 PM CST.
chrony-3.3-3.el8.x86_64 : An NTP client/server
Repo        : @System
Matched from:
Filename    : /usr/sbin/chronyd

chrony-3.3-3.el8.x86_64 : An NTP client/server
Repo        : BaseOS
Matched from:
Filename    : /usr/sbin/chronyd

[root@mars managers]# firewall-cmd --add-service=chrony --permanent && firewall-cmd --reload
[root@mars managers]# vim /etc/chrony.conf
server  materials.example.com  iburst


[root@mars managers]# timedatectl set-ntp true && timedatectl status

[root@mars managers]# systemctl restart chronyd
[root@mars managers]# chronyc
chrony version 3.3
Copyright (C) 1997-2003, 2007, 2009-2018 Richard P. Curnow and others
chrony comes with ABSOLUTELY NO WARRANTY.  This is free software, and
you are welcome to redistribute it under certain conditions.  See the
GNU General Public License version 2 for details.

chronyc> waitsync
try: 1, refid: AC19FEFE, correction: 0.000116401, skew: 0.055
chronyc> quit
[root@mars managers]# systemctl restart chronyd
[root@mars managers]# timedatectl
               Local time: Thu 2021-10-14 21:00:04 CST
           Universal time: Thu 2021-10-14 13:00:04 UTC
                 RTC time: Thu 2021-10-14 13:04:58
                Time zone: Asia/Shanghai (CST, +0800)
System clock synchronized: yes
              NTP service: active
          RTC in local TZ: no

[root@mars managers]# systemctl restart chronyd
[root@mars managers]# systemctl enable chronyd
○ 复查 ○ 完成 配置 autofs
配置 autofs
配置
autofs,以按照如下所述自动挂载远程用户的主目录:
materials.example.com(172.25.254.254) NFS 导出/rhome到您的系统。此文件系统包含为用户remoteuser1预配置的主目录remoteuser1的主目录是materials.example.com:/rhome/remoteuser1remoteuser1的主目录应自动挂载到本地/rhome下的/rhome/remoteuser1- 主目录必须可供其用户
写入remoteuser1的密码是flectrag
1
[root@mars managers]# yum -y install autofs
[root@mars managers]# systemctl restart autofs
[root@mars managers]# systemctl enable   autofs
Created symlink /etc/systemd/system/multi-user.target.wants/autofs.service → /usr/lib/systemd/system/autofs.service.
[root@mars managers]# vim /etc/auto.master
/rhome /etc/re.autofs

[root@mars managers]# cat /etc/re.autofs
remoteuser1 -rw,sync materials.example.com:/rhome/remoteuser1
[root@master ~]# for i in rpc-bind mountd nfs;do firewall-cmd --add-service=$i;done
[root@master ~]# firewall-cmd --reload
[root@mars managers]# systemctl restart autofs
[root@mars managers]# su - remoteuser1
[root@mars managers]# echo "flectrag" |passwd --stdin remoteuser1
[root@mars managers]# df -hT
2
[root@master ~]# yum -y install nfs-utils autofs
[root@master ~]# vim /etc/auto.master
/rhome  /etc/auto.misc
[root@master ~]# vim /etc/auto.misc
remoteuser1   -fstype=nfs,rw  materials.example.com:/rhome/remoteuser1

[root@master ~]# for i in rpc-bind mountd nfs;do firewall-cmd --add-service=$i;done
[root@master ~]# firewall-cmd --reload

[root@master ~]# echo "materials.example.com:/rhome/remoteuser1  /rhome/remoteuser1  nfs  defaults 0 0">>/etc/fstab
[root@master ~]# mkdir -p /rhome/remoteuser1

[root@master ~]# showmount -e 172.25.254.254
[root@master ~]# useradd -d /rhome/remoteuser1 remoteuser1
[root@master ~]# mount -a
○ 复查 ○ 完成 配置 /var/tmp/fstab 权限
配置 /var/tmp/fstab 权限
将文件
/etc/fstab复制到/var/tmp/fstab。配置 /var/tmp/fstab 的权限以满足如下条件:
- 文件
/var/tmp/fstab自root用户所有- 文件
/var/tmp/fstab属于组root- 文件
/var/tmp/fstab应不能被任何人执行- 用户
natasha能够读取和写入/var/tmp/fstab- 用户
harry无法写入或读取/var/tmp/fstab- 所有其他用户(当前或未来)能够读取
/var/tmp/fstab
[root@mars ~]# cp /etc/fstab /var/tmp/fstab
[root@mars ~]# chown root:root /var/tmp/fstab
[root@mars ~]# cd /var/tmp/

[root@mars tmp]# ll
total 4
-rw-r--r--. 1 root root 427 Oct 14 21:25 fstab

[root@mars tmp]# chmod a-x /var/tmp/fstab
[root@mars tmp]# ll
total 4
-rw-r--r--. 1 root root 427 Oct 14 21:25 fstab

[root@mars tmp]# setfacl -m u:natasha:rw- fstab
[root@mars tmp]# setfacl -m u:harry:--- fstab
[root@mars tmp]# setfacl -m o::r-- fstab
[root@mars tmp]# getfacl fstab
# file: fstab
# owner: root
# group: root
user::rw-
user:natasha:rw-
user:harry:---
group::r--
mask::rw-
other::r--
○ 复查 ○ 完成 配置用户帐户
配置用户帐号
配置用户
manalo,其用户 ID 为3533。此用户的密码应当为flectrag。
[root@mars tmp]# useradd -u 3533 manalo
[root@mars tmp]# echo "flectrag" |passwd --stdin manalo
Changing password for user manalo.
passwd: all authentication tokens updated successfully.
[root@mars tmp]# id manalo
uid=3533(manalo) gid=3533(manalo) groups=3533(manalo)
○ 复查 ○ 完成 查找文件
查找文件
查找当
jacques所有的所有文件并将其副本放入/root/findfiles目录
[root@mars tmp]# mkdir /root/findfiles
[root@mars tmp]# find / -user jacques -exec cp -a {} /root/findfiles/ \;
find: ‘/proc/7228/task/7228/fd/7’: No such file or directory
find: ‘/proc/7228/task/7228/fdinfo/7’: No such file or directory
find: ‘/proc/7228/fd/8’: No such file or directory
find: ‘/proc/7228/fdinfo/8’: No such file or directory

[root@mars tmp]# cd /root/findfiles/
[root@mars findfiles]# ls
gamelan  jacques  libWedgeit.so.1.2.3
○ 复查 ○ 完成 查找字符串
查找字符串
查找文件
/usr/share/xml/iso-codes/iso_639_3.xml中包含字符串ng的所有行。将所有这些行的副本按原始顺序放在文件/root/list中。/root/list不得包含空行,且所有行必须是/usr/share/xml/iso-codes/iso_639_3.xml中原始行的确切副本。
[root@mars ~]# grep "ng" /usr/share/xml/iso-codes/iso_639_3.xml > /root/list
[root@mars ~]# cat /root/list
○ 复查 ○ 完成 创建存档
创建存档
创建一个名为
/root/backup.tar.gz的 tar 存档,其应包含/usr/local的 tar 存档,其应包含/usr/local的内容。该 tar 存档必须使用gzip进行压缩。
[root@mars findfiles]# tar -czvf /root/backup.tar.gz  /usr/local/

[root@mars ~]# ls
anaconda-ks.cfg  backup.tar.gz  findfiles  list  original-ks.cfg
[root@mars ~]# tar -tf backup.tar.gz
最后最好做个验证
[root@mars ~]# systemctl enable httpd
[root@mars ~]# systemctl enable crond
[root@mars ~]# systemctl enable chronyd
[root@mars ~]# systemctl enable autofs
[root@mars ~]# reboot
Connection to 172.25.250.100 closed by remote host.
Connection to 172.25.250.100 closed.
在 venus.domain250.example.com 上执行以下任务。
○ 复查 ○ 完成 设置 root 密码
设置 root 密码
将 venus 的 root 密码设置为
flectrag。您需要获得系统访问权限才能进行此操作。
![[外链图片转存失败,源站可能有防盗链机制,建议将图片保存下来直接上传(img-pUxZZn7x-1634607713145)(F:\桌面\红帽初级.assets\image-20211014220427767.png)]](https://i-blog.csdnimg.cn/blog_migrate/bfe0c2140b25b81021ec761e55589111.png)
![[外链图片转存失败,源站可能有防盗链机制,建议将图片保存下来直接上传(img-lvPOQMT1-1634607713146)(F:\桌面\红帽初级.assets\image-20211014220646091.png)]](https://i-blog.csdnimg.cn/blog_migrate/f0b2c2d3255586ce8ff14369e45c61a6.png)
开机出现linux图标后第一项(行)按e-->linux开头的行中将ro改为rw rd.break并将同行后面的全部删除------
ctrl+x      # 保存并退出
chroot  /sysroot    #切换文件系统
echo "flectrag" | passwd --stdin root    #修改root密码
touch /.autorelabel       # 创建selinux相关文件,单词不要拼错,这里是个雷点
exit
exit

注:如该题完不成,下面的题全部可忽略,因为你进不去系统
[kiosk@foundation0 ~]$ ssh root@172.25.250.200
Warning: Permanently added '172.25.250.200' (ECDSA) to the list of known hosts.
Activate the web console with: systemctl enable --now cockpit.socket

Last login: Thu Oct 14 15:50:23 2021 from 172.25.250.250
○ 复查 ○ 完成 配置您的系统以使用默认存储库
配置您 的系统以使用默认存储库
- YUM 存储库已可以从
http://content/rhel8.0/x86_64/dvd/BaseOS和http://content/rhel8.0/x86_64/dvd/AppStream使用配置您的系统,以将这些位置用作默认存储库。
[root@venus ~]# cd /etc/yum.repos.d/
[root@venus yum.repos.d]# ls
[root@venus yum.repos.d]# scp 172.25.250.100:/etc/yum.repos.d/* /etc/yum.repos.d/
The authenticity of host '172.25.250.100 (172.25.250.100)' can't be established.
ECDSA key fingerprint is SHA256:BCd8VCfEpGbUo3zb1De0hd1Q5nOMEzYNpMFu5o7j4Fg.
Are you sure you want to continue connecting (yes/no)? yes
Warning: Permanently added '172.25.250.100' (ECDSA) to the list of known hosts.
root@172.25.250.100's password:
aaa.repo                                                   100%  192    26.0KB/s   00:00
[root@venus yum.repos.d]#
[root@venus yum.repos.d]# ls
aaa.repo
[root@venus yum.repos.d]#
[root@venus yum.repos.d]# yum clean all
0 files removed
[root@venus yum.repos.d]# yum makecache
AppStream                                                    6.6 MB/s | 5.3 MB     00:00
BaseOS                                                       6.9 MB/s | 2.2 MB     00:00
yLast metadata expiration check: 0:00:01 ago on Thu 14 Oct 2021 10:05:12 PM CST.
um Metadata cache created.
[root@venus yum.repos.d]# yum repolist
Last metadata expiration check: 0:00:07 ago on Thu 14 Oct 2021 10:05:12 PM CST.
repo id                                    repo name                                   status
AppStream                                  AppStream                                   4,672
BaseOS                                     BaseOS                                      1,658
○ 复查 ○ 完成 调整逻辑卷大小
设置逻辑卷大小
将逻辑卷
vo及其文件系统的大小调整到230MiB。确保文件系统内容保持不变。注:分区大小很少与请求的大小完全相同,因此可以接受范围为217MiB 到243MiB 的大小。
[root@venus yum.repos.d]# df -h
Filesystem            Size  Used Avail Use% Mounted on
devtmpfs              388M     0  388M   0% /dev
tmpfs                 411M     0  411M   0% /dev/shm
tmpfs                 411M   22M  390M   6% /run
tmpfs                 411M     0  411M   0% /sys/fs/cgroup
/dev/vda1              10G  1.5G  8.6G  15% /
/dev/mapper/myvol-vo  175M  1.6M  160M   1% /reports
tmpfs                  83M     0   83M   0% /run/user/0
[root@venus yum.repos.d]# cd /reports/
[root@venus reports]# ls
file1  file2  file3  lost+found


[root@venus yum.repos.d]# vgs
  VG     #PV #LV #SN Attr   VSize   VFree
  myvol    1   1   0 wz--n- 484.00m 300.00m
  vgroup   1   1   0 wz--n-   1.17g 688.00m
[root@venus yum.repos.d]# lvs
  LV   VG     Attr       LSize   Pool Origin Data%  Meta%  Move Log Cpy%Sync Convert
  vo   myvol  -wi-ao---- 184.00m
  swap vgroup -wi-ao---- 512.00m

[root@venus yum.repos.d]# cd /reports/
[root@venus reports]# ls
file1  file2  file3  lost+found

[root@venus reports]# cat file1
[root@venus reports]# lvextend -L 230M /dev/myvol/vo
  Rounding size to boundary between physical extents: 232.00 MiB.
  Size of logical volume myvol/vo changed from 184.00 MiB (46 extents) to 232.00 MiB (58 extents).
  Logical volume myvol/vo successfully resized.
[root@venus reports]# lvs
  LV   VG     Attr       LSize   Pool Origin Data%  Meta%  Move Log Cpy%Sync Convert
  vo   myvol  -wi-ao---- 232.00m
  swap vgroup -wi-ao---- 512.00m
[root@venus reports]# df -h
Filesystem            Size  Used Avail Use% Mounted on
devtmpfs              388M     0  388M   0% /dev
tmpfs                 411M     0  411M   0% /dev/shm
tmpfs                 411M   22M  390M   6% /run
tmpfs                 411M     0  411M   0% /sys/fs/cgroup
/dev/vda1              10G  1.5G  8.6G  15% /
/dev/mapper/myvol-vo  175M  1.6M  160M   1% /reports
tmpfs                  83M     0   83M   0% /run/user/0
[root@venus reports]# blkid
/dev/vda1: UUID="884f47c9-a69d-4c5b-915d-6b7c9c74c923" TYPE="xfs" PARTUUID="16a1e057-01"
/dev/vda2: UUID="Pzdy9K-I9qQ-C3dI-etOb-il7B-rqNS-IfPET7" TYPE="LVM2_member" PARTUUID="16a1e057-02"
/dev/vdb1: UUID="dwVWr0-9tdm-4lks-QxJm-rUiK-y2LP-VXaqUN" TYPE="LVM2_member" PARTLABEL="primary" PARTUUID="f129fb4c-cfb9-457a-a866-8acb86bd82eb"
/dev/mapper/myvol-vo: UUID="124ca025-16a6-4b5e-9ab8-592be2dd7dc3" TYPE="ext4"
/dev/mapper/vgroup-swap: UUID="92372874-b8ca-4cac-8e5d-a119b31273e7" TYPE="swap"
[root@venus reports]# resize2fs /dev/myvol/vo
resize2fs 1.44.3 (10-July-2018)
Filesystem at /dev/myvol/vo is mounted on /reports; on-line resizing required
old_desc_blocks = 2, new_desc_blocks = 2
The filesystem on /dev/myvol/vo is now 237568 (1k) blocks long.

[root@venus reports]# df -h
Filesystem            Size  Used Avail Use% Mounted on
devtmpfs              388M     0  388M   0% /dev
tmpfs                 411M     0  411M   0% /dev/shm
tmpfs                 411M   22M  390M   6% /run
tmpfs                 411M     0  411M   0% /sys/fs/cgroup
/dev/vda1              10G  1.5G  8.6G  15% /
/dev/mapper/myvol-vo  221M  2.1M  204M   1% /reports
tmpfs                  83M     0   83M   0% /run/user/0
○ 复查 ○ 完成 添加交换分区
添加交换分区
向您的系统添加一个额外的交换分区
756MiB。交换分区应在系统启动时自动挂载。不要删除或以任何方式改动系统上的任何现有交换分区。
[root@venus reports]# free -m
              total        used        free      shared  buff/cache   available
Mem:            821         192         289          18         339         477
Swap:           511           2         509
[root@venus reports]# bc
bc 1.07.1
Copyright 1991-1994, 1997, 1998, 2000, 2004, 2006, 2008, 2012-2017 Free Software Foundation, Inc.
This is free software with ABSOLUTELY NO WARRANTY.
For details type `warranty'.
511+756
1267
^C
(interrupt) Exiting bc.
[root@venus reports]# lsblk
NAME            MAJ:MIN RM   SIZE RO TYPE MOUNTPOINT
vda             252:0    0    16G  0 disk
├─vda1          252:1    0    10G  0 part /
└─vda2          252:2    0   1.2G  0 part
  └─vgroup-swap 253:1    0   512M  0 lvm  [SWAP]
vdb             252:16   0     5G  0 disk
└─vdb1          252:17   0 487.8M  0 part
  └─myvol-vo    253:0    0   232M  0 lvm  /reports
vdc             252:32   0    10G  0 disk
[root@venus reports]# fdisk /dev/vdb

Welcome to fdisk (util-linux 2.32.1).
Changes will remain in memory only, until you decide to write them.
Be careful before using the write command.


Command (m for help): p
Disk /dev/vdb: 5 GiB, 5368709120 bytes, 10485760 sectors
Units: sectors of 1 * 512 = 512 bytes
Sector size (logical/physical): 512 bytes / 512 bytes
I/O size (minimum/optimal): 512 bytes / 512 bytes
Disklabel type: gpt
Disk identifier: 878F1440-4B35-4DA6-90C3-E69F611398C1

Device     Start     End Sectors   Size Type
/dev/vdb1   1024 1000000  998977 487.8M Linux filesystem

Command (m for help): n
Partition number (2-128, default 2):
First sector (1000001-10485726, default 1001472):
Last sector, +sectors or +size{K,M,G,T,P} (1001472-10485726, default 10485726): +756M

Created a new partition 2 of type 'Linux filesystem' and of size 756 MiB.

Command (m for help): t
Partition number (1,2, default 2):
Partition type (type L to list all types): l
  1 EFI System                     C12A7328-F81F-11D2-BA4B-00A0C93EC93B
  2 MBR partition scheme           024DEE41-33E7-11D3-9D69-0008C781F39F
  3 Intel Fast Flash               D3BFE2DE-3DAF-11DF-BA40-E3A556D89593
  4 BIOS boot                      21686148-6449-6E6F-744E-656564454649
  5 Sony boot partition            F4019732-066E-4E12-8273-346C5641494F
  6 Lenovo boot partition          BFBFAFE7-A34F-448A-9A5B-6213EB736C22
  7 PowerPC PReP boot              9E1A2D38-C612-4316-AA26-8B49521E5A8B
  8 ONIE boot                      7412F7D5-A156-4B13-81DC-867174929325
  9 ONIE config                    D4E6E2CD-4469-46F3-B5CB-1BFF57AFC149
 10 Microsoft reserved             E3C9E316-0B5C-4DB8-817D-F92DF00215AE
 11 Microsoft basic data           EBD0A0A2-B9E5-4433-87C0-68B6B72699C7
 12 Microsoft LDM metadata         5808C8AA-7E8F-42E0-85D2-E1E90434CFB3
 13 Microsoft LDM data             AF9B60A0-1431-4F62-BC68-3311714A69AD
 14 Windows recovery environment   DE94BBA4-06D1-4D40-A16A-BFD50179D6AC
 15 IBM General Parallel Fs        37AFFC90-EF7D-4E96-91C3-2D7AE055B174
 16 Microsoft Storage Spaces       E75CAF8F-F680-4CEE-AFA3-B001E56EFC2D
 17 HP-UX data                     75894C1E-3AEB-11D3-B7C1-7B03A0000000
 18 HP-UX service                  E2A1E728-32E3-11D6-A682-7B03A0000000
 19 Linux swap                     0657FD6D-A4AB-43C4-84E5-0933C84B4F4F
 20 Linux filesystem               0FC63DAF-8483-4772-8E79-3D69D8477DE4
 21 Linux server data              3B8F8425-20E0-4F3B-907F-1A25A76F98E8
 22 Linux root (x86)               44479540-F297-41B2-9AF7-D131D5F0458A
 23 Linux root (ARM)               69DAD710-2CE4-4E3C-B16C-21A1D49ABED3
 24 Linux root (x86-64)            4F68BCE3-E8CD-4DB1-96E7-FBCAF984B709
 25 Linux root (ARM-64)            B921B045-1DF0-41C3-AF44-4C6F280D3FAE
 26 Linux root  (IA-64)             993D8D3D-F80E-4225-855A-9DAF8ED7EA97
 27 Linux reserved                 8DA63339-0007-60C0-C436-083AC8230908

Partition type (type L to list all types): 19

Changed type of partition 'Linux filesystem' to 'Linux swap'.

Command (m for help): w
The partition table has been altered.
Syncing disks.

[root@venus reports]# partprobe

[root@venus reports]# lsblk
NAME            MAJ:MIN RM   SIZE RO TYPE MOUNTPOINT
vda             252:0    0    16G  0 disk
├─vda1          252:1    0    10G  0 part /
└─vda2          252:2    0   1.2G  0 part
  └─vgroup-swap 253:1    0   512M  0 lvm  [SWAP]
vdb             252:16   0     5G  0 disk
├─vdb1          252:17   0 487.8M  0 part
│ └─myvol-vo    253:0    0   232M  0 lvm  /reports
└─vdb2          252:18   0   756M  0 part
vdc             252:32   0    10G  0 disk

[root@venus reports]# mkswap /dev/vdb2
Setting up swapspace version 1, size = 756 MiB (792719360 bytes)
no label, UUID=e4d31cc0-7386-4600-b9f3-6f297605158c


[root@venus reports]# vi /etc/fstab
[root@venus reports]# cat /etc/fstab
UUID=e4d31cc0-7386-4600-b9f3-6f297605158c swap swap defaults 0 0


[root@venus reports]# mount -a
[root@venus reports]# free -m
              total        used        free      shared  buff/cache   available
Mem:            821         193         284          18         343         477
Swap:           511           2         509
[root@venus reports]# swapon -a
[root@venus reports]# free -m
              total        used        free      shared  buff/cache   available
Mem:            821         194         283          18         343         476
Swap:          1267           2        1265
○ 复查 ○ 完成 创建逻辑卷
创建逻辑卷
根据如下要求,创建新的逻辑卷:
- 逻辑卷取名为
qa,属于qagroup卷组,大小为60个扩展块qagroup卷组中逻辑卷的扩展块大小应当为16 MiB- 使用
ext3文件系统格式化新逻辑卷。该逻辑卷应在系统启动时自动挂载到/mnt/qa下- (lv : database 大小是50个PE=800M(实际分1G, 因为有空间损耗), PE 大小是16M (默认是4M) vg: datastore PE=16M格式: ext3)
[root@venus reports]# bc
bc 1.07.1
Copyright 1991-1994, 1997, 1998, 2000, 2004, 2006, 2008, 2012-2017 Free Software Foundation, Inc.
This is free software with ABSOLUTELY NO WARRANTY.
For details type `warranty'.
60+16
76
^C
(interrupt) Exiting bc.


[root@venus reports]# fdisk /dev/vdb

Welcome to fdisk (util-linux 2.32.1).
Changes will remain in memory only, until you decide to write them.
Be careful before using the write command.


Command (m for help): p
Disk /dev/vdb: 5 GiB, 5368709120 bytes, 10485760 sectors
Units: sectors of 1 * 512 = 512 bytes
Sector size (logical/physical): 512 bytes / 512 bytes
I/O size (minimum/optimal): 512 bytes / 512 bytes
Disklabel type: gpt
Disk identifier: 878F1440-4B35-4DA6-90C3-E69F611398C1

Device       Start     End Sectors   Size Type
/dev/vdb1     1024 1000000  998977 487.8M Linux filesystem
/dev/vdb2  1001472 2549759 1548288   756M Linux swap

Command (m for help): n
Partition number (3-128, default 3):
First sector (2549760-10485726, default 2549760):
Last sector, +sectors or +size{K,M,G,T,P} (2549760-10485726, default 10485726): +1G

Created a new partition 3 of type 'Linux filesystem' and of size 1 GiB.

Command (m for help): t
Partition number (1-3, default 3):
Partition type (type L to list all types): l
  1 EFI System                     C12A7328-F81F-11D2-BA4B-00A0C93EC93B
  2 MBR partition scheme           024DEE41-33E7-11D3-9D69-0008C781F39F
  3 Intel Fast Flash               D3BFE2DE-3DAF-11DF-BA40-E3A556D89593
  4 BIOS boot                      21686148-6449-6E6F-744E-656564454649
  5 Sony boot partition            F4019732-066E-4E12-8273-346C5641494F
  6 Lenovo boot partition          BFBFAFE7-A34F-448A-9A5B-6213EB736C22
  7 PowerPC PReP boot              9E1A2D38-C612-4316-AA26-8B49521E5A8B
  8 ONIE boot                      7412F7D5-A156-4B13-81DC-867174929325
  9 ONIE config                    D4E6E2CD-4469-46F3-B5CB-1BFF57AFC149
 10 Microsoft reserved             E3C9E316-0B5C-4DB8-817D-F92DF00215AE
 11 Microsoft basic data           EBD0A0A2-B9E5-4433-87C0-68B6B72699C7
 12 Microsoft LDM metadata         5808C8AA-7E8F-42E0-85D2-E1E90434CFB3
 13 Microsoft LDM data             AF9B60A0-1431-4F62-BC68-3311714A69AD
 14 Windows recovery environment   DE94BBA4-06D1-4D40-A16A-BFD50179D6AC
 15 IBM General Parallel Fs        37AFFC90-EF7D-4E96-91C3-2D7AE055B174
 16 Microsoft Storage Spaces       E75CAF8F-F680-4CEE-AFA3-B001E56EFC2D
 17 HP-UX data                     75894C1E-3AEB-11D3-B7C1-7B03A0000000
 18 HP-UX service                  E2A1E728-32E3-11D6-A682-7B03A0000000
 19 Linux swap                     0657FD6D-A4AB-43C4-84E5-0933C84B4F4F
 20 Linux filesystem               0FC63DAF-8483-4772-8E79-3D69D8477DE4
 21 Linux server data              3B8F8425-20E0-4F3B-907F-1A25A76F98E8
 22 Linux root (x86)               44479540-F297-41B2-9AF7-D131D5F0458A
 23 Linux root (ARM)               69DAD710-2CE4-4E3C-B16C-21A1D49ABED3
 24 Linux root (x86-64)            4F68BCE3-E8CD-4DB1-96E7-FBCAF984B709
 25 Linux root (ARM-64)            B921B045-1DF0-41C3-AF44-4C6F280D3FAE
 26 Linux root  (IA-64)             993D8D3D-F80E-4225-855A-9DAF8ED7EA97
 27 Linux reserved                 8DA63339-0007-60C0-C436-083AC8230908
 28 Linux home                     933AC7E1-2EB4-4F13-B844-0E14E2AEF915
 29 Linux RAID                     A19D880F-05FC-4D3B-A006-743F0F84911E
 30 Linux extended boot            BC13C2FF-59E6-4262-A352-B275FD6F7172
 31 Linux LVM                      E6D6D379-F507-44C2-A23C-238F2A3DF928
 32 FreeBSD data                   516E7CB4-6ECF-11D6-8FF8-00022D09712B

Partition type (type L to list all types): 31

Changed type of partition 'Linux filesystem' to 'Linux LVM'.

Command (m for help): p
Disk /dev/vdb: 5 GiB, 5368709120 bytes, 10485760 sectors
Units: sectors of 1 * 512 = 512 bytes
Sector size (logical/physical): 512 bytes / 512 bytes
I/O size (minimum/optimal): 512 bytes / 512 bytes
Disklabel type: gpt
Disk identifier: 878F1440-4B35-4DA6-90C3-E69F611398C1

Device       Start     End Sectors   Size Type
/dev/vdb1     1024 1000000  998977 487.8M Linux filesystem
/dev/vdb2  1001472 2549759 1548288   756M Linux swap
/dev/vdb3  2549760 4646911 2097152     1G Linux LVM

Command (m for help): w
The partition table has been altered.
Syncing disks.

[root@venus reports]# lsblk
NAME            MAJ:MIN RM   SIZE RO TYPE MOUNTPOINT
vda             252:0    0    16G  0 disk
├─vda1          252:1    0    10G  0 part /
└─vda2          252:2    0   1.2G  0 part
  └─vgroup-swap 253:1    0   512M  0 lvm  [SWAP]
vdb             252:16   0     5G  0 disk
├─vdb1          252:17   0 487.8M  0 part
│ └─myvol-vo    253:0    0   232M  0 lvm  /reports
├─vdb2          252:18   0   756M  0 part [SWAP]
└─vdb3          252:19   0     1G  0 part
vdc             252:32   0    10G  0 disk
[root@venus reports]# partprobe
[root@venus reports]# pvcreate /dev/vdb3
  Physical volume "/dev/vdb3" successfully created.
[root@venus reports]# vgcreate -s 16M qagroup /dev/vdb3
  Volume group "qagroup" successfully created
[root@venus reports]# vgdisplay
  --- Volume group ---
  VG Name               qagroup
  System ID
  Format                lvm2
  Metadata Areas        1
  Metadata Sequence No  1
  VG Access             read/write
  VG Status             resizable
  MAX LV                0
  Cur LV                0
  Open LV               0
  Max PV                0
  Cur PV                1
  Act PV                1
  VG Size               1008.00 MiB
  PE Size               16.00 MiB
  Total PE              63
  Alloc PE / Size       0 / 0
  Free  PE / Size       63 / 1008.00 MiB
  VG UUID               ebVGqa-5DgB-FW0F-5uqJ-0Xkp-tcR0-ED1qom

  --- Volume group ---
  VG Name               myvol
  System ID
  Format                lvm2
  Metadata Areas        1
  Metadata Sequence No  3
  VG Access             read/write
  VG Status             resizable
  MAX LV                0
  Cur LV                1
  Open LV               1
  Max PV                0
  Cur PV                1
  Act PV                1
  VG Size               484.00 MiB
  PE Size               4.00 MiB
  Total PE              121
  Alloc PE / Size       58 / 232.00 MiB
  Free  PE / Size       63 / 252.00 MiB
  VG UUID               XMW07t-4oQG-GwPv-IdUD-HU88-DMQV-l3spfj

  --- Volume group ---
  VG Name               vgroup
  System ID
  Format                lvm2
  Metadata Areas        1
  Metadata Sequence No  2
  VG Access             read/write
  VG Status             resizable
  MAX LV                0
  Cur LV                1
  Open LV               1
  Max PV                0
  Cur PV                1
  Act PV                1
  VG Size               1.17 GiB
  PE Size               4.00 MiB
  Total PE              300
  Alloc PE / Size       128 / 512.00 MiB
  Free  PE / Size       172 / 688.00 MiB
  VG UUID               wbdJCU-7c9O-gxR2-6LpW-yu1m-4SkJ-h7LPgU

[root@venus reports]# lvcreate -l 60 -n  qa qagroup
  Logical volume "qa" created.


[root@venus reports]# lvdisplay
  --- Logical volume ---
  LV Path                /dev/qagroup/qa
  LV Name                qa
  VG Name                qagroup
  LV UUID                wxxUY4-pnvx-OdEu-8bMB-gfhv-jBMX-EVcRQd
  LV Write Access        read/write
  LV Creation host, time venus.domain250.example.com, 2021-10-14 23:08:38 +0800
  LV Status              available
  # open                 0
  LV Size                960.00 MiB
  Current LE             60
  Segments               1
  Allocation             inherit
  Read ahead sectors     auto
  - currently set to     8192
  Block device           253:2

  --- Logical volume ---
  LV Path                /dev/myvol/vo
  LV Name                vo
  VG Name                myvol
  LV UUID                b3pe1B-Duvf-sj32-tnIQ-3m5F-2t7s-KWuzN6
  LV Write Access        read/write
  LV Creation host, time venus.domain250.example.com, 2021-10-14 15:50:35 +0800
  LV Status              available
  # open                 1
  LV Size                232.00 MiB
  Current LE             58
  Segments               1
  Allocation             inherit
  Read ahead sectors     auto
  - currently set to     8192
  Block device           253:0

  --- Logical volume ---
  LV Path                /dev/vgroup/swap
  LV Name                swap
  VG Name                vgroup
  LV UUID                PEPFYI-WAyn-NcS6-LEqO-9oFc-V2hA-FdBqVV
  LV Write Access        read/write
  LV Creation host, time venus.domain250.example.com, 2021-10-14 15:50:37 +0800
  LV Status              available
  # open                 2
  LV Size                512.00 MiB
  Current LE             128
  Segments               1
  Allocation             inherit
  Read ahead sectors     auto
  - currently set to     8192
  Block device           253:1

[root@venus reports]# mkdir /mnt/qa -p
[root@venus reports]# mkfs.ext3 /dev/qagroup/qa
mke2fs 1.44.3 (10-July-2018)
Creating filesystem with 245760 4k blocks and 61440 inodes
Filesystem UUID: dd37dca7-19fa-454b-af70-8bb3812e0510
Superblock backups stored on blocks:
        32768, 98304, 163840, 229376

Allocating group tables: done
Writing inode tables: done
Creating journal (4096 blocks): done
Writing superblocks and filesystem accounting information: done

[root@venus reports]# blkid
/dev/vda1: UUID="884f47c9-a69d-4c5b-915d-6b7c9c74c923" TYPE="xfs" PARTUUID="16a1e057-01"
/dev/vda2: UUID="Pzdy9K-I9qQ-C3dI-etOb-il7B-rqNS-IfPET7" TYPE="LVM2_member" PARTUUID="16a1e057-02"
/dev/vdb1: UUID="dwVWr0-9tdm-4lks-QxJm-rUiK-y2LP-VXaqUN" TYPE="LVM2_member" PARTLABEL="primary" PARTUUID="f129fb4c-cfb9-457a-a866-8acb86bd82eb"
/dev/mapper/myvol-vo: UUID="124ca025-16a6-4b5e-9ab8-592be2dd7dc3" TYPE="ext4"
/dev/mapper/vgroup-swap: UUID="92372874-b8ca-4cac-8e5d-a119b31273e7" TYPE="swap"
/dev/vdb2: UUID="e4d31cc0-7386-4600-b9f3-6f297605158c" TYPE="swap" PARTUUID="80ddb037-3362-7a44-9755-2979ec64764b"
/dev/vdb3: UUID="ae4pA0-DI6X-eaIU-wi7E-W6sq-PROh-ode5gu" TYPE="LVM2_member" PARTUUID="614714ba-83e1-7a4e-bcbe-bde3cddbfcab"
/dev/mapper/qagroup-qa: UUID="dd37dca7-19fa-454b-af70-8bb3812e0510" SEC_TYPE="ext2" TYPE="ext3"


[root@venus reports]# vi /etc/fstab
UUID=dd37dca7-19fa-454b-af70-8bb3812e0510 /mnt/qa ext3 defaults 0 0
[root@venus reports]# mount -a
[root@venus reports]# df -h
Filesystem              Size  Used Avail Use% Mounted on
devtmpfs                388M     0  388M   0% /dev
tmpfs                   411M     0  411M   0% /dev/shm
tmpfs                   411M   22M  390M   6% /run
tmpfs                   411M     0  411M   0% /sys/fs/cgroup
/dev/vda1                10G  1.5G  8.6G  15% /
/dev/mapper/myvol-vo    221M  2.1M  204M   1% /reports
tmpfs                    83M     0   83M   0% /run/user/0
/dev/mapper/qagroup-qa  929M  1.2M  880M   1% /mnt/qa
○ 复查 ○ 完成 创建 VDO 卷
创建 VDO 卷
根据如下要求,创建新的
VDO卷:
- 使用未分区的磁盘
- 该卷的名称为
vdough- 该卷的逻辑大小为
50G- 该卷使用
xfs文件系统格式化- 该卷(在系统启动时)挂载到
/vbread下
[root@venus ~]# yum -y install vdo kmod-kvdo

[root@venus ~]# lsblk
NAME            MAJ:MIN RM   SIZE RO TYPE MOUNTPOINT
vda             252:0    0    16G  0 disk
├─vda1          252:1    0    10G  0 part /
└─vda2          252:2    0   1.2G  0 part
  └─vgroup-swap 253:1    0   512M  0 lvm  [SWAP]
vdb             252:16   0     5G  0 disk
├─vdb1          252:17   0 487.8M  0 part
│ └─myvol-vo    253:0    0   232M  0 lvm  /reports
├─vdb2          252:18   0   756M  0 part [SWAP]
└─vdb3          252:19   0     1G  0 part
  └─qagroup-qa  253:2    0   960M  0 lvm  /mnt/qa
vdc             252:32   0    10G  0 disk
[root@venus ~]#  vdo  create --name=vdough --device=/dev/vdc --vdoLogicalSize=50G
Creating VDO vdough
Starting VDO vdough
Starting compression on VDO vdough
VDO instance 0 volume is ready at /dev/mapper/vdough
[root@venus ~]# lsblk
NAME            MAJ:MIN RM   SIZE RO TYPE MOUNTPOINT
vda             252:0    0    16G  0 disk
├─vda1          252:1    0    10G  0 part /
└─vda2          252:2    0   1.2G  0 part
  └─vgroup-swap 253:1    0   512M  0 lvm  [SWAP]
vdb             252:16   0     5G  0 disk
├─vdb1          252:17   0 487.8M  0 part
│ └─myvol-vo    253:0    0   232M  0 lvm  /reports
├─vdb2          252:18   0   756M  0 part [SWAP]
└─vdb3          252:19   0     1G  0 part
  └─qagroup-qa  253:2    0   960M  0 lvm  /mnt/qa
vdc             252:32   0    10G  0 disk
└─vdough        253:3    0    50G  0 vdo


[root@venus ~]# vdo list
vdough
[root@venus ~]# vdo start -a
Starting VDO vdough
VDO instance 0 volume is ready at /dev/mapper/vdough

[root@venus ~]# mkdir /vbread
[root@venus ~]# mkfs.xfs -K /dev/mapper/vdough
meta-data=/dev/mapper/vdough     isize=512    agcount=4, agsize=3276800 blks
         =                       sectsz=4096  attr=2, projid32bit=1
         =                       crc=1        finobt=1, sparse=1, rmapbt=0
         =                       reflink=1
data     =                       bsize=4096   blocks=13107200, imaxpct=25
         =                       sunit=0      swidth=0 blks
naming   =version 2              bsize=4096   ascii-ci=0, ftype=1
log      =internal log           bsize=4096   blocks=6400, version=2
         =                       sectsz=4096  sunit=1 blks, lazy-count=1
realtime =none                   extsz=4096   blocks=0, rtextents=0
[root@venus ~]# blkid
/dev/vda1: UUID="884f47c9-a69d-4c5b-915d-6b7c9c74c923" TYPE="xfs" PARTUUID="16a1e057-01"
/dev/vda2: UUID="Pzdy9K-I9qQ-C3dI-etOb-il7B-rqNS-IfPET7" TYPE="LVM2_member" PARTUUID="16a1e057-02"
/dev/vdb1: UUID="dwVWr0-9tdm-4lks-QxJm-rUiK-y2LP-VXaqUN" TYPE="LVM2_member" PARTLABEL="primary" PARTUUID="f129fb4c-cfb9-457a-a866-8acb86bd82eb"
/dev/mapper/myvol-vo: UUID="124ca025-16a6-4b5e-9ab8-592be2dd7dc3" TYPE="ext4"
/dev/mapper/vgroup-swap: UUID="92372874-b8ca-4cac-8e5d-a119b31273e7" TYPE="swap"
/dev/vdb2: UUID="e4d31cc0-7386-4600-b9f3-6f297605158c" TYPE="swap" PARTUUID="80ddb037-3362-7a44-9755-2979ec64764b"
/dev/vdb3: UUID="ae4pA0-DI6X-eaIU-wi7E-W6sq-PROh-ode5gu" TYPE="LVM2_member" PARTUUID="614714ba-83e1-7a4e-bcbe-bde3cddbfcab"
/dev/mapper/qagroup-qa: UUID="dd37dca7-19fa-454b-af70-8bb3812e0510" TYPE="ext3"
/dev/vdc: UUID="d1effaf0-5a63-45af-82b7-ab6bfbca7163" TYPE="vdo"
/dev/mapper/vdough: UUID="a8bc6e91-942f-46df-816f-8009ea321807" TYPE="xfs"

[root@venus ~]# vi /etc/fstab
UUID=a8bc6e91-942f-46df-816f-8009ea321807 /vbread xfs _netdev,defaults 0 0

[root@venus ~]# df -h
Filesystem              Size  Used Avail Use% Mounted on
devtmpfs                388M     0  388M   0% /dev
tmpfs                   411M     0  411M   0% /dev/shm
tmpfs                   411M   22M  390M   6% /run
tmpfs                   411M     0  411M   0% /sys/fs/cgroup
/dev/vda1                10G  1.5G  8.6G  15% /
/dev/mapper/myvol-vo    221M  2.1M  204M   1% /reports
tmpfs                    83M     0   83M   0% /run/user/0
/dev/mapper/qagroup-qa  929M  1.2M  880M   1% /mnt/qa
/dev/mapper/vdough       50G  390M   50G   1% /vbread
○ 复查 ○ 完成 配置系统调优
配置系统调优
为您的系统选择建议的
tuned配置集并将它设为默认设置。
[root@servera ~]# yum -y install tuned
Last metadata expiration check: 0:17:39 ago on Mon 18 Oct 2021 11:00:27 PM CST.
Package tuned-2.10.0-15.el8.noarch is already installed.
Dependencies resolved.
Nothing to do.
Complete!
[root@servera ~]# tuned-adm recommend
virtual-guest
[root@servera ~]# tuned-adm profile virtual-guest
[root@servera ~]# tuned-adm list
Available profiles:
- balanced                    - General non-specialized tuned profile
- desktop                     - Optimize for the desktop use-case
- latency-performance         - Optimize for deterministic performance at the cost of increased power consumption
- network-latency             - Optimize for deterministic performance at the cost of increased power consumption, focused on low latency network performance
- network-throughput          - Optimize for streaming network throughput, generally only necessary on older CPUs or 40G+ networks
- powersave                   - Optimize for low power consumption
- throughput-performance      - Broadly applicable tuning that provides excellent performance across a variety of common server workloads
- virtual-guest               - Optimize for running inside a virtual guest
- virtual-host                - Optimize for running KVM guests
Current active profile: virtual-guest
[root@servera ~]# tuned-adm active
Current active profile: virtual-guest
[root@servera ~]# tuned-adm list
Available profiles:
- balanced                    - General non-specialized tuned profile
- desktop                     - Optimize for the desktop use-case
- latency-performance         - Optimize for deterministic performance at the cost of increased power consumption
- network-latency             - Optimize for deterministic performance at the cost of increased power consumption, focused on low latency network performance
- network-throughput          - Optimize for streaming network throughput, generally only necessary on older CPUs or 40G+ networks
- powersave                   - Optimize for low power consumption
- throughput-performance      - Broadly applicable tuning that provides excellent performance across a variety of common server workloads
- virtual-guest               - Optimize for running inside a virtual guest
- virtual-host                - Optimize for running KVM guests
Current active profile: virtual-guest
○ 复查 ○配置容器使其自动启动
注册表可以在以下位置里找到http://registry.netwoekX.example.com
要访问该注册表,您需要以注册表用户admin的身份,使用密码redhat登陆。
利用注册表服务器上的nginx 镜像,创建一个名为journal-server 的容器
将其配置为 以systemd服务的形式运行,且仅面对现有用户tom
该服务应命名为container-journal-server. 并应在系统重新引导后自动启动,不需要手
动干预。
podman login (地址)
Username:账号
Password:密码

podman load -i nginx.tar
podman run -dit --name=journal-server -v /xx:/var/log/journal:Z
loginctl enable-linger tom
 podman run -dit --name=journal-server -v /xx:/var/log/journal:Z  localhost/nginx
 podman generate systemd --name journal-server --files --new /home/tom.config/systemd/user/container-journal-server.service

podman run -dit  --name=journal-server -v /xx:/var/log/journal:Z localhost/nginx
○ 复查 ○通过以下方式扩展上一个任务的服务
配置主机系统日志以在系统重启后保留数据,并重新启动8志记录服务
将主机/var/log/journal目录下任何以*.journal的文件复制到/xx 中
将服务配置为在启动时自动将/xx 挂载到容器中的/var/log/journal 下。
mkdir -p /var/log/journal
find /var/log/journal -name "*.journal"  -exec cp -rf {} /var/log/journal \;
podman run -dit  --name=journal-server -v /xx:/var/log/journal:Z localhost/nginx

podman generate systemd --name journal-server --files --new
systemctl --user daemon-reload
podman stop journal-server
podman rm journal-server

systemctl --user status container-journal-server.service
systemctl --user enable container-journal-server.service

//localhost/nginx镜像名称
//--name=journal-server 容器名称
//-v 将主机的目录映射到容器指定目录/var/log/journal
//:Z  podman 自动将SELinux container_file_t context 应用到主机目录
○ 复查 ○ 创建shell 脚本
创建一个名为myresearch的脚本
该脚本放置在/usr/local/bin
该脚本用于查找/usr 下所有小于10m且具有修改组ID 权限的文件,将这些文件放置于/root/myfiles
mkdir -p /root/myfiles
vim /usr/local/bin/myresearch
#!/bin/bash
find /usr -type f and -size -10M -and -perm -2000 -exec cp -a {} /root/myfiles \;
chmod 755 /usr/local/bin/myresearch
脚本题
在/usr/bin目录下创建-个repwis脚本,查找/usr目录 下大于30k小于50k并且具有用户权限的文件,把查到的文件
结果拷贝到/root/myfiles文件夹内 解题方法:
#vi /usr/bin/repwis
#!/bin/bash
for i ih $(find /usr -size +30k -size -50k -perm -4000)
do
echo $i > /root/myfiles.txt
done
○ 复查 ○通过以下方式扩展上一个任务的服务
配置主机系统日志以在系统重启后保留数据,并重新启动8志记录服务
将主机/var/log/journal目录下任何以*.journal的文件复制到/xx 中
将服务配置为在启动时自动将/xx 挂载到容器中的/var/log/journal 下。
mkdir -p /var/log/journal
find /var/log/journal -name "*.journal"  -exec cp -rf {} /var/log/journal \;
podman run -dit  --name=journal-server -v /xx:/var/log/journal:Z localhost/nginx

podman generate systemd --name journal-server --files --new
systemctl --user daemon-reload
podman stop journal-server
podman rm journal-server

systemctl --user status container-journal-server.service
systemctl --user enable container-journal-server.service

//localhost/nginx镜像名称
//--name=journal-server 容器名称
//-v 将主机的目录映射到容器指定目录/var/log/journal
//:Z  podman 自动将SELinux container_file_t context 应用到主机目录
loginctl enable-linger tom
 podman run -dit --name=journal-server -v /xx:/var/log/journal:Z  localhost/nginx
 podman generate systemd --name journal-server --files --new /home/tom.config/systemd/user/container-journal-server.service

podman run -dit  --name=journal-server -v /xx:/var/log/journal:Z localhost/nginx
○ 复查 ○ 创建shell 脚本
创建一个名为myresearch的脚本
该脚本放置在/usr/local/bin
该脚本用于查找/usr 下所有小于10m且具有修改组ID 权限的文件,将这些文件放置于/root/myfiles
mkdir -p /root/myfiles
vim /usr/local/bin/myresearch
#!/bin/bash
find /usr -type f and -size -10M -and -perm -2000 -exec cp -a {} /root/myfiles \;
chmod 755 /usr/local/bin/myresearch
脚本题
在/usr/bin目录下创建-个repwis脚本,查找/usr目录 下大于30k小于50k并且具有用户权限的文件,把查到的文件
结果拷贝到/root/myfiles文件夹内 解题方法:
#vi /usr/bin/repwis
#!/bin/bash
for i ih $(find /usr -size +30k -size -50k -perm -4000)
do
echo $i > /root/myfiles.txt
done


 1499
1499

 被折叠的 条评论
为什么被折叠?
被折叠的 条评论
为什么被折叠?
 到【灌水乐园】发言


