


1.模糊滤镜-UIVisualEffectView
只继承UIview而没有继承UIControl因此只作为静态控件使用

@interface ViewController ()
@property (weak, nonatomic) IBOutlet UIImageView *myImageView;

@end

@implementation ViewController

- (void)viewDidLoad {
  [super viewDidLoad];
  //创建一个light风格的UIBLurEffect
  UIBlurEffect *light=[UIBlurEffect effectWithStyle:UIBlurEffectStyleLight];
  //以light模糊效果创建UIVisualEffectView
  UIVisualEffectView *lightView=[[UIVisualEffectView alloc]initWithEffect:light];
  lightView.frame=CGRectMake(40, 40, 300, 100);
  //为imageview添加模糊效果
  self.myImageView.image=[UIImage imageNamed:@"girl.jpeg"];
  [self.myImageView addSubview:lightView];
}
@end

#import "ViewController.h"

@interface ViewController ()
@property (weak, nonatomic) IBOutlet UIImageView *myImageView;
@property (weak, nonatomic) IBOutlet UIButton *mybtn1;
@property (weak, nonatomic) IBOutlet UIButton *mybtn2;
@property (weak, nonatomic) IBOutlet UIButton *mybtn3;

@end

@implementation ViewController

- (void)viewDidLoad {
  [super viewDidLoad];
  //创建一个light风格的UIBLurEffect
  UIBlurEffect *light=[UIBlurEffect effectWithStyle:UIBlurEffectStyleLight];
  //以light模糊效果创建UIVisualEffectView
  UIVisualEffectView *lightView=[[UIVisualEffectView alloc]initWithEffect:light];
  lightView.frame=CGRectMake(40, 40, 300, 100);
  UIButton* mybtn4=[[UIButton alloc]init];
  [mybtn4 setTitle:@"按钮4" forState:UIControlStateNormal];
  mybtn4.frame=CGRectMake(10, 10, 200, 40);
  [lightView.contentView addSubview:mybtn4];

  //为imageview添加模糊效果
  self.myImageView.image=[UIImage imageNamed:@"girl.jpeg"];
  [self.myImageView addSubview:lightView];
}
@end

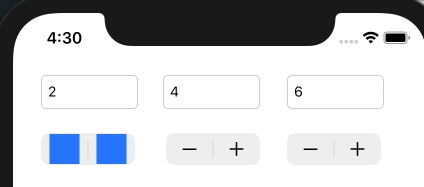
2.微调器-UIStepper
继承自UIControl,属于活动控件,可以与用户交互并激发相应的时间处理方法
#import "ViewController.h"

@interface ViewController ()
@property (weak, nonatomic) IBOutlet UIStepper *steper1;
@property (weak, nonatomic) IBOutlet UIStepper *steper2;
@property (weak, nonatomic) IBOutlet UIStepper *steper3;

@property (weak, nonatomic) IBOutlet UITextField *tf1;
@property (weak, nonatomic) IBOutlet UITextField *tf2;
@property (weak, nonatomic) IBOutlet UITextField *tf3;


- (IBAction)valueChanged:(id)sender;

@end

@implementation ViewController

- (void)viewDidLoad {
  [super viewDidLoad];
  //获取第一个stepper
  id steper=[self.view viewWithTag:10];//似乎这个代码没有起到作用
  //自定义UIStepper的减号及加号的图片
  [steper setDecrementImage:[UIImage imageNamed:@"down.png"] forState:UIControlStateNormal];//似乎这个代码没有起到作用
  [steper setIncrementImage:[UIImage imageNamed:@"up.png"] forState:UIControlStateNormal];//似乎这个代码没有起到作用
}


- (IBAction)valueChanged:(UIStepper*)sender {
  NSLog(@"tapped");
  switch (sender.tag) {
    case 10:
      self.tf1.text=[NSString stringWithFormat:@"%g",sender.value ];
      break;
    case 20:
      self.tf2.text=[NSString stringWithFormat:@"%g",sender.value ];
      break;
    case 30:
    self.tf3.text=[NSString stringWithFormat:@"%g",sender.value ];
    break;
    default:
      break;
  }
}
@end
3.网页控件UIWebView(IOS12后被废止)
UIWebView实现一个内置的浏览器,直接继承了UIView基类,一般不可以与用户交互
4.工具条(UIToolBar)
工具条内部需要拖入若干个工具条按钮(BarButtonItem),此外,还要在item之间拖入分隔空白(固定或可伸缩空白)
UIBarButton
#import "ViewController.h"

@interface ViewController ()
@property (weak, nonatomic) IBOutlet UILabel *info;
- (IBAction)tapped:(id)sender;

@end

@implementation ViewController

- (void)viewDidLoad {
  [super viewDidLoad];
  // Do any additional setup after loading the view.
}


- (IBAction)tapped:(id)sender {
  //创建提示信息
  NSString* myinfo=[NSString stringWithFormat:@"您选择了%@按钮",[sender title] ];
  //显示提示信息
  self.info.text=myinfo;
}
@end

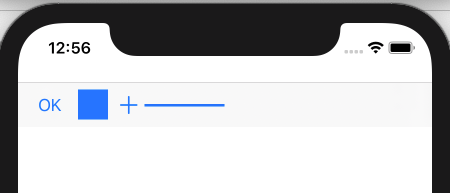
5.工具条(UIToolBar)–自定义工具条控件

#import "ViewController.h"

@interface ViewController ()

@end

@implementation ViewController
{
  UIProgressView * _pro;
  NSTimer* _timer;
}

- (void)viewDidLoad {
  [super viewDidLoad];
  //创建一个工具条,并设置他的大小
  UIToolbar* myToolBar=[[UIToolbar alloc]initWithFrame:CGRectMake(0, 60, 440, 44)];
  //将工具条添加到当前的界面中去
  [self.view addSubview:myToolBar];
  //创建使用文本标题的UIBarButoonItem
  UIBarButtonItem* btn1=[[UIBarButtonItem alloc]initWithTitle:@"OK" style:UIBarButtonItemStylePlain target:self action:@selector(tapped:)];
  //创建使用自定义图片的UIBarButoonItem
  UIBarButtonItem* btn2=[[UIBarButtonItem alloc]initWithImage:[UIImage imageNamed:@"heart.png"] style:UIBarButtonItemStylePlain target:self action:@selector(tapped:)];
  //创建使用系统图标的UIBarButoonItem
  UIBarButtonItem* btn3=[[UIBarButtonItem alloc]initWithBarButtonSystemItem:UIBarButtonSystemItemAdd target:self action:@selector(tapped:)];
  //创建一个可伸缩的UIBarButoonItem
  UIBarButtonItem* flexItem=[[UIBarButtonItem alloc]initWithBarButtonSystemItem:UIBarButtonSystemItemFixedSpace target:self action:nil];
  //设置进度条
    _pro=[[UIProgressView alloc]initWithProgressViewStyle:UIProgressViewStyleBar];
  //设置UIProgeressView的大小
  _pro.frame=CGRectMake(0, 60, 80, 20);
  //设置进度条的初始进度
  _pro.progress=0;
  //创建使用UIView的UIBarButoonItem
  UIBarButtonItem* btn4=[[UIBarButtonItem alloc]initWithCustomView:_pro];
  //为工具条设置按钮
  myToolBar.items=@[btn1,btn2,btn3,flexItem,btn4];
  //定时器
  _timer=[NSTimer scheduledTimerWithTimeInterval:0.2 target:self selector:@selector(changeProgress) userInfo:nil repeats:YES];
}

-(void)tapped:(id)sender{
  NSLog(@"%@",sender);
}
-(void)changeProgress{
  //如果进度满,则停止计时器
  if(_pro.progress>=1.0){
    //停用计时器
    [_timer invalidate];
  }else{
    //改变进度条的进度值
    [_pro setProgress:_pro.progress+0.02 animated:YES];
  }
}

@end


 813
813


 被折叠的 条评论
为什么被折叠?
被折叠的 条评论
为什么被折叠?
 到【灌水乐园】发言


