


1、IOC的基本概念
- 你想要什么(组件,类)的时候,什么(类实例)就来了,ioc容器帮你 注入了这个类,不用亲自去创建(new)了。
- 类实例的注入通过IOC Service Provider来实现(这个provider负责给你类实例)
- 通过三种渠道为用户注入 类实例
- 构造方法注入:使用对象的时候即被注入
- setter方法注入:在调用setter方法的时候被注入
- 接口注入 :在实现接口中方法的时候被注入
2、构造方法、setter方法、接口注入
- 三种注入方式存在一个注入时机的问题
- 构造方法有较完整的生命周期,对象构造完成后就可以注入,无法继承,无法设置默认值
- setter方法可以被继承,允许设置默认值
- 三者都要通过方法的参数来引用这个类,从而实现类对象的注入。
- 构造方法通过带参的形式注入;
- setter也通过setter的参数实现注入。
- 接口的形式是通过实现类中的某个具体实现方法的参数来传入注入的对象。(慎用)
3、IOC Service Provider
IOC Service Provider是一种虚拟的说法,主要是通过一下3种方式来向开发者提供对象的
- 直接编码的方法
- 使用xml之类的配置文件来实现(最常用)
- 通过注解方式来实现(较省事),最终还是通过编码方式来实现,但不需要自己去编码
4、Spring的两种容器类型
- BeanFactory(简洁、快速,因为使用懒加载)
- ApplicationContext(功能强大,预加载)
5、使用注解方式注入依赖
- @Autowired和@Component是主要的方式,@Autowired作用在使用场景,@Component作用在bean上。
- 两者之间需要一个触发器,这个出发器就是组件扫描(component-scan)。context:component-scan会去扫描base-package包内的所有包含@Component注解的bean
<context:component-scan base-package=“cn.spring21.project.base.package”/>
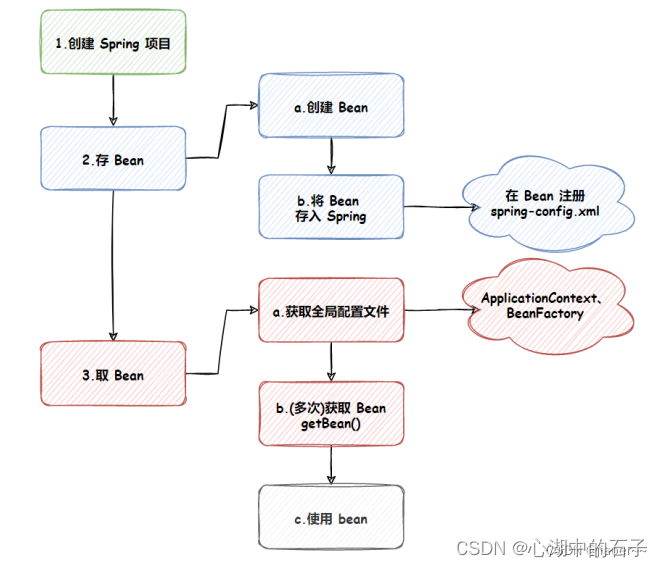
6、如何创建一个spring项目
参看这篇文章:创建spring项目
大致步骤
- 创建一个maven工程
- pom.xml加入相应依赖
    <dependencies>
        <dependency>
            <groupId>org.springframework</groupId>
            <artifactId>spring-context</artifactId>
            <version>5.2.3.RELEASE</version>
        </dependency>
        <dependency>
            <groupId>org.springframework</groupId>
            <artifactId>spring-beans</artifactId>
            <version>5.2.3.RELEASE</version>
        </dependency>
    </dependencies>
- 创建spring配置文件
- 在配置文件中注册bean
- 在程序中通过XmlBeanFactory来获得BeanFactory 或通过ClassPathXmlApplicationContext获取ApplicationContext
- 通过BeanFactory或ApplicationContext的getBean来获取 Bean
- 使用类
6、beans
- xml的顶层元原素,可以包含0-1个<descprition>和多个<bean>、<import>、<alias>
- beans的属性有
- default-lazy-init:默认懒加载
- default-autowire:哪种方式自动注入,取值为no、byName、byType、constructor以及autodetect。
- default-init-method:指定默认初始化方法 default-destroy-method:指定 销毁方法
<descprition>:指定描述信息
<import> :导入其他 配置文件的配置(实际用途不大)
<alias>:为配置的bean起别名
<alias name="dataSourceForMasterDatabase" alias="masterDataSource"/>
7、bean
一个类对应一个bean
- id属性:类与类的id,通常类名小写
- name属性:与id属性类似,但可以使用特殊符号
- calss:bean实际对应的类名称
<bean id="person" class="com.fengray.beans.Person" name="per"></bean>
一个完整的用法
bean
package com.fengray.beans;

public class Person {
  private String name;
  private Integer age;
  private String address;

  public Person() {
  }

  public Person(String name, Integer age, String address) {
    this.name = name;
    this.age = age;
    this.address = address;
  }

  public String getName() {
    return name;
  }

  public void setName(String name) {
    this.name = name;
  }

  public Integer getAge() {
    return age;
  }

  public void setAge(Integer age) {
    this.age = age;
  }

  public String getAddress() {
    return address;
  }

  public void setAddress(String address) {
    this.address = address;
  }

  @Override
  public String toString() {
    return "Person{" +
            "name='" + name + '\'' +
            ", age=" + age +
            ", address='" + address + '\'' +
            '}';
  }
}
spring-config.xml
<?xml version="1.0" encoding="UTF-8"?>
<beans xmlns="http://www.springframework.org/schema/beans"
       xmlns:xsi="http://www.w3.org/2001/XMLSchema-instance"
       xsi:schemaLocation="http://www.springframework.org/schema/beans http://www.springframework.org/schema/beans/spring-beans.xsd">

    <bean id="person" class="com.fengray.beans.Person" name="per"></bean>
</beans>
主程序
@Test
  public void testBean(){
    ClassPathXmlApplicationContext applicationContext = new ClassPathXmlApplicationContext("spring-config.xml");
    Person person = (Person)applicationContext.getBean("person");
    person.setName("zhangsan");
    person.setAge(33);
    person.setAddress("hebei");
    System.out.println(person);

  }
7、注入对象的是三种方法—构造方法注入
- 需要使用构造方法<constructor-arg>进行注入,也就是bean里面要有对应的构造方法
1.bean
Teacher
public class Teacher {
  private String tName;
  private String tOffice;

  public Teacher() {
  }

  public String gettName() {
    return tName;
  }

  public void settName(String tName) {
    this.tName = tName;
  }

  public String gettOffice() {
    return tOffice;
  }

  public void settOffice(String tOffice) {
    this.tOffice = tOffice;
  }

  @Override
  public String toString() {
    return "Teacher{" +
            "tName='" + tName + '\'' +
            ", tOffice='" + tOffice + '\'' +
            '}';
  }
}
Student
public class Student {
  private String major;
  private Integer grade;

  private String university;

  public Student() {
  }

  public Student(String major, Integer grade, String university) {
    this.major = major;
    this.grade = grade;
    this.university = university;
  }

  public String getMajor() {
    return major;
  }

  public void setMajor(String major) {
    this.major = major;
  }

  public Integer getGrade() {
    return grade;
  }

  public void setGrade(Integer grade) {
    this.grade = grade;
  }

  public String getUniversity() {
    return university;
  }

  public void setUniversity(String university) {
    this.university = university;
  }

  @Override
  public String toString() {
    return "Student{" +
            "major='" + major + '\'' +
            ", grade=" + grade +
            ", university='" + university + '\'' +
            '}';
  }
}
lession
public class Lession {
  private String lessionName;
  private Teacher teacher;
  private Student student;

  public Lession() {
  }

  public Lession(String lessionName, Teacher teacher, Student student) {
    this.lessionName = lessionName;
    this.teacher = teacher;
    this.student = student;
  }

  public Lession(Teacher teacher, Student student) {
    this.teacher = teacher;
    this.student = student;
  }

  @Override
  public String toString() {
    return "Lession{" +
            "lessionName='" + lessionName + '\'' +
            ", teacher=" + teacher +
            ", student=" + student +
            '}';
  }
}
2.spring-config.xml
 <!--Teacher-->
    <bean id="teacher" class="com.fengray.beans.Teacher" ></bean>
    <!--Student-->
    <bean id="student" class="com.fengray.beans.Student"></bean>

    <!--Lession-->
    <bean id="lession" class="com.fengray.beans.Lession">
        <constructor-arg>
            <value>移动APP开发</value>
        </constructor-arg>
        <constructor-arg ref="student"/>
        <constructor-arg>
            <ref bean="teacher"/>
        </constructor-arg>
    </bean>
3、测试类
 @Test
  public void testBean(){
    ClassPathXmlApplicationContext applicationContext = new ClassPathXmlApplicationContext("spring-config.xml");
    Lession lession = (Lession)applicationContext.getBean("lession");
    System.out.println(lession);
  }
4、测试结果
Lession{lessionName=‘移动APP开发’, teacher=Teacher{tName=‘null’, tOffice=‘null’}, student=Student{major=‘null’, grade=null, university=‘null’}}
- type属性
如果声明了两个构造方法,分别都只是传入相同个数参数,且参数类型不同。在配置bean的时候,需要使用type
属性进行指定,以避免错误匹配
<!--Lession-->
    <bean id="lession" class="com.fengray.beans.Lession">
        <constructor-arg type="java.lang.String">
            <value>移动APP开发</value>
        </constructor-arg>
        <constructor-arg ref="student"/>
        <constructor-arg>
            <ref bean="teacher"/>
        </constructor-arg>
    </bean>
- index属性
bean
public class Lession {
  private String lessionName;
  private Integer lessionNo;
  private Teacher teacher;
  private Student student;
}
xml
<!--Lession-->
    <bean id="lession" class="com.fengray.beans.Lession">
        <constructor-arg index="0">
            <value >移动APP开发</value>
        </constructor-arg>
        <constructor-arg  index="1" value="800899"/>
        <constructor-arg ref="student"/>
        <constructor-arg>
            <ref bean="teacher"/>
        </constructor-arg>
    </bean>
测试类
 @Test
  public void testBean(){
    ClassPathXmlApplicationContext applicationContext = new ClassPathXmlApplicationContext("spring-config.xml");
    Lession lession = (Lession)applicationContext.getBean("lession");
    System.out.println(lession);
  }
测试结果
Lession{lessionName=‘移动APP开发’, lessionNo=800899, teacher=Teacher{tName=‘null’, tOffice=‘null’}, student=Student{major=‘null’, grade=null, university=‘null’}}
8、注入对象的是三种方法—setter方法注入
<!--Lession-->
    <bean id="lession" class="com.fengray.beans.Lession">
        <property name="lessionName">
            <value>java基础</value>
        </property>
        <property name="lessionNo" value="800874"/>
    </bean>
9、<property>和<constructor-arg>的可用配置项
- <value>
注入简单类型,如:
<!--Lession-->
    <bean id="lession" class="com.fengray.beans.Lession">
        <property name="lessionName">
            <value>java基础</value>
        </property>
        <property name="lessionNo" value="800874"/>
    </bean>
- <ref>
注入引用类型
<!--Lession-->
    <bean id="lession" class="com.fengray.beans.Lession">
        <constructor-arg index="0">
            <value >移动APP开发</value>
        </constructor-arg>
        <constructor-arg  index="1" value="800899"/>
        <constructor-arg ref="student"/>
        <constructor-arg>
            <ref bean="teacher"/>
        </constructor-arg>
    </bean>
还可以和<local>及<parent>容器的类来使用使用,local为本配置文件,parent为父容器bean(未能复现)
- <idref>(大多数时候是用value就可以了)
和ref一致,但是它可以检查该beanName是否存在。(未能复现) - 内部<bean>
直接引用一个内部bean对象。
<!--Lession-->
    <bean id="lession" class="com.fengray.beans.Lession">
        <property name="student">
            <bean id="student" class="com.fengray.beans.Student">
                <property name="grade" value="3"/>
                <property name="major" value="chinese"/>
                <property name="university" value="pku"/>
            </bean>
        </property>
    </bean>
- <list>
<list>对应注入对象类型为java.util.List及其子类或者数组类型的依赖对象。
添加一个University类
public class University {
  private String uName;
  private List<Teacher> teacherList;
  private Map<String,Student> studentMap;

  private Set<Lession> lessionset;

  public University() {
  }

  public University(String uName, List<Teacher> teacherList, Map<String, Student> studentMap, Set<Lession> lessionset) {
    this.uName = uName;
    this.teacherList = teacherList;
    this.studentMap = studentMap;
    this.lessionset = lessionset;
  }

  public String getuName() {
    return uName;
  }

  public void setuName(String uName) {
    this.uName = uName;
  }

  public List<Teacher> getTeacherList() {
    return teacherList;
  }

  @Override
  public String toString() {
    return "University{" +
            "uName='" + uName + '\'' +
            ", teacherList=" + teacherList +
            ", studentMap=" + studentMap +
            ", lessionset=" + lessionset +
            '}';
  }

  public void setTeacherList(List<Teacher> teacherList) {
    this.teacherList = teacherList;
  }

  public Map<String, Student> getStudentMap() {
    return studentMap;
  }

  public void setStudentMap(Map<String, Student> studentMap) {
    this.studentMap = studentMap;
  }

  public Set<Lession> getLessionset() {
    return lessionset;
  }

  public void setLessionset(Set<Lession> lessionset) {
    this.lessionset = lessionset;
  }
}
-
<set>
set是无序的 。<set>对应注入Java Collection中类型为java.util. Set或者其子类的依赖对象 -
<map>
以上三种的集合类型的xml配置法
   <!--Teacher-->
    <bean id="teacher" class="com.fengray.beans.Teacher" >
        <property name="tName" value="李四"/>
        <property name="tOffice" value="数学教研室"/>
    </bean>
    <!--Student-->
    <bean id="student" class="com.fengray.beans.Student">
        <property name="university" value="wuhan University"/>
        <property name="grade" value="2"/>
        <property name="major" value="law"/>
    </bean>

    <!--Lession-->
    <bean id="lession" class="com.fengray.beans.Lession">
        <property name="student">
            <bean id="student" class="com.fengray.beans.Student">
                <property name="grade" value="3"/>
                <property name="major" value="chinese"/>
                <property name="university" value="pku"/>
            </bean>
        </property>
    </bean>

    <!--University-->
    <bean id="university" class="com.fengray.beans.University">
        <property name="uName" value="TingsHua"/>
        <property name="teacherList">
            <list>
                <!--使用内部类的形式-->
                <bean id="teacher1" class="com.fengray.beans.Teacher">
                    <property name="tName" value="张三"/>
                </bean>
                <!--使用通用形式的形式,这里的teacher已经在别处定义了bean-->
                <ref bean="teacher"/>
            </list>
        </property>
        <property name="lessionset" >
            <set>
                <ref bean="lession"/>
                <bean class="com.fengray.beans.Lession">
                    <property name="lessionName" value="java spring 从入门到精通"/>
                    <property name="lessionNo" value="555231"/>
                    <property name="teacher"  ref="teacher"/>
                    <property name="student" ref="student"/>
                </bean>
            </set>
        </property>
        <property name="studentMap">
            <map>
                <entry key="computeStu">
                    <ref bean="student"/>
                </entry>
                <entry key="humanStu">
                    <bean class="com.fengray.beans.Student">
                        <property name="major" value="chinese"/>
                        <property name="grade" value="3"/>
                        <property name="university" value="shanghai university"/>
                    </bean>
                </entry>
                <entry>
                    <key></key>
                    <ref bean="student"/>
                </entry>
            </map>
        </property>
    </bean>
</beans>
- <props>
简化后的map,只对应java.util.Properties的对象依赖,只能指定String类型的键(key)和值
public class MockDemoObject {
private Properties emailAddrs; // 必要的setter和getter方法
...
}
配置类似于
<property name="valueSet"> <props>
<prop key="author">fujohnwang@gmail.com</prop> <prop key="support">support@spring21.cn</prop> ...
</props> </property>
- <null>
使用不多,为了防止<value>的结果为”“,而不是null
public class MockDemoObject {
private String param1; private Object param2; // 必要的setter和getter方法 ...
}
配置为
<property name="param1"> <null/>
</property>
<property name="param2">
<null/>
</property>
实际上就相当于
public class MockDemoObject {
private String param1=null; private Object param2=null; // 必要的setter和getter方法
...
}
虽然这里看起来没有太大意义!
- depends-on
从生命周期的角度看,类的创建如果需要依赖另一个类,这里有一个先后的顺序的问题,depends-on指定了谁依赖谁。
<bean id="classAInstance" class="...ClassA" depends-on="configSetup"/>
<bean id="configSetup" class="SystemConfigurationSetup"/>
-
autowire
自动绑定到类。
autowire提供了5中自动绑定模式。no、byName、byType、constructor和autodetect,下面是 它们的具体介绍。- no
不采取任何形式自动绑定,完全依赖手工明确各个bean之间的依赖关系,以下代码是等效的。
<bean id="beanName" class="..."/> 或者 <bean id="beanName" class="..." autowire="no"/>- byName
通过name进行匹配,Lession类包含Teacher类型的属性Teacher,下列没有为lession实例显式地配置Teacher类型数据,但指定了按名称(byName)自动装备autowire,所以自动为lession实例装配上了name属性。
<!--Lession,这里没有为lession限制配置成员变量值-->
    <bean id="lession" class="com.fengray.beans.Lession" autowire="byName"></bean>

    <!--Teacher,这个bean的id为teaher,在lession类中有一个teacher属性,因此本bean会被自动装备到lession实例中去-->
    <bean id="teacher" class="com.fengray.beans.Teacher" >
        <property name="tName" value="李四"/>
        <property name="tOffice" value="数学教研室"/>
    </bean>
测试类
@Test
  public void testBean(){
    ClassPathXmlApplicationContext applicationContext = new ClassPathXmlApplicationContext("spring-config.xml");
    Lession lession = (Lession)applicationContext.getBean("lession");
    System.out.println(lession);
  }
测试结果
Lession{lessionName=‘null’, lessionNo=null, teacher=Teacher{tName=‘李四’, tOffice=‘数学教研室’}, student=null}
- byType
通过类型类给对象注入成员属性
<!--Lession,这里没有为lession限制配置成员变量值--> <bean id="lession" class="com.fengray.beans.Lession" autowire="byType"> <property name="lessionName" value="mysql"/> <property name="lessionNo" value="322343"/> </bean> <!--Teacher,这个bean的id为teaher,在lession类中有一个teacher属性,因此本bean会被自动装备到lession实例中去--> <bean id="teacher" class="com.fengray.beans.Teacher" > <property name="tName" value="李四"/> <property name="tOffice" value="数学教研室"/> </bean> <bean id="student" class="com.fengray.beans.Student"> <property name="major" value="admin"/> <property name="grade" value="2"/> <property name="university" value="dalianligong"/> </bean>- constructor
针对构造函数的参数的自动绑定,也就是绑定构造函数的参数
<!--Lession,这里没有为lession限制配置成员变量值--> <bean id="lession" class="com.fengray.beans.Lession" autowire="constructor"> <constructor-arg index="0" value="mongdb"/> <constructor-arg index="1" value="66214"/> </bean> <!--Teacher,这个bean的id为teaher,在lession类中有一个teacher属性,因此本bean会被自动装备到lession实例中去--> <bean id="teacher" class="com.fengray.beans.Teacher" > <property name="tName" value="李四"/> <property name="tOffice" value="数学教研室"/> </bean> <bean id="student" class="com.fengray.beans.Student"> <property name="major" value="admin"/> <property name="grade" value="2"/> <property name="university" value="dalianligong"/> </bean>- autodetect
这种模式是byType和constructor模式的结合体,如果对象拥有默认无参数的构造方法,容器会优先考虑byType的自动绑定模式。否则,会使用constructor模式。
另外,<beans>上还有一个default-autowire,取值为上述值,它可以为<beans>下的所有<bean>标签统一设置注入方式。
-
dependency-check
使用每个<bean>的dependency-check属性对其所依赖的对象进行最终检查。以确认每个对象所依赖的对象是否按 照所预期的那样被注入- none:不做依赖检查
- simple,对简单 属性类型及 相关 的collection进行依赖检查
- object:只对对象引用类型依赖进行检查
- all:将simple和object结合。
-
lazy-init
延迟初始化。BeanFactory可以设置延迟初始化,ApplicationContext会设置在容器启动时会立即初始化。
- no
10、继承关系的注入
通过继承,可以减少代码量,也就是继承过来的那部分属性可以不用再写了。
继承需要使用parent属性
创建若干个类
Son,Father,Son继承Father,Famil,Story类作为属性成员存在。
Son类
public class Story {
  private String storyType;
  private String author;

  public Story() {
  }

  public Story(String storyType, String author) {
    this.storyType = storyType;
    this.author = author;
  }

  public String getStoryType() {
    return storyType;
  }

  public void setStoryType(String storyType) {
    this.storyType = storyType;
  }

  public String getAuthor() {
    return author;
  }

  public void setAuthor(String author) {
    this.author = author;
  }

  @Override
  public String toString() {
    return "Story{" +
            "storyType='" + storyType + '\'' +
            ", author='" + author + '\'' +
            '}';
  }
}
Father
public class Father {
  private String job;

  private Story story;
  private Family family;

  public Father() {
  }

  public Father(String job, Story story, Family family) {
    this.job = job;
    this.story = story;
    this.family = family;
  }

  public String getJob() {
    return job;
  }

  public void setJob(String job) {
    this.job = job;
  }

  public Story getStory() {
    return story;
  }

  public void setStory(Story story) {
    this.story = story;
  }

  public Family getFamily() {
    return family;
  }

  public void setFamily(Family family) {
    this.family = family;
  }

  @Override
  public String toString() {
    return "Father{" +
            "job='" + job + '\'' +
            ", story=" + story +
            ", family=" + family +
            '}';
  }
}
Family类
public class Family {
  private String stars;
  private Integer memberCount;

  public Family() {
  }

  public Family(String stars, Integer memberCount) {
    this.stars = stars;
    this.memberCount = memberCount;
  }

  public String getStars() {
    return stars;
  }

  public void setStars(String stars) {
    this.stars = stars;
  }

  public Integer getMemberCount() {
    return memberCount;
  }

  public void setMemberCount(Integer memberCount) {
    this.memberCount = memberCount;
  }

  @Override
  public String toString() {
    return "Family{" +
            "stars='" + stars + '\'' +
            ", memberCount=" + memberCount +
            '}';
  }
}
Story类
public class Story {
  private String storyType;
  private String author;

  public Story() {
  }

  public Story(String storyType, String author) {
    this.storyType = storyType;
    this.author = author;
  }

  public String getStoryType() {
    return storyType;
  }

  public void setStoryType(String storyType) {
    this.storyType = storyType;
  }

  public String getAuthor() {
    return author;
  }

  public void setAuthor(String author) {
    this.author = author;
  }

  @Override
  public String toString() {
    return "Story{" +
            "storyType='" + storyType + '\'' +
            ", author='" + author + '\'' +
            '}';
  }
}
配置文件(不使用继承写法)
<bean id="father" class="com.fengray.beans.Father">
        <property name="job" value="lawyer"/>
        <property name="family" ref="family"/>
        <property name="story" ref="story"/>
    </bean>

    <bean id="son" class="com.fengray.beans.Son">
        <property name="job" value="student"/>
        <property name="major" value="poemer"/>
        <property name="story" ref="story"/>
        <property name="family" ref="family"/>
    </bean>

    <bean id="story" class="com.fengray.beans.Story">
        <property name="author" value="张老三"/>
        <property name="storyType" value="战争故事"/>
    </bean>
    <bean id="family" class="com.fengray.beans.Family">
        <property name="memberCount" value="5"/>
        <property name="stars" value="五好家庭"/>
    </bean>
测试类
 @Test
  public void testBean(){
    ClassPathXmlApplicationContext applicationContext = new ClassPathXmlApplicationContext("spring-config.xml");
    Father father = (Father)applicationContext.getBean("father");
    System.out.println(father);

    Son son = (Son)applicationContext.getBean("son");
    System.out.println(son);
  }
测试结果
Father{job=‘lawyer’, story=Story{storyType=‘战争故事’, author=‘张老三’}, family=Family{stars=‘五好家庭’, memberCount=5}}
Son{major='poemer’job='student’family='Family{stars=‘五好家庭’, memberCount=5}'story=‘Story{storyType=‘战争故事’, author=‘张老三’}’}
配置文件(继承写法)
    <bean id="father" class="com.fengray.beans.Father">
        <property name="job" value="lawyer"/>
        <property name="family" ref="family"/>
        <property name="story" ref="story"/>
    </bean>

    <bean id="son" class="com.fengray.beans.Son" parent="father">
        <property name="major" value="poemer"/>
    </bean>

    <bean id="story" class="com.fengray.beans.Story"  >
        <property name="author" value="张老三"/>
        <property name="storyType" value="战争故事"/>
    </bean>
    <bean id="family" class="com.fengray.beans.Family">
        <property name="memberCount" value="5"/>
        <property name="stars" value="五好家庭"/>
    </bean>
测试结果(测试类写法不变,结也不变)
Father{job=‘lawyer’, story=Story{storyType=‘战争故事’, author=‘张老三’}, family=Family{stars=‘五好家庭’, memberCount=5}}
Son{major='poemer’job='lawyer’family='Family{stars=‘五好家庭’, memberCount=5}'story=‘Story{storyType=‘战争故事’, author=‘张老三’}’}
- parent结合abstract属性来使用可以达到将相应bean的定义模版化的目的。
- 实际操作上就是给一个类的注入作为抽象的模板类
- 在配置文件中不必指明class属性,也不需要实例化 这个模板类作为其他类的父类,从而成为模版
- 模版类中的属性(成员变量),在继承的子类中需要有相同的属性(成员变量)
给Fahter类同时加上两个属性(成员变量)
Father.java
public class Father {
  private String job;

  private Story story;
  private Family family;

  private String character;
  private Hobby hobby;
......
}
Son.java
public class Son extends Father{
  private String major;

  private String character;
  private Hobby hobby;
  ......
  }
配置文件
 <!--作为模板类存在,设计了连个成员变量character和hobby-->

<bean id="template" abstract="true">
        <property name="character" value="开朗"/>
        <property name="hobby" ref="hobby"/>
    </bean>

    <bean name="hobby" class="com.fengray.beans.Hobby">
        <property name="hobbyname" value="擦玻璃"/>
    </bean>

    <bean id="father" class="com.fengray.beans.Father" parent="template">
        <property name="job" value="lawyer"/>
        <property name="family" ref="family"/>
        <property name="story" ref="story"/>
    </bean>

    <bean id="son" class="com.fengray.beans.Son" parent="template" >
        <property name="major" value="poemer"/>
        <property name="job" value="兼职工作"/>
    </bean>

    <bean id="story" class="com.fengray.beans.Story"  >
        <property name="author" value="张老三"/>
        <property name="storyType" value="战争故事"/>
    </bean>
    <bean id="family" class="com.fengray.beans.Family">
        <property name="memberCount" value="5"/>
        <property name="stars" value="五好家庭"/>
    </bean>
测试结果
Father{job=‘lawyer’, story=Story{storyType=‘战争故事’, author=‘张老三’}, family=Family{stars=‘五好家庭’, memberCount=5}, character=‘开朗’, hobby=Hobby{hobbyname=‘擦玻璃’}}
Son{character='开朗’hobby='Hobby{hobbyname=‘擦玻璃’}'major='poemer’job='兼职工作’family='null’story=‘null’}


 927
927


 被折叠的 条评论
为什么被折叠?
被折叠的 条评论
为什么被折叠?
 到【灌水乐园】发言


