


Vue
项目创建
- vue 命令行工具创建项目
npm init vue@latest
-
创建项目名,之后根据选择如果没有其他要求,一律就是 No,回车

-
进入项目-》安装依赖模块到 node_modules 目录下-》运行项目
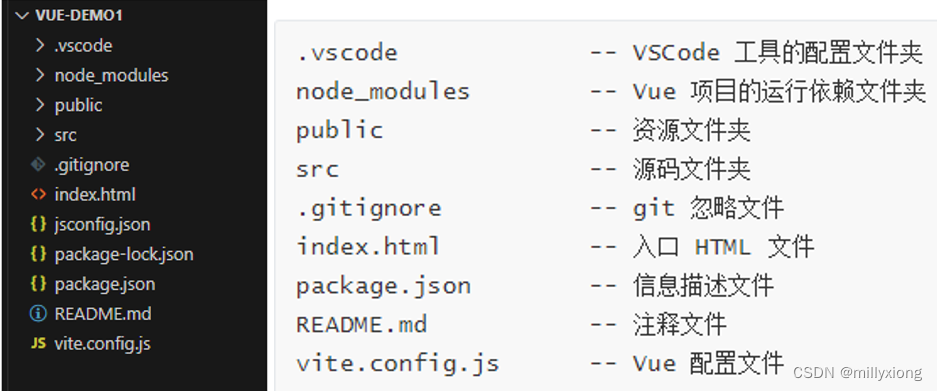
cd vue-demo1
npm install
npm run dev
项目目录结构:
Vue 模板语法
基于 HTML 的模板语法;声明式的把组件实例的数据绑定到呈现的 DOM 上;所有的 Vue 模板都是语法层面合法的 HTML ,可以被复合规范的浏览器和 HTML 解析器解析
文本插值
1、基本的数据绑定形式是文本插值,使用 Mustache 语法(双大括号)
<template>
  {{ msg }}
</template>
2、双大括号不能在 HTML attributes 中使用,响应式绑定一个 attribute, 使用 v-bind 指令,简写时 v-bind:class=“attr” 相当于 :class=“attr”
//案例1
<template>
    <div :class="attr">{{ msg }}</div>
</template>

<script setup>
    let msg = '我是消息'
    let attr = 'active'
</script>
//案例2
<template>
    <div v-bind:class="attr">{{ msg }}</div>
</template>

<script setup>
    let msg = '我是消息'
    let attr = 'active'
</script>
3、v-bind指令如果绑定的值是 null 或者 undifined, 那么 attribute 将会从渲染的元素上移除
条件渲染
v-if		-- 条件性渲染一块内容,内容在指令表达式返回真值时才被渲染;是真实的按条件渲染,确保在切换时,条件区块内的事件监听器和子组件都会被销毁和重建;是惰性的,如果初次渲染时条件值为 flase, 不会做任何事。
v-else		-- 为 V-if 添加一个 else 区块
v-else-if	-- 使 v-if 能够多次重复使用
v-show		-- 元素无论初始条件如何,始终会被渲染,只有 css display 属性会被切换
总结: v-if 和 v-show
v-if 存在更高的开销, v-show 更高的初始渲染开销。因此,如果需要频繁切换,则使用 v-show 较好;如果在运行时绑定条件很少改变,则 v-if 会更合适。
列表渲染
使用 v-for 指令,基于数组来渲染列表, v-for 指令需要使用 item in items 形式的特殊语法, items 是源数组的数组,而 item 是迭代项的别名
<template>
    <div>
        <p v-for:="item in names"> {{  item  }}</p>
    </div>
</template>

<script setup>
    let names = ['苹果','相机']
</script>

// 结果

苹果

相机
v-for 遍历对象
<template>
    <div>
        <p v-for:="(value, key,index) of userinfo"> {{ value }}--{{ key }}--{{ index }}</p>
    </div>
</template>

<script setup>
    let userinfo = {
        name:'张三',
        age:12
    }
</script>

// 结果

张三--name--0

12--age--1
key 管理状态
Vue 默认按照 就地更新 的策略更新通过 v-for 渲染的元素列表,数据项的顺序改变时,Vue 不会随之移动 DOM 元素的顺序,而是就地跟新每个元素,确保在原本置顶的索引位置上渲染
<template>
    <div>
        <p v-for:="(item, index) in items" :key="index">{{ item }} -- {{ index }}</p>
    </div>
</template>
<script setup>
    let items = [
        '青春有你',
        '大话西游'
    ]
</script>
为了提示 Vue ,让它可以追踪每个节点的标识,从而重用和重新排序现有的元素,需要给每个元素对应的块提供一个唯一的 key attribute:
key 在使用是需要 v-bind 绑定特殊的 attribute, 这个值是一个基础类型的值,例如字符串或者 number 类型
推荐在使用 v-for 指令时,带上 key
事件处理
使用 v-on 指令,简写为 @ 来监听 DOM 事件,并在事件触发时执行对应的 javascript。 用法: v-on:click=“methodName” 或者 @click=“handler”
事件处理器的值可以是:
-
内联事件处理器:事件被触发时执行的内联 JavaScript 语句
-
方法时间处理器:一个指向组件上定义的方法属性名或是路径
-
<template>
    <button v-on:click="handler">add +1 = </button><text>{{ count }}</text>
    <button @click="handler">add +1 =  </button><text>{{ count }}</text>
</template>

<script setup>
import { ref } from "vue"
    let count = ref(0)

    const handler = () => {
        count.value++
    }
</script>
事件参数
事件参数可以获取 event 对象和通过事件传递参数
<template>
    <button @click="handler">add +1 =  </button><text>{{ count }}</text>
</template>

<script setup>
import { ref } from "vue"
    let count = ref(0)

    const handler = (e) => {
        console.log('事件:', e )
        count.value++
    }
</script>
传递参数过程中获取 event
<template>
    <button v-on:click="handler(count, $event)">add +1 = </button><text>{{ count }}</text>
</template>

<script setup>
import { ref } from "vue"
    let count = ref(0)

    const handler = (total, $event) => {
        console.log('total', total);
        console.log('事件:', event)
        count.value+= 1
    }
</script>
数组侦听
- 变更方法
Vue 能够侦听响应式数组的变更方法,并在它们被调用时触发相关的更新。方法有如下:
push, pop, shift, unshift, splice, sort, reverse
- 替换数组
不改变原数组,返回一个新数组,当遇到非变更方法时,将旧的数组替换为新的,方法有如下:
filter,concat,slice
计算属性
模板中的表达式虽然方便,但也只能用来做简单的操作,如果在模板中写太多的逻辑,会让模板变得臃肿,难以维护。因此我们推荐使用计算属性来描述依赖响应式状态的复杂逻辑
<template>
    <div>消息数组有内容吗?{{ msgContent }}</div>
</template>

<script setup>
import { computed } from 'vue'
    let msgArr = ['1','2']

    const msgContent = computed (
        () => {
            return msgArr.length > 0 ? 'yes': 'no'
        }
    )
</script>
计算属性 和 方法的区别:
计算属性:计算属性的值会基于其响应式依赖被缓存,一个计算属性仅会在其响应式依赖更新时才重新计算;
方法:方法调用总是会在重渲染发生时再次执行函数。
class 绑定
数据绑定, 使用 v-bind 将 class 属性和动态字符串进行绑定,如果处理的绑定条件比较复杂,字符串拼接较长,那么除了使用字符串之外,表达式的值可以是数组或者对象
<template>
    <div :class="{'active':isactive, 'isHover':isHover}">类{{ msgContent }}</div>
    <div :class="[arractive,isHover]">类2{{ msgContent }}</div>
</template>

<script setup>
import { computed } from 'vue'
    let isactive = true
    let isHover = false
    let arractive = 'active'
    const msgContent = computed (
        () => {
            return msgArr.length > 0 ? 'yes': 'no'
        }
    )
</script>

<style scoped>
.active{
    color: aqua;
}
</style>
Style 绑定
<template>
    <div :style="{color:activeColor, fontSize: fontSize + 'px'}">style{{ msgContent }}</div>
    <div :style="styObj">style</div>
</template>

<script setup>
let activeColor = 'aqua'
let fontSize = 30

const styObj = {
    color : 'red',
    fontSize : '30px'
}
</script>
侦听器
使用 watch 或者 watchEffect 选项在每次响应式属性发生变化时触发
<template>
    <div :class="{'active':isactive, 'isHover':isHover}">侦听器{{ msg }}</div>
    <button @click="msgChange">点击</button>
</template>

<script setup>
import { ref, watchEffect  } from 'vue'
    let msg = ref('旧的消息哦!!!')

    let isactive = true
    let isHover = false

    const msgChange = () => {
        msg.value = '新的消息哦!!!'
    }

    watchEffect(() => {
        console.log('old: ' , msg.value);
    })
</script>

<style scoped>
.active{
    color: aqua;
}
</style>
表单输入绑定
前端进行表单处理,需要将表单输入框的内容同步给 JavaScript 中相应的变量。手动连接值绑定和更改事件监听器比较麻烦,v-model 指令简化了这个麻烦
<template>
    <div>
        表单数据:<input type="text" v-model="msg"/>
        <p>{{  msg }}</p>
    </div>
</template>

<script setup>
import { ref } from 'vue'
    let msg =ref('')
</script>
v-model 提供修饰符: lazy, number(数字类型), trim(去除前后空格)
.lazy
在默认情况下,v-model 会在每次 input 事件后更新数据,添加 lazy 修饰符之后每次change 事件后更新数据
<template>
    <div>
        表单数据:<input type="text" v-model.lazy="msg"/>
        <p>{{  msg }}</p>
    </div>
</template>

<script setup>
import { ref } from 'vue'
    let msg =ref('')
</script>
组件
组件的优势是可复用性
使用构建步骤时,将Vue 组件定义在一个单独的 .vue 文件中,被叫做单文件组件(简称 SFC)
组件的嵌套关系
组件允许将UI划分为独立的、可重用的部分,并且可以对每个部分进行独立的思考,在实际应用中,组件常常被组织成层层嵌套的树状结构
全局组件
Vue 组件在使用前需要先被注册,Vue 才能在渲染模板时找到对应的实现
注册方式:
全局注册:
一次注册,全局使用时不需要再次额外使用 import 进行加载
// HelloWorld.vue

<template>
    <div v-bind:class="attr">{{ msg }}</div>
</template>

<script setup>
    let msg = '我是 hello world'
    let attr = 'active'
</script>
// main.js

import './assets/main.css'

import { createApp } from 'vue'
import App from './App.vue'
//步骤一:引入需要全局注册的组件
import HelloWorld from './components/HelloWorld.vue'

const app = createApp(App)

//定义其他组件的全局注册
//步骤二: 全局注册
// 参数1: 名字(后续在其它组件使用的时候,对应这个名字);  参数2:组件
app.component("HelloWorldComponent", HelloWorld)
app.mount('#app')
// App.vue

<template>
    <HelloWorldComponent />
</template>

<script setup>
</script>
局部注册:
在使用全局注册组件的时候,如果全局组件未被使用,仍然会出现在打包后的JS 文件中,无法自动移除,会造成文件内容过大,浪费空间;项目中使用全局组件,父子组件的依赖关系不明确,影响问题定位,不利于长期维护。
**推荐使用局部注册
组件间数据传递
父子组件通信
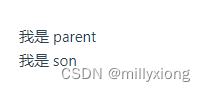
// Child.vue

<script setup>
</script>

<template>
    <div><p>我是 son</p></div>
</template>

<style  scoped>
</style>
// Parent.vue

<template>
    <div><p>我是 parent</p></div>
    <Child />
</template>

<script setup>
import Child from './Child.vue'

</script>

<style  scoped>
</style>
// App.vue

<template>
  <Parent />
</template>

<script setup>
  import Parent from './components/Parent.vue';
</script>

<style  scoped>
</style>
父子组件之间传值
defineProps
父传子:传递普通参数
// Parent.vue
<template>
    <div><p>我是 parent</p></div>
    <Child :sonName="sonName" />
</template>

<script setup>
import { ref } from  'vue'
import Child from './Child.vue'
let sonName = ref('Smith')
</script>

<style  scoped>
</style>
// Son.vue
<template>
    <p>son 的名字是: {{ sonName }}</p>
</template>

<script setup>
const props = defineProps(['sonName'])

</script>

<style  scoped>
</style>
父传子:传递对象, Parent.vue 不变
<template>
    <p>son 的名字是: {{ name }}</p><br/>
</template>

<script setup>
const props = defineProps({
    name:{
        type: String,
        default: ''
    }
})

</script>

<style  scoped>
</style>
子父组件属性传递
defineEmits
<script setup>

const emits = defineEmits(['getSonHeight', 'sonHeightAdd'])
emits('getSonHeight', {height:'120', weight:'50'})

 const add = () => {
    emits('sonHeightAdd', 10)
 }

</script>

<template>
    <button @click="add">son 身高自增</button>
</template>

<style  scoped>
</style>
<script setup>
import { reactive, ref } from  'vue'
import Child from './Child.vue'

const info = reactive({
    weight:0
    height:0
})

const emitSonHeight = (data) => {
  info.weight = data.weight
  Console.log('weight', info.weight)
}

const emitHeightAdd = (data) =>{
    info.height+=data
}
</script>

<template>
    <Child @sonHeightAdd="emitHeightAdd"  @getSonHeight="emitSonHeight"/>
    {{info.height }}
</template>
快捷键
1、使用 vscode 终端后创建一个新项目,按如下快捷键快速打开文件夹
ctrl + k + o
2、打开当前项目文件夹
ctrl + o
3、打开或者关闭终端
ctrl + `
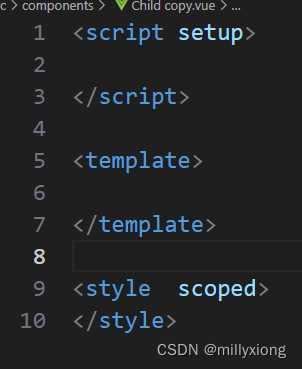
快速设置 Vue3 模板片段
打开 vscode -> 设置 -> user snippets -> 搜索 vue -> 回车 -> 填写如下模板内容
{
	// Place your snippets for vue here. Each snippet is defined under a snippet name and has a prefix, body and
	// description. The prefix is what is used to trigger the snippet and the body will be expanded and inserted. Possible variables are:
	// $1, $2 for tab stops, $0 for the final cursor position, and ${1:label}, ${2:another} for placeholders. Placeholders with the
	// same ids are connected.
	// Example:
	// "Print to console": {
	// 	"prefix": "log",
	// 	"body": [
	// 		"console.log('$1');",
	// 		"$2"
	// 	],
	// 	"description": "Log output to console"
	// }
	//以下是自己定义的模板,开始一个 Vue3 文件最基本的模板,可以自定义
	// prefix 文件后缀
	// body 就是需要的模板内容
	"Print to console": {
		"prefix": "vue",
		"body": [
		 "<script setup>",
		 "",
		 "</script>",
		 "",
		  "<template>",
		 "",
		 "</template>",
		 "",
		 "<style  scoped>",
		 "</style>"
	   ],
		"description": "Log output to console"
	   }
}
定义好模板之后,新建一个 vue 文件,输入 vue 并回车 将看到自动生成的模板内容


 573
573


 被折叠的 条评论
为什么被折叠?
被折叠的 条评论
为什么被折叠?
 到【灌水乐园】发言


