


1.环境准备:
在上一节中已经成功搭建了MyBatis开发的环境,我们在本节中新建一个模块来进行CRUD开发
1.1.新建模块:
a.新的模块名是:mybatis-002-crud

b.更改pom.xml,配置依赖:
<?xml version="1.0" encoding="UTF-8"?>
<project xmlns="http://maven.apache.org/POM/4.0.0"
         xmlns:xsi="http://www.w3.org/2001/XMLSchema-instance"
         xsi:schemaLocation="http://maven.apache.org/POM/4.0.0 http://maven.apache.org/xsd/maven-4.0.0.xsd">
    <modelVersion>4.0.0</modelVersion>

    <groupId>com.jianqun</groupId>
    <artifactId>mybatis-002-crud</artifactId>
    <version>1.0-SNAPSHOT</version>

    <properties>
        <maven.compiler.source>8</maven.compiler.source>
        <maven.compiler.target>8</maven.compiler.target>
        <project.build.sourceEncoding>UTF-8</project.build.sourceEncoding>
    </properties>

    <dependencies>
        <dependency>
            <groupId>org.mybatis</groupId>
            <artifactId>mybatis</artifactId>
            <version>3.5.10</version>
        </dependency>
        <dependency>
            <groupId>mysql</groupId>
            <artifactId>mysql-connector-java</artifactId>
            <version>5.1.47</version>
        </dependency>
        <dependency>
            <groupId>junit</groupId>
            <artifactId>junit</artifactId>
            <version>4.13.2</version>
            <scope>test</scope>
        </dependency>
        <dependency>
            <groupId>ch.qos.logback</groupId>
            <artifactId>logback-classic</artifactId>
            <version>1.2.11</version>
        </dependency>
    </dependencies>
</project>
c.打包⽅式jar:

d.mybatis-config.xml放在类的根路径下:

e.CarMapper.xml放在类的根路径下

f.logback.xml放在类的根路径下:

g.提供com.jianqun.mybatis.utils.SqlSessionUtil⼯具类

h.创建测试⽤例:com.jianqun.mybatis.CarMapperTest

2.编码实现CRUD:
2.1. insert:
a.方法1:
- 1.测试类:
	@Test
    public void testInsertCar(){
        // 准备数据
        Map<String, Object> map = new HashMap<>();
        map.put("k1", "103");
        map.put("k2", "奔驰E300L");
        map.put("k3", 50.3);
        map.put("k4", "2020-10-01");
        map.put("k5", "燃油⻋");
        // 获取SqlSession对象
        SqlSession sqlSession = SqlSessionUtil.openSession();
        // 执⾏SQL语句(使⽤map集合给sql语句传递数据)
        int count = sqlSession.insert("insertCar2", map);
        System.out.println("插⼊了⼏条记录:" + count);

        sqlSession.commit();
        sqlSession.close();
    }
- 2.mapper文件中的sql
<?xml version="1.0" encoding="UTF-8" ?>
<!DOCTYPE mapper
        PUBLIC "-//mybatis.org//DTD Mapper 3.0//EN"
        "http://mybatis.org/dtd/mybatis-3-mapper.dtd">

<mapper namespace="fdsafdsa">
    <!--insert语句,id是这条SQL语句的唯一标识。这个id就代表了这条SQL语句。-->
    <insert id="insertCar">
        insert into t_car(id,car_num,brand,guide_price,produce_time,car_type)
        values(null,'1004','丰田',40.0,'2030-10-11','燃油车');
    </insert>

    <insert id="insertCar2">
        insert into t_car(id,car_num,brand,guide_price,produce_time,car_type)
        values(null,#{k1},#{k2},#{k3},#{k4},#{k5})
    </insert>
</mapper>
b.方法2:
- 1.测试类
	@Test
    public void testInsertCar(){
        // 准备数据
        Map<String, Object> map = new HashMap<>();
        map.put("k1", "103");
        map.put("k2", "奔驰E300L");
        map.put("k3", 50.3);
        map.put("k4", "2020-10-01");
        map.put("k5", "燃油⻋");
        // 获取SqlSession对象
        SqlSession sqlSession = SqlSessionUtil.openSession();
        // 执⾏SQL语句(使⽤map集合给sql语句传递数据)
        int count = sqlSession.insert("insertCar2", map);
        System.out.println("插⼊了⼏条记录:" + count);

        sqlSession.commit();
        sqlSession.close();
    }
- 2.在mapper文件中模拟有个key不存在,导致的结果就是在数据库中这个字段不会存储上数据
<?xml version="1.0" encoding="UTF-8" ?>
<!DOCTYPE mapper
        PUBLIC "-//mybatis.org//DTD Mapper 3.0//EN"
        "http://mybatis.org/dtd/mybatis-3-mapper.dtd">

<mapper namespace="fdsafdsa">
    <!--insert语句,id是这条SQL语句的唯一标识。这个id就代表了这条SQL语句。-->
    <insert id="insertCar">
        insert into t_car(id,car_num,brand,guide_price,produce_time,car_type)
        values(null,'1004','丰田',40.0,'2030-10-11','燃油车');
    </insert>

    <insert id="insertCar2">
        insert into t_car(id,car_num,brand,guide_price,produce_time,car_type)
        values(null,#{k1},#{fsfsf},#{k3},#{k4},#{k5})
    </insert>
</mapper>
c.方式3:
为了增强可读性,我们可以将Java程序做如下修改:将key改成见名只意的形式:
- 1.测试方法:
Map<String, Object> map = new HashMap<>();
// 让key的可读性增强
map.put("carNum", "103");
map.put("brand", "奔驰E300L");
map.put("guidePrice", 50.3);
map.put("produceTime", "2020-10-01");
map.put("carType", "燃油⻋");
- 2.mapper文件中的SQL语句做如下修改,这样可以增强程序的可读性:
<?xml version="1.0" encoding="UTF-8" ?>
<!DOCTYPE mapper
 PUBLIC "-//mybatis.org//DTD Mapper 3.0//EN"
 "http://mybatis.org/dtd/mybatis-3-mapper.dtd">
<mapper namespace="car">
 <insert id="insertCar">
 	insert into t_car(car_num,brand,guide_price,produce_time,car_type) values(#{carNum},#{brand},#{guidePrice},#{produceTime},#{carType})
 </insert>
</mapper>
d.方式4:**编写测试类(使用POJO传参):
- 1.建实体类:
public class Car {
    // 数据库表当中的字段应该和pojo类的属性一一对应。
    // 建议使用包装类,这样可以防止null的问题。
    private Long id;
    private String carNum;
    private String brand;
    private Double guidePrice;
    private String produceTime;
    private String carType;

    @Override
    public String toString() {
        return "Car{" +
                "id=" + id +
                ", carNum='" + carNum + '\'' +
                ", brand='" + brand + '\'' +
                ", guidePrice=" + guidePrice +
                ", produceTime='" + produceTime + '\'' +
                ", carType='" + carType + '\'' +
                '}';
    }

    public Long getId() {
        return id;
    }

    public void setId(Long id) {
        this.id = id;
    }

    public String getCarNum() {
        return carNum;
    }

    /*public String getXyz() {
        return carNum;
    }*/

    public void setCarNum(String carNum) {
        this.carNum = carNum;
    }

    public String getBrand() {
        return brand;
    }

    public void setBrand(String brand) {
        this.brand = brand;
    }

    public Double getGuidePrice() {
        return guidePrice;
    }

    public void setGuidePrice(Double guidePrice) {
        this.guidePrice = guidePrice;
    }

    public String getProduceTime() {
        return produceTime;
    }

    public void setProduceTime(String produceTime) {
        this.produceTime = produceTime;
    }

    public String getCarType() {
        return carType;
    }

    public void setCarType(String carType) {
        this.carType = carType;
    }

    public Car(Long id, String carNum, String brand, Double guidePrice, String produceTime, String carType) {
        this.id = id;
        this.carNum = carNum;
        this.brand = brand;
        this.guidePrice = guidePrice;
        this.produceTime = produceTime;
        this.carType = carType;
    }

    public Car() {
    }
}
- 2.测试类:
  	@Test
    public void testInsertCarByPOJO(){
        // 创建POJO,封装数据
        Car car = new Car();
        car.setCarNum("103");
        car.setBrand("奔驰C200");
        car.setGuidePrice(33.23);
        car.setProduceTime("2020-10-11");
        car.setCarType("燃油⻋");
        // 获取SqlSession对象
        SqlSession sqlSession = SqlSessionUtil.openSession();
        // 执⾏SQL,传数据
        int count = sqlSession.insert("insertCarByPOJO", car);
        System.out.println("插⼊了⼏条记录" + count);

        sqlSession.commit();
        sqlSession.close();
    }
- 3.建mapper:
<insert id="insertCarByPOJO">
 	<!--#{} ⾥写的是POJO的属性名-->
 	insert into t_car(car_num,brand,guide_price,produce_time,car_type) values (#{carNum},#{brand},#{guidePrice},#{produceTime},#{carType})
</insert>
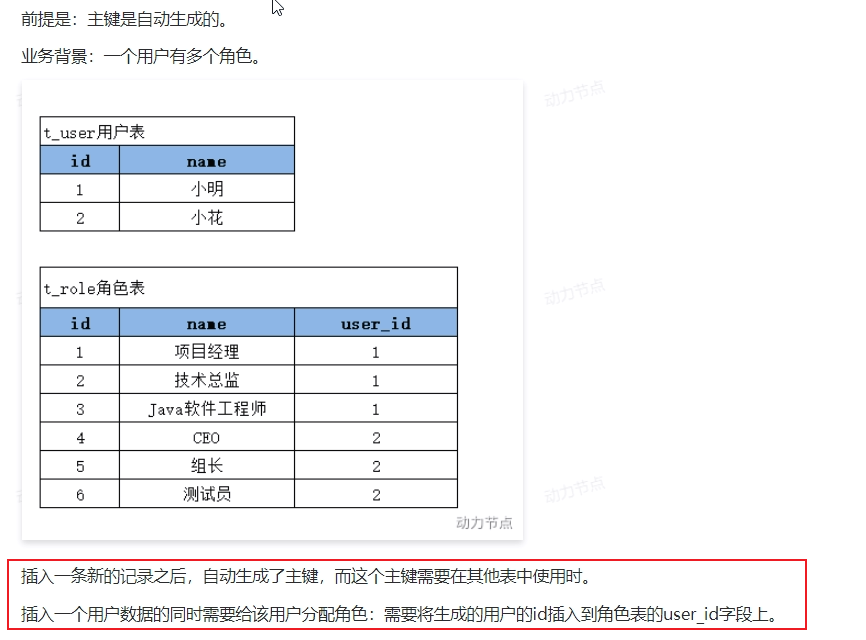
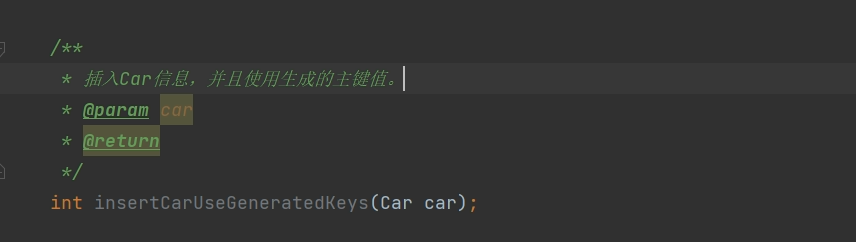
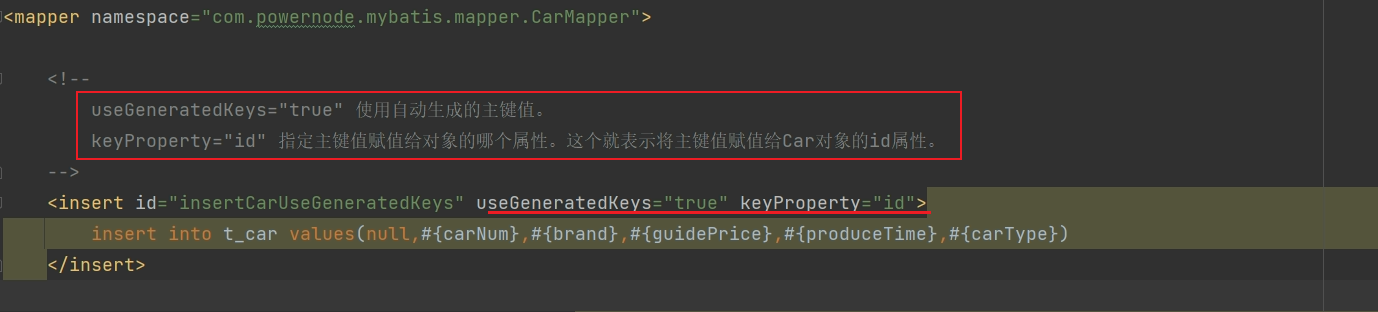
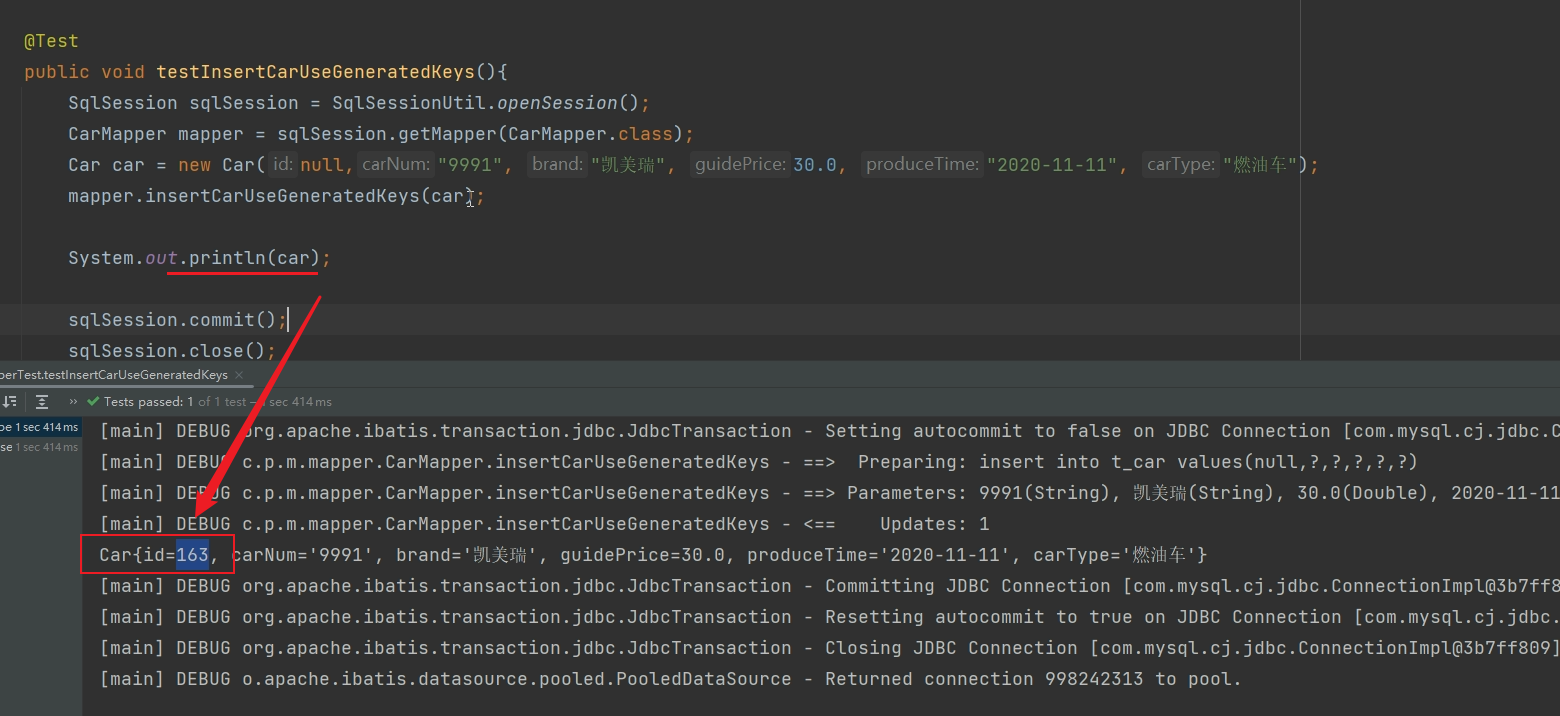
e.插入数据的时,获取自动生成的主键:
1.需求说明:
2.代码测试:
- 1.定义接口:
.
- 2.映射SQL:
- 3.测试:
2.2. delete:
- 1.编码实现根据car_num进⾏删除:
- 1.
CarMapper.xml
<delete id="deleteByCarNum">
 	delete from t_car where car_num = #{SuiBianXie}
</delete>
- 2.
CarMapperTest.testDeleteByCarNum
@Test
public void testDeleteByCarNum(){
	 // 获取SqlSession对象
	 SqlSession sqlSession = SqlSessionUtil.openSession();
	 // 执⾏SQL语句
	 int count = sqlSession.delete("deleteByCarNum", "102");
	 System.out.println("删除了⼏条记录:" + count);

   	 sqlSession.commit();
     sqlSession.close();
}
- 注意:
当占位符只有⼀个的时候,${} ⾥⾯的内容可以随便写
2.3. update:
- 1.需求:
修改id=34的Car信息,car_num为102,brand为⽐亚迪汉,guide_price为30.23,produce_time为2018-09-10,car_type为电⻋
- mapper添加修改方法的SQL:
<update id="updateCarByPOJO">
 update t_car set
 	car_num = #{carNum},
 	brand = #{brand},
 	guide_price = #{guidePrice},
 	produce_time = #{produceTime},
 	car_type = #{carType}
 	where id = #{id}
</update>
CarMapperTest.testUpdateCarByPOJO.java
@Test
 public void testUpdateCarByPOJO(){
	 // 准备数据
	 Car car = new Car();
	 car.setId(34L);
	 car.setCarNum("102");
	 car.setBrand("⽐亚迪汉");
	 car.setGuidePrice(30.23);
	 car.setProduceTime("2018-09-10");
	 car.setCarType("电⻋");
	 // 获取SqlSession对象
	 SqlSession sqlSession = SqlSessionUtil.openSession();
	 // 执⾏SQL语句
	 int count = sqlSession.update("updateCarByPOJO", car);
	 System.out.println("更新了⼏条记录:" + count);

	 sqlSession.commit();
     sqlSession.close();
 }
2.4. select:
select语句和其它语句不同的是:查询会有⼀个结果集!!!
a.查询单条数据:
- 1.mapper文件中添加查询的sql方法:
<select id="selectCarById" resultType="com.powernode.mybatis.pojo.Car">
 	select * from t_car where id = #{id}
</select>
@Test
public void testSelectCarById(){
	 // 获取SqlSession对象
	 SqlSession sqlSession = SqlSessionUtil.openSession();
	 // 执⾏SQL语句
	 Object car = sqlSession.selectOne("selectCarById", 1);
	 System.out.println(car);
}
b.查询多条数据:
- 1.mapper中定义方法写SQL:
  <select id="selectAll" resultType="com.jianqun.mybatis.pojo.Car">
        select
            id,car_num as carNum,brand,guide_price as guidePrice,
            produce_time as produceTime,
            car_type as carType
        from
            t_car
    </select>
- 2.测试查询:
    @Test
    public void testSelectAll(){
        SqlSession sqlSession = SqlSessionUtil.openSession();
        // 执行SQL语句
        //List<Object> cars = sqlSession.selectList("selectAll");
        List<Car> cars = sqlSession.selectList("selectAll");
        // 遍历
        cars.forEach(car -> System.out.println(car));
        sqlSession.close();
    }
3.关于SQL Mapper的namespace说明:
3.1.namespace说明:
- 1.在SQL Mapper配置⽂件中标签的
namespace属性可以翻译为命名空间,这个命名空间主要是为了防⽌sqlId冲突的 - 2.假设具有多个xxxMapper文件的时候,如下图这种情况,两个mapper文件中都有selectAll相关的sql,那么在我们测试调用的时候,就应该对其区分,那么此时
namespace属性就可以起到作用了

- 3.在测试调用的时候,进行如下方式调用,就可以防止方法冲突了:


 50
50

 被折叠的 条评论
为什么被折叠?
被折叠的 条评论
为什么被折叠?
 到【灌水乐园】发言


