


一、相机标定
相机的标定分为内参标定和外参标定,其中内参标定多使用张正友标定法,可以通过matlab、opencv等工具进行实现,不多描述,这里主要讲相机的外参标定。
相机外参标定主要是求出相机相对参考坐标系的旋转误差角度以及位移量,常用旋转矩阵和平移矩阵表示,外参标定有多种标定方法可以选择,例如利用车道线消失点(平行的车道线在相机图像平面上的交点)进行标定;或者利用激光雷达作真值与相机进行联合标定,可以通过autoware中的标定工具箱进行实现,这里对此方法进行讲述。
1. 安装
首先是安装,目标标定工具箱已独立出来,不需要为此安装autoware。
1) 下载安装nlopt
下载地址:https://gitee.com/cuizhi/nlopt?_from=gitee_search
git clone git://github.com/stevengj/nlopt
cd nlopt
mkdir build
cd build
cmake ..
make
sudo make install
2)下载标定工具包。
下载地址:https://github.com/XidianLemon/calibration_camera_lidar
3) 编译
使用catkin_make进行编译,可能会遇到不编译3个可执行文件的情况,需要在 cmakelists.txt 中增加自己的 ros 版本号
2. 使用
具体使用可参考其他博客,不多进行展开,只提几个注意事项:
1) 需要更改标定版格子长宽大小以及角点个数。更改完以后需要关掉再重新打开一次,以更新这些改过的数据。
2)需要将激光雷达的点云话题重映射到该工具箱需要的话题名:/points_raw,例如:
rosbag play 2021-10-13-10-34-37.bag /rslidar_points:=/points_raw
3) 要保证自己圈取的区域内有2条以上的点云线,才可进行计算
4) 尽量使标定版展示尽可能多的角度,以提高标定准确度
5)标定箱得到的内参不一定准确,最好辅助opencv等工具重新再标一次内参
3. 标定结果及修正
如下图所示:

在这里需要特别注意:
1) autoware在得到旋转矩阵后进行了如下操作:
cv::Mat camera_velodyne_rotation = rotation_matrix.t();
所以真正的旋转矩阵应该将autoware标定结果给出的旋转矩阵进行转置操作
2) autoware在得到平移矩阵后进行了如下操作:
camera_velodyne_translation.x = -camera_velodyne_point.z;
camera_velodyne_translation.y = camera_velodyne_point.x;
camera_velodyne_translation.z = camera_velodyne_point.y;
故真正的平移向量x_real = y ; y_real = z ; z_real = - x
所以真实的外参矩阵应为:

二、投影
所谓投影就是将世界坐标系中的坐标转到像素坐标系下,例如可以将世界坐标系中的点云投影到图像中进行显示,也可以从中验证标定的准确性。
#-*- coding:utf-8 -*-
import numpy as np
import cv2 as cv
from PIL import Image
from pylab import imshow
from pylab import array
from pylab import plot
from pylab import title
from pylab import *
import matplotlib.pyplot as plt


import cv2
import numpy as np


x=[]
y=[]
distance=[]    #存放需要投影点转换成二维前的雷达坐标的x坐标(距离信息),以此为依据对投影点进行染色。
distance_3d=[]    #存放转换前雷达坐标的x坐标(距离信息)。


lidar_path = '/home/bit/Pictures/00001.bin'
cloud = np.fromfile(str(lidar_path), dtype=np.float32, count=-1).reshape([-1, 4])

im = Image.open('/home/bit/Pictures/image.png')

pix = im.load()
points_3d = []

for i in range(0, cloud.shape[0]):
    x_raw = float(cloud[i][0])
    y_raw = float(cloud[i][1])
    z_raw = float(cloud[i][2])
    point_3d = []

    point_3d.append(x_raw)
    point_3d.append(y_raw)
    point_3d.append(z_raw)
    if x_raw>0:
        points_3d.append(point_3d)
        distance_3d.append(x_raw)

cube = np.float64(points_3d)

R = np.array([[-1.9525949373390805e-02, -3.8674511666283440e-03, 9.9980187043360824e-01],
              [-9.9980913532152060e-01, 7.3156841759725033e-04,  -1.9523261389525204e-02],
              [-6.5591821222671376e-04, -9.9999225378456014e-01,  -3.8809975746900705e-03]])
r=cv2.Rodrigues(R.T)
print(r[0])
rvec = r
# (.T)

tvec = np.float64([4.3185834825778683e-03, 1.2585050918946972e+00, -1.6388773270631514e+00])
# (y, z, -x)

camera_matrix = np.float64([[1.2686562988224141e+03, 0., 6.3156841197487631e+02],
                            [0., 1.2766674861663803e+03, 5.1346710111425000e+02],
                            [ 0., 0., 1.]])

distCoeffs = np.float64([ -8.6631893015276615e-02, 1.1479512127697723e-01,
                          -1.9558035453158592e-03, -9.1054504003185296e-04, 2.8652030835174269e-01])

point_2d, _ = cv.projectPoints(cube, rvec, tvec, camera_matrix, distCoeffs)

m=-1
for point in point_2d:
    m=m+1
    x_2d = point[0][0]
    y_2d = point[0][1]

    if 0<=x_2d<=1280 and 0<=y_2d<=1024:
        x.append(x_2d)
        y.append(y_2d)
        distance.append(-distance_3d[m]*100)#数值取反是为了让colormap颜色由红到蓝显示而非由蓝到红
        RGB=pix[x_2d,y_2d]
        # print('x,y,z,(r,g,b):',([x_2d,y_2d,distance_3d[m]],RGB))


x=np.array(x)
y=np.array(y)
plt.scatter(x, y, c=distance, cmap='jet',s=4,marker='.')
plt.imshow(im)
plt.show()
显示的结果如下:

三、测距
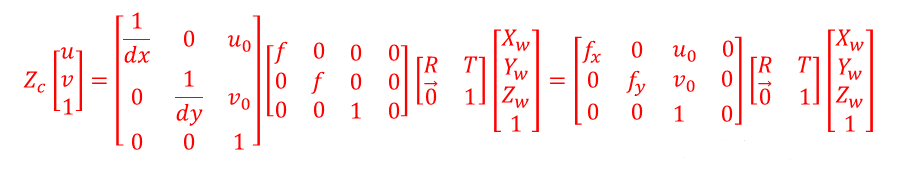
我们知道单目是无法知道深度信息的,对应到上述公式就是其中的Zc我们是无法直接求出的,但我们可以通过一些方法进行测量,例如当地面平坦时,地面的高度是已知的,通过已知的地面高度信息,可以推出此地面点的Zc值,继而可以推出Xw、Yw这两个距离值,从而我们可以得到此地面点上车道线的具体位置,或者位于此地面点上的物体的位置,这种方法叫做地面点估计法。
除此之外,我们还可以通过感知算法检测出的物体宽度或者高度来估计Zc,此方法精度主要取决于感知算法的精度。
下面贴上对地面点估计法:
import numpy as np
import cv2

np.set_printoptions(suppress=True)

def Pix2World(point2D, rVec, tVec, cameraMat, height):
    """
       Function used to convert given 2D points back to real-world 3D points
       point2D  : An array of 2D points
       rVec     : Rotation vector
       tVec     : Translation vector
       cameraMat: Camera Matrix used in solvePnP
       height   : Height in real-world 3D space
       Return   : output_array: Output array of 3D points
    """
    point3D = []
    point2D = (np.array(point2D, dtype='float32')).reshape(-1, 2)
    numPts = point2D.shape[0]
    point2D_op = np.hstack((point2D, np.ones((numPts, 1))))

    rMat = cv2.Rodrigues(rVec)[0]
    # print(rMat)

    rMat_inv = np.linalg.inv(rMat)
    kMat_inv = np.linalg.inv(cameraMat)

    for point in range(numPts):
        uvPoint = point2D_op[point, :].reshape(3, 1)
        tempMat = np.matmul(rMat_inv, kMat_inv)
        tempMat1 = np.matmul(tempMat, uvPoint)
        tempMat2 = np.matmul(rMat_inv, tVec)
        s = (height + tempMat2[2]) / tempMat1[2]
        print(s)
        p = tempMat1 * s - tempMat2
        point3D.append(p)

    point3D = (np.array(point3D, dtype='float32')).reshape([-1, 1, 3])
    return point3D


point2D = np.array([[666, 712], [666,1012], [166, 712], [1066, 712]])
height = 0

rVec = np.array([1.20224752, -1.22675771, 1.22122008])
# (.T)

tVec = np.array([4.3185834825778683e-03, 1.2585050918946972e+00, -1.6388773270631514e+00]).reshape(-1,1)
# (y, z, -x)

cameraMat = np.array([[1.2823399584940221e+03, 0., 6.2975992023192214e+02],
                      [0., 1.2879693403504191e+03, 5.2557461337339316e+02],
                      [ 0., 0., 1.]])

point3D = Pix2World(point2D, rVec, tVec, cameraMat, height)
print(point3D)


 3335
3335


 被折叠的 条评论
为什么被折叠?
被折叠的 条评论
为什么被折叠?
 到【灌水乐园】发言


