


《OpenShift / RHEL / DevSecOps 汇总目录》
说明:本文已经在 OpenShift 4.18 环境中验证
创建 Windows VM
- 在 Template catalog 中进入 Microsoft Windows Server 2019 VM。
- 在下图的 VM 配置界面中完成以下配置:
- 选中
Boot from CD选项 - 为
CD source选择 URL (creates PVC) - 在
Image URL中填入 https://catalog-item-assets.s3.us-east-2.amazonaws.com/qcow_images/Windows2019.iso - 将
Disk size设为 5 GiB Disk source设为 BlankDisk size设为 60 GiB- 选中 Drivers 的
Mount Windows drivers disk选项
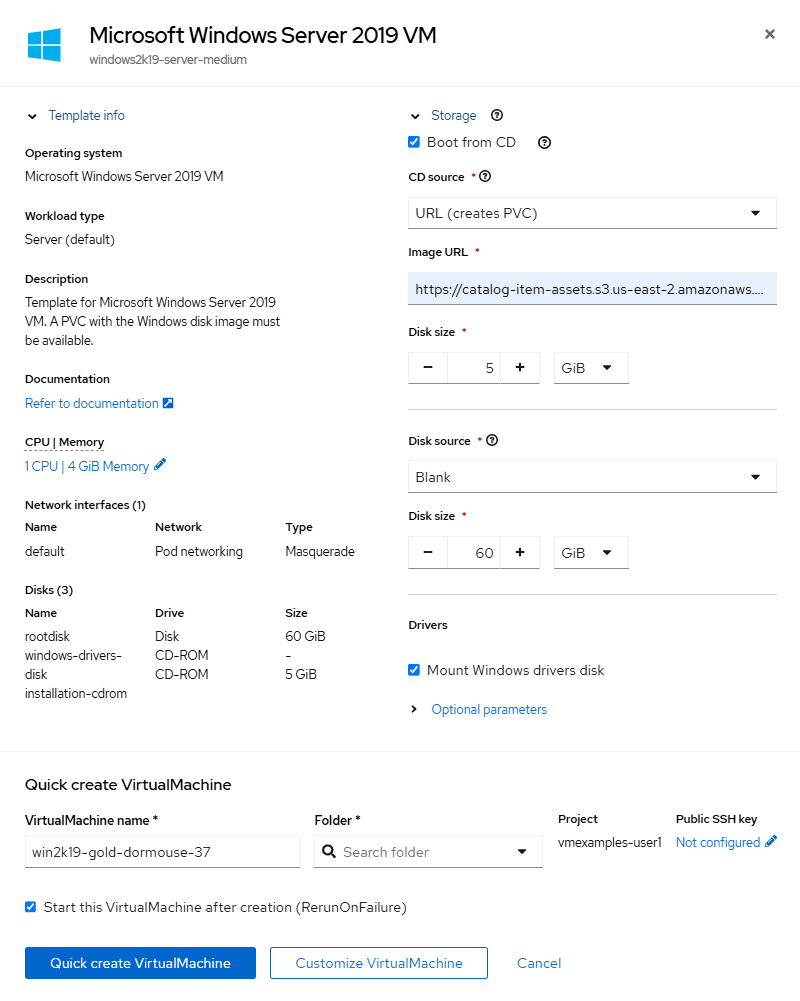
- 点击上图的 Customize and create VirtualMachine,然后在下图的 Overview 中为
Boot mode选择 BIOS。

- 进入下图的 Scripts,然后点击 sysprep 的 Edit。
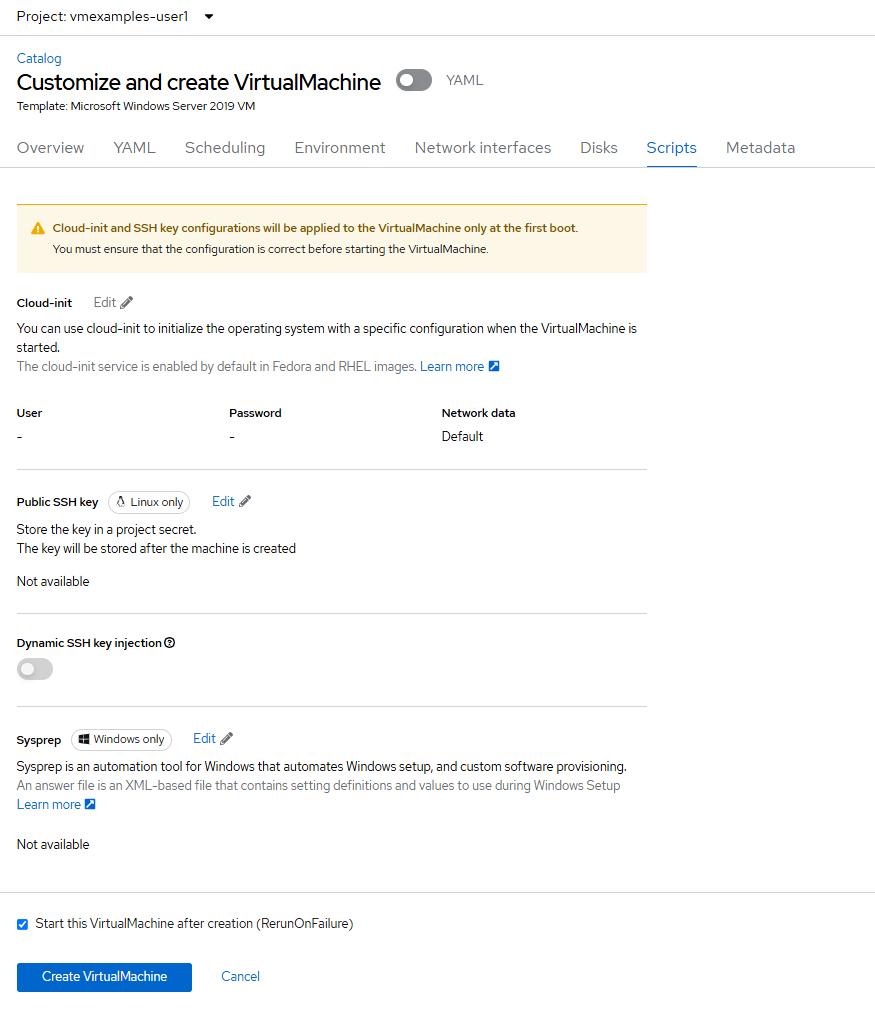
- 在 Sysprep 窗口中填入以下 XML,然后 Save。注意:Sysprep 是微软的自动化工具,可以自动在 Windows 安装软件和配置环境。

<?xml version="1.0" encoding="utf-8"?>
<unattend xmlns="urn:schemas-microsoft-com:unattend" xmlns:wcm="http://schemas.microsoft.com/WMIConfig/2002/State" xmlns:xsi="http://www.w3.org/2001/XMLSchema-instance" xsi:schemaLocation="urn:schemas-microsoft-com:unattend">
  <settings pass="windowsPE">
    <component name="Microsoft-Windows-Setup" processorArchitecture="amd64" publicKeyToken="31bf3856ad364e35" language="neutral" versionScope="nonSxS">
      <DiskConfiguration>
        <Disk wcm:action="add">
          <CreatePartitions>
            <CreatePartition wcm:action="add">
              <Order>1</Order>
              <Extend>true</Extend>
              <Type>Primary</Type>
            </CreatePartition>
          </CreatePartitions>
          <ModifyPartitions>
            <ModifyPartition wcm:action="add">
              <Active>true</Active>
              <Format>NTFS</Format>
              <Label>System</Label>
              <Order>1</Order>
              <PartitionID>1</PartitionID>
            </ModifyPartition>
          </ModifyPartitions>
          <DiskID>0</DiskID>
          <WillWipeDisk>true</WillWipeDisk>
        </Disk>
      </DiskConfiguration>
      <ImageInstall>
        <OSImage>
          <InstallFrom>
            <MetaData wcm:action="add">
              <Key>/IMAGE/NAME</Key>
              <Value>Windows Server 2019 SERVERSTANDARD</Value>
            </MetaData>
          </InstallFrom>
          <InstallTo>
            <DiskID>0</DiskID>
            <PartitionID>1</PartitionID>
          </InstallTo>
        </OSImage>
      </ImageInstall>
      <UserData>
        <AcceptEula>true</AcceptEula>
        <FullName>Administrator</FullName>
        <Organization>My Organization</Organization>
      </UserData>
      <EnableFirewall>false</EnableFirewall>
    </component>
    <component name="Microsoft-Windows-International-Core-WinPE" processorArchitecture="amd64" publicKeyToken="31bf3856ad364e35" language="neutral" versionScope="nonSxS">
      <SetupUILanguage>
        <UILanguage>en-US</UILanguage>
      </SetupUILanguage>
      <InputLocale>en-US</InputLocale>
      <SystemLocale>en-US</SystemLocale>
      <UILanguage>en-US</UILanguage>
      <UserLocale>en-US</UserLocale>
    </component>
  </settings>
  <settings pass="offlineServicing">
    <component name="Microsoft-Windows-LUA-Settings" processorArchitecture="amd64" publicKeyToken="31bf3856ad364e35" language="neutral" versionScope="nonSxS">
      <EnableLUA>false</EnableLUA>
    </component>
  </settings>
  <settings pass="specialize">
    <component name="Microsoft-Windows-Shell-Setup" processorArchitecture="amd64" publicKeyToken="31bf3856ad364e35" language="neutral" versionScope="nonSxS">
      <AutoLogon>
        <Password>
          <Value>R3dh4t1!</Value>
          <PlainText>true</PlainText>
        </Password>
        <Enabled>true</Enabled>
        <LogonCount>999</LogonCount>
        <Username>Administrator</Username>
      </AutoLogon>
      <OOBE>
        <HideEULAPage>true</HideEULAPage>
        <HideLocalAccountScreen>true</HideLocalAccountScreen>
        <HideOnlineAccountScreens>true</HideOnlineAccountScreens>
        <HideWirelessSetupInOOBE>true</HideWirelessSetupInOOBE>
        <NetworkLocation>Work</NetworkLocation>
        <ProtectYourPC>3</ProtectYourPC>
        <SkipMachineOOBE>true</SkipMachineOOBE>
      </OOBE>
      <UserAccounts>
        <LocalAccounts>
          <LocalAccount wcm:action="add">
            <Description>Local Administrator Account</Description>
            <DisplayName>Administrator</DisplayName>
            <Group>Administrators</Group>
            <Name>Administrator</Name>
          </LocalAccount>
        </LocalAccounts>
      </UserAccounts>
      <TimeZone>Eastern Standard Time</TimeZone>
    </component>
  </settings>
  <settings pass="oobeSystem">
    <component name="Microsoft-Windows-International-Core" processorArchitecture="amd64" publicKeyToken="31bf3856ad364e35" language="neutral" versionScope="nonSxS">
      <InputLocale>en-US</InputLocale>
      <SystemLocale>en-US</SystemLocale>
      <UILanguage>en-US</UILanguage>
      <UserLocale>en-US</UserLocale>
    </component>
    <component name="Microsoft-Windows-Shell-Setup" processorArchitecture="amd64" publicKeyToken="31bf3856ad364e35" language="neutral" versionScope="nonSxS">
      <AutoLogon>
        <Password>
          <Value>R3dh4t1!</Value>
          <PlainText>true</PlainText>
        </Password>
        <Enabled>true</Enabled>
        <LogonCount>999</LogonCount>
        <Username>Administrator</Username>
      </AutoLogon>
      <OOBE>
        <HideEULAPage>true</HideEULAPage>
        <HideLocalAccountScreen>true</HideLocalAccountScreen>
        <HideOnlineAccountScreens>true</HideOnlineAccountScreens>
        <HideWirelessSetupInOOBE>true</HideWirelessSetupInOOBE>
        <NetworkLocation>Work</NetworkLocation>
        <ProtectYourPC>3</ProtectYourPC>
        <SkipMachineOOBE>true</SkipMachineOOBE>
      </OOBE>
      <UserAccounts>
        <LocalAccounts>
          <LocalAccount wcm:action="add">
            <Description>Local Administrator Account</Description>
            <DisplayName>Administrator</DisplayName>
            <Group>Administrators</Group>
            <Name>Administrator</Name>
          </LocalAccount>
        </LocalAccounts>
      </UserAccounts>
      <TimeZone>Eastern Standard Time</TimeZone>
    </component>
  </settings>
</unattend>
- 在点击 Create VirtualMachine 后会自动安装 Windows Server 虚机并安装要求的软件,在完成后可看到下图 Windows 虚机的运行状态。

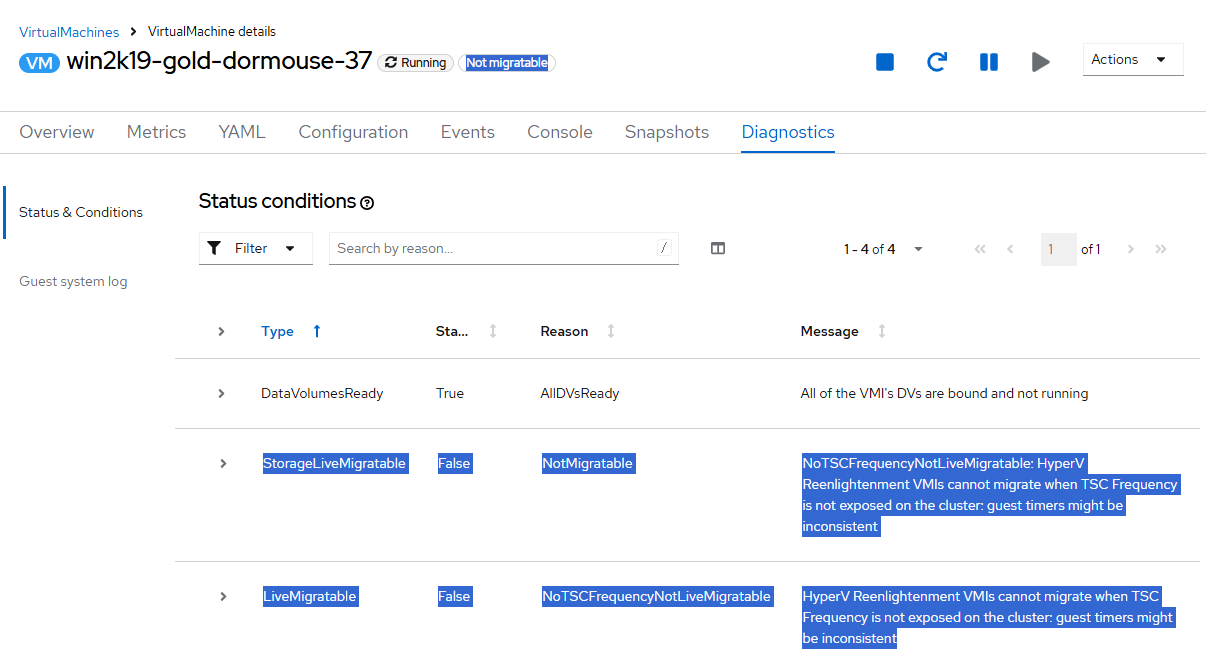
配置可迁移 Windows VM
- 可以看到当前 Windows 虚机的状态为 Not migratable。另外可进入 Windows 虚机的 Diagnstics 栏查看 NotMigratable 的原因:Windows 为了避免在迁移系统时出现时钟不一致的情况。
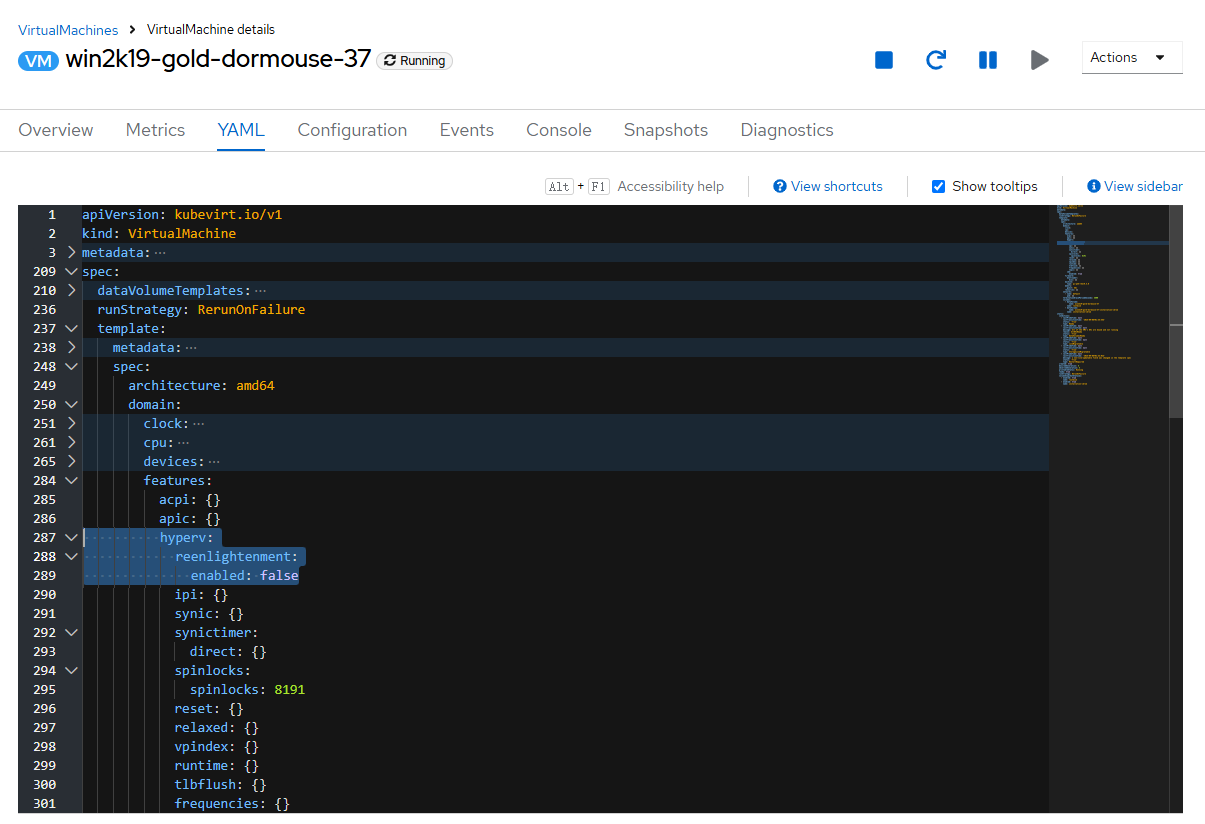
- 可以进入 Windows 虚机的 YAML,然后将 reenlightenment 部分的 enabled 设为 false。
。。。
        features:
          acpi: {}
          apic: {}
          hyperv:
            reenlightenment:
              enabled: false
。。。
- 在保存配置后 Windows 虚机的状态就不再有 Not migratable 了,说明该虚机可自节点间迁移了。
参考
https://rhpds.github.io/openshift-virt-roadshow-cnv-multi-user/modules/module-07-tempinst.html#create_win
https://docs.redhat.com/zh-cn/documentation/red_hat_enterprise_linux/9/html/configuring_and_managing_virtualization/optimizing-windows-virtual-machines-on-rhel_installing-and-managing-windows-virtual-machines-on-rhel


 721
721

 被折叠的 条评论
为什么被折叠?
被折叠的 条评论
为什么被折叠?
 到【灌水乐园】发言


