


ucore的启动过程
- 运行BIOS,完成自检
- 运行BootLoader,将ucore.img载入内存
- 控制器交给UCore
BIOS是ROM上的程序,计算机启动后加载到物理内存0x000F0000 到 0x00100000, 设置cs和ip的值让计算机启动后可以从BIOS开始执行,BIOS会将BootLoader载入内存,并调整cs ip的值,最后通过跳转指令到BootLoader执行.
BootLoader负责将os载入内存,通过主引导扇区中的信息,载入os
练习三
BootLoader进入保护模式的过程
ucore有两种模式,实模式和保护模式,实模式中寻址空间只有1M,保护模式可以启用全部32位地址线.寻址空间扩大到4GB.
为了开启保护模式, 在bootasm.s中,要完成:
- 打开A20 gate
- 初始化GDT(全局描述符表)
- 使能保护模式
打开A20
需要通过键盘控制器发送命令设置A20
有两步:
- 发送端口写指令到input buffer
- 将要写入的数据发送到input buffer
    # Enable A20:
    #  For backwards compatibility with the earliest PCs, physical
    #  address line 20 is tied low, so that addresses higher than
    #  1MB wrap around to zero by default. This code undoes this.
seta20.1:
    inb $0x64, %al                                  # Wait for not busy(8042 input buffer empty).
    testb $0x2, %al
    jnz seta20.1

    movb $0xd1, %al                                 # 0xd1 -> port 0x64
    outb %al, $0x64                              	 #发送写指令
    														 	 # 0xd1 means: write data to 8042's P2 port

seta20.2:
    inb $0x64, %al                                  # Wait for not busy(8042 input buffer empty).
    testb $0x2, %al
    jnz seta20.2

    movb $0xdf, %al                                 # 0xdf -> port 0x60
    outb %al, $0x60                                	#将数据 0xdf=11011111
                                                               # 写入 Inputbuffer, 从而将A20置1
    															 # 0xdf = 11011111, means set P2's A20 bit(the 1 bit) to 1
初始化GDT,使能保护模式
    lgdt gdtdesc					//初始化GDT,gdtdesc表示了gdt的起始地址和长度
    movl %cr0, %eax
    orl $CR0_PE_ON, %eax	//将CR0 的第一位置1使能保护模式
    movl %eax, %cr0

    # Jump to next instruction, but in 32-bit code segment.
    # Switches processor into 32-bit mode.
    ljmp $PROT_MODE_CSEG, $protcseg

.code32                                             # Assemble for 32-bit mode
protcseg:
    # Set up the protected-mode data segment registers
    movw $PROT_MODE_DSEG, %ax                       # Our data segment selector
    movw %ax, %ds                                   # -> DS: Data Segment
    movw %ax, %es                                   # -> ES: Extra Segment
    movw %ax, %fs                                   # -> FS
    movw %ax, %gs                                   # -> GS
    movw %ax, %ss                                   # -> SS: Stack Segment

    # Set up the stack pointer and call into C. The stack region is from 0--start(0x7c00)
    //设置好ebp esp,开始函数调用
    movl $0x0, %ebp
    movl $start, %esp
    call bootmain

    # If bootmain returns (it shouldn't), loop.
spin:
    jmp spin

# Bootstrap GDT
.p2align 2                                          # force 4 byte alignment
gdt:
    SEG_NULLASM                                     # null seg
    SEG_ASM(STA_X|STA_R, 0x0, 0xffffffff)           # code seg for bootloader and kernel
    SEG_ASM(STA_W, 0x0, 0xffffffff)                 # data seg for bootloader and kernel

gdtdesc:
    .word 0x17                                      # sizeof(gdt) - 1
    .long gdt                                       # address gdt
练习四 分析bootloader加载ELF格式的OS的过程
BootLoader 在开启保护模式后,接下来需要将os载入内存.
ucore中os文件为ELF格式, 通过读取EFLHeader中的信息读取os.
struct elfhdr {
  uint magic;  // must equal ELF_MAGIC
  uchar elf[12];
  ushort type;
  ushort machine;
  uint version;
  uint entry;  // 程序入口的虚拟地址
  uint phoff;  // program header 表的位置偏移
  uint shoff;
  uint flags;
  ushort ehsize;
  ushort phentsize;
  ushort phnum; //program header表中的入口数目
  ushort shentsize;
  ushort shnum;
  ushort shstrndx;
};
从硬盘上读取扇区
readsect(void *dst, uint32_t secno) {
    // wait for disk to be ready
    waitdisk();                             //不忙时可读, 0x1F7 第1.2位不为01

    outb(0x1F2, 1);                         // 读1个扇区
    outb(0x1F3, secno & 0xFF);              //设置0-7位
    outb(0x1F4, (secno >> 8) & 0xFF);       //设置8-15位
    outb(0x1F5, (secno >> 16) & 0xFF);      //设置16-23位
    outb(0x1F6, ((secno >> 24) & 0xF) | 0xE0);//设置24-27位
    outb(0x1F7, 0x20);                      // cmd 0x20 - read sectors  读扇区命令

    // wait for disk to be ready
    waitdisk();

    // read a sector
    insl(0x1F0, dst, SECTSIZE / 4);
}
加载os
void
bootmain(void) {
    // read the 1st page off disk
    //Lan:ELFHDR  0x10000
    readseg((uintptr_t)ELFHDR, SECTSIZE * 8, 0);//读elfhdr到0X10000 8个扇区

    // is this a valid ELF?
    if (ELFHDR->e_magic != ELF_MAGIC) {
        goto bad;
    }

    struct proghdr *ph, *eph;

    // load each program segment (ignores ph flags)
    ph = (struct proghdr *)((uintptr_t)ELFHDR + ELFHDR->e_phoff);//ph为程序段目录的入口项
    eph = ph + ELFHDR->e_phnum;//程序段的数目
    for (; ph < eph; ph ++) {
        //将程序段读入内存
        readseg(ph->p_va & 0xFFFFFF, ph->p_memsz, ph->p_offset);//虚拟地址映射, 程序段大小, 程序段偏移
    }

    // call the entry point from the ELF header
    // note: does not return
    ((void (*)(void))(ELFHDR->e_entry & 0xFFFFFF))();//跳转到OS的入口

bad:
    outw(0x8A00, 0x8A00);
    outw(0x8A00, 0x8E00);

    /* do nothing */
    while (1);
}
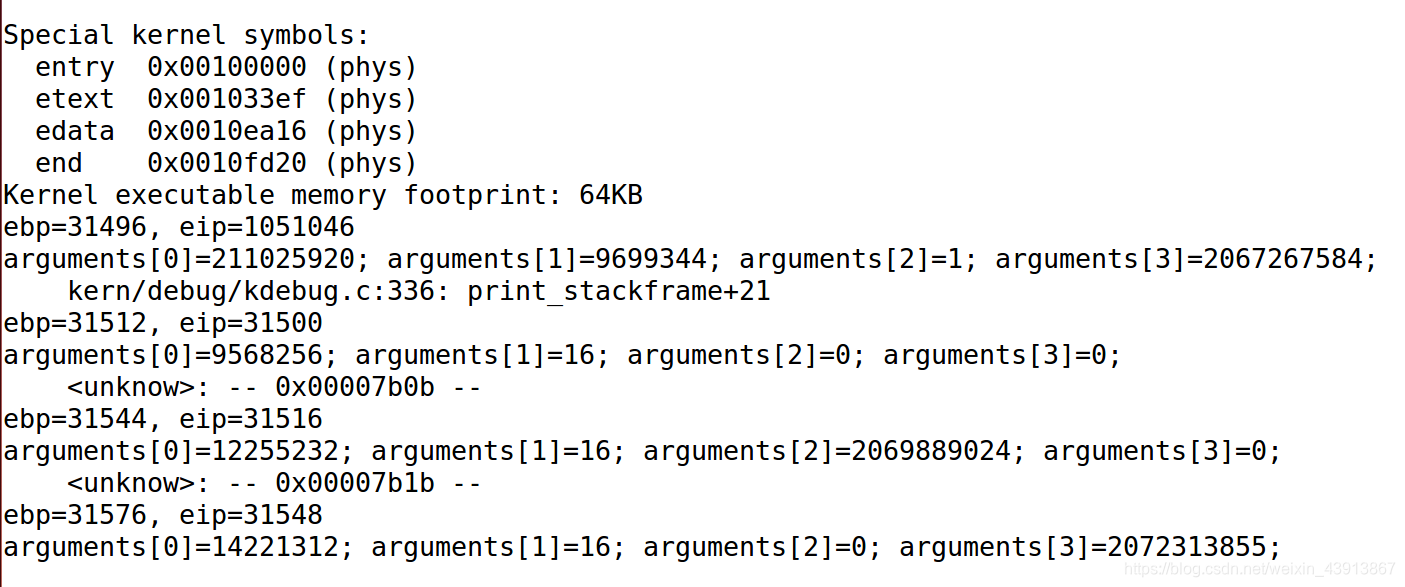
练习五 实现函数调用堆栈跟踪函数
+|  栈底方向        | 高位地址
 |    ...        |
 |    ...        |
 |  参数3        |
 |  参数2        |
 |  参数1        |
 |  返回地址        |
 |  上一层[ebp]    | <-------- [ebp]
 |  局部变量        |  低位地址
esp:栈顶指针
ebp:指向的内存单元中保存着上一层的ebp地址(被调用函数)
函数调用时,将传给调用函数的参数压栈,返回地址压栈,ebp压栈,ebp指向esp,局部变量压栈.
此时,ebp向上可以获取参数,返回地址,向下可以获取局部变量.
调用结束时,ebp回到上一层ebp, ebp=[ebp] ;esp=参数3地址+1;
	 uint32_t ebp=read_ebp();//ebp
     uint32_t eip=read_eip();//eip
     int i,j;
     for( i=0;i<STACKFRAME_DEPTH;i++){
         cprintf("ebp=%d, eip=%d /n",ebp,eip);

         uint32_t* add=(uint32_t*)(ebp+2);
         for( j=0;j<4;j++){//输出参数
             cprintf("arguments[%d]=%d; ",j,*(add+j));
         }
         cprintf("/n");
         print_debuginfo(eip-1);
         //调用结束
         eip=ebp+4;
         ebp=*((uint32_t*)ebp);
     }


 1478
1478

 被折叠的 条评论
为什么被折叠?
被折叠的 条评论
为什么被折叠?
 到【灌水乐园】发言


