


复制工程
1、保留工程基础结构 2、抹掉原始工程痕迹
步骤:
1、将创建好的文件夹进行复制成为一个springboot_0x_xxxxxxx的文件夹
2、进入springboot_0x_xxxxxxx在pom.xml文件中将artifactId修改6
3、删除不需要的文件,仅剩src和pom.xml文件
4、然后springboot_0x_xxxxxxx就可以作为模板
5、在将springboot_0x_xxxxxxx复制一份,修改artifactId为要使用的模块名称
6、进入IDEA,进入模块管理,添加
问题:
1、在复制好工程后,左边项目可明确区分,但右边maven会有两个相同的名称

2、解决办法,删除以下代码
<name>springboot_01_02_quickstart</name>
<description>Demo project for Spring Boot</description>
为了规避此次问题,可直接在springboot_0x_xxxxxxx模板中将上面两行代码进行删除

属性配置
修改服务器端口
将8080修改为80,但现在是内嵌的tomcat所以需要在resources文件夹下的application.properties中进行修改,因为此时application.properties为空,所以直接写需要改的键值对即可server.port=80这就是服务器的端口配置

关闭80端口
C:\WINDOWS\system32>net stop http
HTTP Service 服务已成功停止。
C:\WINDOWS\system32>netstat -ano | findstr 0.0.0.0:80
C:\WINDOWS\system32>sc config http start=disabled
[SC] ChangeServiceConfig 成功
基础配置
在SpringBoot中所有的配置文件都写在application.properties中,不用在写太多的文件
# 服务器的端口配置
server.port=80
# 修改banner
spring.main.banner-mode=off
# 日志
logging.level.root=info
SpringBoot内置属性查询,https://docs.spring.io/spring-boot/docs/current/reference/html/application-properties.html#application-properties.core.debug
在SpringBoot中导入对应的starter后,提供对应配置属性
3中配置文件类型
SpringBoot提供了多种属性配置方式
1、application.properties
server.port=80
2、application.yml
server:
	port:81
3、application.yaml
server:
	port:82

不同配置文件中相同配置按照加载优先级相互覆盖,不同配置文件中不同配置全部保留
加载配置文件为SpringBoot的配置文件

yaml
yaml----一种数据序列化格式
优点:容易阅读、容易与脚本语言交互、以数据为核心,重数据轻格式
yaml文件扩展名
yaml格式的优点

语法规则:
大小写敏感
属性层级关系使用多行描述,每行结尾使用冒号结束
使用缩进表示层级关系,同层级左侧对齐,只允许使用空格(不允许使用Tab键)
属性值前面添加空格(属性名与属性值之间使用冒号+空格作为分隔)
#表示注释
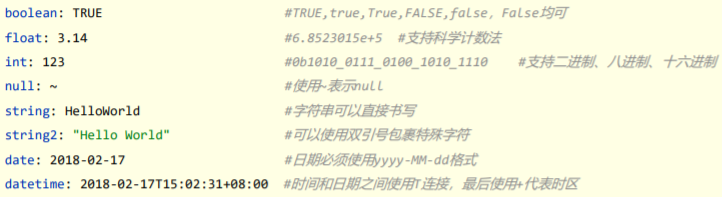
字面值表示方式:
数组表示方式:
在属性名书写位置的下方使用减号作为数据开始符号,每行书写一个数据,减号与数据间空格分隔

使用@Value读取单个数据,属性名引用方式:${一级属性名.二级属性名....}

在yml文件中如何使用属性名引用方式引用属性

在属性值中如果出现转移字符,需要使用双引号包裹
读取yml全部属性数据environment

读取yml引用属性数据
1、需要先提供一个模型数据
# 创建类,用于封装下面的数据
# 由spring帮我们去加载数据到对象中,一定要告诉spring加载这组信息
# 使用时候从spring中直接获取信息使用
datasource:
  driver: com.mysql.cj.jdbc.Driver
  url: jdbc:mysql://localhost:3306/db2?serverTimezone=UTC
  username: root
  password: root
2、提供一个封装数据的类
这个类一定是定义数据中的某一部分@ConfigurationProperties("datasource")指定封装的是哪一部分
package com.zg;

import org.springframework.boot.context.properties.ConfigurationProperties;
import org.springframework.stereotype.Component;

//1、定义数据模型封装yml文件中的数据
//2、定义为Spring管控的Bean
@Component
//3、指定加载的数据
@ConfigurationProperties("datasource")
public class MyDataSource {
    private String driver;
    private String url;
    private String username;
    private String password;

    public String getDriver() {
        return driver;
    }

    public void setDriver(String driver) {
        this.driver = driver;
    }

    public String getUrl() {
        return url;
    }

    public void setUrl(String url) {
        this.url = url;
    }

    public String getUsername() {
        return username;
    }

    public void setUsername(String username) {
        this.username = username;
    }

    public String getPassword() {
        return password;
    }

    public void setPassword(String password) {
        this.password = password;
    }

    @Override
    public String toString() {
        return "MyDataSource{" +
                "driver='" + driver + '\'' +
                ", url='" + url + '\'' +
                ", username='" + username + '\'' +
                ", password='" + password + '\'' +
                '}';
    }
}
3、获取封装的数据
package com.zg.controller;

import com.zg.MyDataSource;
import org.springframework.beans.factory.annotation.Autowired;
import org.springframework.beans.factory.annotation.Value;
import org.springframework.core.env.Environment;
import org.springframework.web.bind.annotation.GetMapping;
import org.springframework.web.bind.annotation.RequestMapping;
import org.springframework.web.bind.annotation.RestController;

//Rest模式
@RestController
@RequestMapping("/books")
public class BookController {

    @Autowired
    private MyDataSource myDataSource;
    @GetMapping
    public String getById(){
        System.out.println("springboot is running...");
        System.out.println(myDataSource);
        return "springboot is running...";
    }

}
总结:
1、使用@ConfigurationProperties注解绑定配置信息到封装类中
2、封装类需要定义为Spring管理的bean,否则无法进行属性注入


 2707
2707


 被折叠的 条评论
为什么被折叠?
被折叠的 条评论
为什么被折叠?
 到【灌水乐园】发言


