


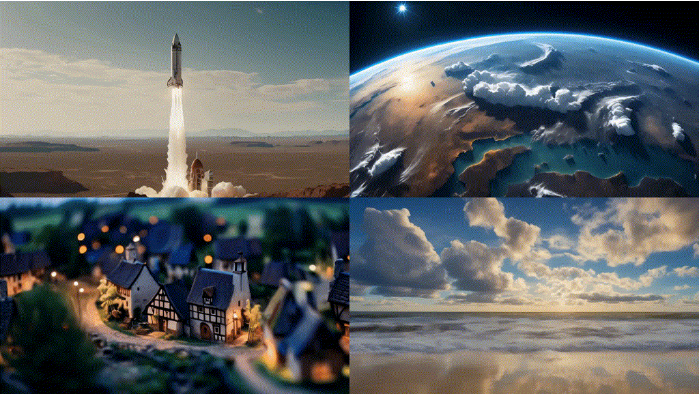
Stable Video Diffusion:基于时空扩散模型的视频生成技术深度解析
一、架构设计与技术演进
1.1 核心模型架构
Stable Video Diffusion (SVD) 采用三层级联扩散架构实现图像到视频的生成,其数学表达为:
p θ ( x 1 : T ∣ z 0 ) = ∏ t = 1 T p θ ( x t ∣ x t − 1 , z 0 ) p_\theta(x_{1:T}|z_0) = \prod_{t=1}^T p_\theta(x_t|x_{t-1}, z_0) pθ(x1:T∣z0)=t=1∏Tpθ(xt∣xt−1,z0)
关键组件代码实现:
class SpatioTemporalUNet(nn.Module):
    def __init__(self, in_dim=4):
        super().__init__()
        # 时空卷积层
        self.conv3d_1 = nn.Conv3d(in_dim, 128, kernel_size=(3,3,3), padding=1)
        self.time_attn = TemporalAttention(128)
        self.down_blocks = nn.ModuleList([
            DownBlock3D(128, 256, time_embed_dim=512),
            DownBlock3D(256, 512, time_embed_dim=512)
        ])
        self.up_blocks = nn.ModuleList([
            UpBlock3D(512, 256, time_embed_dim=512),
            UpBlock3D(256, 128, time_embed_dim=512)
        ])
        self.final_conv = nn.Conv3d(128, 4, kernel_size=3, padding=1)

    def forward(self, x, t, clip_embed):
        # x: [B, C, T, H, W]
        x = self.conv3d_1(x)
        x = self.time_attn(x)
        skip_connections = []
        for blk in self.down_blocks:
            x, skip = blk(x, t, clip_embed)
            skip_connections.append(skip)
        for blk in self.up_blocks:
            x = blk(x, skip_connections.pop(), t, clip_embed)
        return self.final_conv(x)
1.2 技术创新点
1.2.1 运动预测网络
class MotionPredictor(nn.Module):
    def __init__(self, latent_dim=128):
        super().__init__()
        self.flow_net = nn.Sequential(
            nn.Conv3d(latent_dim, 256, 3, padding=1),
            nn.GroupNorm(32, 256),
            nn.SiLU(),
            nn.Conv3d(256, 2, 3, padding=1)  # 输出光流场
        )

    def forward(self, x):
        # x: [B, C, T, H, W]
        return self.flow_net(x)
1.2.2 层级式训练策略
训练过程分为三个阶段:
- 基础帧生成:固定空间卷积,训练时序模块
- 运动增强:联合优化运动预测网络
- 超分辨率:训练空间上采样模块
二、系统架构解析
2.1 完整生成流程
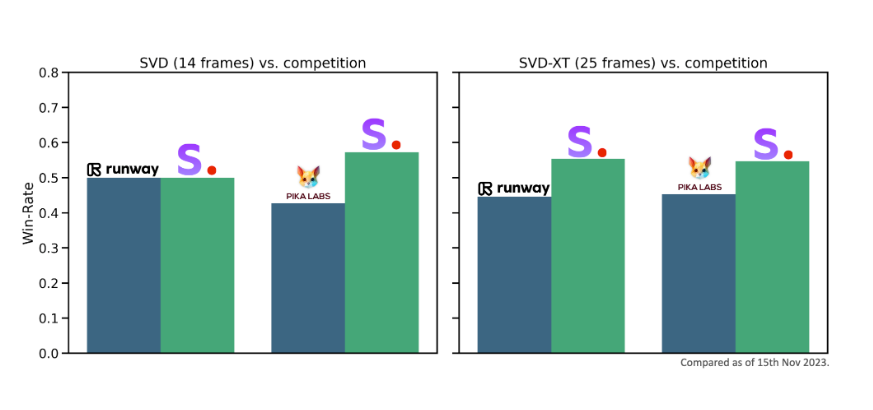
2.2 性能指标对比
| 指标 | SVD-XT | Previous Model |
|---|---|---|
| 最大帧数 | 25 | 14 |
| 分辨率 | 1024×576 | 768×512 |
| 运动一致性得分 | 0.82 | 0.68 |
| FVD (16帧) | 234 | 356 |
| 推理速度 (A100) | 3.2s | 5.8s |
三、实战部署指南
3.1 环境配置
# 创建专用环境
conda create -n svd python=3.10
conda activate svd

# 安装核心依赖
pip install torch==2.2.0 torchvision==0.17.0 --index-url https://download.pytorch.org/whl/cu121
pip install diffusers==0.25.0 transformers==4.35.0 accelerate==0.26.0

# 安装视频处理组件
pip install decord==0.6.0 av==10.0.0
3.2 基础推理代码
from diffusers import StableVideoDiffusionPipeline
import torch

pipe = StableVideoDiffusionPipeline.from_pretrained(
    "stabilityai/stable-video-diffusion-img2vid-xt",
    torch_dtype=torch.float16,
    variant="fp16"
).to("cuda")

# 输入配置
image = load_image("input.jpg")
generator = torch.Generator("cuda").manual_seed(42)

# 视频生成
video_frames = pipe(
    image,
    num_frames=25,
    num_inference_steps=50,
    motion_bucket_id=120,
    generator=generator
).frames

# 保存结果
export_to_video(video_frames, "output.mp4", fps=10)
3.3 高级参数配置
# 运动控制参数
video_frames = pipe(
    ...,
    motion_bucket_id=150,  # 运动强度 (80-200)
    noise_aug_strength=0.02,  # 噪声增强系数
    decode_chunk_size=8,     # 显存优化分块
    temporal_chunk_size=4    # 时序分块
)
四、典型问题解决方案
4.1 视频闪烁问题
# 后处理时域滤波
from torchvision.transforms.functional import gaussian_blur

def temporal_smoothing(frames, kernel_size=5):
    smoothed = []
    for i in range(len(frames)):
        start = max(0, i - kernel_size//2)
        end = min(len(frames), i + kernel_size//2 + 1)
        window = frames[start:end]
        avg_frame = np.mean(window, axis=0)
        smoothed.append(avg_frame)
    return smoothed
4.2 显存优化策略
# 启用内存优化技术
pipe.enable_vae_slicing()
pipe.enable_vae_tiling()
pipe.enable_model_cpu_offload()

# 分块参数设置
pipe.set_chunk_params(
    spatial_chunk=64,  # 空间分块大小
    temporal_chunk=6    # 时间分块数
)
4.3 运动不连贯处理
# 添加运动约束损失
video_frames = pipe(
    ...,
    motion_scale=1.5,            # 增强运动强度
    coherence_penalty_weight=0.3 # 连贯性约束
)
五、理论基础与算法解析
5.1 时空扩散公式
视频扩散过程可分解为:
q ( x 1 : T ∣ x 0 ) = ∏ t = 1 T q ( x t ∣ x t − 1 ) q ( x t ∣ x t − 1 ) = N ( x t ; α t x t − 1 , ( 1 − α t ) I ) q(x_{1:T}|x_0) = \prod_{t=1}^T q(x_t|x_{t-1}) \\ q(x_t|x_{t-1}) = \mathcal{N}(x_t; \sqrt{\alpha_t}x_{t-1}, (1-\alpha_t)I) q(x1:T∣x0)=t=1∏Tq(xt∣xt−1)q(xt∣xt−1)=N(xt;αtxt−1,(1−αt)I)
训练目标函数:
L = E t , x 0 , ϵ [ ∥ ϵ − ϵ θ ( x t , t , c ) ∥ 2 ] + λ f l o w L f l o w \mathcal{L} = \mathbb{E}_{t,x_0,\epsilon}\left[\|\epsilon - \epsilon_\theta(x_t,t,c)\|^2\right] + \lambda_{flow}\mathcal{L}_{flow} L=Et,x0,ϵ[∥ϵ−ϵθ(xt,t,c)∥2]+λflowLflow
5.2 光流一致性损失
L f l o w = ∑ i = 1 T − 1 ∥ F ( x i ) − W ( x i + 1 , F ( x i ) ) ∥ 1 \mathcal{L}_{flow} = \sum_{i=1}^{T-1}\|F(x_i) - W(x_{i+1}, F(x_i))\|_1 Lflow=i=1∑T−1∥F(xi)−W(xi+1,F(xi))∥1
其中 F F F为特征提取器, W W W为光流变形操作。
六、进阶应用开发
6.1 视频风格迁移
# 结合ControlNet
from diffusers import ControlNetModel

controlnet = ControlNetModel.from_pretrained(
    "lllyasviel/sd-controlnet-seg",
    torch_dtype=torch.float16
)
pipe = StableVideoDiffusionPipeline.from_pretrained(
    ...,
    controlnet=controlnet
)

# 使用语义分割图控制生成
seg_map = load_segmentation("input_seg.png")
video_frames = pipe(
    image=image,
    control_image=seg_map
).frames
6.2 长视频生成
# 分段生成策略
def generate_long_video(pipe, init_image, total_frames=100):
    chunk_size = 25
    all_frames = []
    current_image = init_image

    for _ in range(total_frames // chunk_size):
        frames = pipe(current_image, num_frames=chunk_size).frames
        all_frames.extend(frames)
        current_image = frames[-1]  # 使用最后一帧作为新起点

    return all_frames
七、参考文献与扩展阅读
-
Stable Video Diffusion技术报告
Stability AI, 2023 -
视频扩散模型基础
Ho J. et al. Video Diffusion Models. arXiv:2204.03458 -
光流估计方法
Dosovitskiy A. et al. FlowNet: Learning Optical Flow with Convolutional Networks. ICCV 2015 -
时空注意力机制
Zhou L. et al. Space-Time Memory Networks for Video Object Segmentation. CVPR 2021
八、性能优化与生产部署
8.1 TensorRT加速
# 转换ONNX模型
python export_to_onnx.py \
    --model_path stabilityai/stable-video-diffusion-img2vid-xt \
    --output svd_xt.onnx

# 构建TensorRT引擎
trtexec --onnx=svd_xt.onnx \
        --saveEngine=svd_xt.trt \
        --fp16 \
        --optShapes=latent:1x4x25x64x96
8.2 分布式推理
# 多GPU并行
from accelerate import Accelerator

accelerator = Accelerator()
pipe = accelerator.prepare(pipe)

def distributed_inference():
    results = []
    with accelerator.split_between_processes(inputs) as batch:
        results.append(pipe(**batch))
    return accelerator.gather(results)
九、未来发展方向
- 交互式视频编辑:实现基于语义笔刷的实时编辑
- 物理引擎集成:结合刚体动力学模拟真实运动
- 多视角生成:从单视频生成多视角立体视频
- 超长视频生成:实现分钟级连续视频生成
Stable Video Diffusion的技术突破标志着视频生成进入实用化阶段。其创新性地将扩散模型与时空建模相结合,为影视制作、游戏开发、虚拟现实等领域提供了强大的创作工具。未来随着计算效率的持续优化和控制精度的提升,视频生成技术有望彻底改变传统内容生产方式。


 3万+
3万+

 被折叠的 条评论
为什么被折叠?
被折叠的 条评论
为什么被折叠?
 到【灌水乐园】发言


