


WPF中数据绑定验证深入讲解
WPF在用户输入时,提供了验证功能,通常验证使用以下两种方式来实现:
- 在数据对象中引发错误。通常是在属性设置过程中抛出异常,或者在数据类中实现
INotifyDataErrorInfo或IDataErrorInfo接口。 - 在绑定级别定义验证。
只有来自目标的值正在被用于更新数据源时才会应用验证。
数据对象中设置验证
- 在属性中Set上抛出异常
public class MyData
{
    private string _value = "200";

    public string Value
    {
        get { return _value; }
        set
        {
            _value = value;

            if (value == "123")
                throw new System.Exception("报错了~~~[Exception]");
        }
    }
}
- 直接抛出异常,wpf经常会忽略,从而得不到异常的信息,此时需要借助
ExceptionValidationRule。
ExceptionValidationRule是预先构建的验证规则,它向WPF发出所有的异常报告。它必须在<Binding.ValidationRules>里面
<TextBox x:Name="tb1">
    <TextBox.Text>
        <Binding Path="Value" UpdateSourceTrigger="PropertyChanged">
            <Binding.ValidationRules>
                <ExceptionValidationRule />
            </Binding.ValidationRules>
        </Binding>
    </TextBox.Text>
</TextBox>
ExceptionValidationRule在绑定过程中发生的所有异常,包括编辑的值不能转为正确类型、属性设置器异常以及值转换器异常(float转为string)。当出现验证失败后,System.Windows.Controls.Validation类的附加属性会记录下错误:
- 在绑定元素上,
Validation.HasError为True,同时会自动将控件的模板切换为Validation.ErrorTemplate定义的模板。 ValidationRule.Validate()会返回ValidationError,其中中包含错误细节- 如果
Binding.NotifyOnValidationError被设置为True,则会在绑定元素上引发Validation.Error事件
INotifyDataErrorInfo
INotifyDataErrorInfo和IDataErrorInfo都有类似作用,但是INotifyDataErrorInfo界面更加丰富。与上面不同的是,实现INotifyDataErrorInfo或IDataErrorInfo接口时,允许用户修改为非法值,只不过给出错误提示。

使用INotifyDataErrorInfo的案例
- 新建一个Data类
//类实现了INotifyDataErrorInfo接口,该接口定义了HasErrors属性和GetErrors方法,以及ErrorsChanged事件
public class Data : INotifyDataErrorInfo,INotifyPropertyChanged
{
    //key为属性名,value为错误信息列表
    Dictionary<string, List<string>> errors = new();

    void SetErrors(string propertyName, List<string> value)
    {
        errors.Remove(propertyName);
        errors.Add(propertyName, value);
        if (ErrorsChanged != null)
        {
            ErrorsChanged(this, new DataErrorsChangedEventArgs(propertyName));
        }
    }
    void ClearErrors(string propertyName)
    {
        errors.Remove(propertyName);
        if (ErrorsChanged != null)
        {
            ErrorsChanged(this, new DataErrorsChangedEventArgs(propertyName));
        }
    }
    public bool HasErrors => errors.Count>0;

    public event EventHandler<DataErrorsChangedEventArgs>? ErrorsChanged;
    public event PropertyChangedEventHandler? PropertyChanged;

    public IEnumerable Errors => GetErrors("ModelNumber");
    public IEnumerable GetErrors(string? propertyName)
    {
        if (propertyName is null or { Length: <= 0 })
        {
            return errors.Values;
        }
        else
        {
            if (errors.ContainsKey(propertyName))
            {
                return errors[propertyName];
            }
            else
            {
                return null;
            }
        }
    }

    private string modelNumber;

    public string ModelNumber
    {
        get { return modelNumber; }
        set { modelNumber = value;
            bool valid = true;
            foreach (char c in modelNumber)
            {
                if (!char.IsLetterOrDigit(c))
                {
                    valid = false;
                    break;
                }
            }
            if (!valid)
            {
                List<string> errors = new();
                errors.Add("ModelNumber不能含有标点符号,空格等");
                SetErrors("ModelNumber", errors);
            }
            else
            {
                ClearErrors("ModelNumber");
            }
            PropertyChanged?.Invoke(this, new PropertyChangedEventArgs("ModelNumber"));
            PropertyChanged?.Invoke(this, new PropertyChangedEventArgs("HasErrors"));
            PropertyChanged?.Invoke(this, new PropertyChangedEventArgs("Errors"));
        }
    }
}
- 做一个界面,绑定ModelNumber
<Window ...>
<Window.DataContext>
<local:Data/>
</Window.DataContext>
<StackPanel>
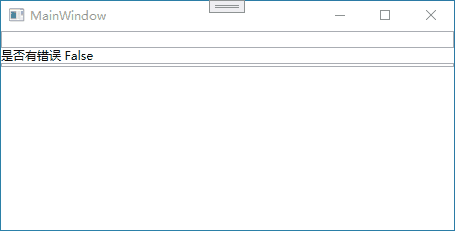
<TextBox Text="{Binding ModelNumber ,Mode=TwoWay,UpdateSourceTrigger=PropertyChanged,ValidatesOnDataErrors=True}"/>
<TextBlock>
<Run Text="是否有错误"/>
<Run Text="{Binding HasErrors, Mode=OneWay}"/>
</TextBlock>
<ListView ItemsSource="{Binding Errors}"/>
</StackPanel>
</Window>
自定义验证规则
自定义验证规则很像自定义转换器
- 针对某个属性自定义验证规则
public class ValueRule : ValidationRule
{

    public override ValidationResult Validate(object value, CultureInfo cultureInfo)
    {
        if (value?.ToString() == "123") return new ValidationResult(false, "输入的值不在范围内");
        return new ValidationResult(true, null);
    }
}
- 界面上使用验证规则
<StackPanel>
    <TextBox>
        <TextBox.Text>
            <Binding Path="Max" UpdateSourceTrigger="PropertyChanged" Mode="TwoWay">
                <Binding.ValidationRules>
                    <local:ValueRule/>
                </Binding.ValidationRules>
            </Binding>
        </TextBox.Text>
    </TextBox>
</StackPanel>
可以看出,<Binding.ValidationRules>下面可以放置多个验证规则,按顺序执行,当所有的验证规则都通过后,则调用转换器(如果存在),其中ExceptionValidationRule比较特殊,当输入内容不能转换为其他规则所定义的转换时,也会触发。
错误显示
首先只有设置了Binding.NotifyOnValidationError为true时,才会引发Validation.Error事件,当含有错误时,可以使用静态类Validation中的附加属性Errors和HasError来获取信息。
通常出现错误时,边框显示未红色,也可以自行设置错误模板,错误模板位于装饰层,它位于普通窗口内容之上。
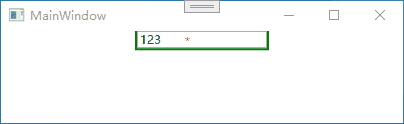
<TextBox Width="130">
    <TextBox.Text>
        <Binding
            Mode="TwoWay"
            Path="Max"
            UpdateSourceTrigger="PropertyChanged">
            <Binding.ValidationRules>
                <local:ValueRule />
            </Binding.ValidationRules>
        </Binding>
    </TextBox.Text>
    <Validation.ErrorTemplate>
        <ControlTemplate>
            <DockPanel LastChildFill="True">
                <TextBlock
                    DockPanel.Dock="Right"
                    Foreground="Red"
                    Text="*" />
                <Border BorderBrush="Green" BorderThickness="2">
                    <AdornedElementPlaceholder />
                </Border>
            </DockPanel>
        </ControlTemplate>
    </Validation.ErrorTemplate>
</TextBox>

其中AdornedElementPlaceholder代表控件本身,上面案例中是将*放入了控件周围,如果想将*重叠放到控件上面,可以使用Grid,放在同一窗格。
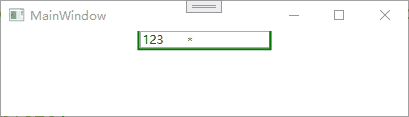
<Validation.ErrorTemplate>
    <ControlTemplate>
        <Grid>
            <TextBlock
                Margin="50,5,0,0"
                DockPanel.Dock="Right"
                Foreground="Red"
                Text="*" />
            <Border BorderBrush="Green" BorderThickness="2">
                <AdornedElementPlaceholder />
            </Border>
        </Grid>
    </ControlTemplate>
</Validation.ErrorTemplate>

但是这样显示不出错误信息,可以使用ToolTip来显示第一个错误内容
<Validation.ErrorTemplate>
    <ControlTemplate>
        <Grid>
            <TextBlock
                Margin="50,5,0,0"
                DockPanel.Dock="Right"
                Foreground="Red"
                Text="*"
                ToolTip="{Binding ElementName=adornerPlaceholder, Path=AdornedElement.(Validation.Errors)[0].ErrorContent}" />
            <Border BorderBrush="Green" BorderThickness="2">
                <AdornedElementPlaceholder x:Name="adornerPlaceholder" />
            </Border>
        </Grid>
    </ControlTemplate>
</Validation.ErrorTemplate>
上面模板中使用了AdornedElementPlaceholder的AdornedElement属性指向背后的元素。
这样只有悬浮在后面的*号时才会显示错误信息,如果想作为TextBox元素本身的ToolTip,可借助Validation.HasError可以实现。
<TextBox Width="130">
    <TextBox.Text>
        <Binding
            Mode="TwoWay"
            Path="Max"
            UpdateSourceTrigger="PropertyChanged">
            <Binding.ValidationRules>
                <local:ValueRule />
            </Binding.ValidationRules>
        </Binding>
    </TextBox.Text>
    <Validation.ErrorTemplate>
        <ControlTemplate>
            <Grid>
                <TextBlock
                    Margin="50,5,0,0"
                    DockPanel.Dock="Right"
                    Foreground="Red"
                    Text="*"
                    ToolTip="{Binding ElementName=adornerPlaceholder, Path=AdornedElement.(Validation.Errors)[0].ErrorContent}" />
                <Border BorderBrush="Green" BorderThickness="2">
                    <AdornedElementPlaceholder x:Name="adornerPlaceholder" />
                </Border>
            </Grid>
        </ControlTemplate>
    </Validation.ErrorTemplate>
    <TextBox.Style>
        <Style TargetType="TextBox">
            <Style.Triggers>
                <Trigger Property="Validation.HasError" Value="True">
                    <Setter Property="ToolTip" Value="{Binding RelativeSource={RelativeSource Mode=Self}, Path=(Validation.Errors)[0].ErrorContent}" />
                </Trigger>
            </Style.Triggers>
        </Style>
    </TextBox.Style>
</TextBox>
验证多个值
很多时候需要动态验证多个绑定值,比如有两个属性,一个Max,一个Min,要求是用户输入Min必须小于Max,要实现这个功能可以使用绑定组来创建。
绑定组的原理很简单,同样是创建继承自ValidationRule的类,不同的是,不能将该规则绑定到单个绑定表达式,而是将其附加到包含所有绑定控件的容器上。
- ViewModel中有两个属性
public class Data : INotifyDataErrorInfo,INotifyPropertyChanged
{
    public int Max { set; get; } = 100;
    public int Min { set; get; } = 1;
}
- 创建验证规则
public class ValueRule : ValidationRule
{
    public override ValidationResult Validate(object value, CultureInfo cultureInfo)
    {
        BindingGroup bindingGroup = (BindingGroup)value;
        var d= (Data)bindingGroup.Items[0];
        if (d.Min >= d.Max)
        {
            return new ValidationResult(false, "错误,最小值必须小于最大值");
        }
        return new ValidationResult(true, null);
    }
}
- UI上绑定,注意,此处要在Grid中添加绑定组
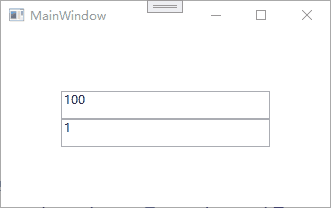
<Grid Margin="60" TextBox.LostFocus="Grid_LostFocus">
    <Grid.BindingGroup>
        <BindingGroup x:Name="customGroup">
            <BindingGroup.ValidationRules>
                <local:ValueRule />
            </BindingGroup.ValidationRules>
        </BindingGroup>
    </Grid.BindingGroup>
    <Grid.RowDefinitions>
        <RowDefinition />
        <RowDefinition />
    </Grid.RowDefinitions>
    <TextBox
        x:Name="ddd"
        Grid.Row="0"
        Text="{Binding Path=Max, BindingGroupName=customGroup, UpdateSourceTrigger=PropertyChanged}" />
    <TextBox Grid.Row="1" Text="{Binding Path=Min, BindingGroupName=customGroup, UpdateSourceTrigger=PropertyChanged}" />
</Grid>
- 此时并不会验证,绑定组使用了事务处理编辑系统,只有正式提交后才会进行验证,所以在Grid上增加事件,当TextBox失去焦点时触发
private void Grid_LostFocus(object sender, RoutedEventArgs e)
{
    customGroup.CommitEdit();
}
-
如果验证失败,则整个Grid会认为是无效的。
注意:
- 当存在多个绑定组时,要为BindingGroup设置Name,这样可以在具体绑定时设置绑定组
Text="{Binding Path=Max, BindingGroupName=customGroup, UpdateSourceTrigger=PropertyChanged}" /> - 默认情况时,Validate方法中接收到的数据是原始对象,而不是新修改的值,所以为了验证新值,可以使用GetValue方法
BindingGroup bindingGroup = (BindingGroup)value;
var d = (Data)bindingGroup.Items[0];
var newValue = bindingGroup.GetValue(d, "Min");


 1531
1531

 被折叠的 条评论
为什么被折叠?
被折叠的 条评论
为什么被折叠?
 到【灌水乐园】发言


