


目录
四、 总结日志分类, 优先级别。图文并茂解释应用如何将日志发到rsyslog,并写到目标。
五、完成功能,将3个主机(要求主机名为ip)的ssh日志,通过rsyslog服务将ssh日志写入到集中的主机上的rsyslog服务,写入到/var/log/all-ssh.log文件
八、完成将多个主机(要求主机名为ip)的logger命令日志集中写入到mysql表中
九、尝试使用logrotate服务切割message日志,每天切割一次,要求大于不超过3M, 保存90天的日志, 旧日志以时间为后缀,要求压缩。
十一、使用inotify + rsync和sersync实现文件的同步,并且总结两种方式的优缺点
一、总结sudo配置文件格式,总结相关示例。
配置文件位置:
#主配置文件
/etc/sudo.conf
#授权规则配置文件
/etc/sudoers
/etc/sudoers.d/*
配置格式:
user host=(runas) [TAG:]command #授权user用户可以在host主机上以runas的身份执行
command,TAG可为空
#可使用通配符
| ? * [abc] [!abc] \x [[alpha]] | #任意单个字符 #任意长度字符 #匹配abc中的一个字符 #匹配任意一个除abc之外的字符 #转义 #字母 |
#user 和 runnas
userName #用户名
#uid #用户ID
%groupName #组名
%#gid #组ID
User_Alias #user别名
Runas_Alias #runas别名
#host
| ip hostname network/netmask Host_Alias | #ip地址 #主机名 #网段/子网掩码 #别名 |
#command
| cmmand directory/* sudoedit Cmnd_Alias | #具体命令 #某个目录下所有命令 #sudoedit命令,有此命令就可以编辑sudo规则 #命令别名 |
#在192.168.153.138主机上查看配置

#查看指定用户

#该用户没有配置sudo 规则

二、搭建时间同步服务器,详细总结配置和搭建过程
此次我们使用两个服务器:时间私有服务器rocky linux 8 :192.168.153.138
客户端ubuntu:192.168.153.137,麒麟客户端:192.168.153.144
用137和144同步138服务器时间
利用时间同步:chrony
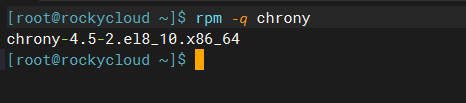
1、首先查询各台服务器是否安装该软件:
服务器138上已经安装,如未安装进行yum -y install chrony
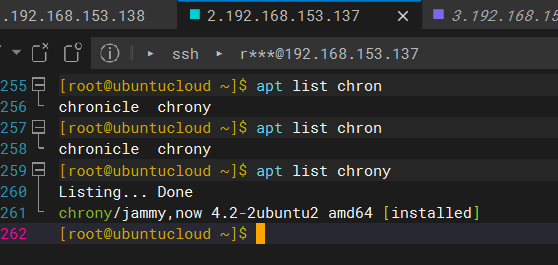
客户机137:已经安装,未安装执行apt install chrony
在服务器138上进行配置时间:
cat /etc/chrony.conf 进入时间配置文件设置如下:
| allow 192.168.153.0/24 local stratum 10 | #允许192.168.153.0网段的主机将本机作为时间同步服务器 #允许本机在不能与外网同步的情况下,还能提供服务 |

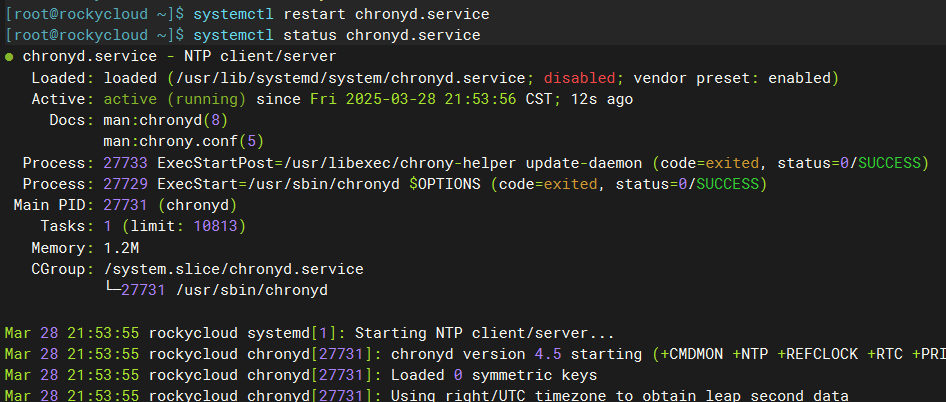
systemctl restart chronyd.service 重启chrony服务
systemctl status chronyd.service 查看chrony状态
确认防火墙已经关闭

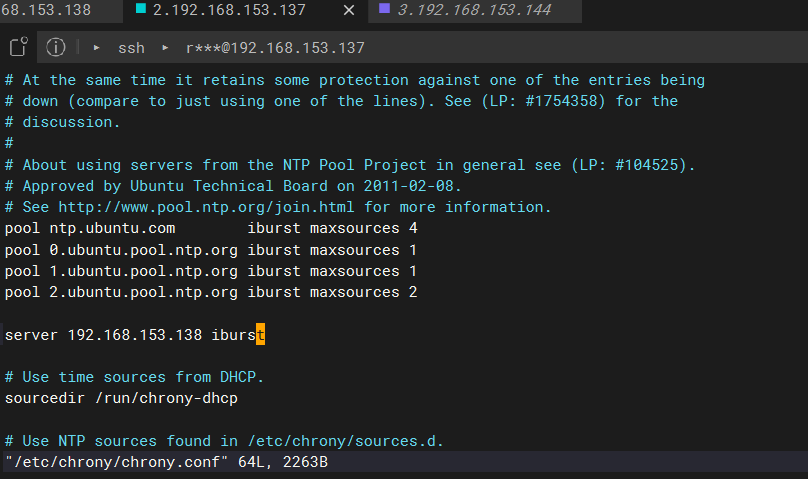
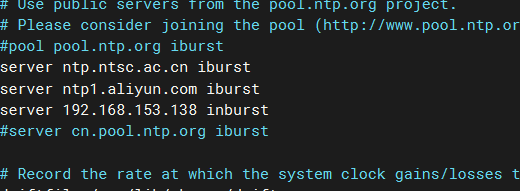
接着我们进入客户端137上进行配置
vim /etc/chrony/cheony.conf 编辑ubuntu的chrony的配置文件
server 192.168.153.138 iburst 添加对应的时间服务器的地址
systemctl restart chronyd.service重启服务
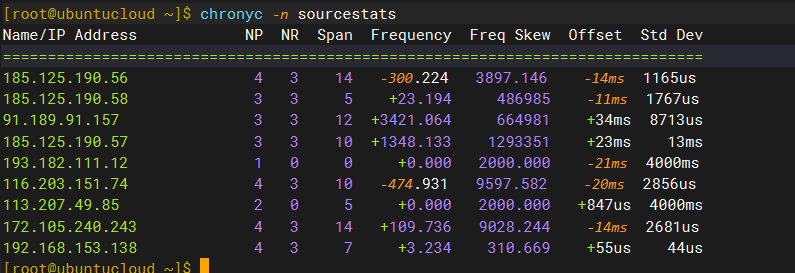
在服务器上138上查看时间同步机器

在客户端137上查看时间服务器来源
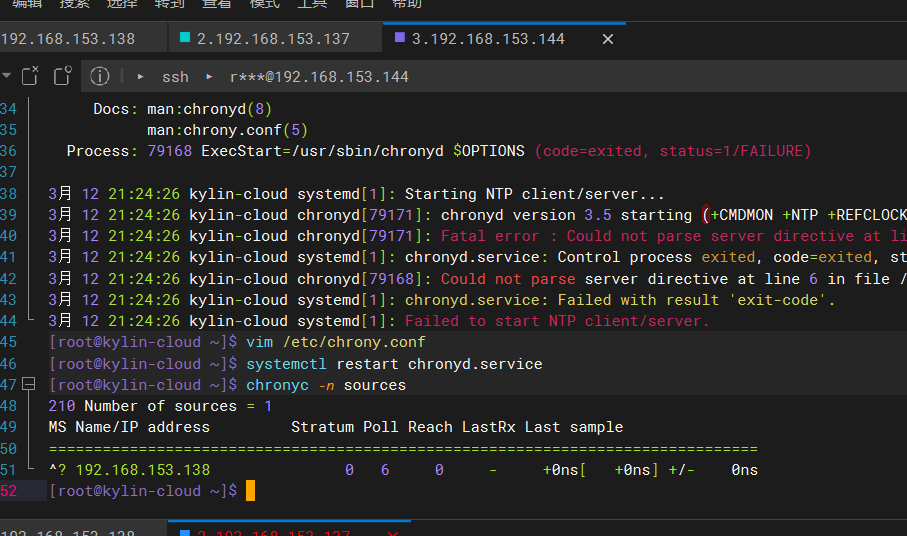
同时我们可以另外增加一个144麒麟客户端进行同步 138上服务器
我们会看到麒麟客户端144上会显示138时间服务器
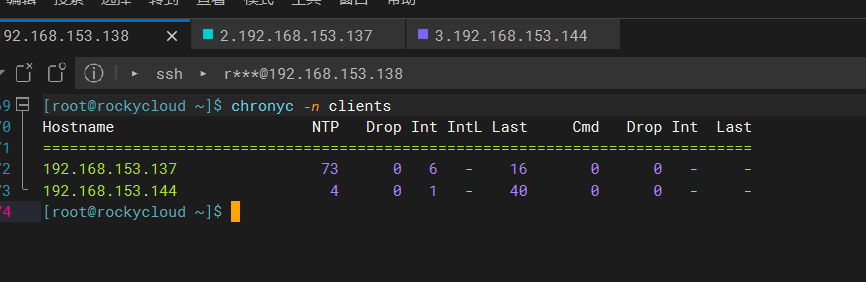
138服务器上多了144麒麟服务器的IP
麒麟客户端已经同步:
查看服务器:会发现多出一个144客户端
三、总结常见的日志服务管理的常见日志服务
1、sysklogd 系统日志服务
在 CentOS5 以及之前的发行版中,其采用的 sysklogd 服务来记录和管理系统日志的。
sysklogd 服务有两个模块:
klogd: 用于记录 linux kernel 相关的日志
syslogd:用于记录用户空间应用日志
2、rsyslog 系统日志服务
RSYSLOG is the rocket-fast system for log processing.
rsyslog 是 CentOS6 以后的版本中使用的日志管理程序,是一个默认安装的服务,并且默认开机启动。
syslog 特性
支持输出日志到各种数据库,如 MySQL,PostgreSQL,MongoDB ElasticSearch,实现使用第三方服
务对日志进行存储和分析;
精细的输出格式控制以及对日志内容的强大过滤能力,可实现过滤记录日志信息中的指定部份;
通过 RELP + TCP 实现数据的可靠传输
支持数据的加密和压缩传输等
多线程
3、ELK 日志服务
ELK 是三个开源软件的缩写,分别表示:Elasticsearch , Logstash, Kibana , 它们都是开源软件。在后续
发展的过程中增加了一个 FileBeat,这几款软件通常在一起配合使用,各司其职。ELK 主要用于部署在
企业架构中,收集多台设备上多个服务的日志信息,并将其统一整合后提供给用户。我们后面的课程中
会有专门的章节讲解 ELK 服务。
rsyslog 日志服务与 ELK 日志服务的区别:
rsyslog 主要用于单机日志管理,ELK 主要用于分布式集群环境中的日志管理。
四、 总结日志分类, 优先级别。图文并茂解释应用如何将日志发到rsyslog,并写到目标。
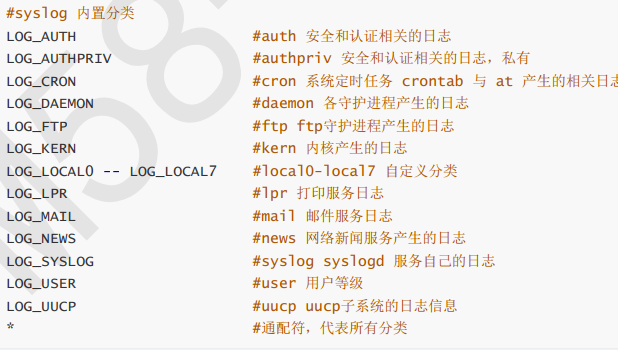
1、facility: 设施,从功能或程序上对日志进行归类
在一台主机上会同时运行多个服务和软件,每个服务或软件都有可能会产生大量的日志,如果每个服务
或软件产生的日志都独立存放管理,那文件数量就太多了,如果都放到一个文件中,似乎也不是很合
适,所以 rsyslog 将日志进行了分类,相同类型的日志放一个文件,这样便于管理。
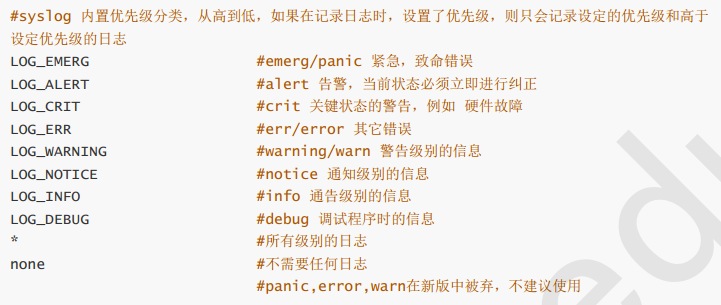
2、Priority: 优先级别,从高到低排序
rsyslog 在记录日志的时候,将各种产生日志的事件和行为进行了优先级的排序,使用者可以根据不同环
境(测试/生产)和需求,设置不同的级别来记录日志,这样可以保证,记录下来的内容都是是我们想要
的。
五、完成功能,将3个主机(要求主机名为ip)的ssh日志,通过rsyslog服务将ssh日志写入到集中的主机上的rsyslog服务,写入到/var/log/all-ssh.log文件
日志服务器153.137
3个主机:153.138、153.144、153.1
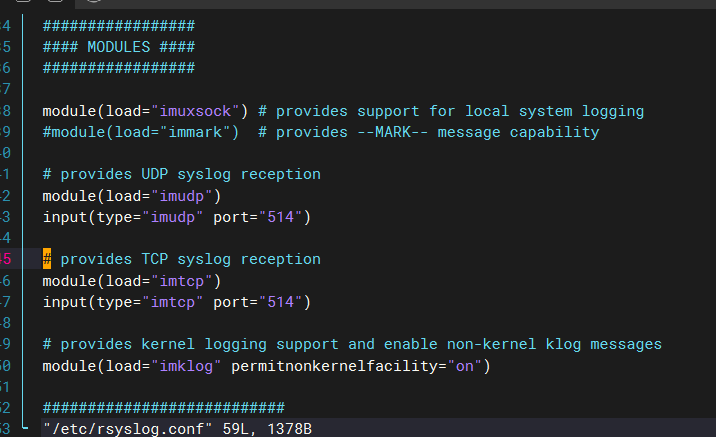
服务器上#启用相关模块, 去掉 UDP,TCP 模块的注释
[root@ubuntu ~]# vim /etc/rsyslog.conf
[root@ubuntucloud ~]$ vim /etc/hosts
重启服务器上的rsyslog服务
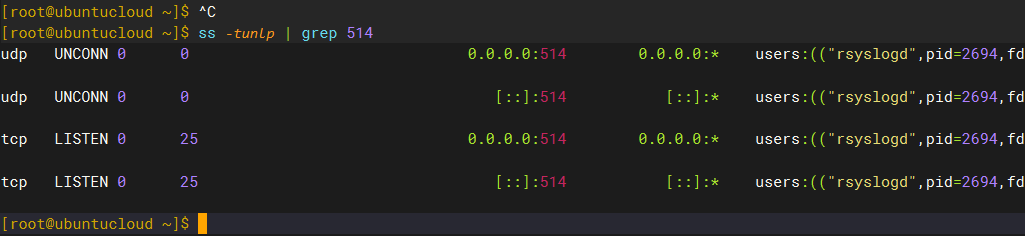
查看进程是否监听514端口
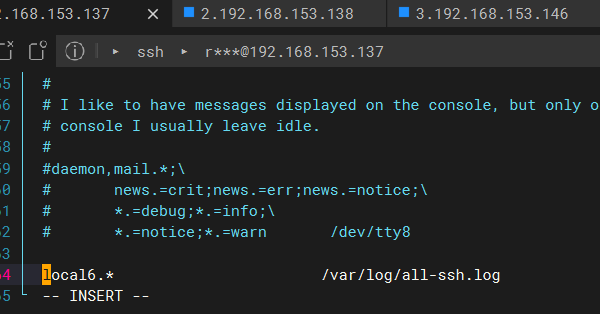
vim /etc/rsyslog.d/50-default.conf ----编辑tsyslog配置文件下的规则:
添加laocl6.*到指定目录
root@ubuntucloud ~]$ vim /etc/rssystemctl restart sshd---重启sshd服务
[root@ubuntucloud ~]$ systemctl restart rsyslog.service ---重启rsyslog
配置客户端1:
更改主机名是IP

#新增配置文件,local6 分类的日志都写到 sshd.log 文件中
[root@192.168.153.138 ~]$ vim /etc/ssh/sshd_config
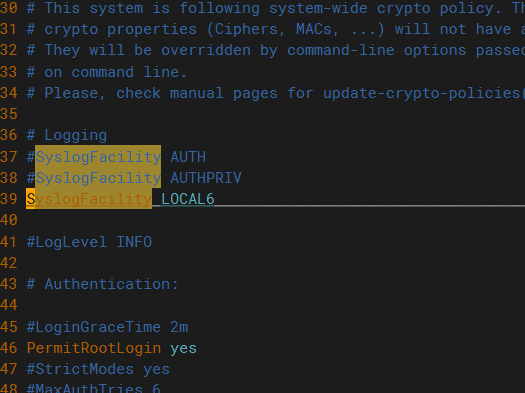
[root@192.168.153.138 ~]$ systemctl restart sshd --- 重启sshd
[root@192.168.153.138 ~]$ vim /etc/rsyslog.conf ---编辑local6.*传到514端口下
[root@192.168.153.138 ~]$ systemctl restart rsyslog.service ---重启rsyslog

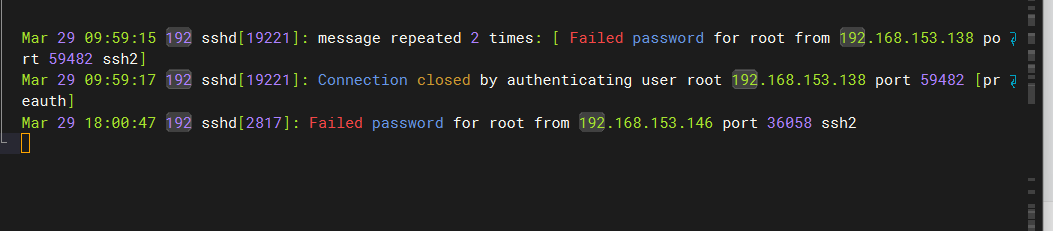
测试:后面两台机子同理配置
六.、总结/var/log/目录下常用日志文件作用
/var/log/secure,/var/log/auth.log:系统安全日志,文本格式,应周期性分析
/var/log/btmp:当前系统上,用户的失败尝试登录相关的日志信息,二进制格式,lastb命令进行 查看
/var/log/wtmp:当前系统上,用户正常登录系统的相关日志信息,二进制格式,last命令可以查看
/var/log/lastlog:每一个用户最近一次的登录信息,二进制格式,lastlog命令可以查看
/var/log/dmesg:CentOS7 之前版本系统引导过程中的日志信息,文本格式,开机后的硬件变化 将不再记录,也可以通过专用命令
dmesg查看,可持续记录硬件变化的情况
/var/log/boot.log:系统服务启动的相关信息,文本格式,Ubuntu无此文件
/var/log/messages(红帽系统),/var/log/syslog (Ubuntu) :系统中大部分的信息
/var/log/anaconda:anaconda的日志,Ubuntu无此文件
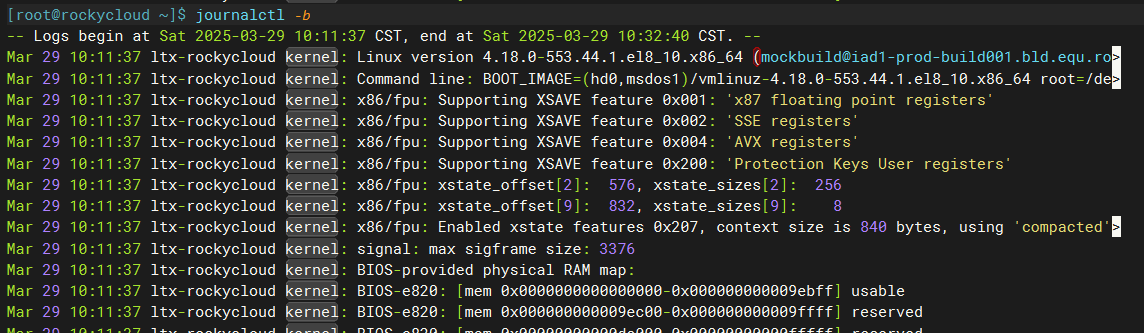
七、总结journalctl命令的选项及示例
# 查看所有日志(默认情况下 ,只保存本次启动的日志)
journalctl
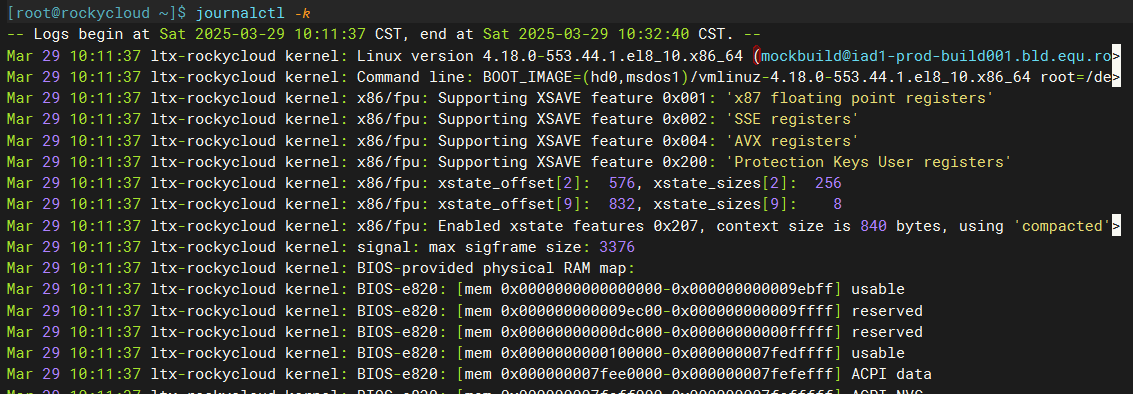
# 查看内核日志(不显示应用日志)
journalctl -k
# 查看系统本次启动的日志
journalctl -b
journalctl -b -0
# 查看上一次启动的日志(需更改设置)
journalctl -b -1
# 查看指定时间的日志
journalctl --since = "2017-10-30 18:10:30"
journalctl --since "20 min ago"
journalctl --since yesterday
journalctl --since "2017-01-10" --until "2017-01-11 03:00"
journalctl --since 09 :00 --until "1 hour ago"
# 显示尾部的最新 10 行日志
journalctl -n
# 显示尾部指定行数的日志
journalctl -n 20
# 实时滚动显示最新日志
journalctl -f
# 查看指定服务的日志
journalctl /usr/lib/systemd/systemd
# 查看指定进程的日志
journalctl _PID = 1
# 查看某个路径的脚本的日志
journalctl /usr/bin/bash
# 查看指定用户的日志
journalctl _UID = 33 --since today
# 查看某个 Unit 的日志
journalctl -u nginx.service
journalctl -u nginx.service --since today
# 实时滚动显示某个 Unit 的最新日志
journalctl -u nginx.service -f
# 合并显示多个 Unit 的日志
journalctl -u nginx.service -u php-fpm.service --since today
# 查看指定优先级(及其以上级别)的日志,共有 8 级
0 : emerg
1 : alert
2 : crit
3 : err
4 : warning
5 : notice
6 : info
7 : debug
journalctl -p err -b
# 日志默认分页输出, --no-pager 改为正常的标准输出
journalctl --no-pager
# 日志管理 journalctl
# 以 JSON 格式(单行)输出
journalctl -b -u nginx.service -o json
# 以 JSON 格式(多行)输出,可读性更好
journalctl -b -u nginx.service -o json-pretty
# 显示日志占据的硬盘空间
journalctl --disk-usage
# 指定日志文件占据的最大空间
journalctl --vacuum-size = 1G
# 指定日志文件保存多久
journalctl --vacuum-time = 1years
#查看内核日志(不显示应用日志)
journalctl -k
#查看系统本次启动的日志
journalctl -b
八、完成将多个主机(要求主机名为ip)的logger命令日志集中写入到mysql表中
6.1 rsyslog服务器准备
#在 rsyslog 服务器上安装连接 mysql 模块相关的程序包
root@huang:~# apt install rsyslog-mysql -y
#查看sql脚本文件内容
root@huang:~# cat //usr/share/dbconfig-common/data/rsyslog-mysql/install/mysql
CREATE DATABASE Syslog;#Ubuntu22.04和20.04没有此行,需要手动创建数据库
USE Syslog;
CREATE TABLE SystemEvents
(
ID int unsigned not null auto_increment primary key,
CustomerID bigint,
ReceivedAt datetime NULL,
DeviceReportedTime datetime NULL,
Facility smallint NULL,
Priority smallint NULL,
FromHost varchar(60) NULL,
Message text,
NTSeverity int NULL,
Importance int NULL,
EventSource varchar(60),
EventUser varchar(60) NULL,
EventCategory int NULL,
EventID int NULL,
EventBinaryData text NULL,
MaxAvailable int NULL,
CurrUsage int NULL,
MinUsage int NULL,
MaxUsage int NULL,
InfoUnitID int NULL ,
SysLogTag varchar(60),
EventLogType varchar(60),
GenericFileName VarChar(60),
SystemID int NULL
);
CREATE TABLE SystemEventsProperties
(
ID int unsigned not null auto_increment primary key,
SystemEventID int NULL ,
ParamName varchar(255) NULL ,
ParamValue text NULL
);
# 方法 1: 事先执行 2.3.2 步骤再执行下面指令
root@huang:~# #mysql -ursyslog -p123456 -h10.0.0.201 Syslog <
/usr/share/dbconfig-common/data/rsyslog-ysql/install/mysql
root@huang:~# #mysql -ursyslog -p123456 -h10.0.0.201 Syslog -e "source
/usr/share/dbconfig-common/data/rsyslog-ysql/install/mysql"
# 方法 2
# 将 sql 脚本复制到数据库服库上
root@huang:~# #scp /usr/share/doc/rsyslog/mysql-createDB.sql 10.0.0.201:/data
6.2 数据库服务器准备
Mysql默认只监听本机端口
#开启远程监听端口
root@huang:~# vim /etc/mysql/mysql.conf.d/mysqld.cnf
#注释两行
#bind-address = 127.0.0.1
#mysqlx-bind-address = 127.0.0.1
#重启服务
root@huang:~# systemctl restart mysql.service
# 在 MySQL 数据库服务器上创建相关数据库和表,并授权 rsyslog 能连接至当前服务器
root@centos8 ~] #yum install mysql-server
[root@centos8 ~] #mysql -u
mysql>source /data/mysql-createDB.sql #如果使用方法1则不需要执行此步
mysql>CREATE USER 'rsyslog' @ '10.0.0.%' IDENTIFIED BY '123456' ;
mysql>GRANT ALL ON Syslog.* TO 'rsyslog' @ '10.0.0.%' ;
6.3 配置rsyslog服务器
# 配置 rsyslog 将日志保存到 mysql 中
[root@centos8 ~] #vim /etc/rsyslog.conf
#
####MODULES####
# 在 MODULES 语言下面,如果是 Ubuntu22.04,20.04 和 CentOS8 加下面行
module (load = "ommysql" )
# 在 MODULES 语言下面,如果是 CentOS 7 , 6 加下面行
$ModLoad ommysql
# 在 RULES 语句块加下面行的格式
#facility.priority :ommysql:DBHOST,DBNAME,DBUSER, PASSWORD
*.info :ommysql:10.0.0.18,Syslog,rsyslog,123456
[root@centos8 ~] #systemctl restart rsyslog.service
#Ubuntu 自动生成以下配置文件,只需要按环境修改
[root@ubuntu2004 ~] #cat /etc/rsyslog.d/mysql.conf
### Configuration file for rsyslog-mysql
### Changes are preserved
module (load = "ommysql" )
*.info action (type = "ommysql" server = "10.0.0.201" db = "Syslog" uid = "rsyslog"
pwd = "123456" )
6.4 测试
#rsyslog服务器使用logger命令生成日志
root@huang:~# logger 'this is a test log '
root@huang:~# logger 'this is a test log '
root@huang:~# logger 'this is a test log '
#mysql查看表
mysql> select * from SystemEvents;
| 227 | NULL | 2024-05-16 11:15:35 | 2024-05-16 11:15:35 | 1 | 5 | huang | message repeated 2 times: [ this is a test log ] | NULL | NULL | NULL | NULL | NULL | NULL | NULL | NULL | NULL | NULL | NULL | 1 | root: | NULL | NULL | NULL |
九、尝试使用logrotate服务切割message日志,每天切割一次,要求大于不超过3M, 保存90天的日志, 旧日志以时间为后缀,要求压缩。
[root@ubuntu2204 ~] #cat /etc/logrotate.d/test1
/var/log/test/test1.log {
daily #每天转储
rotate 90 #指定日志文件删除之前转储的次数
compress #压缩
dateext #旧文件带日期
delaycompress #延迟压缩
missingok #日志不存在,不提示错误,继续处理下一个
size 3M #每个文件大小为3M
notifempty #空文件不转储
create 644 bin daemon #转储旧文件以后,创建新的文件并更改对应的属性
sharedscripts
postrotate
echo `date +%F_%T` >> /data/test1.log
if [ -f /apps/nginx/logs/nginx.pid ]; then #针对nginx特有的设置
kill -USR1 `cat /apps/nginx/logs/nginx.pid` #针对nginx特有的设置
if
endscript
}
#生成新日志
[root@ubuntu2204 ~]#dd if=/dev/zero of=/var/log/test/test1.log bs=4M count=1
[root@ubuntu2204 ~]#ll /var/log/test/
-rw-r----- 1 nginx nginx 4179600 5月 8 17:13 test1.log
-rw-r----- 1 nginx nginx 4179600 5月 8 17:10 test1.log.1
-rw-r----- 1 nginx nginx 1052 5月 8 17:12 test1.log-20240516.gz
十、总结NAS的部署和安装过程
在 Linux 中搭建 NAS 的核心流程如下:
1. **硬件准备**
- 选择硬盘(机械/SSD)和冗余方案(RAID/软件阵列)。
- 选择低功耗或高性能服务器硬件。
2. **系统配置**
- 安装 Linux 系统(如 Ubuntu/Debian/Rocky)。
- 更新系统并安装必要工具(如 `mdadm`、`samba`)。
3. **存储管理**
- 分区、格式化磁盘(EXT4/Btrfs/ZFS)。
- 挂载存储并配置自动挂载(`/etc/fstab`)。
4. **网络共享**
- **Samba**:配置 `smb.conf`,设置共享目录和用户权限。
- **NFS**:编辑 `/etc/exports`,允许客户端访问。
- 开放防火墙端口(SMB: 445/139,NFS: 2049/111)。
5. **权限控制**
- 设置文件系统权限(`chmod`/`chown`)。
- 配置 Samba/NFS 用户认证。
6. **高级优化**
- 启用快照(Btrfs/ZFS)和定时备份。
- 网络优化(Jumbo Frame、多网卡绑定)。
- 安全加固(加密传输、防火墙规则)。
7. **监控维护**
- 监控磁盘健康(`smartctl`)和 RAID 状态。
- 日志轮转(`logrotate`)和性能分析(`iostat`)。
**一句话总结**:准备硬件→装系统→配存储→设共享→控权限→优化安全→持续监控。
十一、使用inotify + rsync和sersync实现文件的同步,并且总结两种方式的优缺点
#服务端以守护进程运行
[root@ubuntu ~]# systemctl enable --now rsync.service
Synchronizing state of rsync.service with SysV service script with
/lib/systemd/systemd-sysv-install.
Executing: /lib/systemd/systemd-sysv-install enable rsync
Created symlink /etc/systemd/system/multi-user.target.wants/rsync.service →
/lib/systemd/system/rsync.service.
#启动失败,因为 /etc/rsyncd.conf 配置文件不存在
[root@ubuntu ~]# systemctl status rsync.service
○ rsync.service - fast remote file copy program daemon
Loaded: loaded (/lib/systemd/system/rsync.service; enabled; vendor preset:
enabled)
Active: inactive (dead)
Condition: start condition failed at Tue 2023-07-11 23:24:05 CST; 4s ago
└─ ConditionPathExists=/etc/rsyncd.conf was not met
Docs: man:rsync(1)
man:rsyncd.conf(5)
#创建空配置文件
[root@ubuntu ~]# touch /etc/rsyncd.conf
#启动服务
[root@ubuntu ~]# systemctl start rsync.service
#查看服务状态,运行中
[root@ubuntu ~]# systemctl status rsync
● rsync.service - fast remote file copy program daemon
Loaded: loaded (/lib/systemd/system/rsync.service; enabled; vendor preset:
enabled)
Active: active (running) since Tue 2023-07-11 23:37:07 CST; 7s ago
Docs: man:rsync(1)
man:rsyncd.conf(5)
Main PID: 26064 (rsync)
Tasks: 1 (limit: 2178)
#监听 873 端口[root@ubuntu ~]# ss -tunlp | grep rsync
tcp LISTEN 0 5 0.0.0.0:873 0.0.0.0:* users: (("rsync",pid=26064,fd=4)) tcp LISTEN 0 5 [::]:873 [::]:* users: (("rsync",pid=26064,fd=5)) #客户端连接测试
[root@ubuntu ~]# rsync rsync://10.0.0.208
[root@ubuntu ~]# echo $?
0
#修改服务端配置,指定共享目录
[root@ubuntu ~]# cat /etc/rsyncd.conf
[dir1]
path=/data/dir1/
read only=no
#重启服务
[root@ubuntu ~]# systemctl restart rsync.service
#查看服务端目录
[root@ubuntu ~]# tree /data/
/data/
└── dir1
1 directory, 0 files
#客户端再次测试,可以看到内容
[root@ubuntu ~]# rsync rsync://10.0.0.208
dir1
#两种写法都可以, :: 表示走rsync协议
[root@ubuntu ~]# rsync 10.0.0.208::
dir1
#传输文件到远程失败,此处的 root 是指rsync服务的用户,当前服务端并没有配置此信息,默认会被映射
成 nobody
[root@ubuntu ~]# rsync /etc/fstab root@10.0.0.208::dir1
rsync: [receiver] mkstemp "/.fstab.tBlxU2" (in dir1) failed: Permission denied
(13)
rsync error: some files/attrs were not transferred (see previous errors) (code
23) at main.c(1338) [sender=3.2.7]
#在服务端配置权限
[root@ubuntu ~]# setfacl -m u:nobody:rwx /data/dir1/
#客户端再次测试,上传成功,现在使用的是匿名连接
[root@ubuntu ~]# rsync /etc/fstab root@10.0.0.208::dir1
[root@ubuntu ~]# rsync /etc/issue tom@10.0.0.208::dir1 #tom 用户在服务端并不存在 #
服务端查看,属主属组都是 nobody
[root@ubuntu ~]# ls -l /data/dir1/
total 8
-rw-r--r-- 1 nobody nogroup 771 Jul 12 00:02 fstab
-rw-r--r-- 1 nobody nogroup 24 Jul 12 00:04 issue
#指定映射账号,指定日志文件,指定远程连接用户名和密码,禁用匿名连接
[root@ubuntu ~]# cat /etc/rsyncd.conf
uid=root
gid=root
max connections=0
log file=/var/log/rsyncd.log
pid file=/var/run/rsyncd.pid
lock file=/var/run/rsyncd.lock
[dir1]
path=/data/dir1/
comment=rsync dir1
read only=no
auth users=rsyncer
secrets file=/etc/rsyncd.pwd
#密码文件
[root@ubuntu ~]# cat /etc/rsyncd.pwd
rsyncer:123456
#重启服务
[root@ubuntu ~]# systemctl restart rsync.service
#客户端再次测试,匿名非匿名都报错
[root@ubuntu ~]# rsync 10.0.0.208::dir1
Password:
@ERROR: auth failed on module dir1
rsync error: error starting client-server protocol (code 5) at main.c(1863)
[Receiver=3.2.7]
[root@ubuntu ~]# rsync rsyncer@10.0.0.208::dir1
Password:
@ERROR: auth failed on module dir1
rsync error: error starting client-server protocol (code 5) at main.c(1863)
[Receiver=3.2.7]
#查看服务端日志,密码文件不能被所有人可读
[root@ubuntu ~]# cat /var/log/rsyncd.log
......
2023/07/13 09:10:55 [3071] secrets file must not be other-accessible (see strict
modes option)
2023/07/13 09:10:55 [3071] auth failed on module dir1 from UNKNOWN (10.0.0.206)
for rsyncer: ignoring secrets file
#修改密码文件权限
[root@ubuntu ~]# chmod 600 /etc/rsyncd.pwd
[root@ubuntu ~]# ll /etc/rsyncd.pwd
-rw------- 1 root root 15 Jul 13 08:58 /etc/rsyncd.pwd
#客户端再次测试
[root@ubuntu ~]# rsync /etc/hosts rsyncer@10.0.0.208::dir1
Password:
[root@ubuntu ~]# rsync rsyncer@10.0.0.208::dir1
Password:#服务端查看,新文件属主属组发生了变化
drwxrwxr-x
-rw-r--r--
-rw-r--r--4,096 2023/07/13 09:23:12 .
771 2023/07/12 00:02:15 fstab
270 2023/07/13 09:23:12 hosts-rw-r--r-- 24 2023/07/12 00:04:37 issue
[root@ubuntu ~]# ls -lh /data/dir1/
total 12K
-rw-r--r-- 1 nobody nogroup 771 Jul 12 00:02 fstab
-rw-r--r-- 1 root root 270 Jul 13 09:23 hosts
-rw-r--r-- 1 nobody nogroup 24 Jul 12 00:04 issue
#查看客户端文件
[root@ubuntu ~]# tree /data/www/
/data/www/
├── dira
│ └── os-release
├── f1
├── f2
├── fstab
└── issue
1 directory, 5 files
#查看服务端文件
[root@ubuntu ~]# tree /data/dir1/
/data/dir1/
├── fstab
├── hosts
└── issue
0 directories, 3 files
#将客户端密码保存在单独文件,实现非交互式连接
[root@ubuntu ~]# echo "123456" > /etc/rsyncd.pwd
[root@ubuntu ~]# chmod 600 /etc/rsyncd.pwd
#客户端测试,保证服务端与客户端同步
#--delete 选项,此次同步完成后,删除服务端不在此次同步中的文件
#-a 保留属性
#-v 显示过程
#-z 压缩传输
[root@ubuntu ~]# rsync -avz --delete --password-file=/etc/rsyncd.pwd /data/www/
rsyncer@10.0.0.208::dir1
sending incremental file list
deleting hosts #删除了远程的 hosts 文件
./
f1
f2
fstab
issue
dira/
dira/os-release
sent 1,169 bytes received 147 bytes
total size is 1,182 speedup is 0.902,632.00 bytes/sec #再次查看服务端,与客户端保持一致了
[root@ubuntu ~]# tree /data/dir1/
/data/dir1/
├── dira
│?? └── os-release
├── f1
├── f2
├── fstab
└── issue
1 directory, 5 files


 524
524

 被折叠的 条评论
为什么被折叠?
被折叠的 条评论
为什么被折叠?
 到【灌水乐园】发言


