


1、创建上传按钮组件
经典款式,用户点击按钮弹出文件选择框。
<template>
	<a-upload name="file" :multiple="true" :show-upload-list="false" :custom-request="handleUpload">
	     <a-button type="primary" icon="upload" >上传</a-button>
	</a-upload>
</template>

export default {
  name: "index",
  data() {
    return {
      uploadFileList: [],
    }
  },
  methods: {
  	handleUpload(options) {
      let formData = new FormData(), file = options.file
      formData.append('file', file);
      let index = this.uploadFileList.push(file) - 1
      upload('http://url',formData, (percent) => this.setUploadProcess(percent, file, index)).then(() => {
      	//成功处理
        Object.assign(file, {status: 'done'})
        this.uploadFileList.splice(index, 1, file)
      }, (err) => {
      	//失败处理
        Object.assign(file, {status: 'error', message: '上传失败'})
        this.uploadFileList.splice(index, 1, file)
      })
    },

	//设置上传进度值
    setUploadProcess(percent, file, index) {
      Object.assign(file, {percent})
      this.uploadFileList.splice(index, 1, file)
    },
  }
}
2、实现上传方法
通过axios实现文件上传,同时返回进度、结果等信息
import axios from 'axios'
/**
 * 文件上传
 *
 * @param url 请求地址
 * @param formData 上传信息
 * @param {Function} uploadProcess 上传进度回调函数
 * @author 乐享生活522
 * @date 2022/6/14 11:19
 */
export async function upload(url, formData, uploadProcess) {
  return axios.post(url, formData, {
    onUploadProgress: progressEvent => {
      let percent = (progressEvent.loaded / progressEvent.total * 100 | 0)
      uploadProcess && uploadProcess(percent)
    }
  })
}
3、结果组件展示
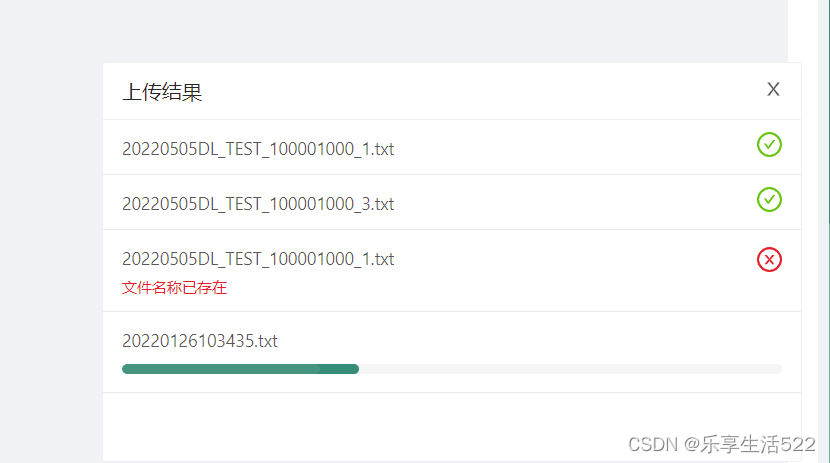
4、上传结果完整组件
用于展示上传文件名称、进度、结果和错误信息
<template>
  <div class="file-upload-process">
    <div class="card-header">
      <span class="title">上传结果</span>
      <div class="action" style="float: right!important">
        <a-icon type="close" @click="handleClose"/>
      </div>
    </div>
    <div ref="main" class="card-body">
      <div class="file-item" v-for="item of fileList" :key="item.uid">
        <span class="title">{{ item.name }}</span>
        <a-icon v-if="item.status==='done'" type="check-circle" class="result done"/>
        <a-icon v-else-if="item.status==='error'" type="close-circle" class="result error"/>
        <a-progress v-else :percent="item.percent" status="active" :show-info="false"/>
        <div v-if="item.message" class="error">
          <span>{{ item.message }}</span>
        </div>
      </div>
    </div>
  </div>
</template>

<script>
export default {
  name: "UploadResult",
  props: {
    fileList: {
      type: Array,
      default: () => []
    }
  },

  watch: {
    fileList() {
      this.$nextTick(() => {
      	//自动滚动到最后一条记录
        let main = this.$refs.main
        main.scrollTop = main.scrollHeight || 200
      })
    }
  },

  methods: {
    handleClose() {
      this.$emit("update:fileList", [])
    }
  }
}
</script>

<style lang="less" scoped>
.file-upload-process {
  position: fixed;
  width: 560px;
  bottom: 4px;
  right: 24px;
  z-index: 10;
  box-shadow: 0 0 24px rgb(0 0 0 / 18%);
  background: @base-bg-color;
  max-height: 320px;
  height: 320px;
  border-radius: 3px;
  border: solid 1px @border-color;

  .card-header {
    padding: 10px 15px;
    border-bottom: solid 1px @border-color;

    .title {
      font-size: 16px;
      color: @title-color;
      font-weight: 500;
    }

    .action {
      display: block;
    }
  }

  .card-body {
    min-height: 200px;
    overflow-y: auto;
    overflow-x: hidden;
    max-height: 280px;

    .file-item {
      padding: 10px 15px;
      border-bottom: solid 1px #eaeaea;

      .title {
        color: @text-color;
        display: inline-block;
        max-width: 300px;
        overflow: hidden;
        white-space: nowrap;
        text-overflow: ellipsis;
        vertical-align: middle;
      }

      .error {
        color: @error-color;
        font-size: 12px;
        padding-top: 4px;
      }

      .result.done {
        font-size: 20px;
        color: @success-color;
        float: right;
        display: inline-block;
        vertical-align: middle;
      }

      .result.error {
        font-size: 20px;
        color: @error-color;
        float: right;
        display: inline-block;
        vertical-align: middle;
      }
    }
  }
}
</style>


 3133
3133


 被折叠的 条评论
为什么被折叠?
被折叠的 条评论
为什么被折叠?
 到【灌水乐园】发言


