


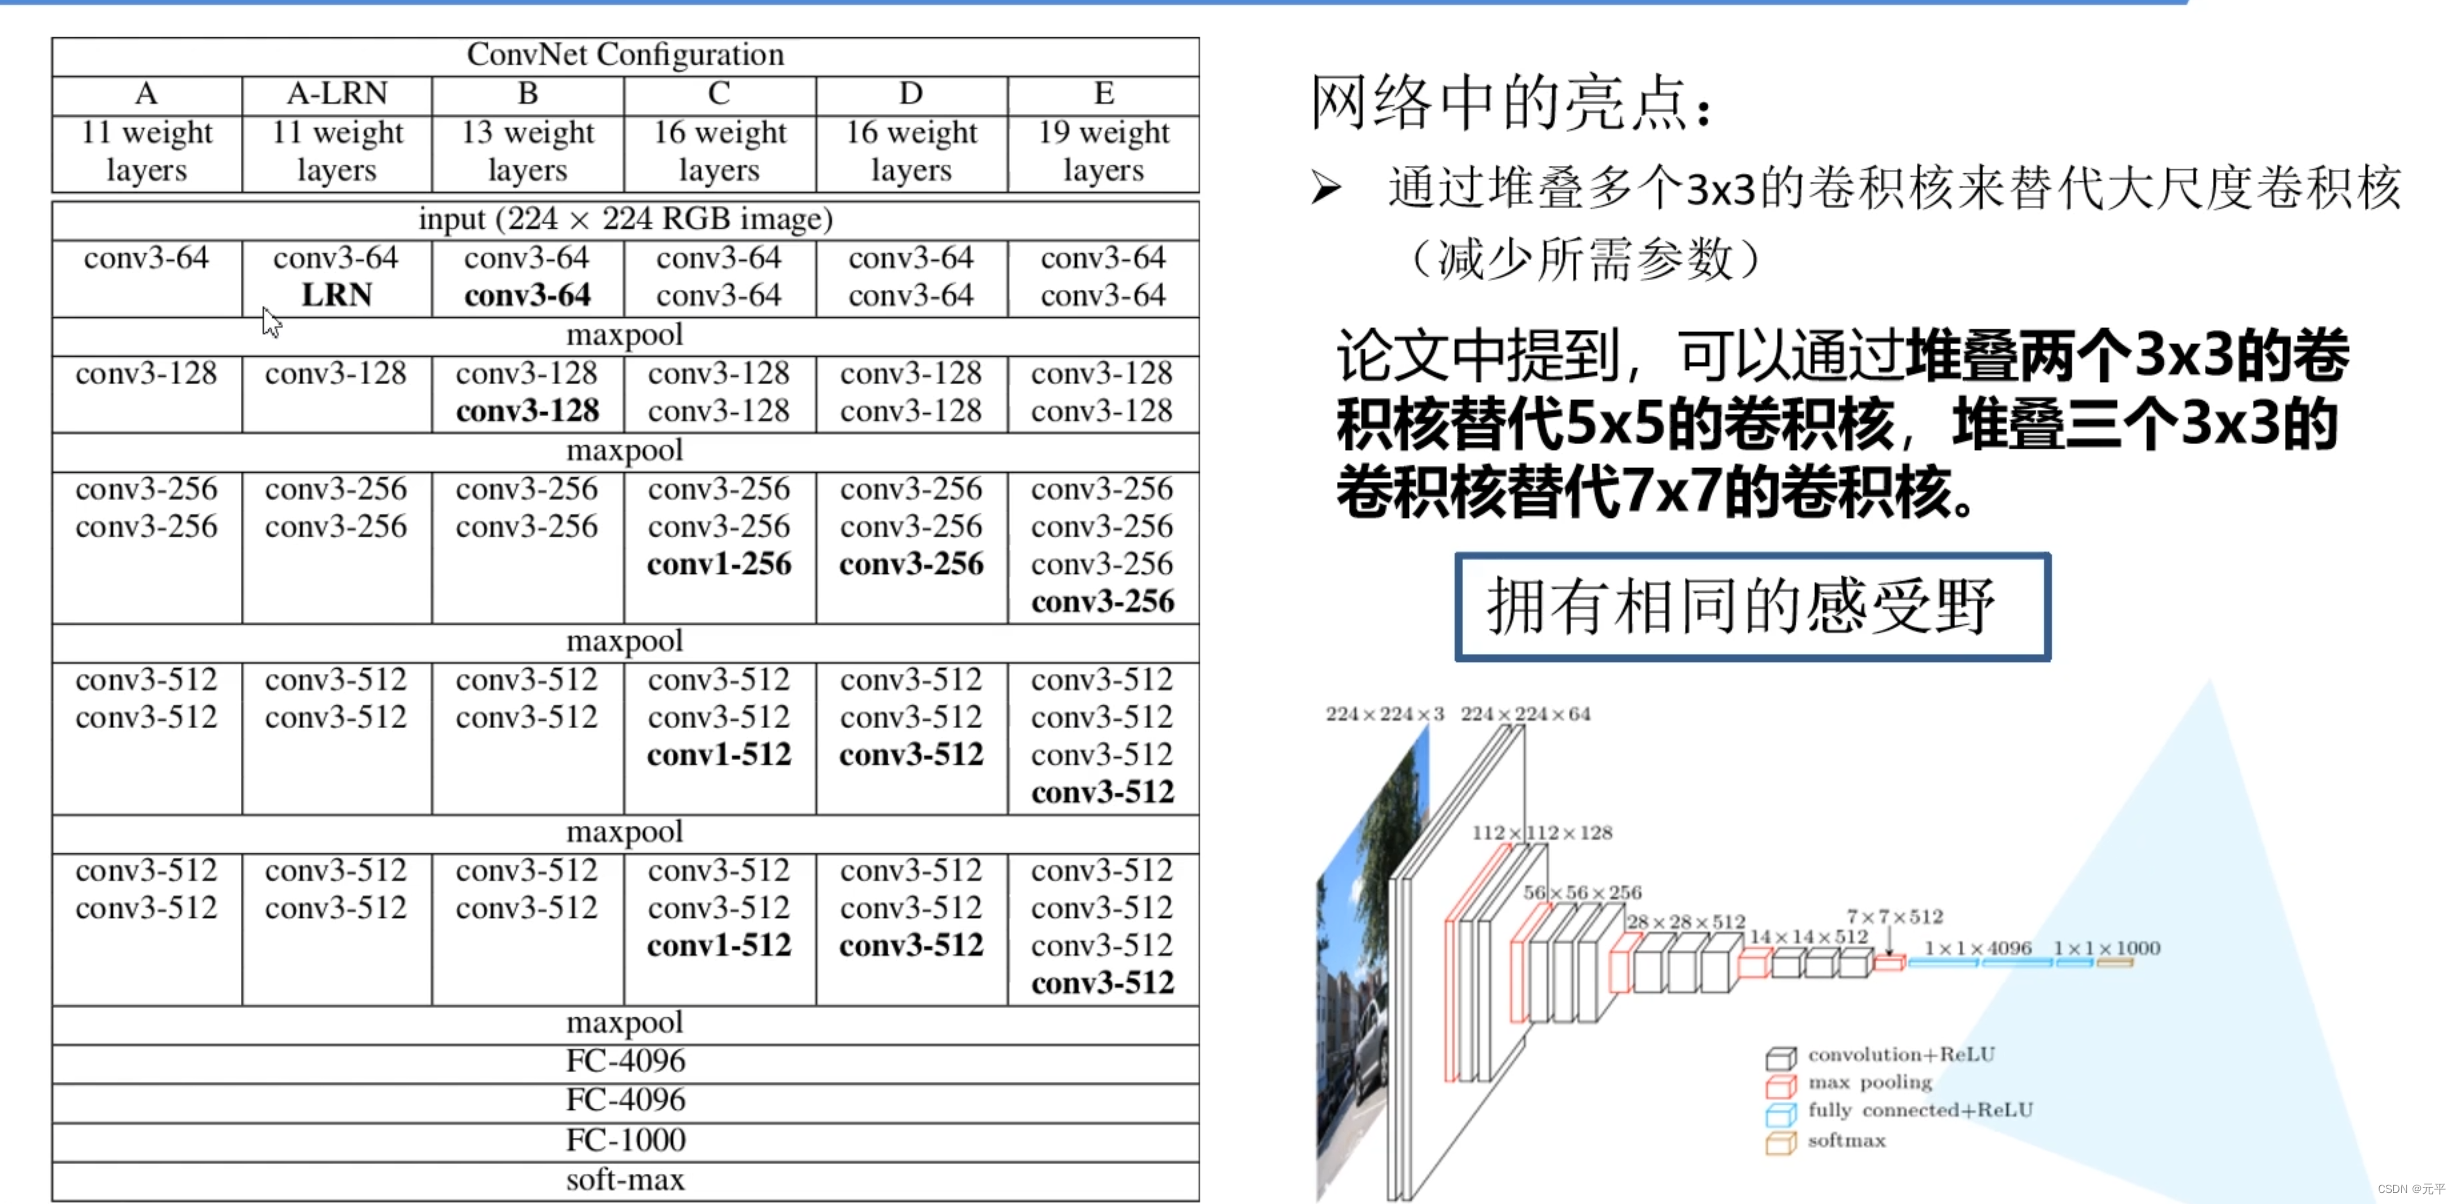

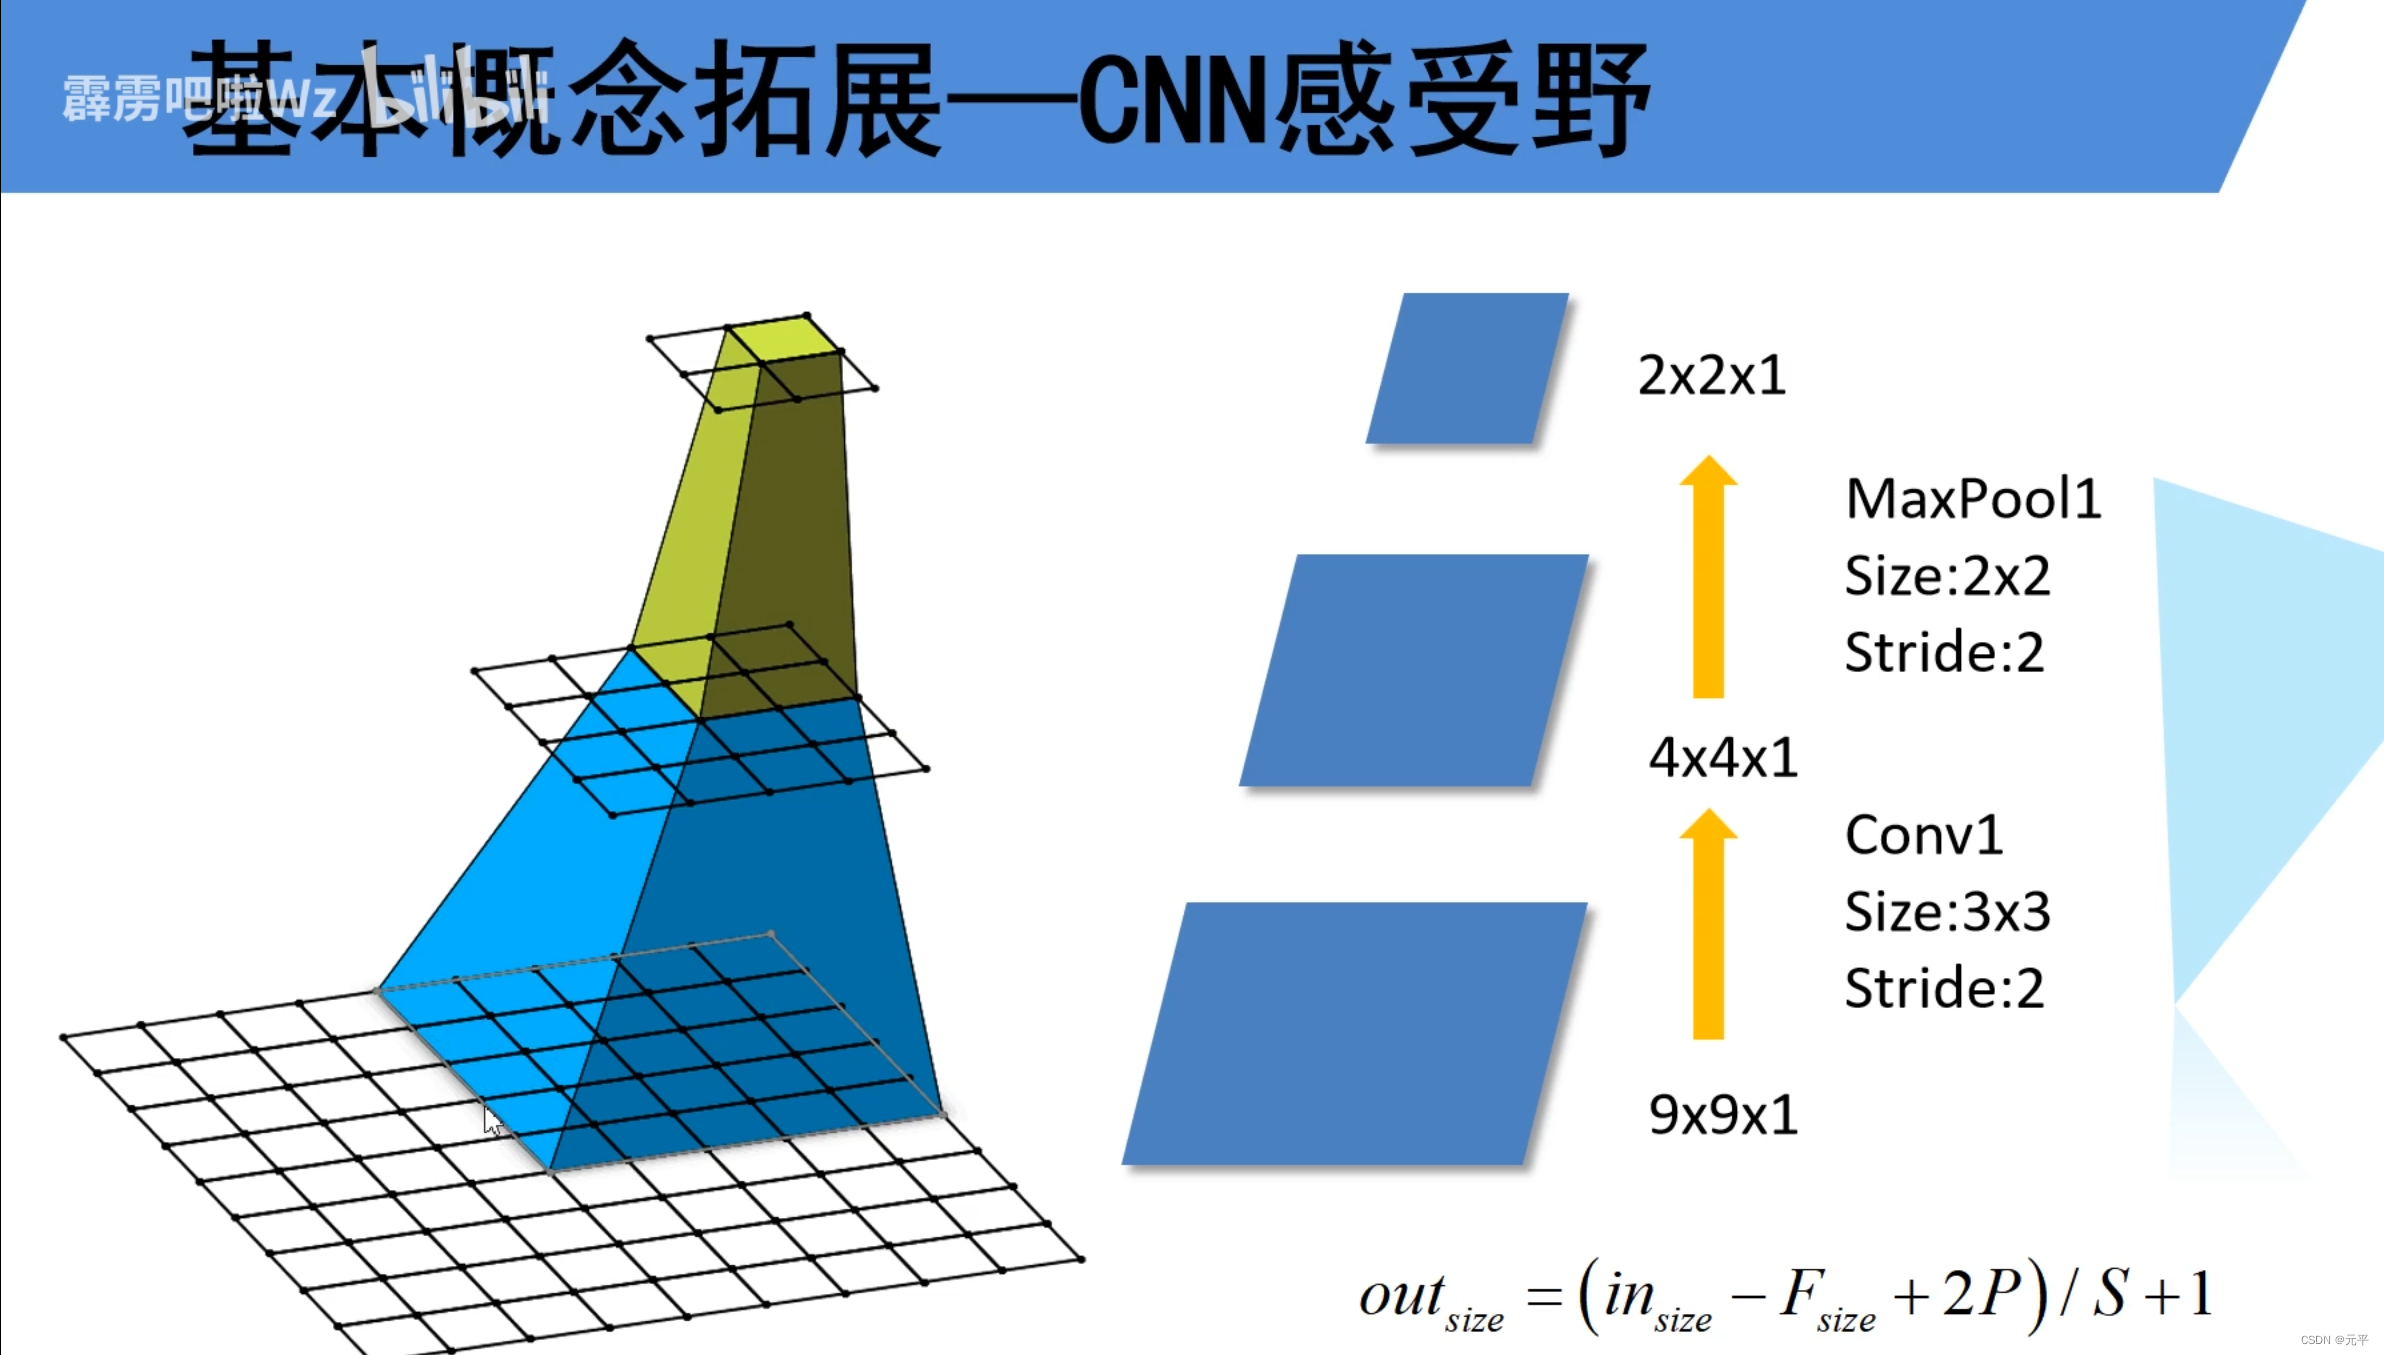
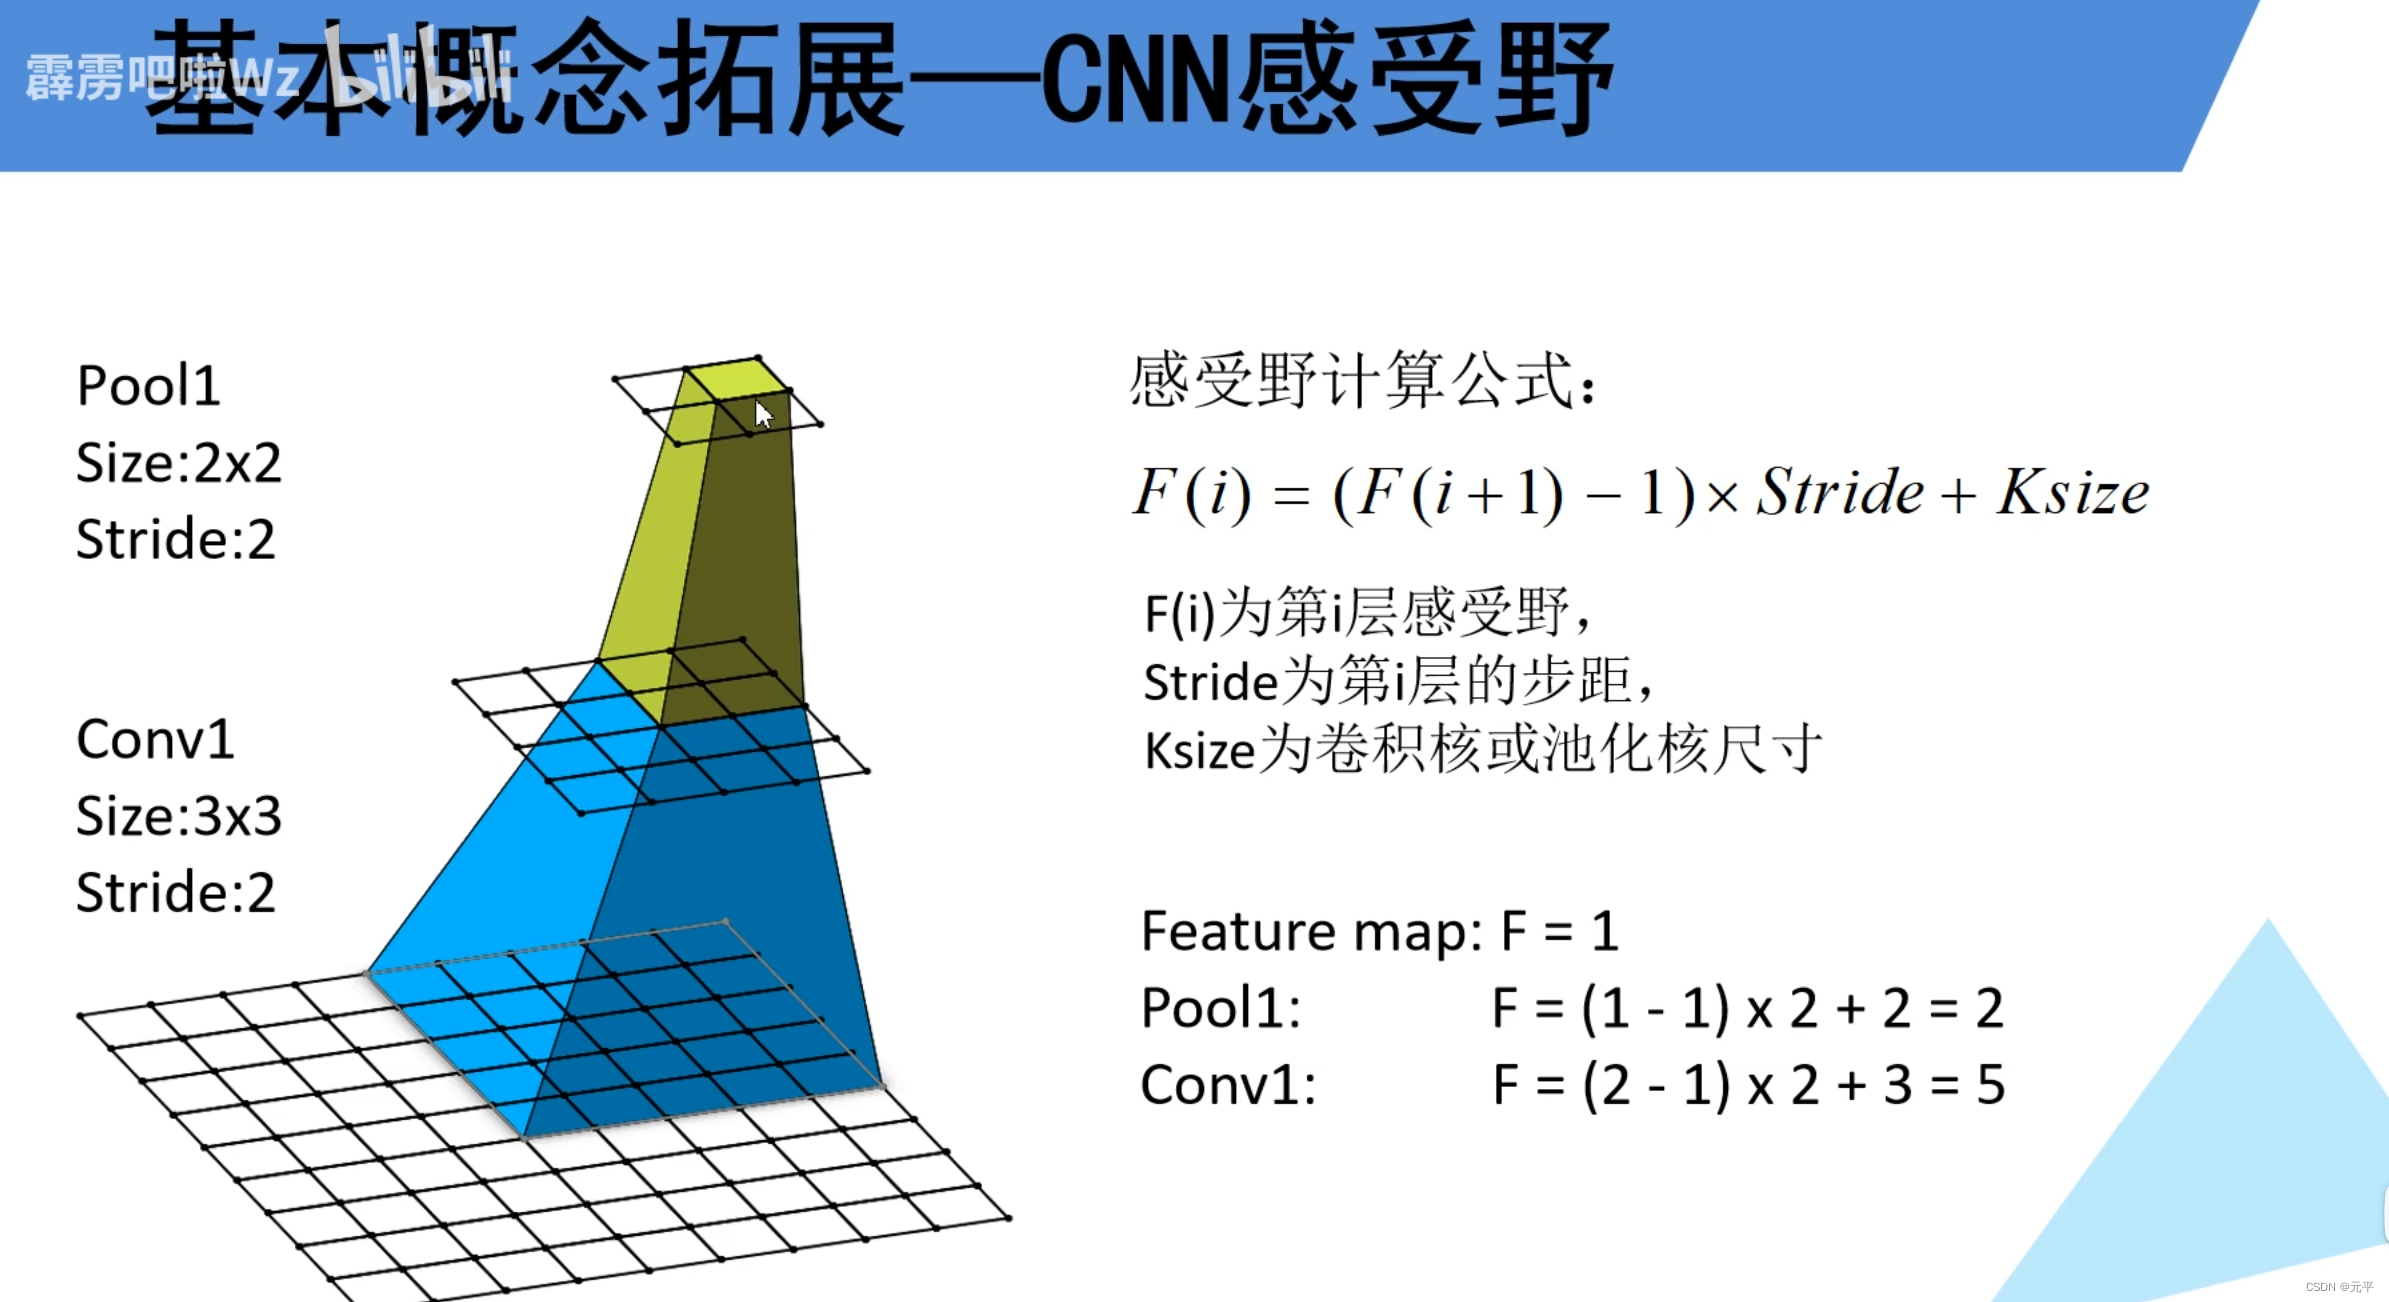
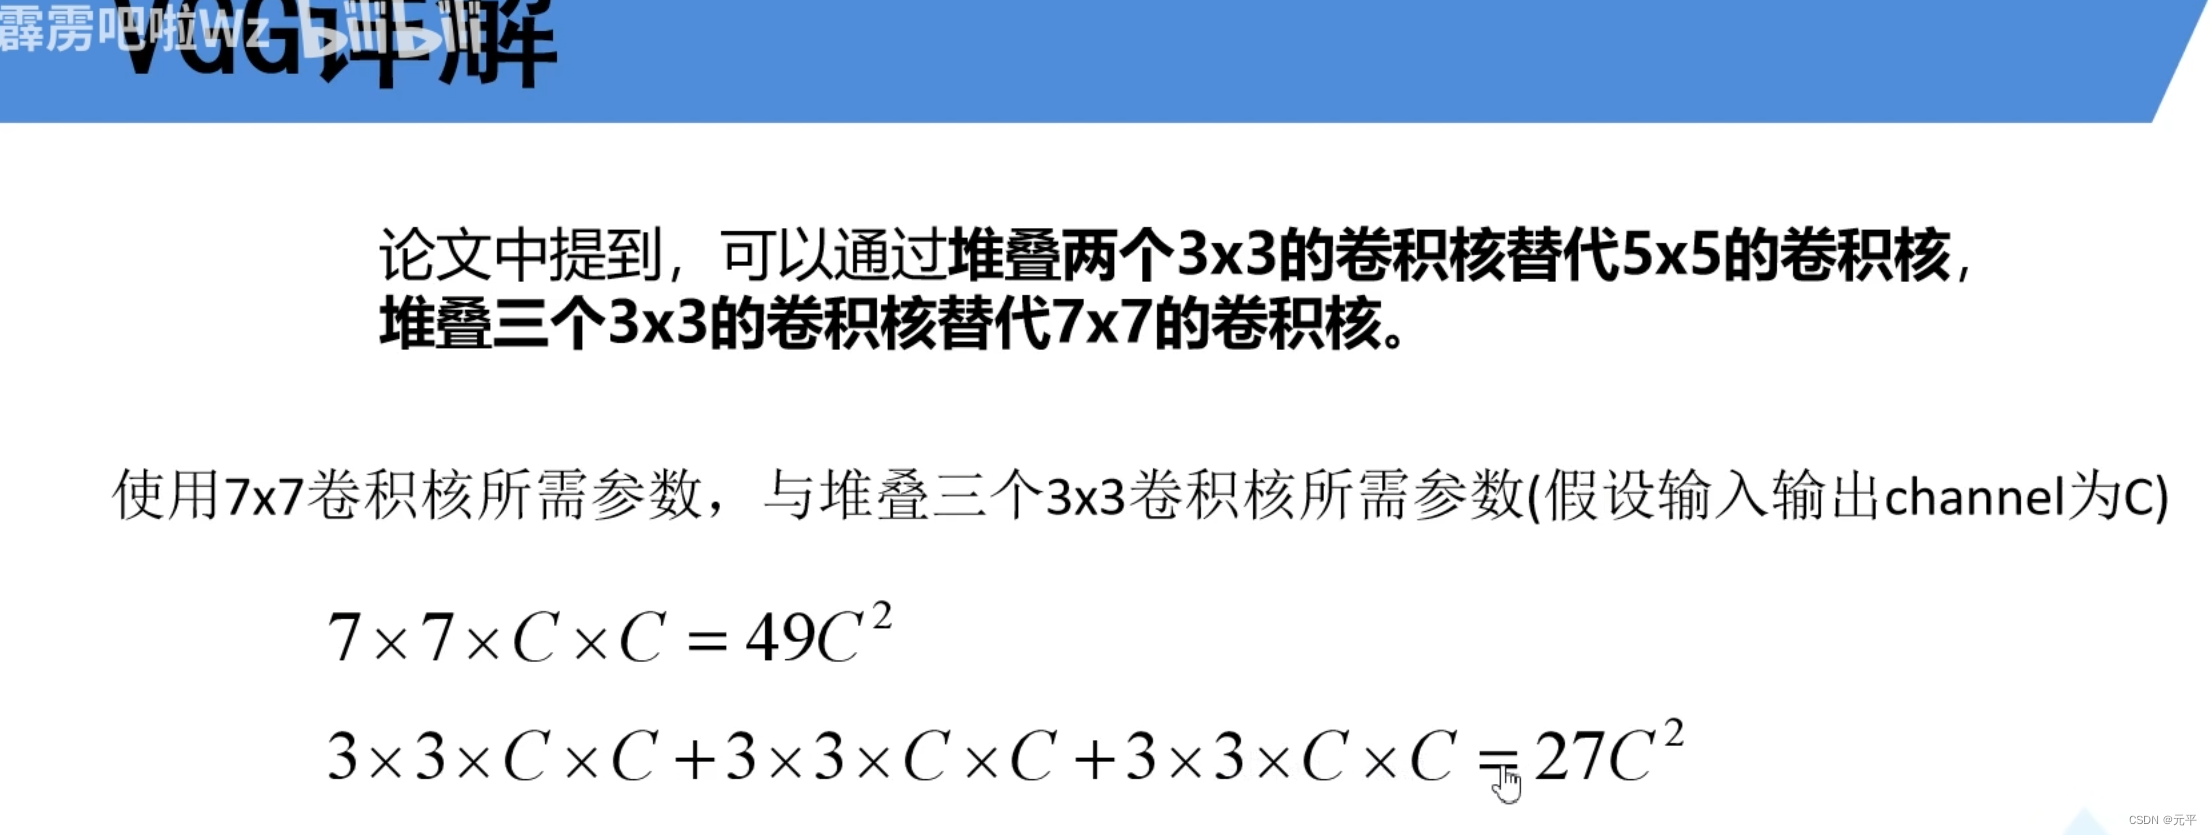
搭建了四个vgg模型(上图中的A,B,D,E),并基于花分类数据集每个模型训练了10个epoco,画出了测试集上每个epoch不同模型的准确度对比分析,数据集介绍及下载可以参考我的上一篇文章:
https://blog.csdn.net/weixin_44230855/article/details/125251054?spm=1001.2014.3001.5502
模型搭建代码:
import torch.nn as nn
import torch
# class VGG(nn.Module):
# def __init__(self, features, num_classes=1000, init_weights=False):
# super(VGG, self).__init__()
# self.features = features
# self.classifier = nn.Sequential(
# nn.Dropout(p=0.5),
# nn.Linear(512*7*7, 2048), #原论文为4096
# nn.ReLU(True),
# nn.Dropout(p=0.5),
# nn.Linear(2048, 2048), #原论文为4096
# nn.ReLU(True),
# nn.Linear(2048, num_classes)
# )
# if init_weights:
# self._initialize_weights()
#
# def forward(self, x): #前向传播
# x = self.features(x)
# x = torch.flatten(x, start_dim=1)
# x = self.classifier(x)
# return x
#
# def _initialize_weights(self): #参数初始化
# for m in self.modules():
# if isinstance(m, nn.Conv2d):
# nn.init.xavier_uniform_(m.weight)
# if m.bias is not None:
# nn.init.constant_(m.bias, 0)
# elif isinstance(m, nn.Linear):
# nn.init.xavier_uniform_(m.weight)
# nn.init.constant_(m.bias, 0)
#
#
# def make_features(cfg: list):
# layers = []
# in_channels = 3
# for v in cfg:
# if v== "M":
# layers += [nn.MaxPool2d(kernel_size=2, stride=2)]
# else:
# conv2d = nn.Conv2d(in_channels, v, kernel_size=3, padding=1)
# layers += [conv2d, nn.ReLU(True)]
# in_channels = v
# return nn.Sequential(*layers)
#
# cfgs = {
# 'vgg11': [64, 'M', 128, 'M', 256, 256, 'M', 512, 512, 'M', 512, 512, 'M'],
# 'vgg13': [64, 64, 'M', 128, 128, 'M', 256, 256, 'M', 512, 512, 'M', 512],
# 'vgg16': [64, 64, 'M', 128, 128, 'M', 256, 256, 256, 'M', 512, 512, 512],
# 'vgg16': [64, 64, 'M', 128, 128, 'M', 256, 256, 256, 'M', 512, 512, 512, 'M', 512, 512, 512, 'M'],
# 'vgg19': [64, 64, 'M', 128, 128, 'M', 256, 256, 256, 256, 'M', 512, 512],
# }
#
# def vgg(model_name='vgg16', **kwargs):
# try:
# cfg = cfgs[model_name]
# except:
# print("Warning: model number {} not in cfgs dict!".format(model_name))
# exit(-1)
# model = VGG(make_features(cfg), **kwargs) #**kwargs不定个数的参数
# return model
import torch.nn as nn
import torch
class VGG(nn.Module):
def __init__(self, features, num_classes=1000, init_weights=False):
super(VGG, self).__init__()
self.features = features # 卷积层提取特征
self.classifier = nn.Sequential( # 全连接层进行分类
nn.Dropout(p=0.5),
nn.Linear(512*7*7, 2048),
nn.ReLU(True),
nn.Dropout(p=0.5),
nn.Linear(2048, 2048),
nn.ReLU(True),
nn.Linear(2048, num_classes)
)
if init_weights:
self._initialize_weights()
def forward(self, x):
# N x 3 x 224 x 224
x = self.features(x)
# N x 512 x 7 x 7
x = torch.flatten(x, start_dim=1)
# N x 512*7*7
x = self.classifier(x)
return x
def _initialize_weights(self):
for m in self.modules():
if isinstance(m, nn.Conv2d):
# nn.init.kaiming_normal_(m.weight, mode='fan_out', nonlinearity='relu')
nn.init.xavier_uniform_(m.weight)
if m.bias is not None:
nn.init.constant_(m.bias, 0)
elif isinstance(m, nn.Linear):
nn.init.xavier_uniform_(m.weight)
# nn.init.normal_(m.weight, 0, 0.01)
nn.init.constant_(m.bias, 0)
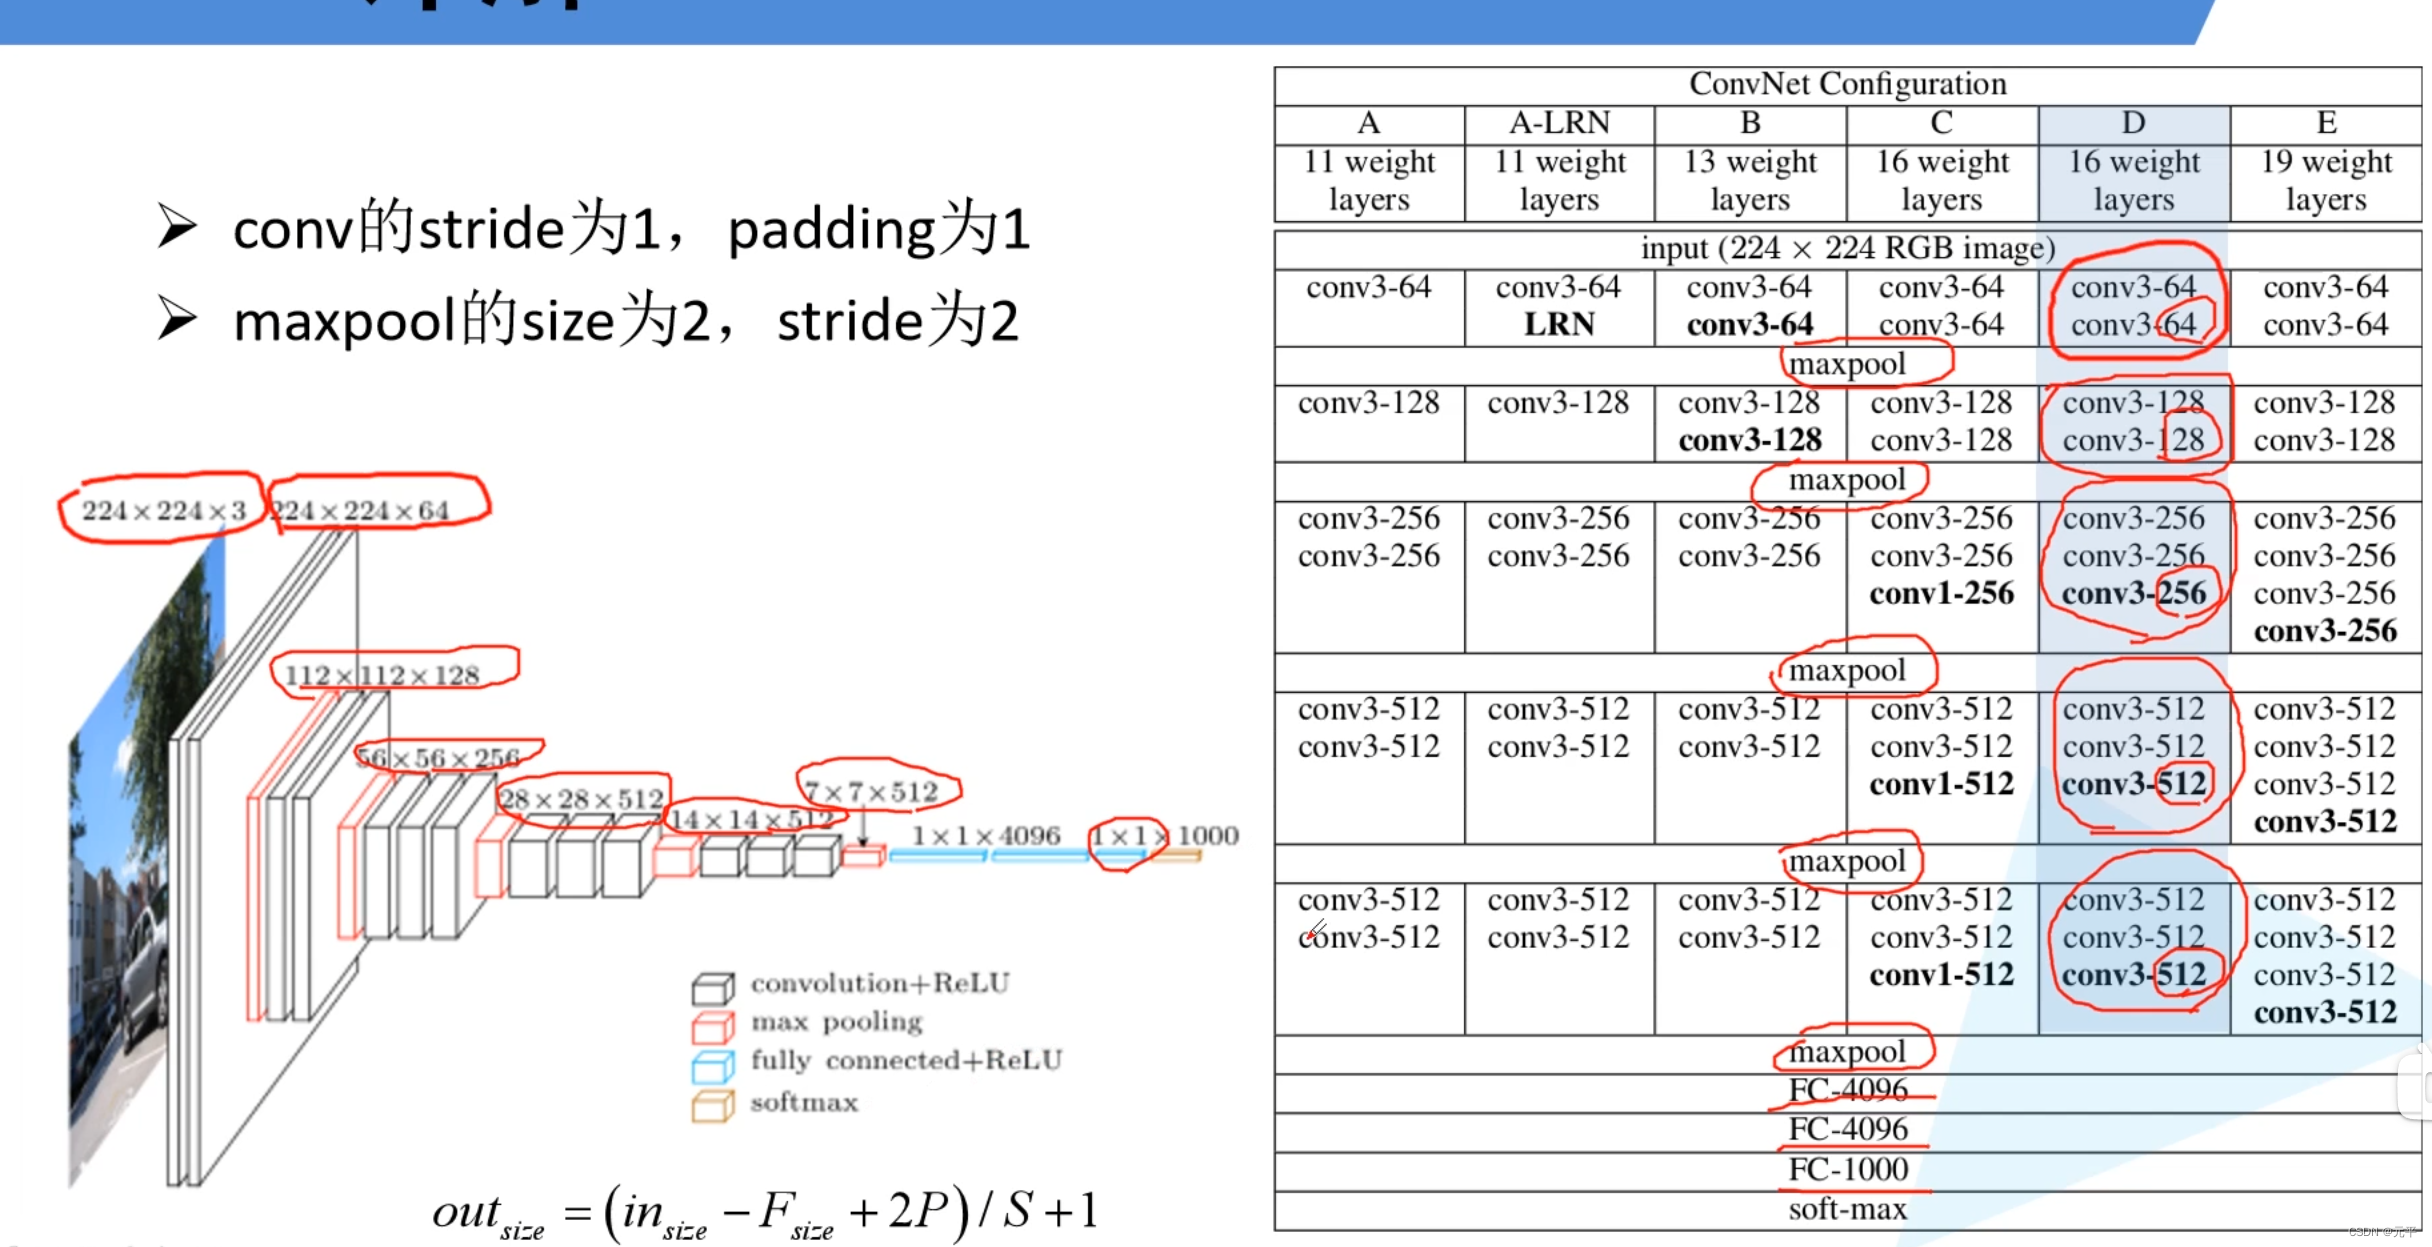
# vgg网络模型配置列表,数字表示卷积核个数,'M'表示最大池化层
cfgs = {
'vgg11': [64, 'M', 128, 'M', 256, 256, 'M', 512, 512, 'M', 512, 512, 'M'], # 模型A
'vgg13': [64, 64, 'M', 128, 128, 'M', 256, 256, 'M', 512, 512, 'M', 512, 512, 'M'], # 模型B
'vgg16': [64, 64, 'M', 128, 128, 'M', 256, 256, 256, 'M', 512, 512, 512, 'M', 512, 512, 512, 'M'], # 模型D
'vgg19': [64, 64, 'M', 128, 128, 'M', 256, 256, 256, 256, 'M', 512, 512, 512, 512, 'M', 512, 512, 512, 512, 'M'], # 模型E
}
# 卷积层提取特征
def make_features(cfg: list): # 传入的是具体某个模型的参数列表
layers = []
in_channels = 3 # 输入的原始图像(rgb三通道)
for v in cfg:
# 最大池化层
if v == "M":
layers += [nn.MaxPool2d(kernel_size=2, stride=2)]
# 卷积层
else:
conv2d = nn.Conv2d(in_channels, v, kernel_size=3, padding=1)
layers += [conv2d, nn.ReLU(True)]
in_channels = v
return nn.Sequential(*layers) # 单星号(*)将参数以元组(tuple)的形式导入
def vgg(model_name="vgg16", **kwargs): # 双星号(**)将参数以字典的形式导入
try:
cfg = cfgs[model_name]
except:
print("Warning: model number {} not in cfgs dict!".format(model_name))
exit(-1)
model = VGG(make_features(cfg), **kwargs)
return model
训练以及可视化代码:
# 导入包
import os
os.environ['KMP_DUPLICATE_LIB_OK'] = 'True'
import torch
import torch.nn as nn
from torchvision import transforms, datasets, utils
import matplotlib.pyplot as plt
import numpy as np
import torch.optim as optim
from model import vgg
import os
import json
import time
#
# 使用GPU训练
device = torch.device("cuda:0" if torch.cuda.is_available() else "cpu")
print(device)

data_transform = {
    "train": transforms.Compose([transforms.RandomResizedCrop(224),       # 随机裁剪,再缩放成 224×224
                                 transforms.RandomHorizontalFlip(p=0.5),  # 水平方向随机翻转,概率为 0.5, 即一半的概率翻转, 一半的概率不翻转
                                 transforms.ToTensor(),
                                 transforms.Normalize((0.5, 0.5, 0.5), (0.5, 0.5, 0.5))]),


    "val": transforms.Compose([transforms.Resize((224, 224)),  # cannot 224, must (224, 224)
                               transforms.ToTensor(),
                               transforms.Normalize((0.5, 0.5, 0.5), (0.5, 0.5, 0.5))])}

# 获取图像数据集的路径
image_path = r'C:\Users\18312\PycharmProjects\AlexNet_pytorch\data_set\flower_data' #数据文件夹


# # 导入训练集并进行预处理
train_dataset = datasets.ImageFolder(root=image_path + "/train",
                                     transform=data_transform["train"])
train_num = len(train_dataset)
#
# # 按batch_size分批次加载训练集
train_loader = torch.utils.data.DataLoader(train_dataset,	# 导入的训练集
                                           batch_size=32, 	# 每批训练的样本数
                                           shuffle=True,	# 是否打乱训练集
                                           num_workers=0)	# 使用线程数,在windows下设置为0
# 导入验证集并进行预处理
validate_dataset = datasets.ImageFolder(root=image_path + "/val",
                                        transform=data_transform["val"])
val_num = len(validate_dataset)
print(val_num)

# 加载验证集
validate_loader = torch.utils.data.DataLoader(validate_dataset,	# 导入的验证集
                                              batch_size=32,
                                              shuffle=True,
                                              num_workers=0)
# 字典,类别:索引 {'daisy':0, 'dandelion':1, 'roses':2, 'sunflower':3, 'tulips':4}
flower_list = train_dataset.class_to_idx
# 将 flower_list 中的 key 和 val 调换位置
cla_dict = dict((val, key) for key, val in flower_list.items())

# 将 cla_dict 写入 json 文件中
json_str = json.dumps(cla_dict, indent=4)
with open('class_indices.json', 'w') as json_file:
    json_file.write(json_str)
model_names = ['vgg11', 'vgg13', 'vgg16', 'vgg19']
log_s = []
for i in range (len(model_names)):
    log_temp =[]
    model_name = model_names[i]
    net = vgg(model_name=model_name, num_classes=5, init_weights=True)
    net.to(device)  # 分配网络到指定的设备(GPU/CPU)训练 这里有问题
    loss_function = nn.CrossEntropyLoss()  # 交叉熵损失
    optimizer = optim.Adam(net.parameters(), lr=0.0001)  # 优化器(训练参数,学习率)
    save_path = './{}Net.pth'.format(model_name)
    best_acc = 0.0
    for epoch in range(10):
        net.train()  # 训练过程中开启 Dropout
        running_loss = 0.0  # 每个 epoch 都会对 running_loss  清零
        time_start = time.perf_counter()  # 对训练一个 epoch 计时
        for step, data in enumerate(train_loader, start=0):  # 遍历训练集,step从0开始计算
            images, labels = data  # 获取训练集的图像和标签
            optimizer.zero_grad()  # 清除历史梯度
            outputs = net(images.to(device))  # 正向传播
            loss = loss_function(outputs, labels.to(device))  # 计算损失
            loss.backward()  # 反向传播
            optimizer.step()  # 优化器更新参数
            running_loss += loss.item()

            # 打印训练进度(使训练过程可视化)
            rate = (step + 1) / len(train_loader)  # 当前进度 = 当前step / 训练一轮epoch所需总step
            a = "*" * int(rate * 50)
            b = "." * int((1 - rate) * 50)
            print("\rtrain loss: {:^3.0f}%[{}->{}]{:.3f}".format(int(rate * 100), a, b, loss), end="")
        print()
        print('%f s' % (time.perf_counter() - time_start))

        ########################################### validate ###########################################
        net.eval()  # 验证过程中关闭 Dropout
        acc = 0.0
        with torch.no_grad():
            for val_data in validate_loader:

                val_images, val_labels = val_data
                outputs = net(val_images.to(device))
                predict_y = torch.max(outputs, dim=1)[1]  # 以output中值最大位置对应的索引(标签)作为预测输出
                acc += (predict_y == val_labels.to(device)).sum().item()
            val_accurate = acc / val_num

            # 保存准确率最高的那次网络参数
            if val_accurate > best_acc:
                best_acc = val_accurate
                torch.save(net.state_dict(), save_path)
            print('[epoch %d] train_loss: %.3f  test_accuracy: %.3f \n' %
                  (epoch + 1, running_loss / step, val_accurate))
            log_temp.append((running_loss/step,val_accurate))
    log_s.append(log_temp)
    print(log_s)
    print('Finished Training: '+model_names[i])

print(log_s)
a = log_s
vgg11_acc = []
vgg13_acc = []
vgg16_acc = []
vgg19_acc = []
for i in range(len(a)):
    if i==0:
        for x in a[i]:
            vgg11_acc.append(x[-1])
    elif i==1:
        for x in a[i]:
            vgg13_acc.append(x[-1])
    elif i==2:
        for x in a[i]:
            vgg16_acc.append(x[-1])
    else:
        for x in a[i]:
            vgg19_acc.append(x[-1])
x =  [i for i in range(1,len(a[0])+1)]
plt.plot(x, vgg11_acc, marker='o', markersize=3)  # 绘制折线图,添加数据点,设置点的大小
plt.plot(x, vgg13_acc, marker='o', markersize=3)
plt.plot(x, vgg16_acc, marker='o', markersize=3)  # 绘制折线图,添加数据点,设置点的大小
plt.plot(x, vgg19_acc, marker='o', markersize=3)
plt.legend(['agg11', 'agg13','agg16','agg19'])  # 设置折线名称
plt.title('VGG测试集准确度对比')  # 折线图标题
plt.rcParams['font.sans-serif'] = ['SimHei']  # 显示汉字
plt.show()
电脑配置:华硕天选3 rtx7070显卡 8g显存
vgg11一个epoch用时大约:25s
vgg13一个epoch用时大约:32s
vgg16一个epoch用时大约:37s
vgg19一个epoch用时大约:42s
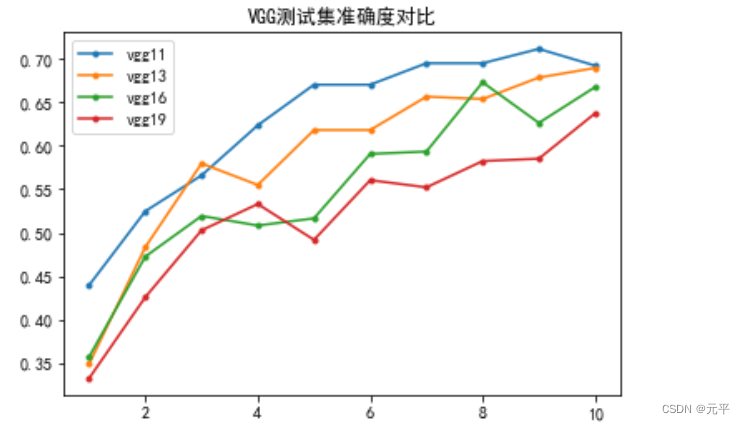
可以看到训练10个epoch,准确度最高的是vgg11,理论上来说随着模型深度的增加准确度会上升,不过这可能也和训练轮次和数据集有关,感兴趣的可以多训练一下试试看。
预测代码如下:
import os
os.environ["KMP_DUPLICATE_LIB_OK"]="TRUE"
import torch
from model import AlexNet
from PIL import Image
from torchvision import transforms
import matplotlib.pyplot as plt
import json

# 预处理
data_transform = transforms.Compose(
    [transforms.Resize((224, 224)),
     transforms.ToTensor(),
     transforms.Normalize((0.5, 0.5, 0.5), (0.5, 0.5, 0.5))])

# load image
img = Image.open("蒲公英.jpeg") #你的图片
plt.imshow(img)
# [N, C, H, W]
img = data_transform(img)
# expand batch dimension
img = torch.unsqueeze(img, dim=0)

# read class_indict
try:
    json_file = open('./class_indices.json', 'r')
    class_indict = json.load(json_file)
except Exception as e:
    print(e)
    exit(-1)

# create model
model = AlexNet(num_classes=5)
# load model weights
model_weight_path = "./vggNet.pth" #你需要加载的模型参数
model.load_state_dict(torch.load(model_weight_path))

# 关闭 Dropout
model.eval()
with torch.no_grad():
    # predict class
    output = torch.squeeze(model(img))     # 将输出压缩,即压缩掉 batch 这个维度
    predict = torch.softmax(output, dim=0)
    predict_cla = torch.argmax(predict).numpy()
print(class_indict[str(predict_cla)], predict[predict_cla].item())
plt.show()
仅供学习交流 如有侵权 联系删除 QQ:1831255835
致谢:
B站up主:霹雳吧啦Wz
https://www.bilibili.com/video/BV1W7411T7qc/?spm_id_from=333.788&vd_source=e93113e88e71956b3d18f1eb599bf012
https://blog.csdn.net/m0_37867091/article/details/107150142


 2558
2558


 被折叠的 条评论
为什么被折叠?
被折叠的 条评论
为什么被折叠?
 到【灌水乐园】发言


