


C#WPF实现TextBox控件水印效果的两种实现方法
在WPF实际项目中往往需要在TextBox中加入水印,来告诉使用者输入TextBox中的内容,如下图片所示:
下面介绍两种方式,来添加上图中的水印效果:
第一种方法:也是最简单的一种,使用第三方的组件库HandyControl来实现,
首先在Nuget中查找HandyControl,并安装,如图:
随后在WPF前端Xaml中引用这个库:
xmlns:hc="https://handyorg.github.io/handycontrol"

随后在App.xaml文件中加入以下代码,用以加入HandyControl样式资源:
<Application x:Class="WaterHole.App"
             xmlns="http://schemas.microsoft.com/winfx/2006/xaml/presentation"
             xmlns:x="http://schemas.microsoft.com/winfx/2006/xaml"
             xmlns:local="clr-namespace:WaterHole"
             StartupUri="MainWindow.xaml">
    <Application.Resources>
        <ResourceDictionary>
            <ResourceDictionary.MergedDictionaries>
                <ResourceDictionary Source="pack://application:,,,/HandyControl;component/Themes/SkinDefault.xaml" />
                <ResourceDictionary Source="pack://application:,,,/HandyControl;component/Themes/Theme.xaml" />
            </ResourceDictionary.MergedDictionaries>
        </ResourceDictionary>
    </Application.Resources>
</Application>
到这边就差不多引用完毕了,在界面上画个TextBox,引用HandyControl样式,水印添加成功:
      <StackPanel HorizontalAlignment="Left">
                <TextBlock Text="HandyControl方式加水印" Margin="10"/>
                <TextBox Width="200" Style="{StaticResource TextBoxExtend}"  hc:InfoElement.Placeholder="请输入用户名!" Margin="5"/>
            </StackPanel>

第二种方法:是针对那些不愿意引用第三方库,坚持要自己画的小伙伴的,既然要自己画,那肯定会麻烦一点。
但也不会太麻烦,直接引用下面样式代码就行,在Window.Resources中画出自己想要的样式:
   <Window.Resources>
        <Style TargetType="TextBox" x:Key="UserNameTextBoxStyle">
            <Setter Property="Height" Value="30"/>
            <Setter Property="FontSize" Value="12"/>
            <Setter Property="Template">
                <Setter.Value>
                    <ControlTemplate TargetType="TextBox">
                        <Border x:Name="border" BorderBrush="{TemplateBinding BorderBrush}" BorderThickness="{TemplateBinding BorderThickness}" Background="{TemplateBinding Background}" SnapsToDevicePixels="True" CornerRadius="5">
                            <Grid>
                                <TextBlock Text="请输入用户名!" VerticalAlignment="Center" HorizontalAlignment="Left" Foreground="#BBB" Name="markText" Visibility="Collapsed" FontSize="12" Margin="10,0"/>
                                <ScrollViewer x:Name="PART_ContentHost" Focusable="False" HorizontalScrollBarVisibility="Hidden" VerticalScrollBarVisibility="Hidden"  VerticalAlignment="Center" MinHeight="20"/>
                            </Grid>
                        </Border>
                        <ControlTemplate.Triggers>
                            <Trigger Property="IsEnabled" Value="false">
                                <Setter Property="Opacity" TargetName="border" Value="0.56"/>
                            </Trigger>
                            <Trigger Property="IsMouseOver" Value="true">
                                <Setter Property="BorderBrush" TargetName="border" Value="#FF7EB4EA"/>
                            </Trigger>
                            <Trigger Property="IsKeyboardFocused" Value="true">
                                <Setter Property="BorderBrush" TargetName="border" Value="#FF569DE5"/>
                            </Trigger>
                            <DataTrigger Binding="{Binding Path=Text,RelativeSource={RelativeSource Mode=self}}" Value="">
                                <Setter Property="Visibility" TargetName="markText" Value="Visible"/>
                            </DataTrigger>
                        </ControlTemplate.Triggers>
                    </ControlTemplate>
                </Setter.Value>
            </Setter>
        </Style>
    </Window.Resources>
随后在界面上画个TextBox,并引用这个自定义样式,水印添加成功:
   <StackPanel>
                <TextBlock Text="自定义样式方式加水印" Margin="10"/>
                <TextBox Width="200" Style="{StaticResource UserNameTextBoxStyle}"  Margin="5" HorizontalAlignment="Left"/>
            </StackPanel>

下面是两种方式的添加效果: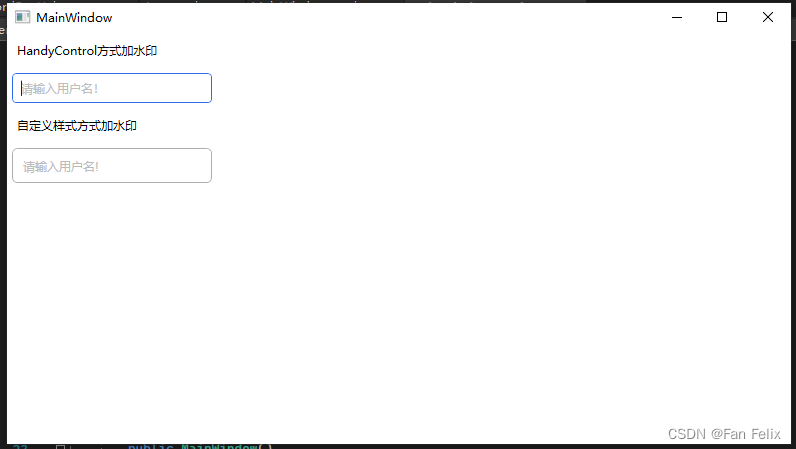

两种方式都能实现水印效果,且自由度都比较高,第一种方法可以通过编辑模板副本的形式来对HandyControl的样式进行更改,以达到自己想要的效果。第二种方式直接在样式代码上更改自己想要的字体,颜色。
以上代码使用VS2022,.net 4.7.2完成和测试。


 1179
1179


 被折叠的 条评论
为什么被折叠?
被折叠的 条评论
为什么被折叠?
 到【灌水乐园】发言


