


评价指标
二分类评价指标
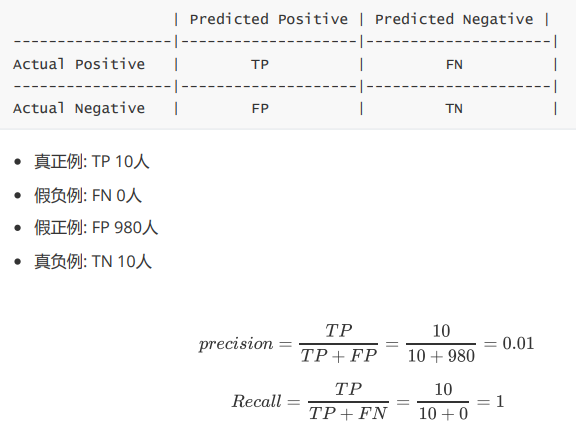
混淆矩阵

TP: 正确预测为了正样本,原来也是正样本
FN: 错误的预测为负样本,原来是正样本 (漏报,没有找到正确匹配的数目)
FP: 错误的预测为正样本,原来是负样本 (误报,没有的匹配不正确)
TN: 正确的预测为负样本,原来是负样本
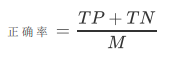
正确率
精确率和召回率
精确率/查准率
TP: 真实P类 预测P类, FP: 真实N类 预测P类, TP + FP: 模型预测为P类的数量

召回率/查全率
FN 真实为P类,预测为N类; TP + FN: 真实P类的数量 (不考虑预测的结果)

例如
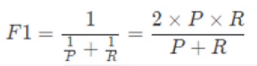
F1-Score
即F值为正确率和召回率的调和平均值
ROC
精确率、召回率 和 F1-score 都是单一的数值指标,如果想观察分类算法在不同的参数下的表现,此时可以使用一条曲线,即 ROC。ROC 曲线可以用评价一个分类器在不同阈值下的表现。
横坐标是 FPR(假正例率),FPR= FP / (FP + TN),表示分类器预测的正类中实际负实例占所有负例的比例,FPR越大,预测正类中的实际负类越多, 越小越好。(假警报率)
纵坐标是TPR(真正例率),公式同召回率的,TPR= TP / (TP + FN),表示分类器预测的正类中实际正实例占所有正例的比例, 值越大越好。(命中率)
ROC曲线的横轴为假正例率,纵轴为真正例率,范围都是[0,1],现在我们开始画图——根据从大到小遍历预测值,把当前的预测值当做阈值,计算FPR和TPR
结论: ROC下面的面积越大,分类器越好
P-R曲线
为了找到最合适的阈值,需要遍历 0 到 1 之间所有的阈值,每个阈值都对应着一对查准率和查全率,从而得到 PR 曲线
结论:越靠近正方形的对角越好
AP(average precision)
平均精确度(AP)通常是通过积分(或者近似的方法)的方式计算PR曲线下的面积来得到的
使用积分(或者近似的方法)来计算从召回率0到1的整个曲线下的面积。
通常来说一个越好的分类器,AP值越高
多分类评价指标
混淆矩阵
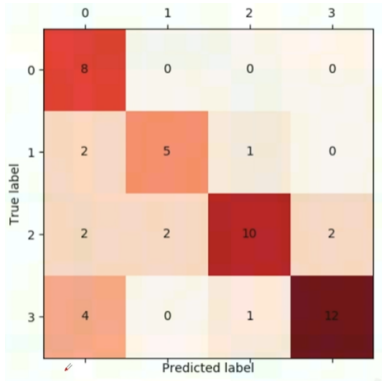
混淆矩阵可以提供以下信息:
正确分类的数量:主对角线上的元素显示了每个类别被正确预测的次数
错误分类的数量:非对角线上的元素显示了每个类别被错误预测为其他类别的次数
Accuracy 之 top1和top5
Top-1 Accuracy:是指模型预测的最高概率分数对应的类别与真实类别相同的情况下,认为是正确预测
Top-5 Accuracy:它允许模型在预测的概率最高的五个类别中只要有一个是正确的,就认为预测是成功的
mAP-全类平均精确率

其中 n 是类别的总数,AP(i) 是第 i 个类别的 Average Precision 值
AP 与 mAP
AP 衡量的是训练好的模型在每个类别上的好坏
mAP 衡量的是模型在所有类别上的好坏,mAP 就是取所有 AP 的平均值
mAP 常作为目标检测算法的评价指标,对于每张图片检测模型会输出多个预测框(远超真实框的个数),用 IoU (Intersection Over Union,交并比)来标记预测框是否预测准确。
标记完成后,随着预测框的增多,查全率 R 总会上升,在不同查全率 R 水平下对准确率 P 做平均,即得到AP,最后再对所有类别按其所占比例做平均,即得到 mAP 指标
目标检测
目标检测中的性能指标主要包括:精确率(precision)、召回率(recall)、平均精度(average precision,AP)、平均精度均值(mean average precision,mAP)。
目标检测算法中主要使用的性能指标是 mAP、 检测速度(帧/s)–> FPS (每秒传输帧数(Frames Per Second))
性能指标
机器性能
FLOPS
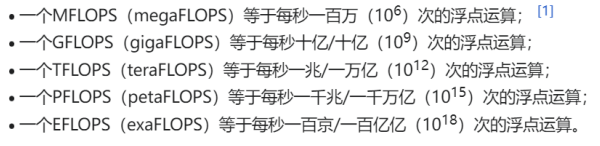
FLOPS(Floating Point Operations per Second)指每秒浮点运算次数,可以理解为评估计算速度的单位
算法性能
FLOPs
FLOPs:(Floating Point Operations) s小写,指浮点运算数,理解为计算量。可以用来衡量算法/模型的复杂度。(模型) 在论文中常用GFLOPs(1 GFLOPs = 10^9 FLOPs)
一般计算FLOPs来衡量模型的复杂度:
- 较大的FLOPs值通常表示任务或算法具有更高的计算需求,需要更多的计算资源来完成
- FLOPs越小时,表示模型所需计算量越小,运行起来时速度更快
安装库
pip install thop
查看FLOPs性能
import torch
from thop import profile
from torchvision.models import resnet50
model = resnet50()
input1 = torch.randn(1, 3, 224, 224)
flops, params = profile(model, inputs=(input1, ))
print('FLOPs = ' + str(flops / 1000 ** 3) + 'G')


 3344
3344


 被折叠的 条评论
为什么被折叠?
被折叠的 条评论
为什么被折叠?
 到【灌水乐园】发言


