


一、**Spring Batch是什么?
**(Spring官网翻译后copy过来)
一个轻量级、全面的批处理框架,旨在开发对企业系统日常操作至关重要的强大批处理应用程序。
Spring Batch提供了可重复使用的功能,这些功能在处理大量记录时至关重要,包括日志记录/跟踪、事务管理、作业处理统计、作业重新启动、跳过和资源管理。它还提供了更先进的技术服务和功能,通过优化和分区技术实现了高容量和高性能的批处理作业。简单和复杂的高容量批处理作业都可以以高度可扩展的方式利用该框架来处理大量信息。
二、现在开始Hello World!入门案例。
数据库用的是mysql。
- JDK17 或者以上版本
- springboot3.x
- spring6
(JobBuilderFactory、StepBuilderFactory在SpringBatch5已经弃用)
2.1需要的maven依赖:
        <dependency>
            <groupId>org.springframework.boot</groupId>
            <artifactId>spring-boot-starter-web</artifactId>
        </dependency>

        <dependency>
            <groupId>com.mysql</groupId>
            <artifactId>mysql-connector-j</artifactId>
            <scope>runtime</scope>
        </dependency>
        <dependency>
            <groupId>org.springframework.boot</groupId>
            <artifactId>spring-boot-starter-batch</artifactId>
            <version>3.2.4</version>
        </dependency>
2.2 以下为application.properties的内容:
spring.application.name=demo
#spring.datasource.driver-class-name=com.mysql.jdbc.Driver

#初始化数据源的配置  (注意添加serverTimezone)
spring.datasource.url=jdbc:mysql://127.0.0.1:3306/myapp?useUnicode=true&characterEncoding=UTF-8&useSSL=false&serverTimezone=GMT%2B8
spring.datasource.username=root
spring.datasource.password=xxxx

#初始化的schema脚本位置(多个脚本的时候可以用逗号隔开位置、第二个脚本位置是创建person表)
spring.sql.init.schema-locations=classpath:/org/springframework/batch/core/schema-mysql.sql,classpath:schema-all.sql
#初始化脚本模式(首次初始化之后改为never)
spring.sql.init.mode=always
##启动时在上下文中执行所有Spring Batch作业(默认时是true)
#spring.batch.job.enabled=false
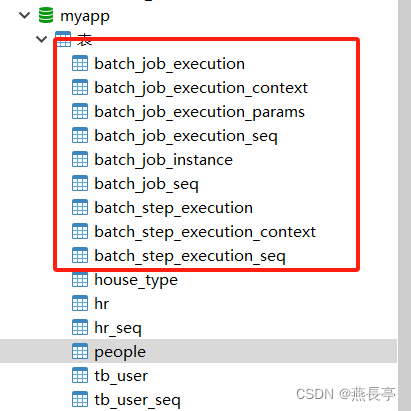
初始化脚本会建立batch所需的表。
2.3 编写Hello World的job和step
@Configuration
public class HelloWorldConfiguration {

    @Bean
    public Step helloStep(JobRepository jobRepository, DataSourceTransactionManager transactionManager){
        return new StepBuilder("helloStep",jobRepository).tasklet((contribution, chunkContext) -> {
            System.out.println("Hello world!");
            return RepeatStatus.FINISHED;
        }, transactionManager).build();
    }

    @Bean
    public Job helloJob(JobRepository jobRepository, Step helloStep){
        return new JobBuilder("helloJob",jobRepository).start(helloStep).build();
    }
}
2.4 启动后就可以了。
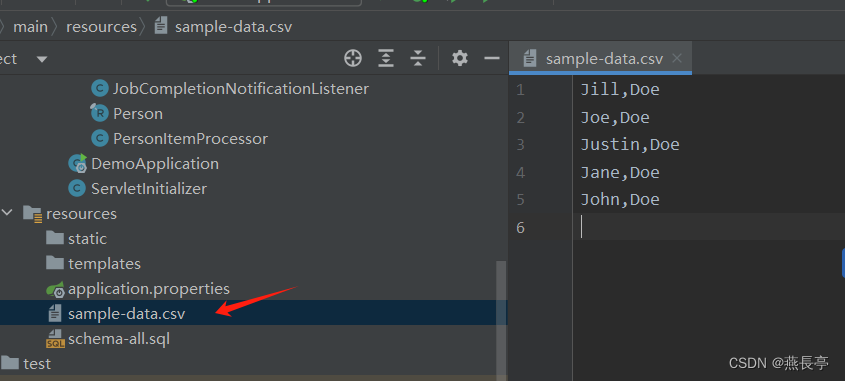
三、例子:(从csv读取数据,批量插入数据到person表)
person表在上面初始化脚本的时候已经加上了。在上面启动的时候就创建了。
要读取的数据在sample-data.csv
3.1 创建Person
public record Person(String firstName, String lastName) {
}
3.2 创建处理器 (实现ItemProcessor)
public class PersonItemProcessor implements ItemProcessor<Person, Person> {
    private static final Logger log = LoggerFactory.getLogger(PersonItemProcessor.class);

    @Override
    public Person process(final Person person) {
        final String firstName = person.firstName().toUpperCase();
        final String lastName = person.lastName().toUpperCase();

        final Person transformedPerson = new Person(firstName, lastName);

        log.info("Converting (" + person + ") into (" + transformedPerson + ")");

        return transformedPerson;
    }
}
3.3 创建job的监听器
@Component
public class JobCompletionNotificationListener implements JobExecutionListener {

    private static final Logger log = LoggerFactory.getLogger(JobCompletionNotificationListener.class);

    private final JdbcTemplate jdbcTemplate;

    public JobCompletionNotificationListener(JdbcTemplate jdbcTemplate) {
        this.jdbcTemplate = jdbcTemplate;
    }

    @Override
    public void afterJob(JobExecution jobExecution) {
        if(jobExecution.getStatus() == BatchStatus.COMPLETED) {
            log.info("!!! JOB FINISHED! Time to verify the results");

            jdbcTemplate
                    .query("SELECT first_name, last_name FROM people", new DataClassRowMapper<>(Person.class))
                    .forEach(person -> log.info("Found <{{}}> in the database.", person));
        }
    }
}
3.4 创建job、step、readerwriterprocessor,交给spring管理
@Configuration
public class BatchConfiguration {
    // tag::readerwriterprocessor[]
    @Bean
    public FlatFileItemReader<Person> reader() {
        return new FlatFileItemReaderBuilder<Person>()
                .name("personItemReader")
                .resource(new ClassPathResource("sample-data.csv"))
                .delimited()
                .names("firstName", "lastName")
                .targetType(Person.class)
                .build();
    }

    @Bean
    public PersonItemProcessor processor() {
        return new PersonItemProcessor();
    }

    @Bean
    public JdbcBatchItemWriter<Person> writer(DataSource dataSource) {
        return new JdbcBatchItemWriterBuilder<Person>()
                .sql("INSERT INTO people (first_name, last_name) VALUES (:firstName, :lastName)")
                .dataSource(dataSource)
                .beanMapped()
                .build();
    }
    // end::readerwriterprocessor[]

    // tag::jobstep[]
    @Bean(name = "importUserJob1")
    public Job importUserJob(JobRepository jobRepository, Step step1, JobCompletionNotificationListener listener, BatchProperties properties) {
        //properties.getJob().setName("importUserJob1");
        return new JobBuilder("importUserJob1", jobRepository)
                .listener(listener)
                .start(step1)
                .build();
    }


    @Bean
    public Step step1(JobRepository jobRepository, DataSourceTransactionManager transactionManager,
                      FlatFileItemReader<Person> reader, PersonItemProcessor processor, JdbcBatchItemWriter<Person> writer) {
        return new StepBuilder("step1", jobRepository)
                .<Person, Person> chunk(3, transactionManager)
                .reader(reader)
                .processor(processor)
                .writer(writer)
                .build();
    }
    // end::jobstep[]

}
3.5 application启动项目。
插入数据成功。

四、执行多个job
这时候,启动两个job是不是会报错?
Job name must be specified in case of multiple jobs
那么这时我们就要在application.properties添加一个属性配置:
#启动时在上下文中执行所有Spring Batch作业
spring.batch.job.enabled=false
4.1 然后可以通过调用接口的方式触发
@RestController
@RequestMapping("/batch")
public class BatchController {

    private final ApplicationContext context;

    public BatchController(ApplicationContext context) {
        this.context = context;
    }

    @RequestMapping(value = "/helloJob")
    public String startBatch() {
        // 检查context是否被正确初始化
        if (context == null) {
            return "Error: ApplicationContext is null.";
        }

        JobLauncher jobLauncher;
        JobRegistry jobRegistry;
        Job job;

        try {
            jobLauncher = context.getBean(JobLauncher.class);
            jobRegistry = context.getBean(JobRegistry.class);
        } catch (NoSuchBeanDefinitionException e) {
            // 捕获获取bean时可能抛出的异常
            return "Error: Failed to retrieve JobLauncher or JobRegistry from ApplicationContext.";
        }

        try {
            job = jobRegistry.getJob("helloJob");
            jobLauncher.run(job,new JobParameters());
        } catch (NoSuchJobException e) {
            // 捕获获取作业时可能抛出的异常
            return "Error: Job 'helloJob' not found in JobRegistry.";
        } catch (JobInstanceAlreadyCompleteException e) {
            throw new RuntimeException(e);
        } catch (JobExecutionAlreadyRunningException e) {
            throw new RuntimeException(e);
        } catch (JobParametersInvalidException e) {
            throw new RuntimeException(e);
        } catch (JobRestartException e) {
            throw new RuntimeException(e);
        }

        if (job == null) {
            return "Error: Job 'helloJob' was not retrieved successfully.";
        }
        // 此处应包含实际启动作业的代码逻辑
        // 由于代码示例的限制,这里不展开
        return "Batch job 'helloJob' started successfully.";
    }
}
4.2 也可以通过@Scheduled定时器,定时执行
@SpringBootApplication
//(scanBasePackages = {"org.example.batch.demo"})
@EnableScheduling
public class DemoApplication {

    @Autowired
    private ApplicationContext context;

    @Autowired
    private JobLauncher jobLauncher;

    @Autowired
    private JobRegistry jobRegistry;

    public static void main(String[] args) {
        SpringApplication.run(DemoApplication.class, args);
    }

    @Scheduled(fixedRate =10000)
    public void scheduleJob() throws Exception {
        for (String jobName : jobRegistry.getJobNames()) {
            Job job = jobRegistry.getJob(jobName);
            JobExecution jobExecution = jobLauncher.run(job, new JobParameters());
        }
    }
}


 1277
1277


 被折叠的 条评论
为什么被折叠?
被折叠的 条评论
为什么被折叠?
 到【灌水乐园】发言


