


文章目录
简述
基本实现了如目录所示的功能,其中HSI变换针对24位RGB图像,其它理论上可以对色深为8位的图片进行操作(包括8位灰度、24位RGB等),仅在RGB和灰度图上测试过。
bmp图片的色彩简单介绍
图片来自 文大侠的CSDN文章Windows DIB文件操作详解-5.DIB和调色板,很详细的介绍了bmp图片调色板和储存之间的关系。
本文中用到的就是其中的8位位图和24位位图,分别使用调色板和R,G,B各八位的方式来指定颜色。

代码中将要涉及到的变量和函数
unsigned char* m_pDibBits; //图片数据区的首地址
int m_nWidth; //图片宽度
int m_nHeight; // 图片高度
Destory() or IsNull() or Create() //都是DIB库自带函数,看名字就懂干啥的了,不懂自己查一下。
Get_Distance() //获取两点之间距离
double CDib::Get_Distance(int x1, int y1, int x2 = 256, int y2 = 256)
{
	double result = sqrt(pow((x2 - x1), 2) + pow((y2 - y1), 2));
	return result;
}
案例及其C++实现
生成三 色 图
创建新的图像
具体内容写在注释里了。
void CDib::createCircle()
{
	//如果已经有数据了,那么久销毁掉
	if (!IsNull())
	{
		Destroy();
	}

	// 创建新的数据区
	int Width = 512;
	int Height = 512;
	int BPP = 24;

	Create(Width, Height, BPP, 0);
	m_nWidth = Width;
	m_nHeight = Height;

	// 初始化各个变量
	m_nWidthBytes = abs(GetPitch());
	m_nBitCount = GetBPP();
	m_pDibBits = (unsigned char*)GetBits() + (m_nHeight - 1)*GetPitch();
	memset(m_pDibBits, 0, m_nWidthBytes*m_nHeight);

	//给数据区赋值,三种颜色坐标分别是 170,170 ;340,255 ;170,340
	RGBTRIPLE* RGBtemp; // 用来指向每一位数据,实现赋值
	for (int i = 0; i < m_nHeight; i++)
	{
		for (int j = 0; j < m_nWidth; j++)
		{
			RGBtemp = (RGBTRIPLE*) (m_pDibBits + i * m_nWidthBytes + j * 3);

			if (Get_Distance(i, j, 170, 170) < 150)
			{
				RGBtemp->rgbtBlue = 255;
			}
			if (Get_Distance(i, j, 340, 255) < 150)
			{
				RGBtemp->rgbtGreen = 255;
			}
			if (Get_Distance(i, j, 170, 340) < 150)
			{
				RGBtemp->rgbtRed = 255;
			}
		}
	}
}
对图片做HSI变换(仅针对RGB图片)
HSI简介
HSI是数字图像的一种表现形式,具体定义参照百度百科
计算方式为:
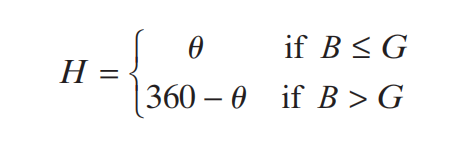
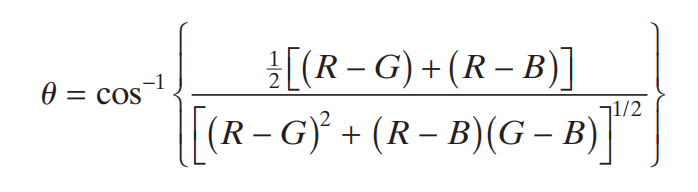
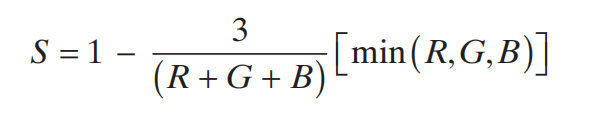
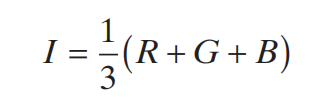
当然了,其中可能会涉及到一些分子全为零、整形浮点型之间转换数据丢失的问题,自己考虑一下。
代码实现
代码基本就是公式,不懂的对着公式看一下就懂了,部分地方做出了一小小的改变。
void CDib::HSI(HSIChannel Channel)
{
	double theta = 0;
	RGBTRIPLE* RGBtemp;
	double R, G, B, value;
	for (int lineX = 0; lineX < m_nHeight; lineX++)
	{
		for (int lineY = 0; lineY < m_nWidth; lineY++)
		{
			RGBtemp = (RGBTRIPLE*)(m_pDibBits + lineX * m_nWidthBytes + lineY * 3);
			B = RGBtemp->rgbtBlue;
			R = RGBtemp->rgbtRed;
			G = RGBtemp->rgbtGreen;
			switch (Channel)
			{
			case HUE:
				{
					theta = acos(((R - G) + (R - B)) / 2 / \
					pow(pow((R - G), 2) + (R - B)*(G - B), 0.5)) * 180 / Pi;
					value = B > G ? 360 - theta : theta;
					break;
				}
			case SATURATION:
				{
				value = 1 - 3 / (R + G + B + 0.01)* min(min(R, G), B);
				if (!(R || G || B)) value = 0;
				value *= 255;
				break;
				}
			case INTENSITY:
			{
				value = (R+G+B)/3;
				break;
			}
			}

			RGBtemp->rgbtBlue = value;
			RGBtemp->rgbtRed = value;
			RGBtemp->rgbtGreen = value;
		}
	}
}
缩放
中值滤波
作用
用来去掉椒盐噪声,能有如下图所示的效果。


代码实现
void CDib::midfilter()
{
	//开新空间
	//1~(width-1)
	int pixelSize = m_nWidthBytes / m_nWidth;

	for (int i = pixelSize; i < m_nHeight - 1; i++)
	{
		for (int j = pixelSize; j < (m_nWidth - 1) * pixelSize; j++)
		{
			double *mid = new double[9];
			mid[0] = *(m_pDibBits + (i - 1) * m_nWidthBytes + (j - pixelSize));
			mid[1] = *(m_pDibBits + (i - 1) * m_nWidthBytes + (j));
			mid[2] = *(m_pDibBits + (i - 1) * m_nWidthBytes + (j + pixelSize));
			mid[3] = *(m_pDibBits + (i)* m_nWidthBytes + (j - pixelSize));
			mid[4] = *(m_pDibBits + (i)* m_nWidthBytes + (j));
			mid[5] = *(m_pDibBits + (i)* m_nWidthBytes + (j + pixelSize));
			mid[6] = *(m_pDibBits + (i + 1)* m_nWidthBytes + (j - pixelSize));
			mid[7] = *(m_pDibBits + (i + 1)* m_nWidthBytes + (j));
			mid[8] = *(m_pDibBits + (i + 1)* m_nWidthBytes + (j + pixelSize));
			for (int x = 0; x < 8; x++) { //控制n-1趟冒泡
				for (int y = 0; y < 8 - x; y++)
				{
					if (mid[y] > mid[y + 1]) { //比较相邻的两个元素
						double tmp; //临时变量
						tmp = mid[y]; //交换
						mid[y] = mid[y + 1];
						mid[y + 1] = tmp;
					}
				}
			}
			*(m_pDibBits + (i)* m_nWidthBytes + (j)) = mid[4];
			delete[]mid;
		}
	}
}
平滑&拉普拉斯增强&sobel算子卷积
简述
本质上就是对图像与一个3*3的卷积核进行卷积,其中几个卷积核的定义如下,其中,Sobel算子需要对原图卷积两次:
const int Smooth_Kernel[9] = {1,1,1,1,1,1,1,1,1};
const int Laplacian_Kernel[9] = { 1, 1, 1, 1, -7, 1, 1, 1, 1 };
const int Sobel_Kernel_x[9] = { -1, -2, -1, 0, 0, 0, 1, 2, 1 };
const int Sobel_Kernel_y[9] = { -1, 0, 1, -2, 0, 2, -1, 0, 1 };
前两个卷积核分别是
1
1
1
1
1
1
1
1
1
\begin{matrix} 1 & 1 & 1 \\ 1 & 1 & 1 \\ 1 & 1 & 1 \end{matrix}
111111111
和
1
1
1
1
−
7
1
1
1
1
\begin{matrix} 1 & 1 & 1 \\ 1 & -7 & 1 \\ 1 & 1 & 1 \end{matrix}
1111−71111
有如下效果:
原图 ↓

平滑 ↓(因为卷积核小,只是变糊了一点点,不太明显)

拉普拉斯增强 ↓
(就像对图片做了描边操作,这里如果把卷积核中间的-7调成-8,就可以只看到描出来的边)

sobel卷积 ↓(这边实际上就是一个描边的效果了)

代码实现
void CDib::Conv(int kernel)
{
	if (!this) return;
	const int* k1 = 0;
	const int* k2 = 0;
	float sum = 0;
	switch (kernel)
	{
	case Smooth: k1 = Smooth_Kernel; sum = 9; break;
	case Sobel: k1 = Sobel_Kernel_x; k2 = Sobel_Kernel_y; sum = 2; break;
	case Laplacian: k1 = Laplacian_Kernel; sum = 1; break;
	default: assert(0);
	}

	int pixelSize = m_nWidthBytes / m_nWidth;

	int* bitTemp = new int[m_nWidthBytes * m_nHeight];
	memset(bitTemp, 0, m_nWidthBytes * m_nHeight * sizeof(int));
	//所有都需要经过的卷积
	for (int i = 0; i < m_nHeight; i++)
	{
		for (int j = 0; j < m_nWidth; j++)
		{
			for (int ch = 0; ch < pixelSize ; ch++)
			{
				//ch指不同的通道
				bitTemp[i*m_nWidthBytes + j * pixelSize+ ch] += *getPos(j, i, ch)*k1[4]; //·
				bitTemp[i*m_nWidthBytes + j * pixelSize + ch] += *getPos(j - 1, i - 1, ch)*k1[0];//↖
				bitTemp[i*m_nWidthBytes + j * pixelSize + ch] += *getPos(j - 1, i, ch)*k1[1];//↑
				bitTemp[i*m_nWidthBytes + j * pixelSize + ch] += *getPos(j - 1, i + 1, ch)*k1[2];//↗
				bitTemp[i*m_nWidthBytes + j * pixelSize + ch] += *getPos(j, i - 1, ch)*k1[3];//←
				bitTemp[i*m_nWidthBytes + j * pixelSize + ch] += *getPos(j, i + 1, ch)*k1[5];//→
				bitTemp[i*m_nWidthBytes + j * pixelSize + ch] += *getPos(j + 1, i - 1, ch)*k1[6];//↙
				bitTemp[i*m_nWidthBytes + j * pixelSize + ch] += *getPos(j + 1, i, ch)*k1[7];//↓
				bitTemp[i*m_nWidthBytes + j * pixelSize + ch] += *getPos(j + 1, i + 1, ch)*k1[8];//↘
				bitTemp[i*m_nWidthBytes + j * pixelSize + ch] = abs(bitTemp[i*m_nWidthBytes + j * pixelSize + ch]);
			}
		}
	}

	//Sobel滤波器需要过两次卷积
	if (k2)
	{
		k1 = k2;//上面复制下来的 懒得改了
		for (int i = 0; i < m_nHeight ; i++)
		{
			for (int j = 0; j < m_nWidth; j++)
			{
				for (int ch = 0; ch < pixelSize; ch++)
				{
					//ch指不同的通道
					bitTemp[i*m_nWidthBytes + j * pixelSize + ch] += *getPos(j, i, ch)*k1[4]; //·
					bitTemp[i*m_nWidthBytes + j * pixelSize + ch] += *getPos(j - 1, i - 1, ch)*k1[0];//↖
					bitTemp[i*m_nWidthBytes + j * pixelSize + ch] += *getPos(j - 1, i, ch)*k1[1];//↑
					bitTemp[i*m_nWidthBytes + j * pixelSize + ch] += *getPos(j - 1, i + 1, ch)*k1[2];//↗
					bitTemp[i*m_nWidthBytes + j * pixelSize + ch] += *getPos(j, i - 1, ch)*k1[3];//←
					bitTemp[i*m_nWidthBytes + j * pixelSize + ch] += *getPos(j, i + 1, ch)*k1[5];//→
					bitTemp[i*m_nWidthBytes + j * pixelSize + ch] += *getPos(j + 1, i - 1, ch)*k1[6];//↙
					bitTemp[i*m_nWidthBytes + j * pixelSize + ch] += *getPos(j + 1, i, ch)*k1[7];//↓
					bitTemp[i*m_nWidthBytes + j * pixelSize + ch] += *getPos(j + 1, i + 1, ch)*k1[8];//↘
					bitTemp[i*m_nWidthBytes + j * pixelSize + ch] = abs(bitTemp[i*m_nWidthBytes + j * pixelSize + ch]);
				}
			}
		}
	}
	//卷积后结果放回原图数据区
	int tempByte = 0;
	for (int i = 0; i < m_nHeight; i++)
	{
		for (int j = 0; j < m_nWidth; j++)
		{
			for (int ch = 0; ch < pixelSize; ch++)
			{

				tempByte = bitTemp[i*m_nWidthBytes + j * pixelSize + ch] / sum;
				//防止超过上下限
				if (tempByte > 255) tempByte = 255;
				else if (tempByte < 0) tempByte = 0;
				//tempByte = 100;
				*getPos(j, i, ch) = tempByte;
			}
		}
	}
	delete bitTemp;
}
对图片做直方图均衡
直方图均衡效果
直方图均衡,简而言之就是根据概率分布,将原数据的分布拉伸到从下限到上限的区间(表现在灰度图中为0-255),具体解释百度都知道。
对于彩色图像来讲,有很多种不同的方法,可以对RGB三个通道分别均衡,也可以根据HSI图中的I属性进行数据的均衡。
本代码统计颜色分布的方式如下(大体就是统计I值):
n
u
m
=
R
[
i
]
+
G
[
i
]
+
B
[
i
]
c
o
u
n
t
[
n
u
m
]
+
+
num = R[i] + G[i] + B[i]\\ count[num] ++
num=R[i]+G[i]+B[i]count[num]++
统计后根据概率分布进行映射。
但由于我有点懒,仍存在一定的问题:
映射后,将数据超过255的数据直接置为255,这样可能会导致对应位置的H和S值的改变
有想法的朋友希望可以评论区讨论下如何改进这个问题。
下面放一下效果:
原图 ↓

直方图均衡 ↓

代码
long* ValueCount(unsigned char* begin,int width, int height,int pixelSize = 1)
{
	//统计不同的像素强度的和的数量
	//pixelSize是看一个像素占几位(一个通道八位哦)
	long* count = new long[256*pixelSize];
	memset(count, 0, 256 * pixelSize * sizeof(long));
	for (int i = 0; i < width*height; i++)
	{
		int num = 0;
		for (int ch = 0; ch < pixelSize; ch++)
			num += begin[i * pixelSize + ch];
		 count[num]++;
	}
	return count;
}

void CDib::Equalization()
{
	int pixelSize = m_nWidthBytes / m_nWidth;
	long * count = ValueCount(m_pDibBits, m_nWidth, m_nHeight, pixelSize);
	double *tableFunc = new double[256 * pixelSize];
	memset(tableFunc, 0, 256 * pixelSize * sizeof(double));

	int counter = 0;
	int pixels = m_nHeight * m_nWidth;

	for(int i = 0; i < 256 * pixelSize; i++ )
	{
		counter += count[i];
		tableFunc[i] = counter * (256 * pixelSize - 1) / pixels;
	}
	int pixeltemp;
	for (int i = 0; i < m_nHeight; i++)
	{
		for (int j = 0; j < m_nWidth; j++)
		{
			unsigned char *temp = m_pDibBits + i * m_nWidthBytes + j * pixelSize;
			int t = 0;
			for (int ch = 0; ch < pixelSize; ch++)
				t += temp[ch];//计算一下原来的总值,做个比较
			for (int ch = 0; ch < pixelSize; ch++)
			{
				pixeltemp = temp[ch] * tableFunc[t] * 1.0 / t;
				pixeltemp = pixeltemp > 255 ? 255 : pixeltemp;
				temp[ch] = pixeltemp;//映射过去
			}
		}
	}
	delete tableFunc;
	delete count;
}


 495
495


 被折叠的 条评论
为什么被折叠?
被折叠的 条评论
为什么被折叠?
 到【灌水乐园】发言


