


Kafka简介
起源和初衷
Kafka最初由LinkedIn开发,目的是解决其内部对数据实时处理和分析的需求。LinkedIn当时面临的主要问题包括数据收集的正确性和系统的高度定制化。为了解决这些问题,LinkedIn尝试过使用ActiveMQ,但效果不理想。因此,他们决定开发一个新的系统,这就是Kafka。
为什么选择kafka
Kafka的高吞吐量,低延迟和分布式特性使其成为处理大规模实时数据流的理想选择。
kafka是如何做到的呢
今天就从kafka内核源码级别分析一下kafka是如何实现高吞吐量的关键因素内存管理的巧妙设计
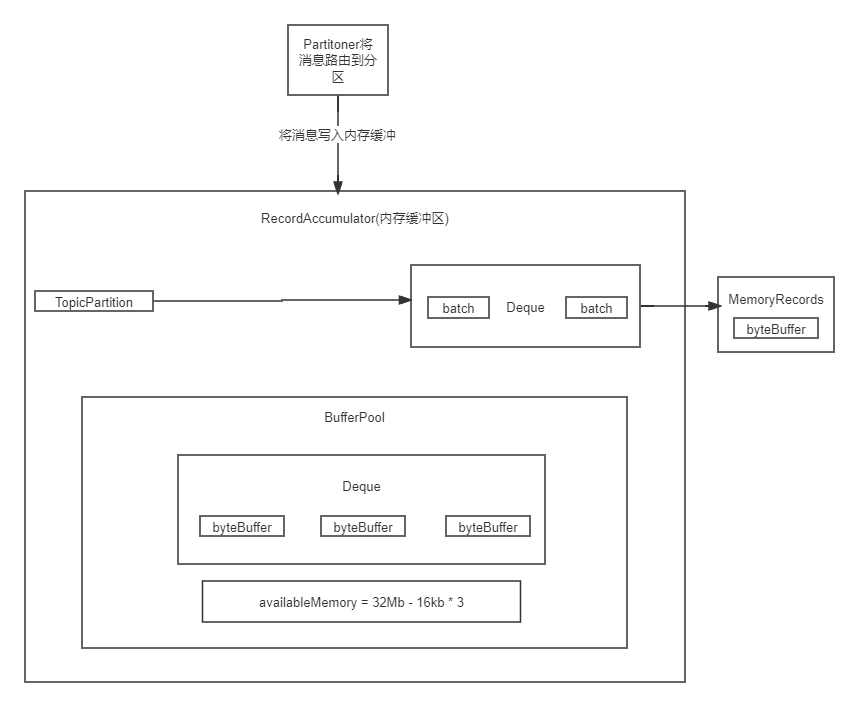
首先来看一下kafka的全景流程图

初步窥探客户端发送消息时源码运行的大致流程
 public Future<RecordMetadata> send(ProducerRecord<K, V> record, Callback callback) {
        // intercept the record, which can be potentially modified; this method does not throw exceptions
        ProducerRecord<K, V> interceptedRecord = this.interceptors.onSend(record);
        return doSend(interceptedRecord, callback);
    }
首先来看下核心的send方法底层做了什么
 /**
     * 将消息异步发送到主题。
     */
    private Future<RecordMetadata> doSend(ProducerRecord<K, V> record, Callback callback) {
        TopicPartition tp = null;
        try {
            throwIfProducerClosed();
            // 确保主题的元数据可用
            long nowMs = time.milliseconds();
            ClusterAndWaitTime clusterAndWaitTime;
            try {
                clusterAndWaitTime = waitOnMetadata(record.topic(), record.partition(), nowMs, maxBlockTimeMs);
            } catch (KafkaException e) {
                if (metadata.isClosed())
                    throw new KafkaException("Producer closed while send in progress", e);
                throw e;
            }
            nowMs += clusterAndWaitTime.waitedOnMetadataMs;
            long remainingWaitMs = Math.max(0, maxBlockTimeMs - clusterAndWaitTime.waitedOnMetadataMs);
            Cluster cluster = clusterAndWaitTime.cluster;
            byte[] serializedKey;
            try {
                serializedKey = keySerializer.serialize(record.topic(), record.headers(), record.key());
            } catch (ClassCastException cce) {
                throw new SerializationException("Can't convert key of class " + record.key().getClass().getName() +
                        " to class " + producerConfig.getClass(ProducerConfig.KEY_SERIALIZER_CLASS_CONFIG).getName() +
                        " specified in key.serializer", cce);
            }
            byte[] serializedValue;
            try {
                serializedValue = valueSerializer.serialize(record.topic(), record.headers(), record.value());
            } catch (ClassCastException cce) {
                throw new SerializationException("Can't convert value of class " + record.value().getClass().getName() +
                        " to class " + producerConfig.getClass(ProducerConfig.VALUE_SERIALIZER_CLASS_CONFIG).getName() +
                        " specified in value.serializer", cce);
            }
            int partition = partition(record, serializedKey, serializedValue, cluster);
            tp = new TopicPartition(record.topic(), partition);

            setReadOnly(record.headers());
            Header[] headers = record.headers().toArray();

            int serializedSize = AbstractRecords.estimateSizeInBytesUpperBound(apiVersions.maxUsableProduceMagic(),
                    compressionType, serializedKey, serializedValue, headers);
            ensureValidRecordSize(serializedSize);
            long timestamp = record.timestamp() == null ? nowMs : record.timestamp();
            if (log.isTraceEnabled()) {
                log.trace("Attempting to append record {} with callback {} to topic {} partition {}", record, callback, record.topic(), partition);
            }
            // 生产者回调将确保同时调用“回调”和拦截器回调
            Callback interceptCallback = new InterceptorCallback<>(callback, this.interceptors, tp);

            if (transactionManager != null) {
                transactionManager.maybeAddPartition(tp);
            }

        //核心方法
        RecordAccumulator.RecordAppendResult result = accumulator.append(tp, timestamp, serializedKey,
                    serializedValue, headers, interceptCallback, remainingWaitMs, true, nowMs);

            if (result.abortForNewBatch) {
                int prevPartition = partition;
                partitioner.onNewBatch(record.topic(), cluster, prevPartition);
                partition = partition(record, serializedKey, serializedValue, cluster);
                tp = new TopicPartition(record.topic(), partition);
                if (log.isTraceEnabled()) {
                    log.trace("Retrying append due to new batch creation for topic {} partition {}. The old partition was {}", record.topic(), partition, prevPartition);
                }

                interceptCallback = new InterceptorCallback<>(callback, this.interceptors, tp);

                result = accumulator.append(tp, timestamp, serializedKey,
                    serializedValue, headers, interceptCallback, remainingWaitMs, false, nowMs);
            }

            if (result.batchIsFull || result.newBatchCreated) {
                log.trace("Waking up the sender since topic {} partition {} is either full or getting a new batch", record.topic(), partition);
                this.sender.wakeup();
            }
            return result.future;

        } catch (ApiException e) {
            log.debug("Exception occurred during message send:", e);

            if (tp == null) {

                tp = ProducerInterceptors.extractTopicPartition(record);
            }

            Callback interceptCallback = new InterceptorCallback<>(callback, this.interceptors, tp);
.
            interceptCallback.onCompletion(null, e);
            this.errors.record();
            this.interceptors.onSendError(record, tp, e);
            if (transactionManager != null) {
                transactionManager.maybeTransitionToErrorState(e);
            }
            return new FutureFailure(e);
        } catch (InterruptedException e) {
            this.errors.record();
            this.interceptors.onSendError(record, tp, e);
            throw new InterruptException(e);
        } catch (KafkaException e) {
            this.errors.record();
            this.interceptors.onSendError(record, tp, e);
            throw e;
        } catch (Exception e) {
           this.interceptors.onSendError(record, tp, e);
            throw e;
        }
    }
这个方法主要做了什么事情?
- 回调自定义拦截器
- 同步等待阻塞获取topic元数据
- 序列化key和value
- 基于获取到的元数据,使用Partiitoner组件获取消息对应的分区
- 检查要发送的这条消息是否超出了请求最大大小以及内存缓冲最大大小
- 将消息添加到内存缓冲里,RecordAccumulator组件
- 设置好自定义的callback回调函数以及对应的interceptor拦截器回调函数
- 如果某个分区对应的batch满了,此时会唤醒Sender线程,让它来工作,负责发送batch
总结和启示
1.拉去集群元数据不是刚开始直接拉取,而是知道要发送给那个topic,再去拉取,利用懒加载的设计思想
2.通过拦截器的模式预留一些扩展点可以给其他人扩展,对程序可扩展性的优秀设计
3.异步发送请求,先进入内存缓冲,同时设置一个callback回调函数通知消息的发送结果,基于异步运行的后台线程配合使用
下来重点来了。。。我们重点分析kafka如何实现内存缓冲和复用
RecordAccumulator组件
public RecordAppendResult append(TopicPartition tp,
                                     long timestamp,
                                     byte[] key,
                                     byte[] value,
                                     Header[] headers,
                                     Callback callback,
                                     long maxTimeToBlock,
                                     boolean abortOnNewBatch,
                                     long nowMs) throws InterruptedException {

  //多个线程可能同时访问,需要进行计数
   appendsInProgress.incrementAndGet();
        ByteBuffer buffer = null;
        if (headers == null) headers = Record.EMPTY_HEADERS;
        try {
            // 检查是否有正在进行的批处理
            Deque<ProducerBatch> dq = getOrCreateDeque(tp);
            synchronized (dq) {
                if (closed)
                    throw new KafkaException("Producer closed while send in progress");
                RecordAppendResult appendResult = tryAppend(timestamp, key, value, headers, callback, dq, nowMs);
                if (appendResult != null)
                    return appendResult;
            }

            // 没有正在进行的,就尝试分配新的批
            if (abortOnNewBatch) {
                // 追加结果.
                return new RecordAppendResult(null, false, false, true);
            }

            byte maxUsableMagic = apiVersions.maxUsableProduceMagic();

//首先默认情况下一个batch对应一块内存空间,大小是16kb
//如果你的消息是1Mb,大于了16kb,就会使用你的消息来分配内存空间,反之如果消息小于16kb,就分配16kb的内存空间
            int size = Math.max(this.batchSize, AbstractRecords.estimateSizeInBytesUpperBound(maxUsableMagic, compression, key, value, headers));
            log.trace("Allocating a new {} byte message buffer for topic {} partition {} with remaining timeout {}ms", size, tp.topic(), tp.partition(), maxTimeToBlock);
            buffer = free.allocate(size, maxTimeToBlock);


            nowMs = time.milliseconds();
            synchronized (dq) {
                // 获取出队锁后,进行doublecheck
                if (closed)
                    throw new KafkaException("Producer closed while send in progress");

                RecordAppendResult appendResult = tryAppend(timestamp, key, value, headers, callback, dq, nowMs);
                if (appendResult != null) {

                    return appendResult;
                }
//写入内存缓冲区
                MemoryRecordsBuilder recordsBuilder = recordsBuilder(buffer, maxUsableMagic);
                ProducerBatch batch = new ProducerBatch(tp, recordsBuilder, nowMs);
                FutureRecordMetadata future = Objects.requireNonNull(batch.tryAppend(timestamp, key, value, headers,
                        callback, nowMs));

//加入dp队列
                dq.addLast(batch);
                incomplete.add(batch);

                // 不要在finally块中解除分配此缓冲区,因为它正在记录批处理中使用
                buffer = null;
                return new RecordAppendResult(future, dq.size() > 1 || batch.isFull(), true, false);
            }
        } finally {
            if (buffer != null)
                free.deallocate(buffer);
            appendsInProgress.decrementAndGet();
        }
    }
1.这段代码我们可以主要关注 buffer = free.allocate(size, maxTimeToBlock);的实现,它是在BufferPool里面实现的,我们看下是如何分配内存的
2. if (buffer != null) free.deallocate(buffer);
通过这段代码我们可以看到buffer用完之后,会被释放掉,达到内存复用的一个效果,防止进行频繁的gc
3.可以关注消息底层是如何被写入缓冲区的 MemoryRecordsBuilder recordsBuilder = recordsBuilder(buffer, maxUsableMagic);
为什么内存缓冲要进行doublecheck模式
因为kafka主要特性是高并发程序,多个线程可能都拿到了16kb的byteBuffer,doublecheck模式主要是为了多个线程同时进入时,都将内存缓冲append到Deque队列中,同时在结合finally中 ` free.deallocate(buffer);``可以将持有byteBuffer但是被拒绝加入Deque队列的buffer释放掉,达到内存复用
BufferPool组件
 public ByteBuffer allocate(int size, long maxTimeToBlockMs) throws InterruptedException {
        if (size > this.totalMemory)
            throw new IllegalArgumentException("Attempt to allocate " + size
                                               + " bytes, but there is a hard limit of "
                                               + this.totalMemory
                                               + " on memory allocations.");

        ByteBuffer buffer = null;
        this.lock.lock();

        if (this.closed) {
            this.lock.unlock();
            throw new KafkaException("Producer closed while allocating memory");
        }

        try {
            // 检查我们是否有合适大小的可用缓冲池
            if (size == poolableSize && !this.free.isEmpty())
                return this.free.pollFirst();

            // 检查空闲内存是否满足分配
            int freeListSize = freeSize() * this.poolableSize;
            if (this.nonPooledAvailableMemory + freeListSize >= size) {
                // 有足够内存分配缓冲区
                freeUp(size);
                this.nonPooledAvailableMemory -= size;
            } else {
                //内存不足时
                int accumulated = 0;
                Condition moreMemory = this.lock.newCondition();
                try {
                    long remainingTimeToBlockNs = TimeUnit.MILLISECONDS.toNanos(maxTimeToBlockMs);
                    this.waiters.addLast(moreMemory);
                    //循环直到有缓冲区分配

                    while (accumulated < size) {
                        long startWaitNs = time.nanoseconds();
                        long timeNs;
                        boolean waitingTimeElapsed;
                        try {
                            waitingTimeElapsed = !moreMemory.await(remainingTimeToBlockNs, TimeUnit.NANOSECONDS);
                        } finally {
                            long endWaitNs = time.nanoseconds();
                            timeNs = Math.max(0L, endWaitNs - startWaitNs);
                            recordWaitTime(timeNs);
                        }

                        if (this.closed)
                            throw new KafkaException("Producer closed while allocating memory");

                        if (waitingTimeElapsed) {
                            this.metrics.sensor("buffer-exhausted-records").record();
                            throw new BufferExhaustedException("Failed to allocate " + size + " bytes within the configured max blocking time "
                                + maxTimeToBlockMs + " ms. Total memory: " + totalMemory() + " bytes. Available memory: " + availableMemory()
                                + " bytes. Poolable size: " + poolableSize() + " bytes");
                        }

                        remainingTimeToBlockNs -= timeNs;

                        // 检查空闲列表我们是否可以满足

                        if (accumulated == 0 && size == this.poolableSize && !this.free.isEmpty()) {

                            buffer = this.free.pollFirst();
                            accumulated = size;
                        } else {

                            freeUp(size - accumulated);
                            int got = (int) Math.min(size - accumulated, this.nonPooledAvailableMemory);
                            this.nonPooledAvailableMemory -= got;
                            accumulated += got;
                        }
                    }

                    accumulated = 0;
                } finally {
                    // 当此循环无法成功终止时,不要释放可用内存
                    this.nonPooledAvailableMemory += accumulated;
                    this.waiters.remove(moreMemory);
                }
            }
        } finally {

            try {
                if (!(this.nonPooledAvailableMemory == 0 && this.free.isEmpty()) && !this.waiters.isEmpty())
                    this.waiters.peekFirst().signal();
            } finally {
                /
                lock.unlock();
            }
        }

        if (buffer == null)
            return safeAllocateByteBuffer(size);
        else
            return buffer;
    }


 private void freeUp(int size) {
        while (!this.free.isEmpty() && this.nonPooledAvailableMemory < size)
            this.nonPooledAvailableMemory += this.free.pollLast().capacity();
    }


 private ByteBuffer safeAllocateByteBuffer(int size) {
        boolean error = true;
        try {
            ByteBuffer buffer = allocateByteBuffer(size);
            error = false;
            return buffer;
        } finally {
            if (error) {
                this.lock.lock();
                try {
                    this.nonPooledAvailableMemory += size;
                    if (!this.waiters.isEmpty())
                        this.waiters.peekFirst().signal();
                } finally {
                    this.lock.unlock();
                }
            }
        }
    }


//分配内存
public static ByteBuffer allocate(int capacity) {
        if (capacity < 0)
            throw new IllegalArgumentException();
        return new HeapByteBuffer(capacity, capacity);
    }
BufferPool里面有一个Deque作为队列,缓存了ByteBuffer,每个ByteBuffer都是16kb,默认是batch的大小
Deque里的ByteBuffer数量*16kb = 已经缓存的内存空间大小
avaliableMemory就是剩余的内存空间大小 = 32Mb-batchsize
一条消息是如何按照二进制协议写入Batch的ByteBuffer中的
主要是recordsBuilder(buffer, maxUsableMagic)这个方法实现的
 public static long write(DataOutputStream out,
                             byte magic,
                             long timestamp,
                             ByteBuffer key,
                             ByteBuffer value,
                             CompressionType compressionType,
                             TimestampType timestampType) throws IOException {
        byte attributes = computeAttributes(magic, compressionType, timestampType);
        long crc = computeChecksum(magic, attributes, timestamp, key, value);
        write(out, magic, crc, attributes, timestamp, key, value);
        return crc;
    }

   private static void write(DataOutputStream out,
                              byte magic,
                              long crc,
                              byte attributes,
                              long timestamp,
                              ByteBuffer key,
                              ByteBuffer value) throws IOException {
        if (magic != RecordBatch.MAGIC_VALUE_V0 && magic != RecordBatch.MAGIC_VALUE_V1)
            throw new IllegalArgumentException("Invalid magic value " + magic);
        if (timestamp < 0 && timestamp != RecordBatch.NO_TIMESTAMP)
            throw new IllegalArgumentException("Invalid message timestamp " + timestamp);

        // write crc
        out.writeInt((int) (crc & 0xffffffffL));
        // write magic value
        out.writeByte(magic);
        // write attributes
        out.writeByte(attributes);

        // maybe write timestamp
        if (magic > RecordBatch.MAGIC_VALUE_V0)
            out.writeLong(timestamp);

        // write the key
        if (key == null) {
            out.writeInt(-1);
        } else {
            int size = key.remaining();
            out.writeInt(size);
            Utils.writeTo(out, key, size);
        }
        // write the value
        if (value == null) {
            out.writeInt(-1);
        } else {
            int size = value.remaining();
            out.writeInt(size);
            Utils.writeTo(out, value, size);
        }
    }
可以看到是按照二进制协议规范写入
offsert | crc | magic | timestamp | key | value | key size | value size
public MemoryRecordsBuilder(ByteBuffer buffer,
                                byte magic,
                                CompressionType compressionType,
                                TimestampType timestampType,
                                long baseOffset,
                                long logAppendTime,
                                long producerId,
                                short producerEpoch,
                                int baseSequence,
                                boolean isTransactional,
                                boolean isControlBatch,
                                int partitionLeaderEpoch,
                                int writeLimit) {
        this(new ByteBufferOutputStream(buffer), magic, compressionType, timestampType, baseOffset, logAppendTime,
                producerId, producerEpoch, baseSequence, isTransactional, isControlBatch, partitionLeaderEpoch,
                writeLimit);
最后是通过ByteBufferOutputStream写入ByteBuffer的I/O流
compressionType
  NONE(0, "none", 1.0f) {
        @Override
        public OutputStream wrapForOutput(ByteBufferOutputStream buffer, byte messageVersion) {
            return buffer;
        }

        @Override
        public InputStream wrapForInput(ByteBuffer buffer, byte messageVersion, BufferSupplier decompressionBufferSupplier) {
            return new ByteBufferInputStream(buffer);
        }
    },

    // Shipped with the JDK
    GZIP(1, "gzip", 1.0f) {
        @Override
        public OutputStream wrapForOutput(ByteBufferOutputStream buffer, byte messageVersion) {
            try {
                // Set input buffer (uncompressed) to 16 KB (none by default) and output buffer (compressed) to
                // 8 KB (0.5 KB by default) to ensure reasonable performance in cases where the caller passes a small
                // number of bytes to write (potentially a single byte)
                return new BufferedOutputStream(new GZIPOutputStream(buffer, 8 * 1024), 16 * 1024);
            } catch (Exception e) {
                throw new KafkaException(e);
            }
        }
我们可以看到 ByteBufferOutputStream 包裹在一个压缩流里,gzip ,snappy,写入的时候会有限写入压缩流缓冲区
再写入底层ByteBufferOutputStream 里去。如果是非压缩模式,都会在底层转换为字节进入ByteBuffer
我们通过一张图更清楚看清以上内存管理
通过深入分析Kafka的内存管理和消息发送流程,我们可以从中学到许多关于高性能、高并发系统设计的宝贵经验。以下是一些总结和启示:
总结:
1. 懒加载(Lazy Loading)
Kafka在需要时才拉取元数据,而不是在启动时就拉取所有元数据。这种懒加载的设计思想可以有效减少不必要的资源消耗,提高系统初始化速度。
,在设计系统时,可以考虑使用懒加载技术,延迟资源的初始化,只有在真正需要时才进行加载,从而提高系统的性能和响应速度。
2. 拦截器模式(Interceptor Pattern)
Kafka在消息发送过程中使用了拦截器模式,提供了扩展点供用户自定义拦截器。这种设计提高了系统的可扩展性和灵活性,设计可扩展系统时,可以通过拦截器模式预留扩展点,允许用户自定义行为,增强系统的灵活性和可维护性。
3. 异步处理和回调机制
Kafka采用异步发送消息的方式,先将消息放入内存缓冲区,然后通过回调机制通知消息发送结果。这种设计可以提高系统的吞吐量和响应速度,在需要高性能和高并发的场景下,可以采用异步处理和回调机制,减少同步操作带来的性能瓶颈,提高系统的吞吐量。
4. 内存池和内存复用
Kafka通过BufferPool组件管理内存,使用内存池和内存复用技术,减少频繁的内存分配和垃圾回收开销,在高性能系统中,可以使用内存池和内存复用技术,减少内存分配和垃圾回收的开销,提高系统性能。
5. 双重检查锁定
在RecordAccumulator组件中,Kafka使用了双重检查锁定模式,确保线程安全的同时减少锁开销,在多线程环境下,可以使用双重检查锁定模式,既保证线程安全,又减少不必要的同步开销,提高系统性能。
6. 压缩和序列化优化
Kafka在消息写入缓冲区时,使用了压缩和序列化优化技术,通过压缩流写入底层ByteBuffer,提高了数据传输效率,在需要传输大量数据的场景下,可以使用压缩和序列化优化技术,减少数据传输量,提高传输效率。
7. 批处理
Kafka将消息批量处理,减少网络I/O次数,提高系统吞吐量,在高并发系统中,可以采用批处理技术,减少I/O操作次数,提高系统吞吐量和性能。
8. 高效的内存管理
Kafka通过RecordAccumulator和BufferPool组件高效管理内存,确保内存的合理分配和使用,避免内存泄漏和过度分配,在设计高性能系统时,内存管理是关键。可以通过合理的内存分配策略和管理机制,确保内存的高效使用,避免内存泄漏和过度分配。
9. 容错和异常处理
Kafka在消息发送过程中,有完善的异常处理机制,确保系统在异常情况下仍能稳定运行,在设计高可用系统时,完善的异常处理机制是必不可少的。需要考虑各种可能的异常情况,并设计合理的处理机制,确保系统的稳定性和可靠性。


 654
654


 被折叠的 条评论
为什么被折叠?
被折叠的 条评论
为什么被折叠?
 到【灌水乐园】发言


