


提示:继自动部署war项目后,部署java的jar项目,这里我还是没有使用docker。
Jenkins 实现Pipeline类型工程部署SpringBoot项目
写在前面
Jenkins以及配套软件的安装请移步我的上一篇博客:从0到1,Gitee + Maven + Idea + Jenkins 实现Pipeline类型工程部署Java的war包项目
提示:以下是本篇文章正文内容,下面案例可供参考
一.IDEA创建SpringBoot项目
下图就是SpringBoot测试自动化部署的demo
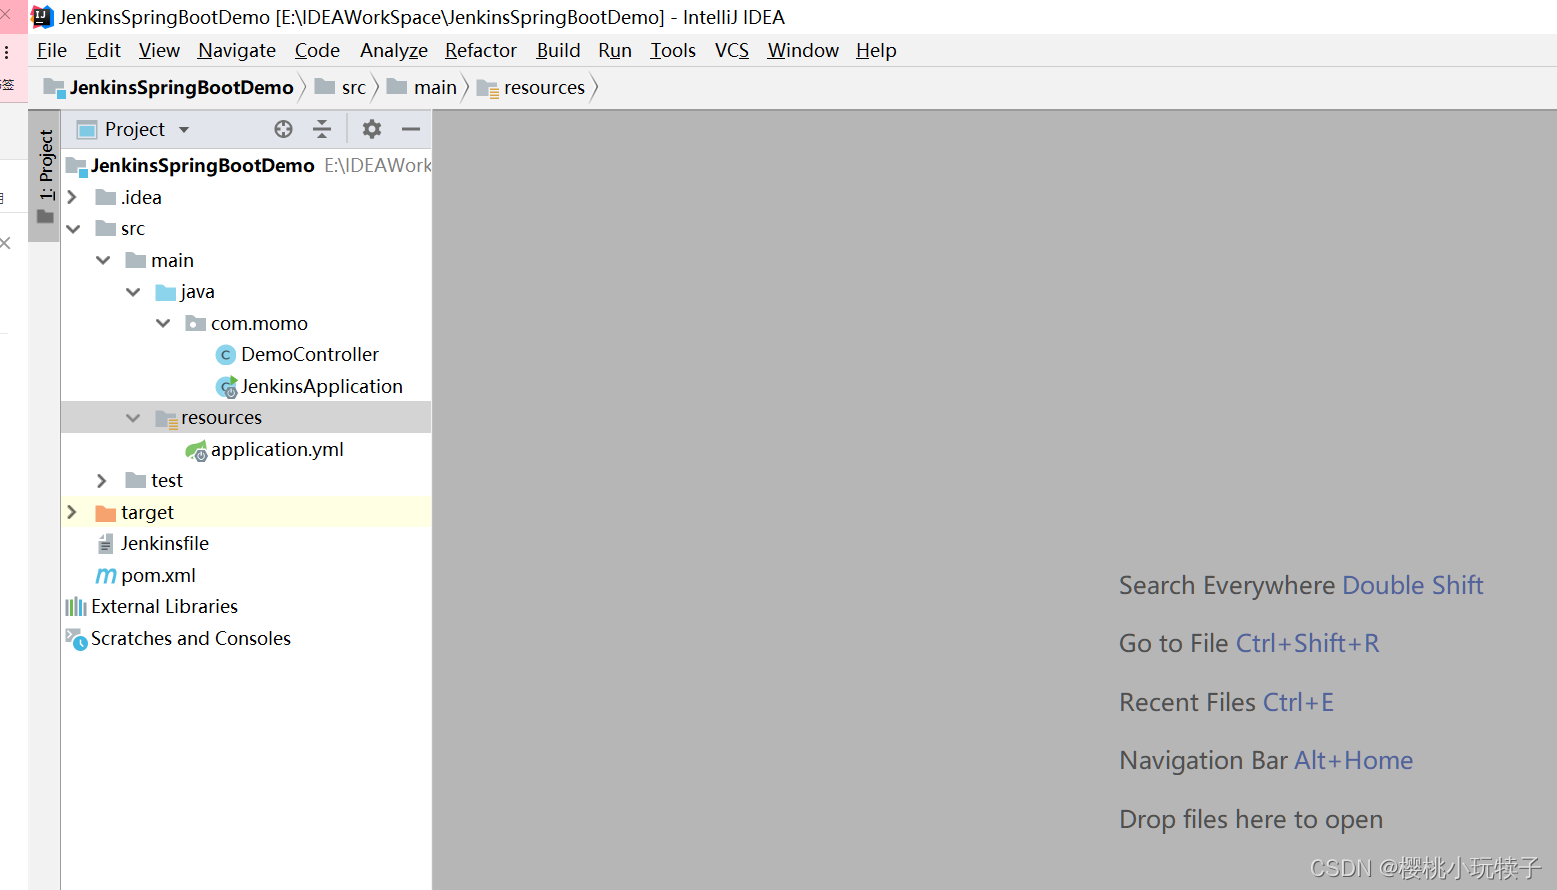
控制层
package com.momo;

import org.springframework.web.bind.annotation.GetMapping;
import org.springframework.web.bind.annotation.RestController;

import java.text.SimpleDateFormat;
import java.util.Date;

/**
 * description:
 * author:maozl
 * date:2022/4/27
 */
@RestController
public class DemoController {

    @GetMapping("/demo")
    public String get(){

        SimpleDateFormat df = new SimpleDateFormat("yyyy-MM-dd HH:mm:ss");//设置日期格式
        String str_date = df.format(new Date());// new Date()为获取当前系统时间

        return "<h1>Jenkins自动部署单体SpringBoot项目成功! 现在时间是北京时间:" + str_date + "</h1>";
    }
}
启动类
package com.momo;


import org.springframework.boot.SpringApplication;
import org.springframework.boot.autoconfigure.SpringBootApplication;

@SpringBootApplication
public class JenkinsApplication {

    public static void main(String[] args) {
        SpringApplication.run(JenkinsApplication.class,args);
    }
}
配置文件:application.yml
server:
  port: 9090
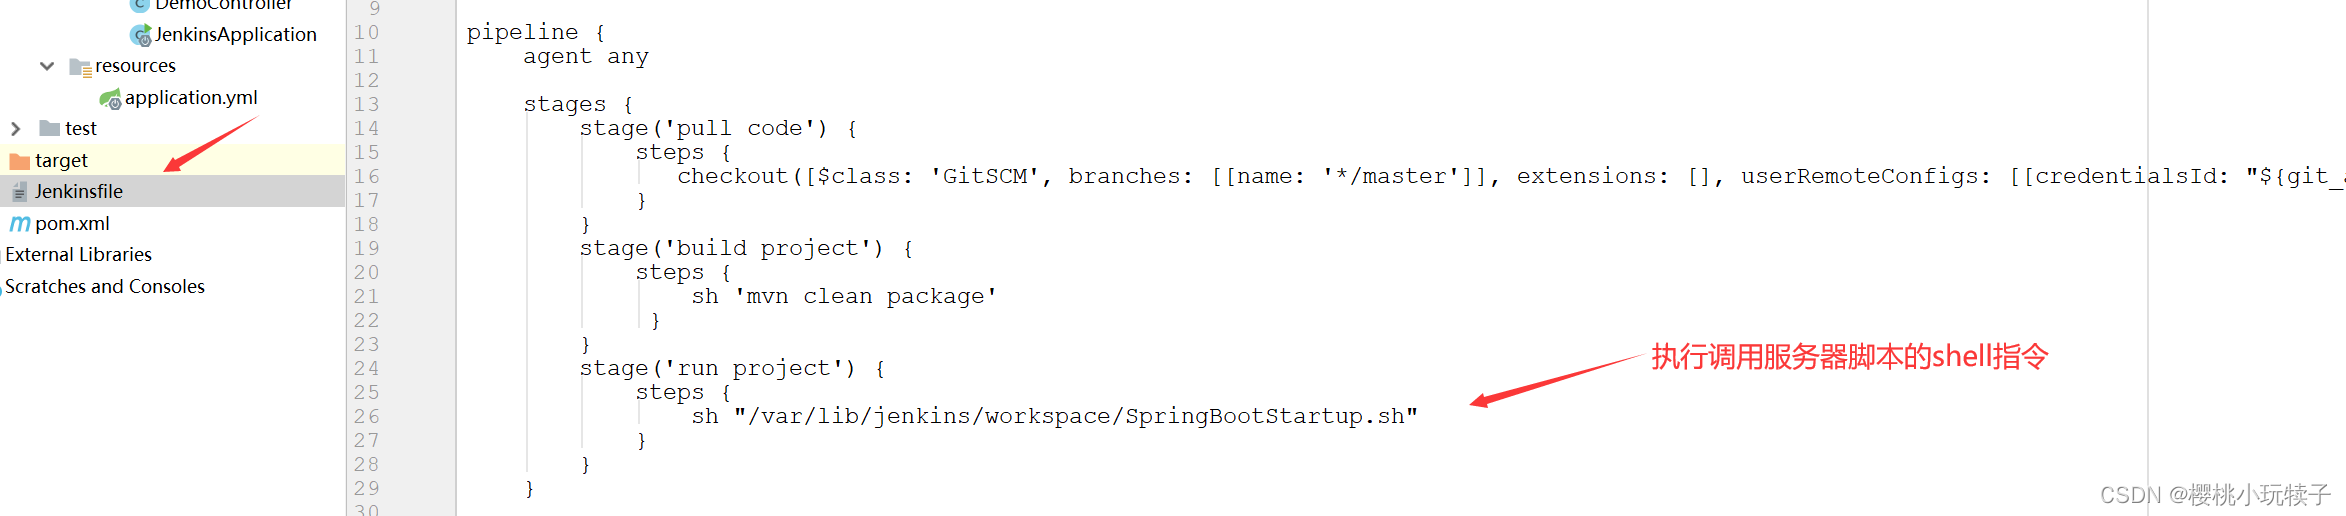
Jenkins脚本:Jenkinsfile
//git凭证ID
def git_auth = "git_auth_id"

//git的url地址
def git_url = "git项目url地址"

//钉钉机器人ID
def dingding_robot_id = "钉钉机器人ID"

pipeline {
    agent any

    stages {
        stage('pull code') {
            steps {
               checkout([$class: 'GitSCM', branches: [[name: '*/master']], extensions: [], userRemoteConfigs: [[credentialsId: "${git_auth}", url: "${git_url}"]]])
            }
        }
        stage('build project') {
            steps {
                sh 'mvn clean package'
             }
        }
        stage('run project') {
            steps {
                sh "/var/lib/jenkins/workspace/SpringBootStartup.sh"
            }
        }
    }

    post {

        success {
            dingtalk (
                robot: "${dingding_robot_id}",
                type:'ACTION_CARD',
                atAll: true,
                title: "构建成功:${env.JOB_NAME}",
                text: [
                    "### [${env.JOB_NAME}](${env.JOB_URL}) ",
                    '---',
                    "- 任务:[${currentBuild.displayName}](${env.BUILD_URL})",
                    '- 状态:<font color=#33ff00 >成功</font>',
                    "- 持续时间:${currentBuild.durationString}".split("and counting")[0],
                    "- 执行人:${currentBuild.buildCauses.shortDescription}",
                    "- 测试报告:${BUILD_URL}allure",
                    "- 构建日志地址:${BUILD_URL}console",
                ],
                singleTitle:'',
                btns: []
            )
        }
        failure {
            dingtalk (
                robot: '${dingding_robot_id}',
                type: 'ACTION_CARD',
                atAll: true,
                title: "构建失败:${env.JOB_NAME}",
                text: [
                    "### [${env.JOB_NAME}](${env.JOB_URL}) ",
                    '---',
                    "- 任务:[${currentBuild.displayName}](${env.BUILD_URL})",
                    '- 状态:<font color=#EE0000 >失败</font>',
                    "- 持续时间:${currentBuild.durationString}".split("and counting")[0],
                    "- 执行人:${currentBuild.buildCauses.shortDescription}",
                    "- 测试报告:${BUILD_URL}allure",
                    "- 构建日志地址:${BUILD_URL}console",
                ],
                singleTitle:'',
                btns: []
            )
        }
    }

}
pom文件
<?xml version="1.0" encoding="UTF-8"?>
<project xmlns="http://maven.apache.org/POM/4.0.0"
         xmlns:xsi="http://www.w3.org/2001/XMLSchema-instance"
         xsi:schemaLocation="http://maven.apache.org/POM/4.0.0 http://maven.apache.org/xsd/maven-4.0.0.xsd">
    <modelVersion>4.0.0</modelVersion>

    <groupId>com.momo</groupId>
    <artifactId>JenkinsSpringBootDemo</artifactId>
    <version>1.0</version>

    <dependencies>

        <dependency>
            <groupId>org.springframework.boot</groupId>
            <artifactId>spring-boot-starter</artifactId>
            <version>2.5.4</version>
        </dependency>

        <dependency>
            <groupId>org.springframework.boot</groupId>
            <artifactId>spring-boot-starter-web</artifactId>
            <version>2.5.4</version>
        </dependency>

    </dependencies>

    <properties>
        <project.build.sourceEncoding>UTF-8</project.build.sourceEncoding>
    </properties>

    <build>
        <plugins>
            <plugin>
                <groupId>org.springframework.boot</groupId>
                <artifactId>spring-boot-maven-plugin</artifactId>
                <version>2.5.4</version>
                <executions>
                    <execution>
                        <goals>
                            <goal>repackage</goal>
                        </goals>
                    </execution>
                </executions>
            </plugin>
        </plugins>
    </build>
</project>
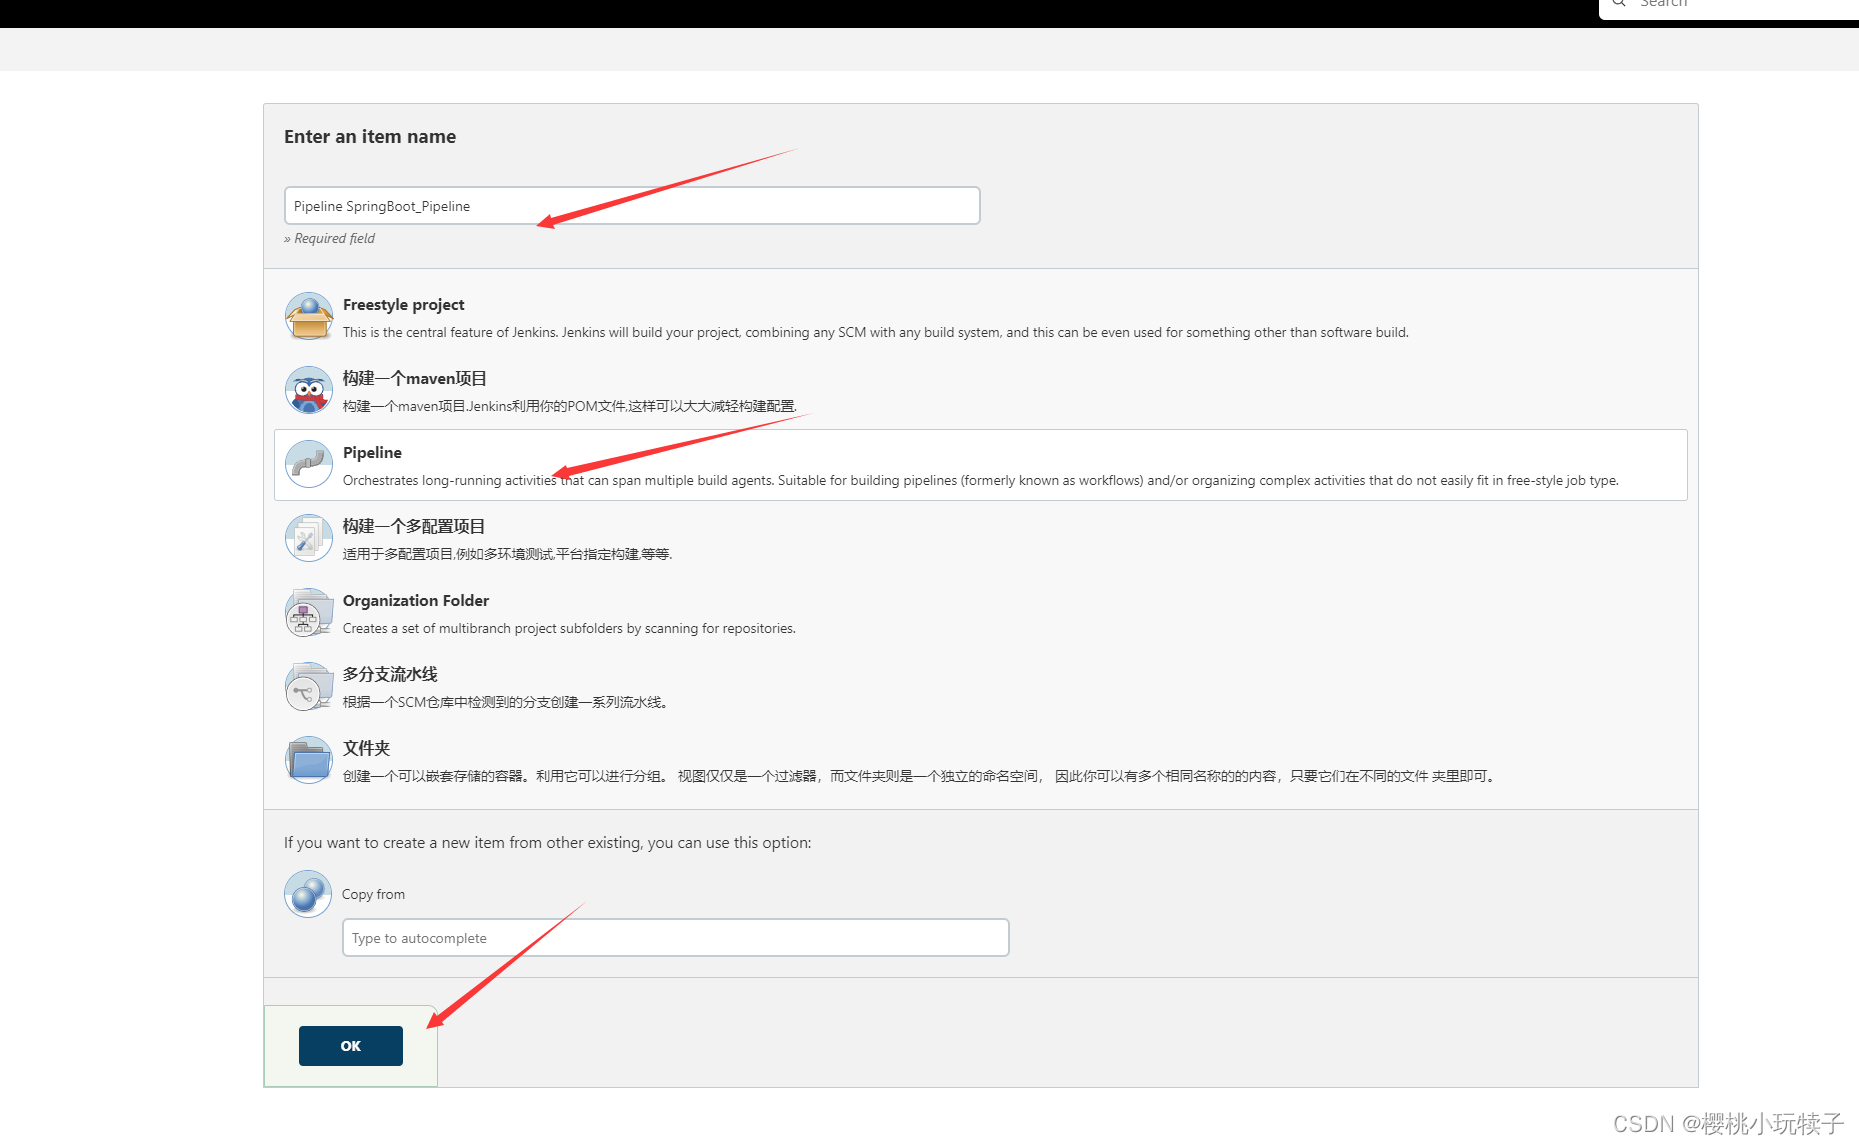
二.Jenkins创建Pipeline项目
1.创建项目
2.配置参数
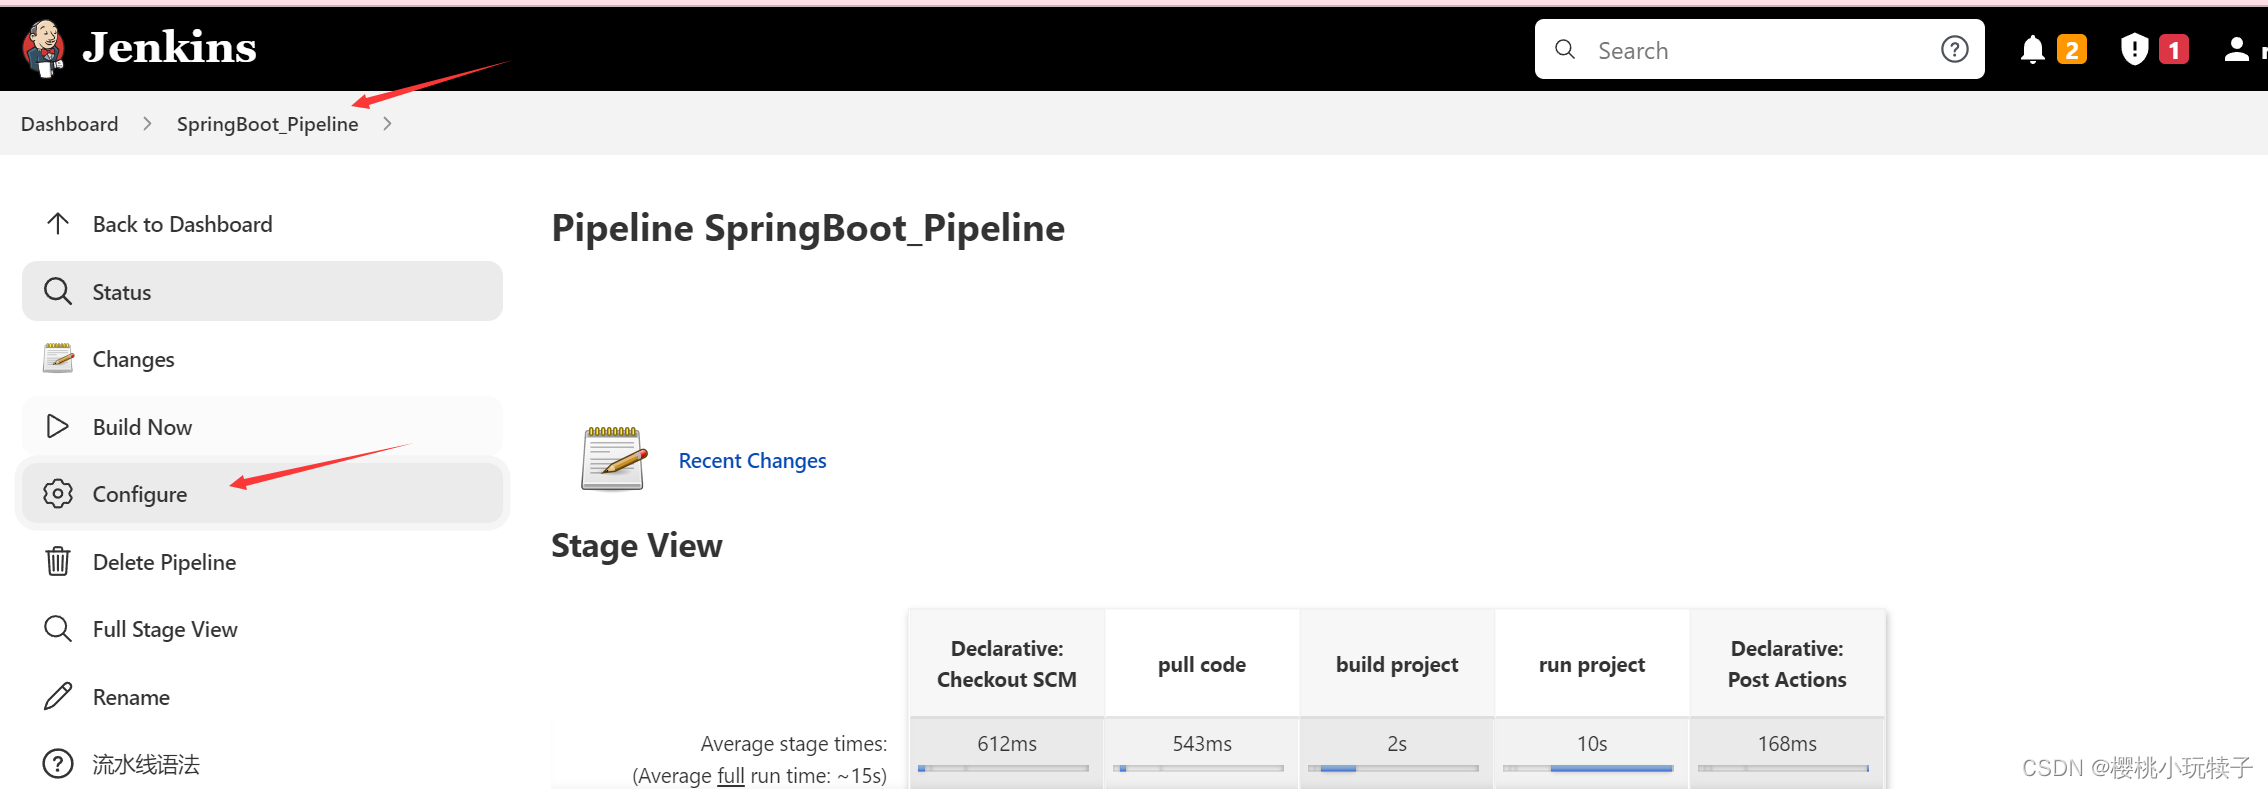
参数的具体配置参考上一篇博客的:八.Git hook自动触发构建 的具体步骤
这里就不详细叙述了
3.书写脚本文件
我们是使用shell脚本文件实现服务器的jar包部署的,之所以使用shell脚本是因为更加的方便快捷
我的脚本文件在服务的存放路径是:/var/lib/jenkins/workspace
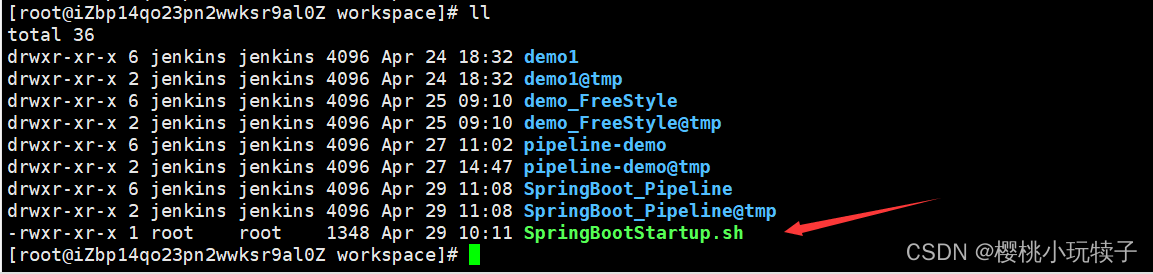
这里我说明一下:项目在使用Jenkinsfile文件进行部署的时候,会在项目运行阶段(run project)去执行这个脚本文件,这个脚本文件具体执行相应的部署jar的操作
SpringBootStartup.sh的具体内容,仅供参考
#!/bin/bash
function kill_project()
{
project_pid=`ps aux | grep "JenkinsSpringBootDemo-1.0.jar" | grep -v grep | awk 'END{print $2}'`
if [ $project_pid > 0 ];then
echo "项目已经启动,开始关闭项目,项目pid为: $project_pid "
echo "--------------------"
kill -9 `ps aux | grep "JenkinsSpringBootDemo-1.0.jar" | grep -v grep | awk 'END{print $2}'`
echo '项目关闭成功,开始重启项目 '
echo "--------------------"
else
echo "项目未启动,直接启动"
echo "--------------------"
fi
}
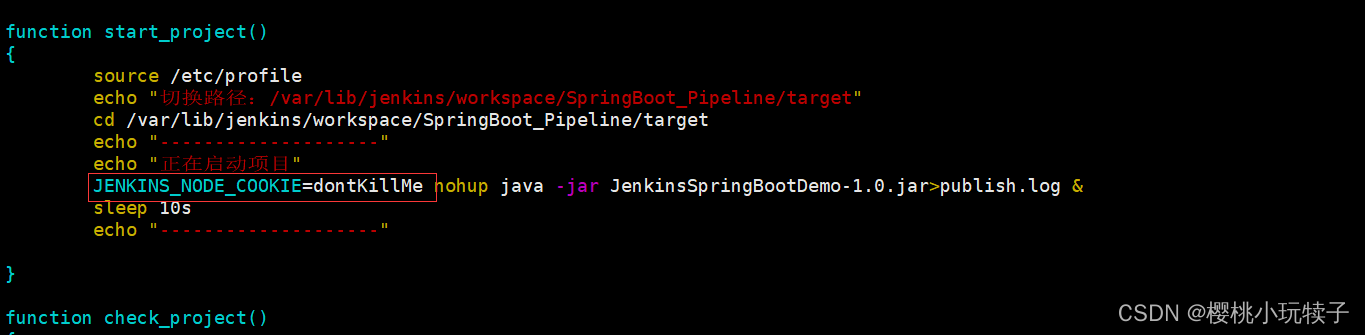
function start_project()
{
source /etc/profile
echo "切换路径:/var/lib/jenkins/workspace/SpringBoot_Pipeline/target"
cd /var/lib/jenkins/workspace/SpringBoot_Pipeline/target
echo "--------------------"
echo "正在启动项目"
JENKINS_NODE_COOKIE=dontKillMe nohup java -jar JenkinsSpringBootDemo-1.0.jar>publish.log &
sleep 10s
echo "--------------------"
}
function check_project()
{
check_pid=`ps aux | grep "JenkinsSpringBootDemo-1.0.jar" | grep -v grep | awk 'END{print $2}'`
if [ $check_pid > 0 ];then
echo "项目启动成功: pid = : $check_pid "
else
echo "项目启动失败"
exit 1
fi
}
kill_project
start_project
check_project
三.测试部署
Jenkins控制台输出

访问项目

钉钉机器人项目部署通知
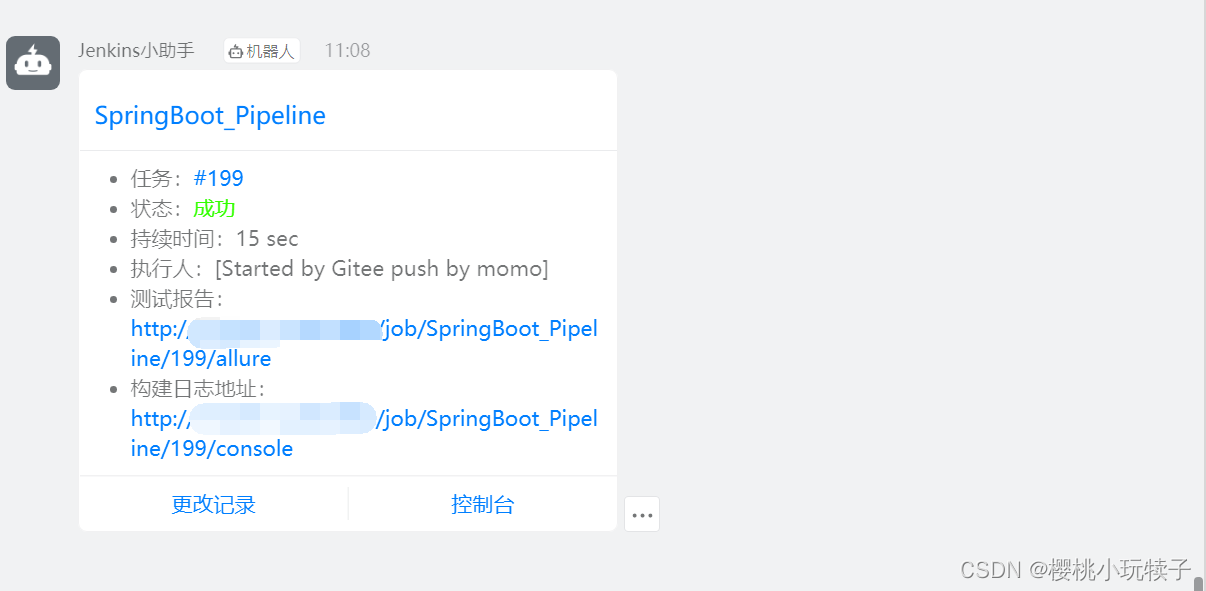
到这里,jar的自动化部署就成功了!
四.问题及解决方案
配置期间遇到大大小小无数个bug,这里我列举几个印象深刻的
1.Jenkisn控制台警告
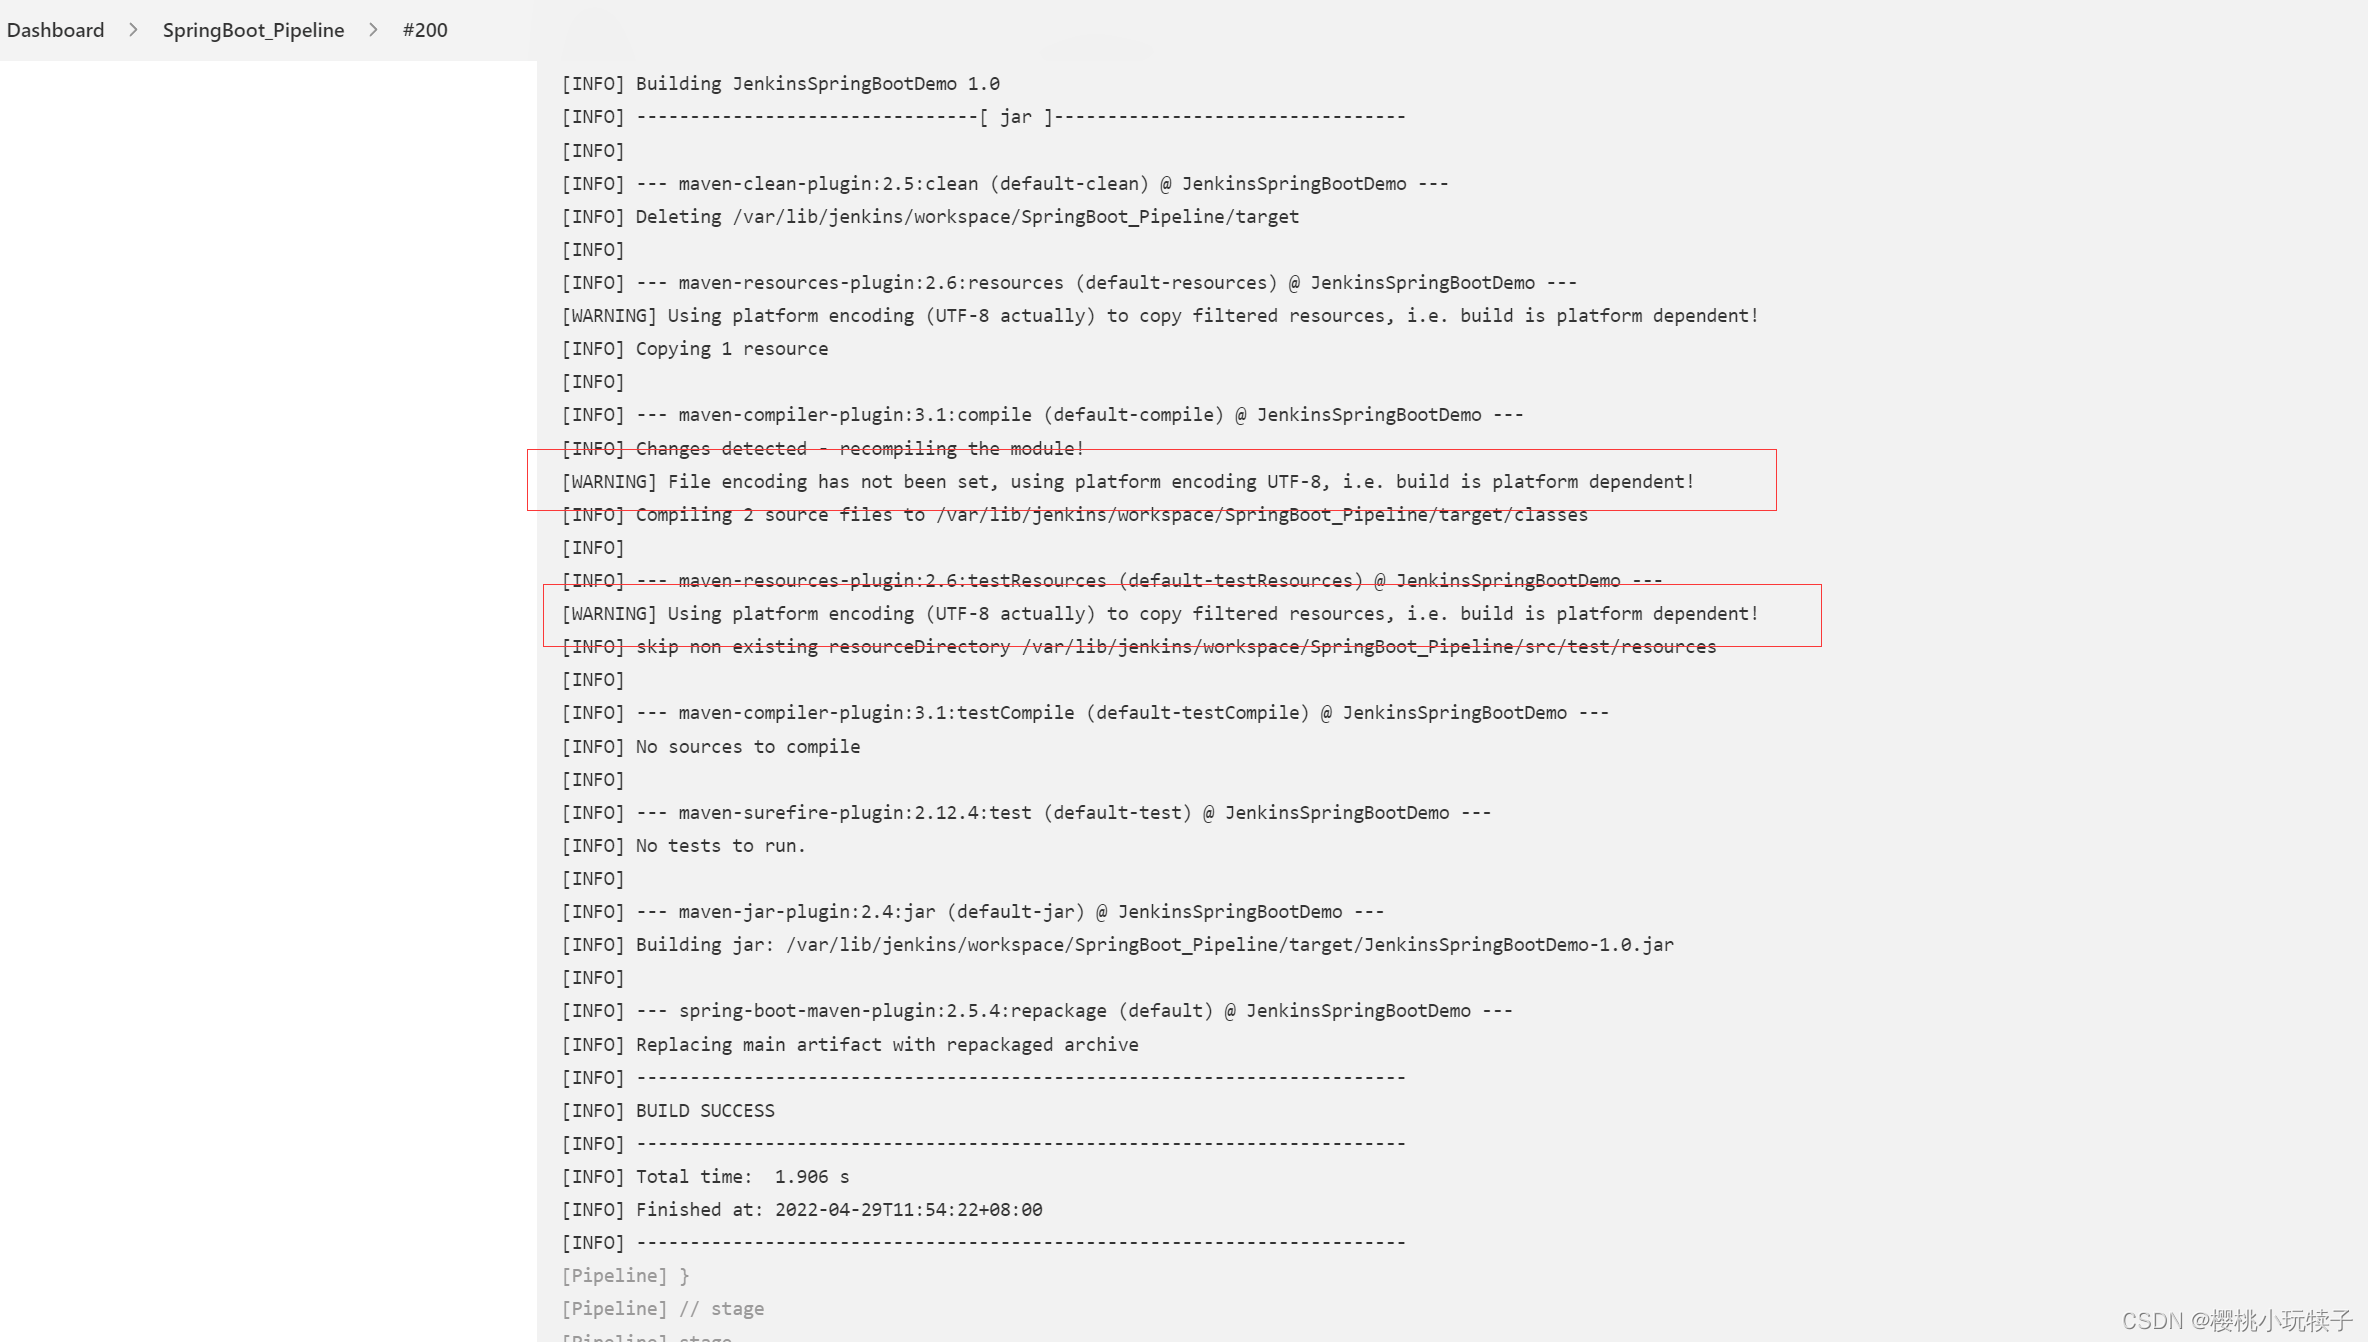
解决方案:在Springboot工程的pom文件里增加相应的配置
    <properties>
        <project.build.sourceEncoding>UTF-8</project.build.sourceEncoding>
    </properties>
2.no main manifest attribute

解决方案:在Springboot中引入打包插件
<build>
        <plugins>
            <plugin>
                <groupId>org.springframework.boot</groupId>
                <artifactId>spring-boot-maven-plugin</artifactId>
                <version>2.5.4</version>
                <executions>
                    <execution>
                        <goals>
                            <goal>repackage</goal>
                        </goals>
                    </execution>
                </executions>
            </plugin>
        </plugins>
    </build>
3.Jenkins控制台输出启动成功,但是实际上项目并没有启动
这个问题花了一整天的时间才解决
官方文档地址:Jenkins : ProcessTreeKiller
具体的原因:Jenkins会在构建完成后使用processTreeKiller杀掉了所有子进程,而且这是Jenkins的默认行为。
所以控制台输出正常也能给出项目的具体pid,是因为这个项目确实启动过,只是后面Jenkins又干掉这个进程了。坑爹啊!!!!!
注意:不同的Jenkins项目类型有不同的解决的方法,我这里写的是Pipeline工程的解决方法
解决方案:更改Jenkins的ProcessTreeKiller寻找的环境变量BUILD_ID
4.diamond operator is not supported in -source 1.5

问题:主要是maven默认的jdk版本过低导致的
需要修改maven的配置文件 settings.xml
  <profiles>
    <profile>
      <id>jdk1.8</id>
      <activation>
        <activeByDefault>true</activeByDefault>
        <jdk>1.8</jdk>
      </activation>
      <properties>
        <maven.compiler.source>1.8</maven.compiler.source>
        <maven.compiler.target>1.8</maven.compiler.target>
        <maven.compiler.compilerVersion>1.8</maven.compiler.compilerVersion>
      </properties>
    </profile>
  </profiles>

  <activeProfiles>
    <activeProfile>jdk1.8</activeProfile>
  </activeProfiles>


 674
674


 被折叠的 条评论
为什么被折叠?
被折叠的 条评论
为什么被折叠?
 到【灌水乐园】发言


